【第三章】Ribbon客户端负载均衡
1.1 Ribbon概述
在微服务架构中,业务都会被拆分成一个独立的服务,服务与服务的通讯是基于http restful的。Spring Cloud有两种服务调用方式,一种是Ribbon+restTemplate,另一种是Feign,本文介绍使用Spring Cloud Ribbon在客户端负载均衡的调用服务。
Ribbon 是一个客户端负载均衡器,可以简单的理解成类似于 nginx的负载均衡模块的功能,Feign默认集成了Ribbon。
主流的LB方案可分成两类:
- 一种是集中式
LB,即在服务的消费方和提供方之间使用独立的LB设施(可以是硬件,如F5, 也可以是软件,如nginx),由该设施负责把访问请求通过某种策略转发至服务的提供方; - 另一种是进程内
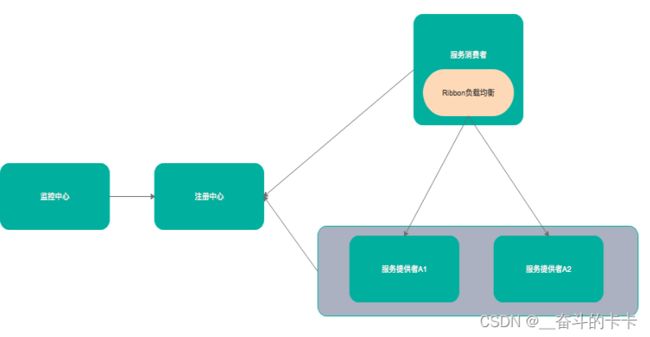
LB,将LB逻辑集成到消费方,消费方从服务注册中心获知有哪些地址可用,然后自己再从这些地址中选择出一个合适的服务器。Ribbon就属于后者,它只是一个类库,集成于消费方进程,消费方通过它来获取到服务提供方的地址。
Ribbon的架构图如下所示:
1.2 负载均衡算法
在这里给普及一下有哪些负载均衡算法:
1、简单轮询负载均衡(RoundRobin)
以轮询的方式依次将请求调度不同的服务器,即每次调度执行i = (i + 1) mod n,并选出第i台服务器。
2、随机负载均衡 (Random)
随机选择状态为UP的Server
3、加权响应时间负载均衡(WeightedResponseTime)
根据相应时间分配一个weight,相应时间越长,weight越小,被选中的可能性越低。
4、区域感知轮询负载均衡(ZoneAvoidanceRule)
复合判断server所在区域的性能和server的可用性选择server
1.2.1 Ribbon自带负载均衡策略比较
| 策略名 | 策略声明 | 策略描述 | 实现说明 |
|---|---|---|---|
| BestAvailableRule | public class BestAvailableRule extends ClientConfigEnabledRoundRobinRule | 选择一个最小的并发请求的server | 逐个考察Server,如果Server被tripped了,则忽略,在选择其中ActiveRequestsCount最小的server |
| AvailabilityFilteringRule | public class AvailabilityFilteringRule extends PredicateBasedRule | 过滤掉那些因为一直连接失败的被标记为circuit tripped的后端server,并过滤掉那些高并发的的后端server(active connections 超过配置的阈值) | 使用一个AvailabilityPredicate来包含过滤server的逻辑,其实就就是检查status里记录的各个server的运行状态 |
| WeightedResponseTimeRule | public class WeightedResponseTimeRule extends RoundRobinRule | 根据相应时间分配一个weight,相应时间越长,weight越小,被选中的可能性越低。 | 一个后台线程定期的从status里面读取评价响应时间,为每个server计算一个weight。Weight的计算也比较简单responsetime 减去每个server自己平均的responsetime是server的权重。当刚开始运行,没有形成statas时,使用roubine策略选择server。 |
| RetryRule | public class RetryRule extends AbstractLoadBalancerRule | 对选定的负载均衡策略机上重试机制。 | 在一个配置时间段内当选择server不成功,则一直尝试使用subRule的方式选择一个可用的server |
| RoundRobinRule | public class RoundRobinRule extends AbstractLoadBalancerRule | roundRobin方式轮询选择server | 轮询index,选择index对应位置的server |
| RandomRule | public class RandomRule extends AbstractLoadBalancerRule | 随机选择一个server | 在index上随机,选择index对应位置的server |
| ZoneAvoidanceRule | public class ZoneAvoidanceRule extends PredicateBasedRule | 复合判断server所在区域的性能和server的可用性选择server | 使用ZoneAvoidancePredicate和AvailabilityPredicate来判断是否选择某个server,前一个判断判定一个zone的运行性能是否可用,剔除不可用的zone(的所有server),AvailabilityPredicate用于过滤掉连接数过多的Server。 |
1.3 代码示例
建一个服务消费者,重新新建一个spring-boot工程,取名为:service-ribbon;
在它的pom.xml继承了父pom文件,并引入了以下依赖:
<project xmlns="http://maven.apache.org/POM/4.0.0" xmlns:xsi="http://www.w3.org/2001/XMLSchema-instance"
         xsi:schemaLocation="http://maven.apache.org/POM/4.0.0 http://maven.apache.org/xsd/maven-4.0.0.xsd">
    <modelVersion>4.0.0modelVersion>

    <groupId>com.forezpgroupId>
    <artifactId>service-ribbonartifactId>
    <version>0.0.1-SNAPSHOTversion>
    <packaging>jarpackaging>

    <name>service-ribbonname>
    <description>Demo project for Spring Bootdescription>


    <parent>
        <groupId>com.forezpgroupId>
        <artifactId>sc-f-chapter2artifactId>
        <version>0.0.1-SNAPSHOTversion>
    parent>

    <dependencies>
        <dependency>
            <groupId>org.springframework.cloudgroupId>
            <artifactId>spring-cloud-starter-netflix-eureka-clientartifactId>
        dependency>
        <dependency>
            <groupId>org.springframework.bootgroupId>
            <artifactId>spring-boot-starter-webartifactId>
        dependency>
        <dependency>
            <groupId>org.springframework.cloudgroupId>
            <artifactId>spring-cloud-starter-netflix-ribbonartifactId>
        dependency>
    dependencies>

project>
在工程的配置文件指定服务的注册中心地址为http://localhost:8761/eureka/,程序名称为 service-ribbon,程序端口为8764。配置文件application.yml如下:
eureka:
  client:
    serviceUrl:
      defaultZone: http://localhost:8761/eureka/
server:
  port: 8764
spring:
  application:
    name: service-ribbon
在工程的启动类中,通过@EnableDiscoveryClient向服务中心注册;并且向程序的ioc注入一个bean: restTemplate;并通过@LoadBalanced注解表明这个restRemplate开启负载均衡的功能。
@SpringBootApplication
@EnableEurekaClient
@EnableDiscoveryClient
public class ServiceRibbonApplication {

    public static void main(String[] args) {
        SpringApplication.run( ServiceRibbonApplication.class, args );
    }

    @Bean
    @LoadBalanced
    RestTemplate restTemplate() {
        return new RestTemplate();
    }

}
写一个测试类HelloService,通过之前注入ioc容器的restTemplate来消费service-hi服务的“/hi”接口,在这里我们直接用的程序名替代了具体的url地址,在ribbon中它会根据服务名来选择具体的服务实例,根据服务实例在请求的时候会用具体的url替换掉服务名,代码如下:
@Service
public class HelloService {

    @Autowired
    RestTemplate restTemplate;

    public String hiService(String name) {
    	//String url = "http://localhost:8990/drce/hi?name="+name,String.class)";
        return restTemplate.getForObject("http://SERVICE-HI/hi?name="+name,String.class);
    }
}
写一个controller,在controller中用调用HelloService 的方法,代码如下:
@RestController
public class HelloControler {

    @Autowired
    HelloService helloService;

    @GetMapping(value = "/hi")
    public String hi(@RequestParam String name) {
        return helloService.hiService( name );
    }
}
在浏览器上多次访问http://localhost:8764/hi?name=forezp,浏览器交替显示:
hi forezp,i am from port:8762
hi forezp,i am from port:8763
这说明当我们通过调用restTemplate.getForObject(“http://SERVICE-HI/hi?name=”+name,String.class)方法时,已经做了负载均衡,访问了不同的端口的服务实例。
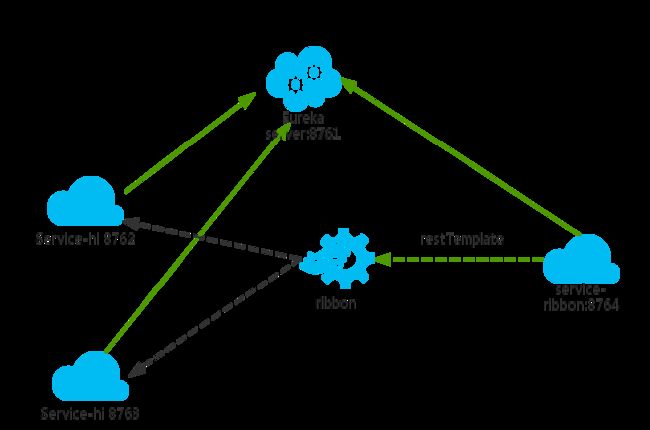
1.4 此时的架构图
- 一个服务注册中心,
eureka server,端口为8761 service-hi工程跑了两个实例,端口分别为8762,8763,分别向服务注册中心注册sercvice-ribbon端口为8764,向服务注册中心注册- 当
sercvice-ribbon通过restTemplate调用service-hi的hi接口时,因为用ribbon进行了负载均衡,会轮流的调用service-hi:8762和8763两个端口的hi接口;
1.5 RestTemplate用法详解
1.5.1 RestTemplate简介
RestTemplate是从 Spring3.0开始支持的一个 HTTP请求工具,它提供了常见的REST请求方案的模版,例如 GET请求、POST请求、PUT 请求、DELETE请求以及一些通用的请求执行方法exchange以及execute。RestTemplate 继承自 InterceptingHttpAccessor并且实现了 RestOperations 接口,其中RestOperations接口定义了基本的 RESTful 操作,这些操作在 RestTemplate 中都得到了实现。接下来我们就来看看这些操作方法的使用。
1.5.2 Spring 中如何使用Rest资源
借助 RestTemplate,Spring应用能够方便地使用REST资源,Spring的 RestTemplate访问使用了模版方法的设计模式。
模版方法将过程中与特定实现相关的部分委托给接口,而这个接口的不同实现定义了接口的不同行为。
RestTemplate定义了36个与REST资源交互的方法,其中的大多数都对应于HTTP的方法。其实,这里面只有11个独立的方法,其中有十个有三种重载形式,而第十一个则重载了六次,这样一共形成了36个方法。
-
delete()
在特定的URL上对资源执行HTTP DELETE操作 -
exchange()
在URL上执行特定的HTTP方法,返回包含对象的ResponseEntity,这个对象是从响应体中映射得到的 -
execute()
在URL上执行特定的HTTP方法,返回一个从响应体映射得到的对象 -
getForEntity()
发送一个HTTP GET请求,返回的ResponseEntity包含了响应体所映射成的对象 -
getForObject()
发送一个HTTP GET请求,返回的请求体将映射为一个对象 -
postForEntity()
POST数据到一个URL,返回包含一个对象的ResponseEntity,这个对象是从响应体中映射得到的 -
postForObject()
POST数据到一个URL,返回根据响应体匹配形成的对象 -
headForHeaders()
发送HTTP HEAD请求,返回包含特定资源URL的HTTP头 -
optionsForAllow()
发送HTTP OPTIONS请求,返回对特定URL的Allow头信息 -
postForLocation()
POST数据到一个URL,返回新创建资源的URL -
put()
PUT资源到特定的URL
实际上,由于Post操作的非幂等性,它几乎可以代替其他的CRUD操作
1.5.3 Get请求
RestTemplate 的get方法有以上几个,可以分为两类: getForEntity()和 getForObject()
首先看 getForEntity()的返回值类型ResponseEntity
ResponseEntity getForEntity()
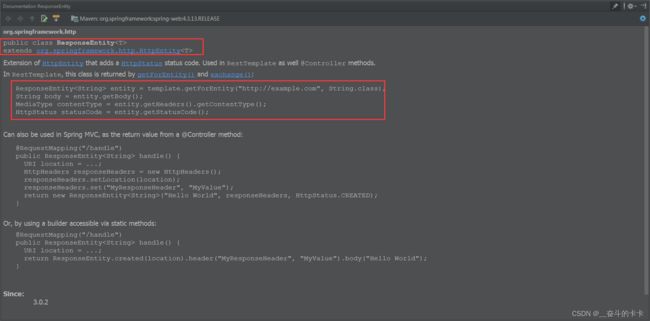
看一下 ResponseEntity 的文档描述:

它继承了HttpEntity,封装了返回的响应信息,包括响应状态、响应头和响应体.
在测试之前我们首先 创建一个Rest服务,模拟提供Rest数据,这里给出Controller层代码,具体可以查看源码,文章最后会给出:
@RestController
public class UserController {

    @Autowired
    private UserService userService;

    @RequestMapping(value = "getAll")
    public List<UserEntity> getUser() {
        List<UserEntity> list = userService.getAll();
        return list;
    }

    @RequestMapping("get/{id}")
    public UserEntity getById(@PathVariable(name = "id") String id) {
        return userService.getById(id);
    }

    @RequestMapping(value = "save")
    public String save(UserEntity userEntity) {
        return "保存成功";
    }

    @RequestMapping(value = "saveByType/{type}")
    public String saveByType(UserEntity userEntity,@PathVariable("type")String type) {
        return "保存成功,type="+type;
    }
}
1.5.3.1 测试:getForEntity
1、无参数的 getForEntity 方法
 @RequestMapping("getForEntity")
    public List<UserEntity> getAll2() {
        ResponseEntity<List> responseEntity = restTemplate.getForEntity("http://localhost/getAll", List.class);
        HttpHeaders headers = responseEntity.getHeaders();
        HttpStatus statusCode = responseEntity.getStatusCode();
        int code = statusCode.value();

        List<UserEntity> list = responseEntity.getBody();

        System.out.println(list.toString());
        return list;
    }
2、有参数的 getForEntity 请求,参数列表,可以使用{} 进行url路径占位符
    //有参数的 getForEntity 请求,参数列表
    @RequestMapping("getForEntity/{id}")
    public UserEntity getById2(@PathVariable(name = "id") String id) {

        ResponseEntity<UserEntity> responseEntity = restTemplate.getForEntity("http://localhost/get/{id}", UserEntity.class, id);
        UserEntity userEntity = responseEntity.getBody();
        return userEntity;
    }
3、有参数的 get 请求,使用map封装参数
    //有参数的 get 请求,使用map封装参数
    @RequestMapping("getForEntity/{id}")
    public UserEntity getById4(@PathVariable(name = "id") String id) {
        HashMap<String, String> map = new HashMap<>();
        map.put("id",id);

        ResponseEntity<UserEntity> responseEntity = restTemplate.getForEntity("http://localhost/get/{id}", UserEntity.class, map);
        UserEntity userEntity = responseEntity.getBody();

        return userEntity;
    }
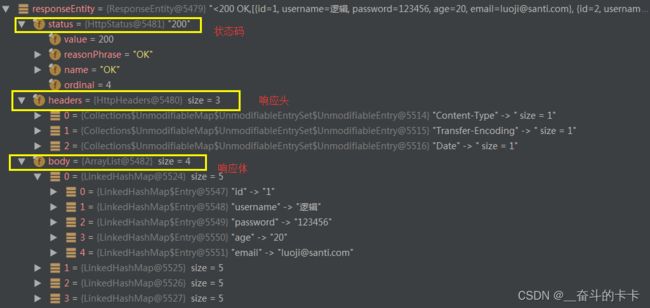
通过断点调试我们看下 返回的 responseEntity的信息如图:
因此我们可以获取Http请求的全部信息。
但是,通常情况下我们并不想要Http请求的全部信息,只需要相应体即可.对于这种情况,RestTemplate提供了 getForObject() 方法用来只获取 响应体信息.
getForObject和getForEntity 用法几乎相同,指示返回值返回的是 响应体,省去了我们 再去getBody()。
1.5.3.2 测试:getForObject
1、无参数的 getForObject请求
    //无参数的 getForObject 请求
    @RequestMapping("getAll2")
    public List<UserEntity> getAll() {
        List<UserEntity> list = restTemplate.getForObject("http://localhost/getAll", List.class);

        System.out.println(list.toString());
        return list;

    }
2、有参数的getForObject 请求,使用参数列表
    //有参数的 getForObject 请求
    @RequestMapping("get2/{id}")
    public UserEntity getById(@PathVariable(name = "id") String id) {
        UserEntity userEntity = restTemplate.getForObject("http://localhost/get/{id}", UserEntity.class, id);

        return userEntity;
    }
3、有参数的 get 请求,使用map封装请求参数
    //有参数的 get 请求,使用map封装请求参数
    @RequestMapping("get3/{id}")
    public UserEntity getById3(@PathVariable(name = "id") String id) {
        HashMap<String, String> map = new HashMap<>();
        map.put("id",id);

        UserEntity userEntity = restTemplate.getForObject("http://localhost/get/{id}", UserEntity.class, map);

        return userEntity;
    }
1.5.4 Post请求
了解了get请求后,Post请求就变得很简单了,我们可以看到post有如下方法:
1.5.4.1 测试:postForEntity
1、post请求,保存 UserEntity对像
    //post 请求,提交 UserEntity 对像
    @RequestMapping("saveUser")
    public String save(UserEntity userEntity) {

        ResponseEntity<String> responseEntity = restTemplate.postForEntity("http://localhost/save", userEntity, String.class);
        String body = responseEntity.getBody();

        return body;

    }
浏览器访问:http://localhost/saveUser?username=itguang&password=123456&age=20&email=123@123.com
我们再次断点调试,查看 responseEntity中的信息:
2、有参数的postForEntity 请求
   // 有参数的 postForEntity 请求
    @RequestMapping("saveUserByType/{type}")
    public String save2(UserEntity userEntity,@PathVariable("type")String type) {

        ResponseEntity<String> responseEntity = restTemplate.postForEntity("http://localhost/saveByType/{type}", userEntity, String.class, type);
        String body = responseEntity.getBody();

        return body;

    }

    // 有参数的 postForEntity 请求,使用map封装
    @RequestMapping("saveUserByType2/{type}")
    public String save3(UserEntity userEntity,@PathVariable("type")String type) {
        HashMap<String, String> map = new HashMap<>();
         map.put("type", type);


        ResponseEntity<String> responseEntity = restTemplate.postForEntity("http://localhost/saveByType/{type}", userEntity, String.class,map);
        String body = responseEntity.getBody();

        return body;

    }
我们浏览器访问:localhost/saveUserByType/[email protected]
就会返回:保存成功,type=120
对与其它请求方式,由于不常使用,所以这里就不再讲述。


