【如何使用pytorch查看网络中间层特征矩阵以及卷积核参数】
【如何使用pytorch查看网络中间层特征矩阵以及卷积核参数】
- 文前白话
-
- 涉及文件及脚本
- 脚本代码解析
-
- ①resnet_model.py
- ②alexnet_model.py
- ③analyze_feature_map.py
-
- 运行效果
- ④analyze_kernel_weight.py
-
- 运行效果
- Reference
文前白话
通过脚本代码结合搭建的网络结构调用训练网络输入的图片信息和网络结构,获取并打印出网络结构层的特征信息,以图片展示。
(以Resnet训练网络为例)
推荐可视化工具tensorboard,tensorflow和pytorch都可以用,查看数据的流向,训练过程中的损失信息,准确率信息等等
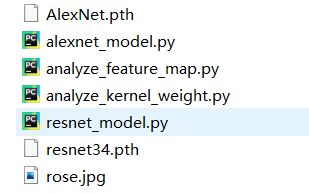
涉及文件及脚本
搭建的网络模型
resnet_model.py
alexnet_model.py分析中间层输出特征矩阵脚本
analyze_feature_map.py分析卷积核权重的脚本
analyze_kernel_weight.pyrose.jpg 为输入图
.pth文件为网络预训练模型权重
预训练权重下载地址:
①[resnet34.pth]
链接:https://pan.baidu.com/s/1BWYOOl73thzeiasPxgSnzQ
提取码:olfd
用pytorch训练的AlexNet预训练权重下载链接:https://pan.baidu.com/s/1UzA4nxcml_cTtPDdZLmPDQ
提取码:pqjf
脚本代码解析
①resnet_model.py
# 搭建resnet训练网络结构

import torch.nn as nn
import torch


class BasicBlock(nn.Module):
    expansion = 1

    def __init__(self, in_channel, out_channel, stride=1, downsample=None):
        super(BasicBlock, self).__init__()
        self.conv1 = nn.Conv2d(in_channels=in_channel, out_channels=out_channel,
                               kernel_size=3, stride=stride, padding=1, bias=False)
        self.bn1 = nn.BatchNorm2d(out_channel)
        self.relu = nn.ReLU()
        self.conv2 = nn.Conv2d(in_channels=out_channel, out_channels=out_channel,
                               kernel_size=3, stride=1, padding=1, bias=False)
        self.bn2 = nn.BatchNorm2d(out_channel)
        self.downsample = downsample

    def forward(self, x):
        identity = x
        if self.downsample is not None:
            identity = self.downsample(x)

        out = self.conv1(x)
        out = self.bn1(out)
        out = self.relu(out)

        out = self.conv2(out)
        out = self.bn2(out)

        out += identity
        out = self.relu(out)

        return out


class Bottleneck(nn.Module):
    expansion = 4

    def __init__(self, in_channel, out_channel, stride=1, downsample=None):
        super(Bottleneck, self).__init__()
        self.conv1 = nn.Conv2d(in_channels=in_channel, out_channels=out_channel,
                               kernel_size=1, stride=1, bias=False)  # squeeze channels
        self.bn1 = nn.BatchNorm2d(out_channel)
        # -----------------------------------------
        self.conv2 = nn.Conv2d(in_channels=out_channel, out_channels=out_channel,
                               kernel_size=3, stride=stride, bias=False, padding=1)
        self.bn2 = nn.BatchNorm2d(out_channel)
        # -----------------------------------------
        self.conv3 = nn.Conv2d(in_channels=out_channel, out_channels=out_channel*self.expansion,
                               kernel_size=1, stride=1, bias=False)  # unsqueeze channels
        self.bn3 = nn.BatchNorm2d(out_channel*self.expansion)
        self.relu = nn.ReLU(inplace=True)
        self.downsample = downsample

    def forward(self, x):
        identity = x
        if self.downsample is not None:
            identity = self.downsample(x)

        out = self.conv1(x)
        out = self.bn1(out)
        out = self.relu(out)

        out = self.conv2(out)
        out = self.bn2(out)
        out = self.relu(out)

        out = self.conv3(out)
        out = self.bn3(out)

        out += identity
        out = self.relu(out)

        return out


class ResNet(nn.Module):

    def __init__(self, block, blocks_num, num_classes=1000, include_top=True):
        super(ResNet, self).__init__()
        self.include_top = include_top
        self.in_channel = 64

        self.conv1 = nn.Conv2d(3, self.in_channel, kernel_size=7, stride=2,
                               padding=3, bias=False)
        self.bn1 = nn.BatchNorm2d(self.in_channel)
        self.relu = nn.ReLU(inplace=True)
        self.maxpool = nn.MaxPool2d(kernel_size=3, stride=2, padding=1)
        self.layer1 = self._make_layer(block, 64, blocks_num[0])
        self.layer2 = self._make_layer(block, 128, blocks_num[1], stride=2)
        self.layer3 = self._make_layer(block, 256, blocks_num[2], stride=2)
        self.layer4 = self._make_layer(block, 512, blocks_num[3], stride=2)
        if self.include_top:
            self.avgpool = nn.AdaptiveAvgPool2d((1, 1))  # output size = (1, 1)
            self.fc = nn.Linear(512 * block.expansion, num_classes)

        for m in self.modules():
            if isinstance(m, nn.Conv2d):
                nn.init.kaiming_normal_(m.weight, mode='fan_out', nonlinearity='relu')

    def _make_layer(self, block, channel, block_num, stride=1):
        downsample = None
        if stride != 1 or self.in_channel != channel * block.expansion:
            downsample = nn.Sequential(
                nn.Conv2d(self.in_channel, channel * block.expansion, kernel_size=1, stride=stride, bias=False),
                nn.BatchNorm2d(channel * block.expansion))

        layers = []
        layers.append(block(self.in_channel, channel, downsample=downsample, stride=stride))
        self.in_channel = channel * block.expansion

        for _ in range(1, block_num):
            layers.append(block(self.in_channel, channel))

        return nn.Sequential(*layers)

    def forward(self, x):
        outputs = []
        x = self.conv1(x)
        outputs.append(x)
        x = self.bn1(x)
        x = self.relu(x)
        x = self.maxpool(x)

        x = self.layer1(x)
        outputs.append(x)
        # x = self.layer2(x)
        # x = self.layer3(x)
        # x = self.layer4(x)
        #
        # if self.include_top:
        #     x = self.avgpool(x)
        #     x = torch.flatten(x, 1)
        #     x = self.fc(x)

        return outputs


def resnet34(num_classes=1000, include_top=True):
    return ResNet(BasicBlock, [3, 4, 6, 3], num_classes=num_classes, include_top=include_top)


def resnet101(num_classes=1000, include_top=True):
    return ResNet(Bottleneck, [3, 4, 23, 3], num_classes=num_classes, include_top=include_top)
②alexnet_model.py
# 搭建alexnet训练网络结构

import torch.nn as nn
import torch


class AlexNet(nn.Module):
    def __init__(self, num_classes=1000, init_weights=False):
        super(AlexNet, self).__init__()
        self.features = nn.Sequential(
            nn.Conv2d(3, 48, kernel_size=11, stride=4, padding=2),  # input[3, 224, 224]  output[48, 55, 55]
            nn.ReLU(inplace=True),
            nn.MaxPool2d(kernel_size=3, stride=2),                  # output[48, 27, 27]
            nn.Conv2d(48, 128, kernel_size=5, padding=2),           # output[128, 27, 27]
            nn.ReLU(inplace=True),
            nn.MaxPool2d(kernel_size=3, stride=2),                  # output[128, 13, 13]
            nn.Conv2d(128, 192, kernel_size=3, padding=1),          # output[192, 13, 13]
            nn.ReLU(inplace=True),
            nn.Conv2d(192, 192, kernel_size=3, padding=1),          # output[192, 13, 13]
            nn.ReLU(inplace=True),
            nn.Conv2d(192, 128, kernel_size=3, padding=1),          # output[128, 13, 13]
            nn.ReLU(inplace=True),
            nn.MaxPool2d(kernel_size=3, stride=2),                  # output[128, 6, 6]
        )
        self.classifier = nn.Sequential(
            nn.Dropout(p=0.5),
            nn.Linear(128 * 6 * 6, 2048),
            nn.ReLU(inplace=True),
            nn.Dropout(p=0.5),
            nn.Linear(2048, 2048),
            nn.ReLU(inplace=True),
            nn.Linear(2048, num_classes),
        )
        if init_weights:
            self._initialize_weights()

    def forward(self, x):
        outputs = []
        # 遍历网络中的层结构
        for name, module in self.features.named_children():
            x = module(x)
            # 判断是否为卷层结构,下标0,3,6分别对应网络的1,2,3卷积层
            # 只有卷积层才包含训练参数;激活函数层结构和池化采样层结构是不包含训练参数的
            if name in ["0", "3", "6"]:
                outputs.append(x)

        return outputs #返回列表就是3个卷积层的输出特征矩阵

    def _initialize_weights(self):
        for m in self.modules():
            if isinstance(m, nn.Conv2d):
                nn.init.kaiming_normal_(m.weight, mode='fan_out', nonlinearity='relu')
                if m.bias is not None:
                    nn.init.constant_(m.bias, 0)
            elif isinstance(m, nn.Linear):
                nn.init.normal_(m.weight, 0, 0.01)
                nn.init.constant_(m.bias, 0)
③analyze_feature_map.py
# 获取网络结构的特征矩阵并可视化
import torch
from alexnet_model import AlexNet
from resnet_model import resnet34
import matplotlib.pyplot as plt
import numpy as np
from PIL import Image
from torchvision import transforms

#  定义图像预处理过程(要与网络模型训练过程中的预处理过程一致)
# alexnet
# data_transform = transforms.Compose(
#     [transforms.Resize((224, 224)),
#      transforms.ToTensor(),
#      transforms.Normalize((0.5, 0.5, 0.5), (0.5, 0.5, 0.5))])

# resnet
data_transform = transforms.Compose(
    [transforms.Resize(256),
     transforms.CenterCrop(224),
     transforms.ToTensor(),
     transforms.Normalize([0.485, 0.456, 0.406], [0.229, 0.224, 0.225])])

# create model
# model = AlexNet(num_classes=5)
# model = AlexNet(num_classes=1000)
model = resnet34(num_classes=1000)
# load model weights加载预训练权重
# model_weight_path ="./AlexNet.pth"
model_weight_path = "./resnet34.pth"
model.load_state_dict(torch.load(model_weight_path))
# 打印出模型的结构
print(model)


# load image
img = Image.open("./rose.jpg")

# [N, C, H, W](对图片预处理)
img = data_transform(img)
# expand batch dimension 增加一个banch维度
img = torch.unsqueeze(img, dim=0)
# forward正向传播过程
out_put = model(img)
for feature_map in out_put:
    # [N, C, H, W] -> [C, H, W]    维度变换
    im = np.squeeze(feature_map.detach().numpy())
    # [C, H, W] -> [H, W, C]
    im = np.transpose(im, [1, 2, 0])

    # show top 12 feature maps
    plt.figure()
    for i in range(15):
        ax = plt.subplot(3,5, i+1)# 参数意义:3:图片绘制行数,5:绘制图片列数,i+1:图的索引
        # [H, W, C]
        # 特征矩阵每一个channel对应的是一个二维的特征矩阵,就像灰度图像一样,channel=1
        # plt.imshow(im[:, :, i])
        plt.imshow(im[:, :, i], cmap='gray')
    plt.show()
运行效果
使用官方的预训练模型,在实例化模型时候:
设置 num_classes=1000
(模型定义的区别主要在正向传播过程)
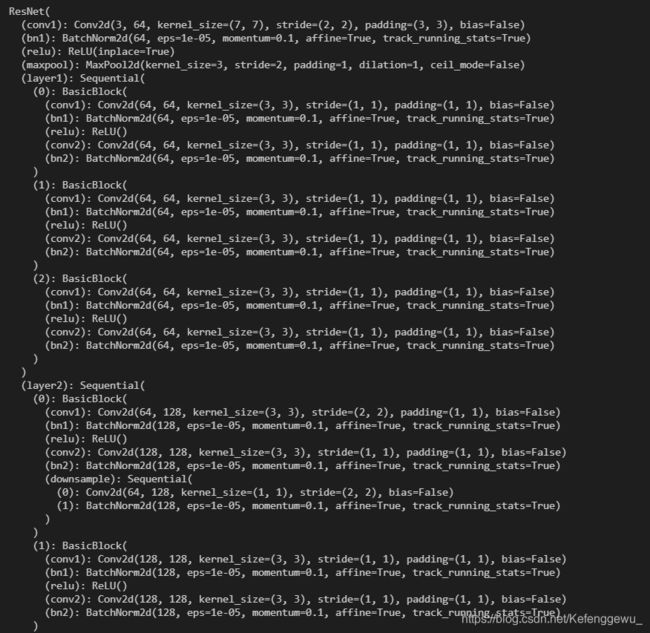
打印出的网络模型结构:(Resnet.model)
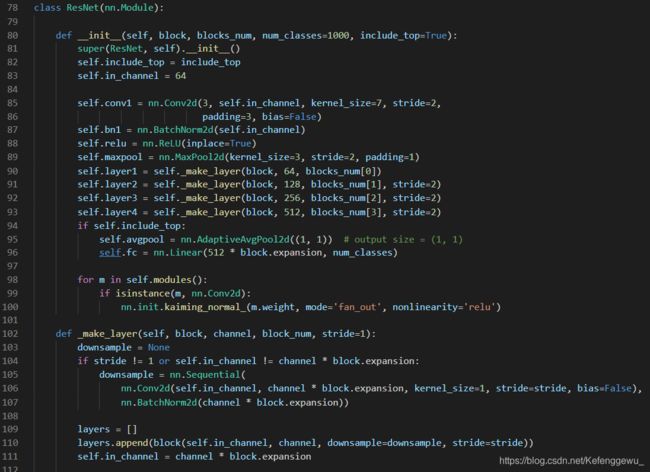
对应脚本文件中定义的网络结构(Resnet.model)
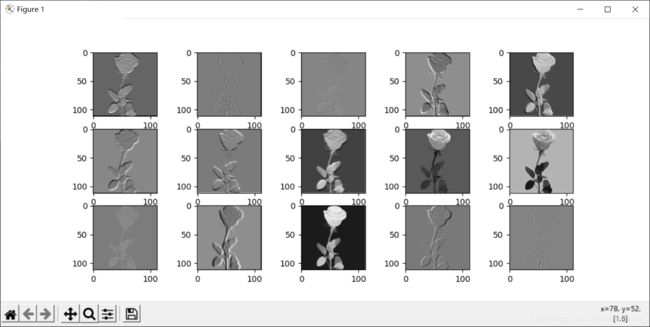
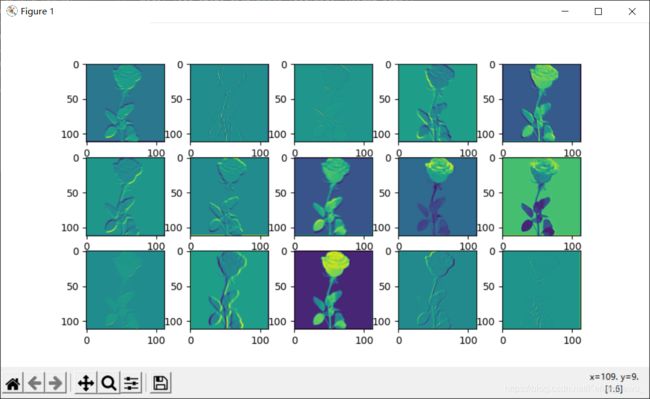
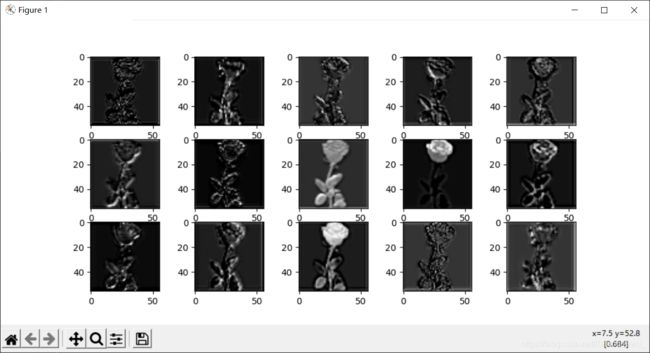
第一层卷积层显示特征图的信息:第一个卷积层所输出的特征矩阵的前15个通道的特征图。明暗程度表示对应卷积核感兴趣的区域。
每个卷积层都有一堆通道,这里是前15个通道
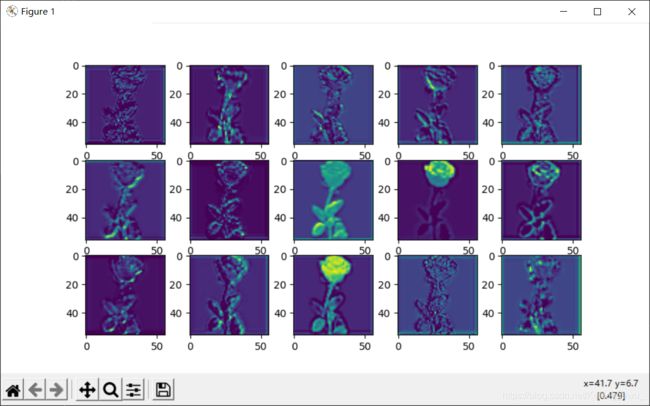
卷积2层特征信息输出:(有些卷积核没有起到作用的–>卷积的过程中没有学到有用的信息)而且越往后,抽象程度越高
不同颜色的展示效果
 for i in range(12):
        ax = plt.subplot(3, 4, i+1)# 参数意义:3行数,4绘制图片列数,i+1图的索引
        # [H, W, C]
        # 特征矩阵每一个channel对应的是一个二维的特征矩阵,就像灰度图像一样,channel=1
      #  plt.imshow(im[:, :, i], cmap='gray')
        plt.imshow(im[:, :, i])非灰度图显示效果
延伸:
查看全连接层输出:
还是要将图像经过features结构,再通过全连接结构,不能直接输入到classifier结构下的linear(全连接层),即是要保证:图像信息要经过想要查看结构的之前所有层结构
注释更换Alexnet网络结构代码可以有相同的步骤效果!
④analyze_kernel_weight.py
分析网络卷积核权重并可视化
import torch
from alexnet_model import AlexNet
from resnet_model import resnet34
import matplotlib.pyplot as plt
import numpy as np


# create model 实例化模型
# model = AlexNet(num_classes=5)
model = resnet34(num_classes=1000)
# load model weights
# load pretrain weights
    # download url: https://download.pytorch.org/models/resnet34-333f7ec4.pth

# model_weight_path = "./AlexNet.pth"  #
model_weight_path = "./resNet34.pth"
model.load_state_dict(torch.load(model_weight_path))
print(model)

weights_keys = model.state_dict().keys()
for key in weights_keys:
    # remove num_batches_tracked para(in bn)
    if "num_batches_tracked" in key:
        continue
    # 卷积核通道排列顺序
    # [kernel_number, kernel_channel, kernel_height, kernel_width]
    # kernel_number 卷积核个数对应输出特征矩阵的深度
    # kernel_channel 卷积核的深度,对应着输入特征矩阵的深度
    # kernel_height 卷积核的高度
    # kernel_width 卷积核的宽度
    weight_t = model.state_dict()[key].numpy()

    # read a kernel information
    # k = weight_t[0, :, :, :] # 获取第一个卷积核的信息参数
    #  该层卷积层的所有卷积核信息进行计算
    # calculate mean, std, min, max
    weight_mean = weight_t.mean()
    weight_std = weight_t.std(ddof=1)
    weight_min = weight_t.min()
    weight_max = weight_t.max()
    print("mean is {}, std is {}, min is {}, max is {}".format(weight_mean,
                                                               weight_std,
                                                               weight_max,
                                                               weight_min))

    # plot hist image
    plt.close()
    weight_vec = np.reshape(weight_t, [-1])
    plt.hist(weight_vec, bins=50)
    plt.title(key)
    plt.show()
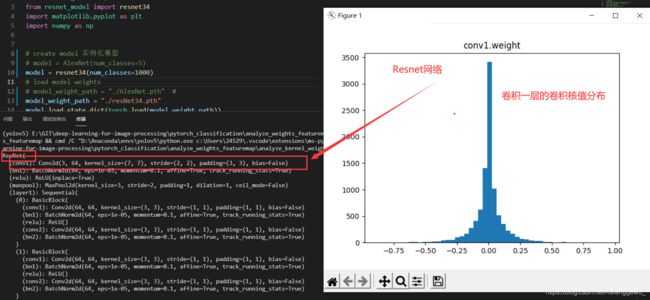
运行效果
分析卷积核权重的脚本
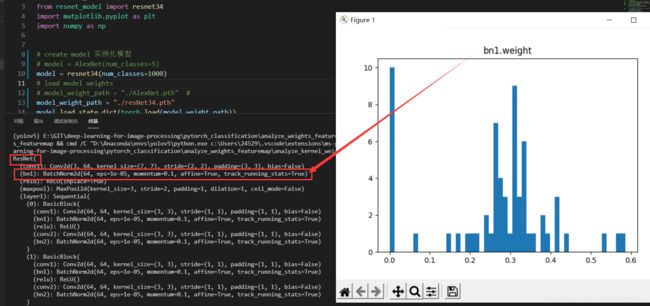
卷积层1层偏置的分布情况:
注释更换Alexnet网络结构代码可以有相同的步骤效果!
Reference
https://www.bilibili.com/video/BV1z7411f7za

