ESP8266模块使用

文章目录

        • ESP8266模块使用
          • 开发方式
          • 硬件模块
          • 配置环境
          • 连接网络
            • 简单连接WIFI
            • 连接wifi后作为服务器使用
            • 作为热点使用
            • 作为客户端与服务器进行通信
          • NodeMCU开发板数字引脚使用
          • 做一个网页控制的开关

ESP8266模块使用

8266片上集成wifi+MCU,使用的是一个M0的内核,成本很低,因为片上有wifi和MCU,所以作为网络终端非常的方便,当然,因为是wifi,所以低功耗较高。

说白了,esp8266也是一个单片机,上电还是得从0地址开始跑,平时我们使用单片机,一般都是使用keil等软件编程,然后下载,软件很多事情已经帮我们做好了,我们的重心放在main函数之后就行了。

所谓的固件,我们可以把它看做一个很大的程序,只不过人家帮我们写好了,上电就开始运行,然后一直等待我们给单片机发送指令,我们发送指令后就执行相应的操作。

开发方式

目前ESP8266的开发方式有这几种:

  • AT指令方式:烧录AT的固件包,使用AT指令与ESP8266交互,执行相应指令,需与单片机相连。

  • NodeMCU的lua开发:烧录NodeMCU的固件包,使用Lua语言开发,使用ESP内部资源。

  • Arduino IDE下的开发:相当于直接编写固件,编译之后,烧录进ESP,使用ESP内部资源。

优缺点:

  • AT指令开发:

    优点:开发简单,资料较多。只需知道AT指令集,以及它的通信方式即可。

    缺点:浪费资源,需要MCU与其通信,不能独立完成某项功能。

  • NodeMCU的lua开发:NodeMCU本质也是ESP8266,只是它的固件是与lua脚本语言交互。

    优点:节省资源,开发简单,代码量少。

    缺点:lua解释器执行效率较低,最终换成ArduinoIDE开发,就是因为读取传感器数据时,总是漏掉一个数 据。前期准备比较麻烦。需要准备相应功能的固件,烧录进去,然后使用lua语言和工具与之调试。

  • Arduino IDE下的开发:

    优点:集编程和烧录一体,使用很方便。语言执行效率高,节省资源,库函数比较多,开发语言简单,能够很快上手。

    缺点:Arduino IDE需要写较长的代码时,不是很方便,如果需要查看底层函数或者方法,非常费劲。

AT指令开发参考烂大街的ESP8266该怎么玩!

Lua开发我懒得配置环境,所以我这里使用Arduino IDE进行开发。

硬件模块

我这里用了两个硬件模块,一个是ESP-01S:
ESP8266模块使用_第1张图片

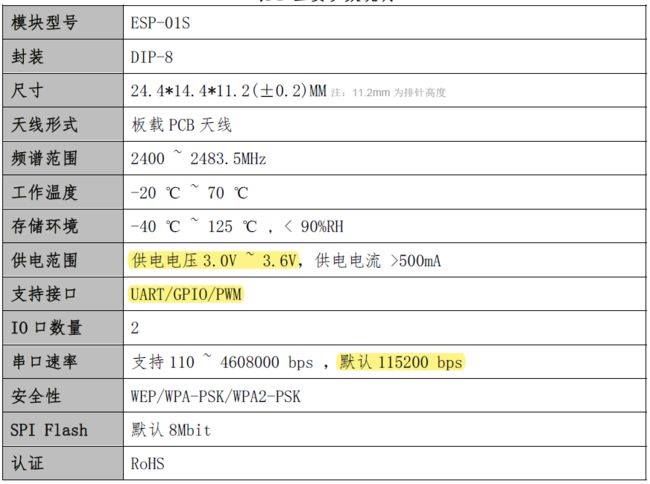
主要参数:

ESP8266模块使用_第2张图片

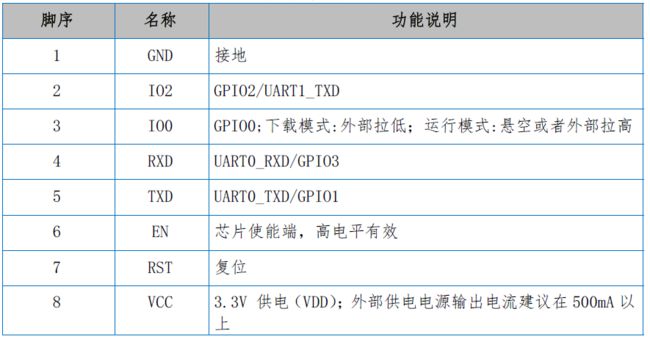
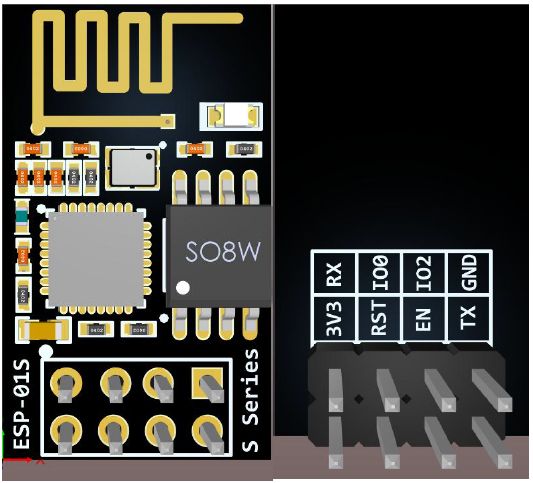
管脚定义:

ESP8266模块使用_第3张图片

模组启动模式说明:

image-20201028110919573

注意,部分引脚(EN、RST、GPIO0、GPIO2)已经上拉,GPIO15已经下拉。

也就是说运行的时候只需连接GND、VCC、TX和RX即可。
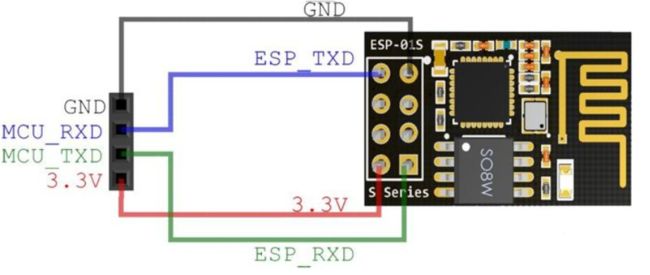
ESP8266模块使用_第4张图片

一般出厂默认烧写了AT固件。如果要为其烧写其他固件,需要一个USB转TTL模块或者专门购买一个下载器。

USB转TTL模块时注意接3.3V供电,下载时GPIO0接入低电平,EN使能和RST引脚接高电平,和模块的RX和TX反接。

不过为了方便还是推荐购买一个下面这样的下载模块,接上直接就能进入下载模式。
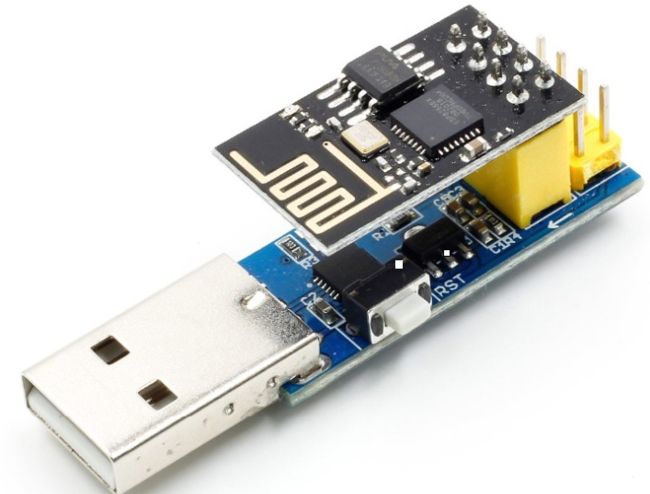
ESP8266模块使用_第5张图片

注意:芯片一旦烧写了程序便不可使用AT指令集,需要重新刷回AT指令集固件才可以使用AT指令集。

我用到的另外一个模块是一款NodeMCU开发板。其板载ESP-12E(4MB Flash)WIFI模组和USB转TTL串口(CP2102/CH340)芯片,方便下载固件和调试,默认为Lua固件,有10个数字io引脚可以控制。
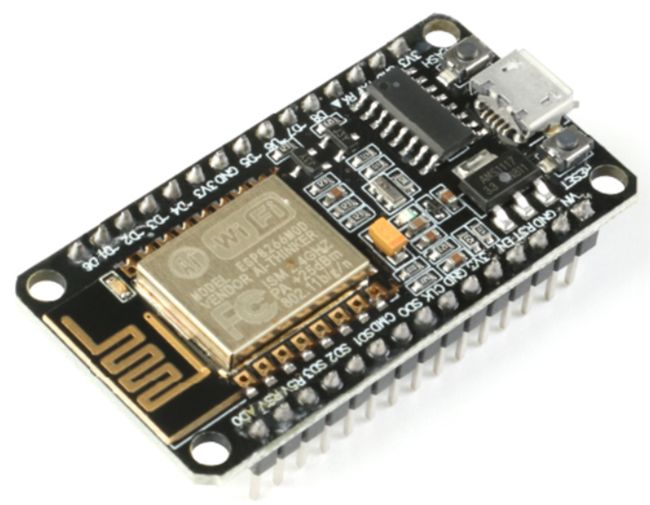
ESP8266模块使用_第6张图片

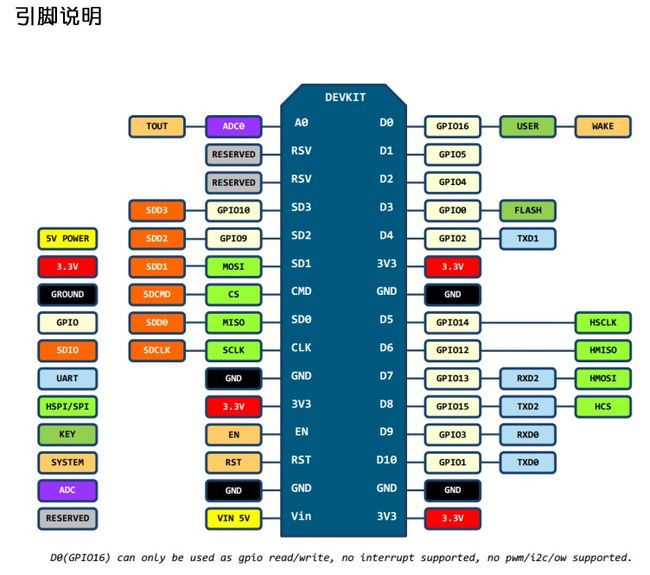
引脚说明:

ESP8266模块使用_第7张图片

注意:ESP8266 芯片有自己的引脚(GPIO)布局,但是基于该芯片设计的众多开发板,对于芯片上 GPIO 的引出方式却有自己的规则。在程序中操作的引脚序号是GPIO号。

配置环境

1.在IDE的文件->首选项下添加开发板管理网址http://arduino.esp8266.com/stable/package_esp8266com_index.json
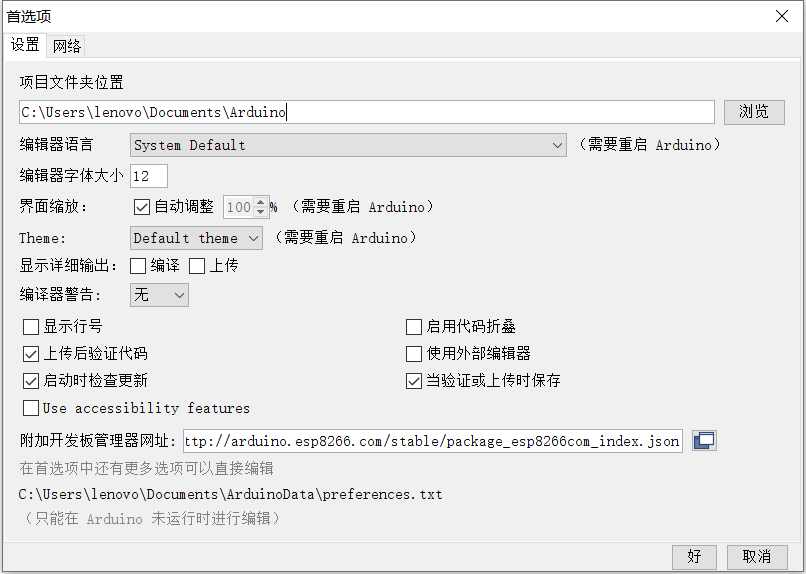
ESP8266模块使用_第8张图片
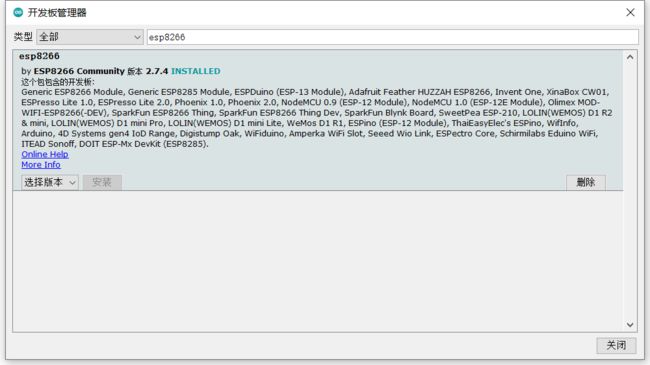
  1. 重启IDE在 工具->开发板->开发板管理器 下找到esp8266并安装
ESP8266模块使用_第9张图片
  1. 重启IDE在 工具->开发板 下就会出现如下开发板,选择自己的型号就可以(一般开发板比如ESP-01s选第一个Generic ESP8266 Module即可,NodeMCU板我选的是NodeMCU1.0(ESP-12Module)。

选完型号后注意看一下配置是否和自己的开发板一致,比如Builtin LED引脚,串口波特率,晶振频率等。
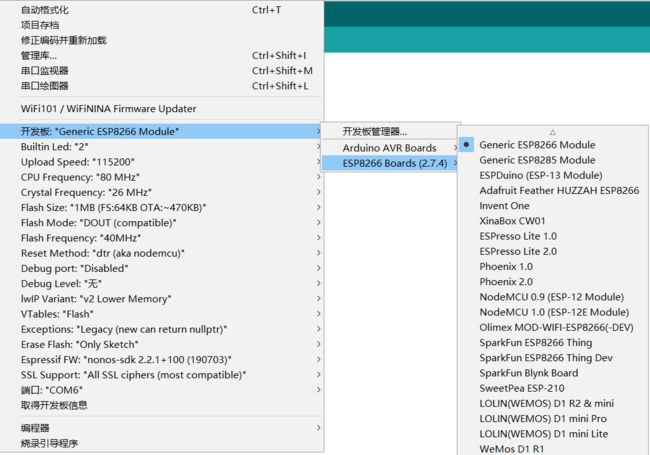
ESP8266模块使用_第10张图片

4.测试

在文件下的示例找到ESP8266选择Blink示例,也可以直接用下面的代码。(示例里LED_BUILTIN用的是Builtin LED引脚设置的引脚,我的ESP-12E是2号引脚连接板载LED,ESP8266-01s用的也是2号引脚)

int ledPin = 2;
void setup() {
  pinMode(ledPin, OUTPUT);
} 
void loop() {
  //开灯
  digitalWrite(ledPin, LOW); 
  delay(1000);   
  //关灯                   
  digitalWrite(ledPin, HIGH);  
  delay(2000);                      
}

然后连接好硬件,在工具里面选择好串口,然后就可以进行代码上传了。上传完成后拔下下载器,使GPIO0悬空,重新上电就可以看到板载小灯闪烁,证明硬件和软件配置无误!

这里说一下,esp8266-01s本身就是一个mcu,所以可以利用GPIO2来做一些简单的控制,比如外接一个LED灯(注意:GPIO2在模块启动的时候是不能下拉的,所以led的正极要接VCC负极接GPIO2)。

连接网络
简单连接WIFI
// Import required libraries
#include 

// WiFi parameters
const char* ssid = "your_wifi_name";
const char* password = "your_wifi_password";

void setup(void)
{
  // Start Serial
  Serial.begin(115200);
  // Connect to WiFi
  WiFi.begin(ssid, password);
  // Wait for connection
  while (WiFi.status() != WL_CONNECTED) {
    delay(500);
    Serial.print(".");
  }
  Serial.println("");

  // Print the IP address
  Serial.print("Connected to ");
  Serial.println(ssid);
  Serial.print("IP address: ");
  Serial.println(WiFi.localIP());
}

void loop() {
}

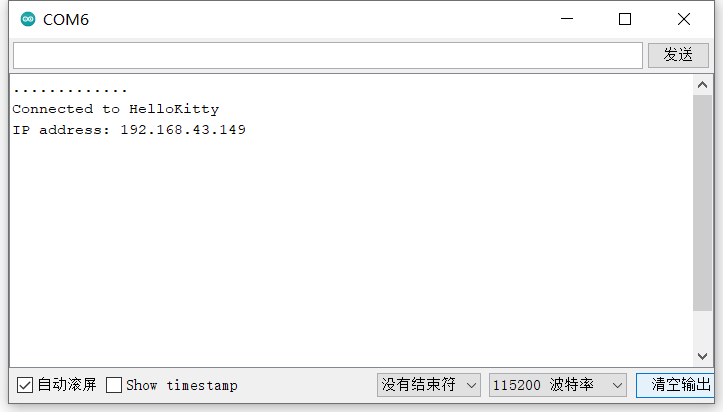
串口输出:

ESP8266模块使用_第11张图片
连接wifi后作为服务器使用

可以参考ESP8266WebServer下的示例:

#include 
#include 
#include 
#include 

#ifndef STASSID
#define STASSID "your_wifi_name"
#define STAPSK  "your_wifi_password"
#endif

const char* ssid = STASSID;
const char* password = STAPSK;

ESP8266WebServer server(80);  //开启服务器端口为80端口

void handleRoot() {  // root路径的信息
  server.send(200, "text/plain", "hello from esp8266!");
}

void handleNotFound() {  // 报错信息
  String message = "File Not Found\n\n";
  message += "URI: ";
  message += server.uri();
  message += "\nMethod: ";
  message += (server.method() == HTTP_GET) ? "GET" : "POST";
  message += "\nArguments: ";
  message += server.args();
  message += "\n";
  for (uint8_t i = 0; i < server.args(); i++) {
    message += " " + server.argName(i) + ": " + server.arg(i) + "\n";
  }
  server.send(404, "text/plain", message);
}

void setup(void) {
  Serial.begin(115200);
  WiFi.mode(WIFI_STA);  // 设置为客户端
  WiFi.begin(ssid, password);

  // Wait for connection
  while (WiFi.status() != WL_CONNECTED) {
    delay(500);
    Serial.print(".");
  }
  Serial.println("");
  Serial.print("Connected to ");
  Serial.println(ssid);
  Serial.print("IP address: ");
  Serial.println(WiFi.localIP());

  if (MDNS.begin("esp8266")) {
    Serial.println("MDNS responder started");
  }

  server.on("/", handleRoot);

  server.onNotFound(handleNotFound);

  server.begin();
  Serial.println("HTTP server started");
}

void loop(void) {
  server.handleClient();
  MDNS.update();
}

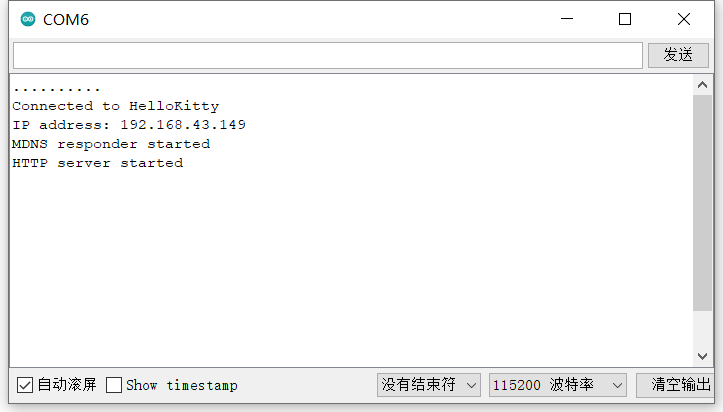
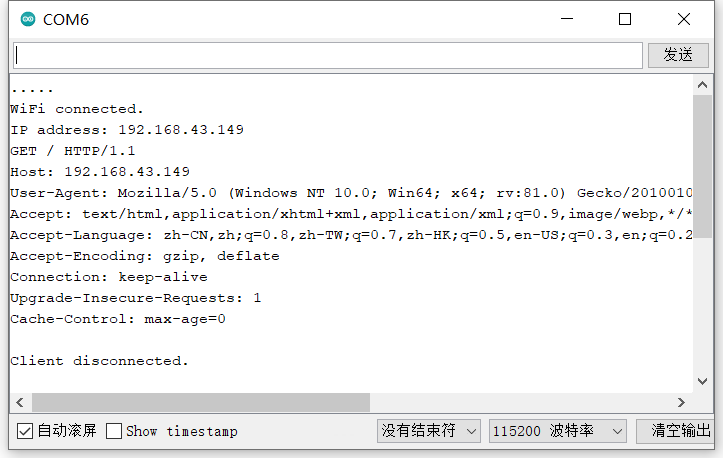
串口输出:

ESP8266模块使用_第12张图片

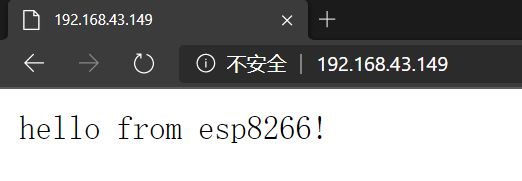
之后再浏览器输入ESP8266的IP地址,即可看到我们的页面:

ESP8266模块使用_第13张图片

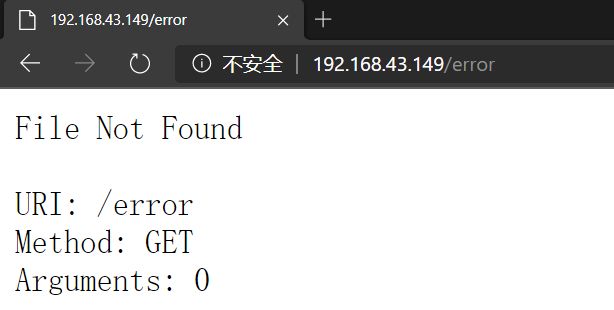
如果是一个不存在的路径,就会返回我们写好的错误页面:

ESP8266模块使用_第14张图片
作为热点使用
#include 
#include 
#include 

#ifndef APSSID
#define APSSID "设置的Wifi名"
#define APPSK  "设置的密码"
#endif

/* Set these to your desired credentials. */
const char *ssid = APSSID;
const char *password = APPSK;

ESP8266WebServer server(80);

/* Just a little test message.  Go to http://192.168.4.1 in a web browser
   connected to this access point to see it.
*/
void handleRoot() {
  server.send(200, "text/html", "

You are connected

"
); } void setup() { delay(1000); Serial.begin(115200); Serial.println(); Serial.print("Configuring access point..."); /* You can remove the password parameter if you want the AP to be open. */ WiFi.softAP(ssid, password); IPAddress myIP = WiFi.softAPIP(); Serial.print("AP IP address: "); Serial.println(myIP); server.on("/", handleRoot); server.begin(); Serial.println("HTTP server started"); } void loop() { server.handleClient(); }

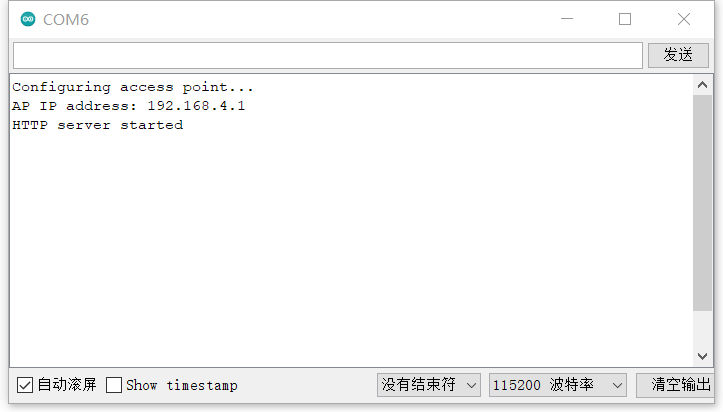
串口输出:

ESP8266模块使用_第15张图片

连接上开启的热点,输入设置的IP地址即可看到我们设置的页面:

ESP8266模块使用_第16张图片
作为客户端与服务器进行通信

以TCP通信为例:

需要在局域网里建立一个TCP服务端和TCP客户端。这里我使用网络调试助手(USR-TCP232-Test-V1.3)软件建立TCP服务:
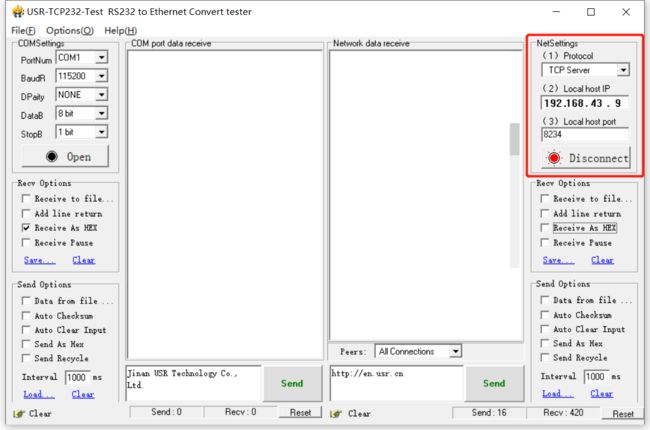
ESP8266模块使用_第17张图片

之后编写如下程序:

/*
    This sketch sends a string to a TCP server, and prints a one-line response.
    You must run a TCP server in your local network.
    For example, on Linux you can use this command: nc -v -l 3000
*/

#include 
#include 

#ifndef STASSID
#define STASSID "HelloKitty"
#define STAPSK  "88888888"
#endif

const char* ssid     = STASSID;
const char* password = STAPSK;

const char* host = "192.168.43.9";
const uint16_t port = 8234;

ESP8266WiFiMulti WiFiMulti;

void setup() {
  Serial.begin(115200);

  // We start by connecting to a WiFi network
  WiFi.mode(WIFI_STA);
  WiFiMulti.addAP(ssid, password);

  Serial.println();
  Serial.println();
  Serial.print("Wait for WiFi... ");

  while (WiFiMulti.run() != WL_CONNECTED) {
    Serial.print(".");
    delay(500);
  }

  Serial.println("");
  Serial.println("WiFi connected");
  Serial.println("IP address: ");
  Serial.println(WiFi.localIP());

  delay(500);
}


void loop() {
  Serial.print("connecting to ");
  Serial.print(host);
  Serial.print(':');
  Serial.println(port);

  // Use WiFiClient class to create TCP connections
  WiFiClient client;

  if (!client.connect(host, port)) {
    Serial.println("connection failed");
    Serial.println("wait 5 sec...");
    delay(5000);
    return;
  }

  // This will send the request to the server
  client.println("hello from ESP8266");

  //read back one line from server
  Serial.println("receiving from remote server");
  String line = client.readStringUntil('\r');
  Serial.println(line);

  Serial.println("closing connection");
  client.stop();

  Serial.println("wait 5 sec...");
  delay(5000);
}

串口输出:

ESP8266模块使用_第18张图片

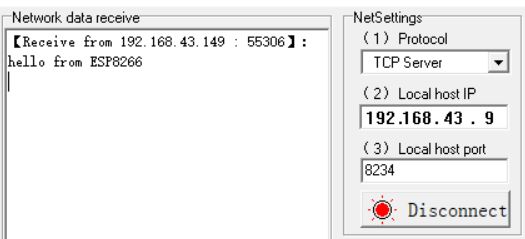
网络调试助手输出:

ESP8266模块使用_第19张图片

既然做到网络通信了,同时通过ESP8266的串口可以很方便地与我们的Arduino开发板进行通信,所以我们的Arduino开发板通过ESP8266模块就可以实现网络通信了。

可以参考这篇文章:Arduino使用ESP8266模块联网

上面的实验中,通过TCP通信的方式我们只能在局域网进行通信,还未实现真正的联网操作。

MQTT协议算是一个比较成熟的做物联网的比较好的协议。

NodeMCU开发板数字引脚使用

NodeMCU开发板由于有10个数字引脚,可以很方便地做一些控制,这里我通过ESP-12E使用ULN2003控制28BYJ-48步进电机。

接线:uln2003驱动上的1,2,3,4分别连接到esp12e上的D0,D1,D2,D3

编写代码:

#include 

const int stepsPerRevolution = 200;

//D0:GPIO16
//D1:GPIO5
//D2:GPIO4
//D3:GPIO0
//这里特别注意 ,后面4个参数分别是驱动板上的 IN1 , IN3 , IN2 , IN4 ,而不是顺着来的
Stepper myStepper(stepsPerRevolution, 16, 4, 5, 0);

void setup() {
  myStepper.setSpeed(120);  //设置转速
}

void loop() {
  //这个电机转一圈是  2048步
  //先顺时针转90
  myStepper.step(512);
  delay(500);
  //逆时针转90
  myStepper.step(-512);
  delay(500);
}
做一个网页控制的开关

做一个通过网页控制的LED灯。

首先编写如下代码:

#include 

const char* ssid     = "HelloKitty";
const char* password = "88888888";

WiFiServer server(80);// Set port to 80

String header; // This storees the HTTP request

// Declare the pins to which the LED are connected 
int inD1 = 5;

String D1state = "关";

void setup() {
  Serial.begin(115200);
  pinMode(inD1, OUTPUT);
  digitalWrite(inD1, LOW);
  //connect to access point
  WiFi.begin(ssid, password);

  while (WiFi.status() != WL_CONNECTED) {
    delay(500);
    Serial.print(".");
  }
  // Print local IP address and start web server
  Serial.println("");
  Serial.println("WiFi connected.");
  Serial.print("IP address: ");
  Serial.println(WiFi.localIP());// this will display the Ip address of the Pi which should be entered into your browser
  
  server.begin();
}

void loop(){
  WiFiClient client = server.available();   // Listen for incoming clients
  //(浏览器进入这个网址或者刷新就会建立一次连接,按钮的功能就是更改网页的url,每次点击就会建立一次连接)
  if (client) {                             // If a new client connects,
    String currentLine = "";                // make a String to hold incoming data from the client
    while (client.connected()) {            // loop while the client's connected
      if (client.available()) {             // if there's bytes to read from the client,
        char c = client.read();             // read a byte, then
        Serial.write(c);                    // print it out the serial monitor
        header += c;
        if (c == '\n') {                    // if the byte is a newline character
          // if the current line is blank, you got two newline characters in a row.
          // that's the end of the client HTTP request, so send a response:
          if (currentLine.length() == 0) {  // 如果新行没有数据,那就表示浏览器的请求已经发送完毕
            // HTTP headers always start with a response code (e.g. HTTP/1.1 200 OK)
            // and a content-type so the client knows what's coming, then a blank line:
            client.println("HTTP/1.1 200 OK");  // 返回给浏览器网页
            client.println("Content-type:text/html");
            client.println("Connection: close");
            client.println();
            
            // turns the GPIOs on and off
            if (header.indexOf("GET /D1/on") >= 0) {
              Serial.println("D1 开");
              D1state = "开";
              digitalWrite(inD1, HIGH);
            } else if (header.indexOf("GET /D1/off") >= 0) {
              Serial.println("D1 关");
              D1state = "关";
              digitalWrite(inD1, LOW);
            }
       
            // Display the HTML web page
            client.println("");
            client.println("");
          
            client.println("");
            // CSS to style the on/off buttons 
            // Feel free to change the background-color and font-size attributes to fit your preferences
            client.println("