企业入门实战--k8s之存储之configMap配置管理、Secret配置管理和Volumes配置管理
企业入门实战--k8s之存储之configMap配置管理、Secret配置管理和Volumes配置管理
- 一、configMap配置管理
-
- 创建configmap
- 使用configmap
- 二、Secret配置管理
- 三、Volumes配置管理
-
- 持久卷PV --静态
- 动态逻辑卷分配
一、configMap配置管理
Configmap用于保存配置数据,以键值对形式存储。
configMap资源提供了向Pod 注入配置数据的方法。旨在让镜像和配置文件解耦,以便实现镜像的可移植性和可复用性。
典型的使用场景:·填充环境变量的值
·设置容器内的命令行参数
·填充卷的配置文件
创建configmap
使用字面值指定创建
kubectl create configmap my-config --from-literal=key1=config1 --from-literal=key2=config2
kubectl get cm
kubectl describe cm my-config
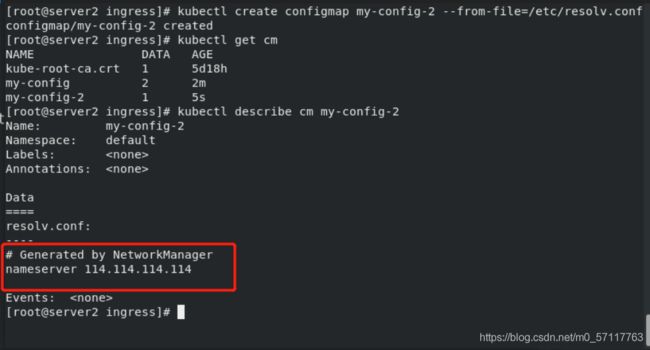
kubectl create configmap my-config-2 --from-file=/etc/resolv.conf
kubectl get cm
kubectl describe cm my-config-2
mkdir configmap
cd configmap/
mkdir test
cp /etc/passwd test/
cp /etc/fstab test/
ls test/
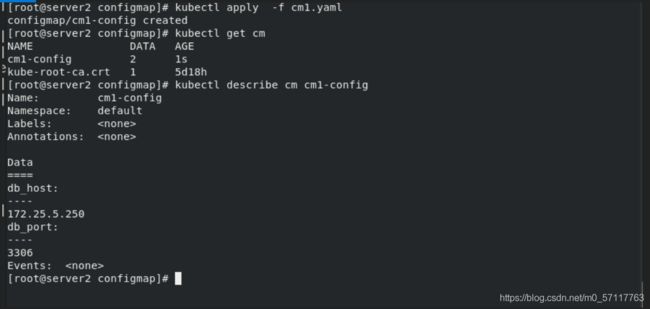
apiVersion: v1
kind: ConfigMap
metadata:
  name: cm1-config
data:
  db_host: "172.25.5.250"
  db_port: "3306"
创建
cat cm1.yaml
kubectl apply -f cm1.yaml
kubectl get cm
使用configmap
·通过环境变量的方式直接传递给pod
·通过在pod的命令行下运行的方式
·作为volume的方式挂载到pod内
通过环境变量的方式直接传递给pod
cd configmap/
vim pod.yaml
apiVersion: v1
kind: Pod
metadata:
  name: pod1
spec:
  containers:
    - name: pod1
      image: busyboxplus
      command: ["/bin/sh", "-c", "env"]
      env:
        - name: key1
          valueFrom:
            configMapKeyRef:
              name: cm1-config
              key: db_host
        - name: key2
          valueFrom:
            configMapKeyRef:
              name: cm1-config
              key: db_port
  restartPolicy: Never
拉起资源清单,创建节点
kubectl apply -f pod.yaml

kubectl get pod

通过在pod的命令行下运行的方式
vim pod2.yaml
apiVersion: v1
kind: Pod
metadata:
  name: pod2
spec:
  containers:
    - name: pod2
      image: busyboxplus
      command: ["/bin/sh", "-c", "env"]
      envFrom:
        - configMapRef:
            name: cm1-config
  restartPolicy: Never
拉起资源清单,创建pod2节点
kubectl apply -f pod2.yaml
kubectl get pod
apiVersion: v1
kind: Pod
metadata:
  name: pod3
spec:
  containers:
    - name: pod3
      image: busybox
      command: ["/bin/sh", "-c", "echo $(db_host) $(db_port)"]
      envFrom:
        - configMapRef:
            name: cm1-config
  restartPolicy: Never
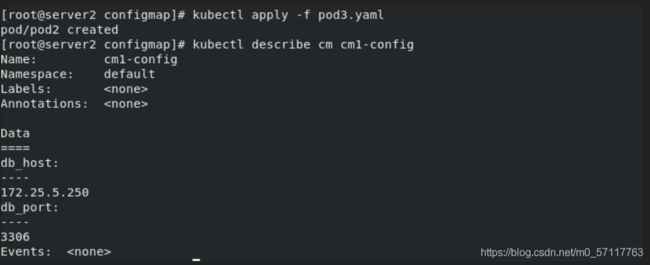
kubectl apply -f pod3.yaml
kubectl get pod
kubectl logs pod1
kubectl describe cm cm1-config
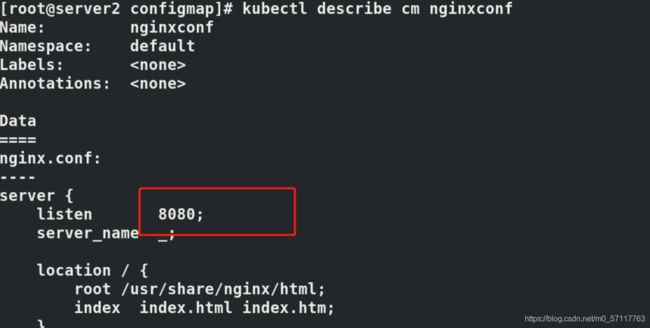
server {
    listen       8080;
    server_name  _;

    location / {
        root /usr/share/nginx/html;
        index  index.html index.htm;
    }
}
 kubectl create configmap nginxconf --from-file=nginx.conf
kubectl get cm
![]()
kubectl describe cm nginxconf
编写清单挂载覆盖nginx配置文件
vim nginx.yaml
apiVersion: apps/v1
kind: Deployment
metadata:
  name: my-nginx
spec:
  replicas: 1
  selector:
    matchLabels:
      app: nginx
  template:
    metadata:
      labels:
        app: nginx
    spec:
      containers:
        - name: nginx
          image: nginx
          volumeMounts:
          - name: config-volume
            mountPath: /etc/nginx/conf.d
      volumes:
        - name: config-volume
          configMap:
            name: nginxconf
kubectl apply -f nginx.yaml
kubectl get pod -o wide
curl 10.244.141.232:8080
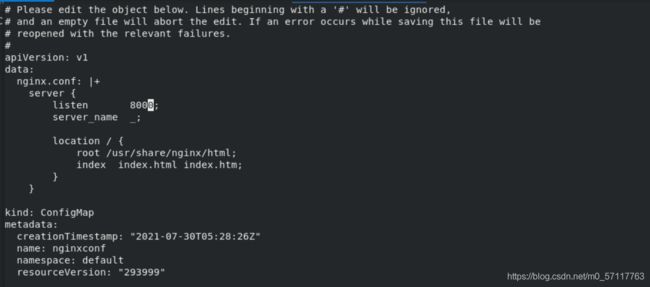
kubectl edit cm nginxconf
apiVersion: v1
data:
  nginx.conf: |
    server {
        listen       8000;
        server_name  _;

        location / {
            root /usr/share/nginx/html;
            index  index.html index.htm;
        }
    }
 kubectl patch deployments.apps my-nginx --patch '{"spec": {"template": {"metadata": {"annotations": {"version/config": "20200219"}}}}}'
  kubectl get pod -o wide   ### 查看重新分配的IP,访问8000,更新已生效
curl 10.244.141.238:8000
二、Secret配置管理
·Secret对象类型用来保存敏感信息,例如密码、OAuth 令牌和ssh key。
·敏感信息放在secret中比放在Pod的定义或者容器镜像中来说更加安全和灵活。
·Pod 可以用两种方式使用secret:
·作为volume中的文件被挂载到pod中的一个或者多个容器里。
·当kubelet为pod拉取镜像时使用。
·Secret的类型:
·Service Account:Kubernetes 自动创建包含访问API凭据的secret,并自动修改pod 以使用此类型的 secret。
·Opaque:使用base64编码存储信息,可以通过base64–decode解码获得原始数据,因此安全性弱。
·kubernetes.io/dockerconfigjson:用于存储docker registry的认证信息。
查看secrets命令
kubectl get secrets
从文件创建secret
创建认证文本文件
echo -n 'admin' > ./username.txt
echo -n 'westos' > ./password.txt
kubectl create secret generic db-user-pass --from-file=./username.txt --from-file=./password.txt
kubectl get secrets
查看认证信息
kubectl describe secrets db-user-pass
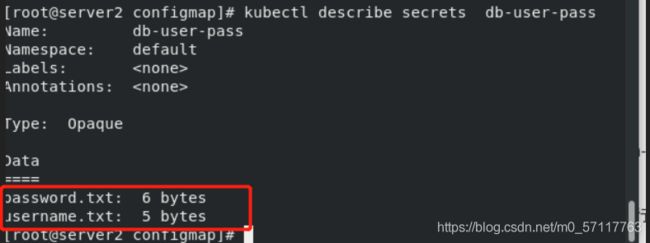
默认情况下 kubectl get和kubectl describe 为了安全是不会显示密码的内容,可以通过以下方式查看
查看yaml格式的secret ,可以看到base64格式的认证信息
kubectl get secrets db-user-pass -o yaml
![]()
查看base64方式加密的明文
echo YWRtaW4= |base64 -d
vim secret.yaml
apiVersion: v1
kind: Secret
metadata:
  name: mysecret
type: Opaque
data:
  username: YWRtaW4=
  password: d2VzdG9z
kubectl apply -f secret.yaml

将Secret挂载到Volume中
vim secret.yaml
apiVersion: v1
kind: Pod
metadata:
  name: mysecret
spec:
  containers:
  - name: nginx
    image: nginx
    volumeMounts:
    - name: secrets
      mountPath: "/secret"
      readOnly: true
  volumes:
  - name: secrets
    secret:
      secretName: mysecret
拉起容器,查看pod节点
kubectl apply -f secret.yaml
kubectl get pod
kubectl exec -it mysecret -- bash

向指定路径映射 secret 密钥
vim secret.yaml
apiVersion: v1
kind: Pod
metadata:
  name: mysecret
spec:
  containers:
  - name: nginx
    image: nginx
    volumeMounts:
    - name: secrets
      mountPath: "/secret"
      readOnly: true
  volumes:
  - name: secrets
    secret:
      secretName: mysecret
      items:
      - key: username
        path: my-group/my-username
kubectl apply -f secret.yaml
进入节点终端查看
kubectl exec -it mysecret -- bash

可以看到,文件挂载在指定路径my-group/my-username下
将Secret设置为环境变量
vim secret.yaml
apiVersion: v1
kind: Pod
metadata:
  name: secret-env
spec:
  containers:
  - name: nginx
    image: nginx
    env:
      - name: SECRET_USERNAME
        valueFrom:
          secretKeyRef:
            name: mysecret
            key: username
      - name: SECRET_PASSWORD
        valueFrom:
          secretKeyRef:
            name: mysecret
            key: password
kubectl apply -f secret.yaml
kubectl get pod
echo yuyu|base64
kubectl edit secrets
kubectl create secret docker-registry myregistrykey --docker-server=reg.westos.org --dockerusername=admin --docker-password=westos --docker-email=yakexi007@westos.org
vim registry.yaml
apiVersion: v1
kind: Pod
metadata:
name: mypod
spec:
containers:
- name: game2048
image: reg.westos.org/westos/game2048:latest
imagePullSecrets:
- name: myregistrykey
拉起清单
kubectl apply -f registry.yaml
kubectl get pod
查看pod节点详细信息,可以看到已成功拉取
kubectl describe pod mypod
三、Volumes配置管理
·容器中的文件在磁盘上是临时存放的,这给容器中运行的特殊应用程序带来一些问题。首先,当容器崩溃时,kubelet将重新启动容器,容器中的文件将会丢失,因为容器会以干净的状态重建。其次,当在一个Pod中同时运行多个容器时,常常需要在这些容器之间共享文件。Kubernetes 抽象出Volume 对象来解决这两个问题。
·Kubernetes 卷具有明确的生命周期,与包裹它的Pod相同。因此,卷比Pod中运行的任何容器的存活期都长,在容器重新启动时数据也会得到保留。当然,当一个Pod 不再存在时,卷也将不再存在。也许更重要的是,Kubernetes可以支持许多类型的卷,Pod也能同时使用任意数量的卷。
·卷不能挂载到其他卷,也不能与其他卷有硬链接。Pod中的每个容器必须独立地指定每个卷的挂载位置。
emptyDir 示例
mkdir volumes
cd volumes/
vim vol1.yaml
apiVersion: v1
kind: Pod
metadata:
name: vol1
spec:
containers:
- image: busyboxplus
name: vm1
command: ["sleep", "300"]
volumeMounts:
- mountPath: /cache
name: cache-volume
- name: vm2
image: nginx
volumeMounts:
- mountPath: /usr/share/nginx/html
name: cache-volume
volumes:
- name: cache-volume
emptyDir:
medium: Memory
sizeLimit: 100Mi
拉起节点
kubectl apply -f vol1.yaml
 kubectl get pod
kubectl describe pod vol1
kubectl get pod -o wide
进入容器,创建默认发布文件
kubectl exec -it vol1 -- sh
curl 10.244.141.222
kubectl exec -it vol1 -- sh
查看两个节点的日志
kubectl logs vol1 vm1
kubectl logs vol1 vm2

hostPath卷能将主机节点文件系统上的文件或目录挂载到您的Pod中。虽然这不是大多数Pod需要的,但是它为一些应用程序提供了强大的逃生舱。
hostPath的一些用法有:
·运行一个需要访问Docker 引擎内部机制的容器,挂载/var/lib/docker路径。
·在容器中运行cAdvisor时,以hostPath 方式挂载/sys。
·允许Pod 指定给定的hostPath 在运行Pod之前是否应该存在,是否应该创建以及应该以什么方式存在。
vim host.yam
data目录不存咋自动创建
apiVersion: v1
kind: Pod
metadata:
  name: test-pd
spec:
  containers:
  - image: nginx
    name: test-container
    volumeMounts:
    - mountPath: /test-pd
      name: test-volume
  volumes:
  - name: test-volume
    hostPath:
      path: /data
      type: DirectoryOrCreate
kubectl apply -f host.yaml
kubectl get pod -o wide
进入容器,测试挂载是否成功
在容器挂载目录中创建一个
kubectl exec -it test-pd -- sh

文件,受控node主机的相应目录也会自动生成相应文件。

共享文件系统nfs使用,首先在所有结点上安装nfs,在仓库结点上配置nfs
server1
yum install -y nfs-utils
vim /etc/exports
systemctl start nfs
showmount -e
vim nfs.yaml
apiVersion: v1
kind: Pod
metadata:
  name: test-pd
spec:
  containers:
  - image: nginx
    name: test-container
    volumeMounts:
    - mountPath: /usr/share/nginx/html
      name: test-volume
  volumes:
  - name: test-volume
    nfs:
      server: 172.25.5.1
      path: /mnt/nfs
验证nfs配置是否有误
showmount -e 172.25.5.1
kubectl apply -f nfs.yaml
kubectl get pod -o wide

server1:
等待nfs.yaml 拉起后,测试是否同步
cd /mnt/nfs
echo wwwww > index.html
进入容器,测试挂载是否成功
kubectl exec -it test-pd -- sh
持久卷PV --静态
静态PV:集群管理员创建多个PV,它们携带着真实存储的详细信息,这些存储对于集群用户是可用的。它们存在于KubernetesAPl中,并可用于存储使用
创建NFS 静态PV卷
server1
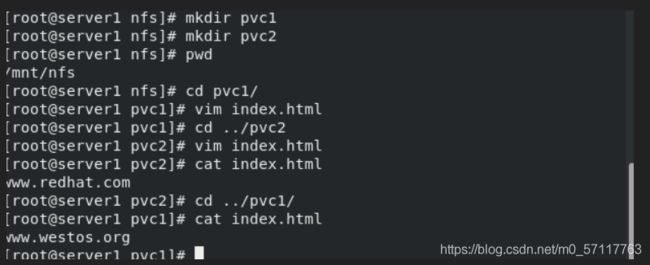
cd /mnt/nfs
mkdir pvc1
mkdir pvc2
cd pvc1
vim index.html
cd ../pv2
vim index.htm
vim pv.yaml
apiVersion: v1
kind: PersistentVolume
metadata:
name: pv1
spec:
capacity:
storage: 5Gi
volumeMode: Filesystem
accessModes:
- ReadWriteOnce
persistentVolumeReclaimPolicy: Recycle
storageClassName: nfs
nfs:
path: /mnt/nfs/pvc1
kubectl apply -f pv.yaml
kubectl get pv
vim pvc.yaml
kubectl apply -f pvc1.yaml
kubectl get pvc
kubectl get pv
server: 172.25.5.1
---
apiVersion: v1
kind: PersistentVolume
metadata:
name: pv2
spec:
capacity:
storage: 10Gi
volumeMode: Filesystem
accessModes:
- ReadWriteMany
persistentVolumeReclaimPolicy: Recycle
storageClassName: nfs
nfs:
path: /mnt/nfs/pv2
server: 172.25.5.1
拉起容器 查看pv
kubectl apply -f pv.yaml
kubectl get pv
创建PVC
vim pvc.yaml
apiVersion: v1
kind: PersistentVolumeClaim
metadata:
name: pvc1
spec:
storageClassName: nfs
accessModes:
- ReadWriteOnce
resources:
requests:
storage: 1G
---
apiVersion: v1
kind: PersistentVolumeClaim
metadata:
name: pvc2
spec:
storageClassName: nfs
accessModes:
- ReadWriteMany
resources:
requests:
storage: 10G
拉起pvc容器,查看pvc和pv相关信息
kubectl apply -f pvc1.yaml
kubectl get pvc
kubectl get pv
vim pod.yaml
apiVersion: v1
kind: Pod
metadata:
  name: test-pd
spec:
  containers:
  - image: nginx
    name: nginx
    volumeMounts:
    - mountPath: /usr/share/nginx/html
      name: pv1
  volumes:
  - name: pv1
    persistentVolumeClaim:
      claimName: pvc1
apiVersion: v1
kind: Pod
metadata:
  name: test-pd-2
spec:
  containers:
  - image: nginx
    name: nginx
    volumeMounts:
    - mountPath: /usr/share/nginx/html
      name: pv2
  volumes:
  - name: pv2
    persistentVolumeClaim:
      claimName: pvc2
kubectl apply -f pod.yaml
kubectl get pod
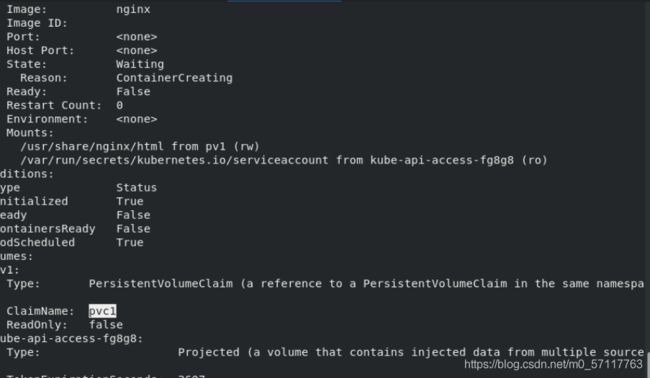
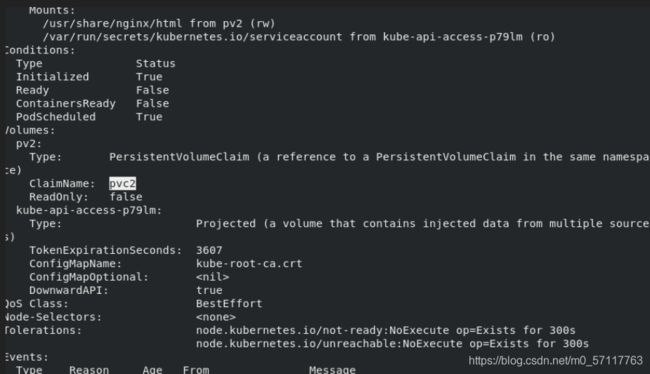
kubectl describe pod test-pd
kubectl exec -it test-pd -- bash
kubectl get pod -o wide
curl 10.244.141.236
curl 10.244.22.33
kubectl delete -f pod.yaml
kubectl delete -f pvc1.yaml
kubectl delete -f pvc.yaml
删除顺序: pod pvs pv
动态逻辑卷分配
server1
将所需要的工具包导入并上传至仓库
docker load -i nfs-client-provisioner-v4.0.0.tar 将镜像包导入

docker push  reg.westos.org/library/nfs-subdir-external-provisioner:v4.0.0 上传镜像至仓库

![]()
server2
vim nfs-client-provisioner.yaml
apiVersion: v1
kind: ServiceAccount
metadata:
  name: nfs-client-provisioner
  # replace with namespace where provisioner is deployed
  namespace: nfs-client-provisioner
---
kind: ClusterRole
apiVersion: rbac.authorization.k8s.io/v1
metadata:
  name: nfs-client-provisioner-runner
rules:
  - apiGroups: [""]
    resources: ["nodes"]
    verbs: ["get", "list", "watch"]
  - apiGroups: [""]
    resources: ["persistentvolumes"]
    verbs: ["get", "list", "watch", "create", "delete"]
  - apiGroups: [""]
    resources: ["persistentvolumeclaims"]
    verbs: ["get", "list", "watch", "update"]
  - apiGroups: ["storage.k8s.io"]
    resources: ["storageclasses"]
    verbs: ["get", "list", "watch"]
  - apiGroups: [""]
    resources: ["events"]
    verbs: ["create", "update", "patch"]
---
kind: ClusterRoleBinding
apiVersion: rbac.authorization.k8s.io/v1
metadata:
  name: run-nfs-client-provisioner
subjects:
  - kind: ServiceAccount
    name: nfs-client-provisioner
    # replace with namespace where provisioner is deployed
    namespace: nfs-client-provisioner
roleRef:
  kind: ClusterRole
  name: nfs-client-provisioner-runner
  apiGroup: rbac.authorization.k8s.io
---
kind: Role
apiVersion: rbac.authorization.k8s.io/v1
metadata:
  name: leader-locking-nfs-client-provisioner
  # replace with namespace where provisioner is deployed
  namespace: nfs-client-provisioner
rules:
  - apiGroups: [""]
    resources: ["endpoints"]
    verbs: ["get", "list", "watch", "create", "update", "patch"]
---
kind: RoleBinding
apiVersion: rbac.authorization.k8s.io/v1
metadata:
  name: leader-locking-nfs-client-provisioner
  # replace with namespace where provisioner is deployed
  namespace: nfs-client-provisioner
subjects:
  - kind: ServiceAccount
    name: nfs-client-provisioner
    # replace with namespace where provisioner is deployed
    namespace: nfs-client-provisioner
roleRef:
  kind: Role
  name: leader-locking-nfs-client-provisioner
  apiGroup: rbac.authorization.k8s.io
---
apiVersion: apps/v1
kind: Deployment
metadata:
  name: nfs-client-provisioner
  labels:
    app: nfs-client-provisioner
  # replace with namespace where provisioner is deployed
  namespace: nfs-client-provisioner
spec:
  replicas: 1
  strategy:
    type: Recreate
  selector:
    matchLabels:
      app: nfs-client-provisioner
  template:
    metadata:
      labels:
        app: nfs-client-provisioner
    spec:
      serviceAccountName: nfs-client-provisioner
      containers:
        - name: nfs-client-provisioner
          image: nfs-subdir-external-provisioner:v4.0.0
          volumeMounts:
            - name: nfs-client-root
              mountPath: /persistentvolumes
          env:
            - name: PROVISIONER_NAME
              value: westos.org/nfs
            - name: NFS_SERVER
              value: 172.25.5.1 ##仓库地址
            - name: NFS_PATH
              value: /mnt/nfs
      volumes:
        - name: nfs-client-root
          nfs:
            server: 172.25.5.1 ## 仓库地址
            path: /mnt/nfs  ##nfs的共享目录
---
apiVersion: storage.k8s.io/v1
kind: StorageClass
metadata:
  name: managed-nfs-storage
provisioner: westos.org/nfs
parameters:
  archiveOnDelete: "true"  ## 完成后备份
kubectl create  namespace  nfs-client-provisioner   ## 创建一个namespace

kubectl apply -f nfs-client-provisioner.yaml ## 创建
kubectl get sc ## 查看
kind: PersistentVolumeClaim
apiVersion: v1
metadata:
  name: test-claim
spec:
  storageClassName: managed-nfs-storage
  accessModes:
    - ReadWriteMany
  resources:
    requests:
      storage: 1Gi
kubectl apply -f test-pvc.yaml
kubectl delete  -f test-pvc.yaml

kubectl get pv

kubectl get pvc
apiVersion: v1
kind: Pod
metadata:
  name: test-pd-2
spec:
  containers:
  - image: nginx
    name: nginx
    volumeMounts:
    - mountPath: /usr/share/nginx/html
      name: pv2
  volumes:
  - name: pv2
    persistentVolumeClaim:
      claimName: test-claim
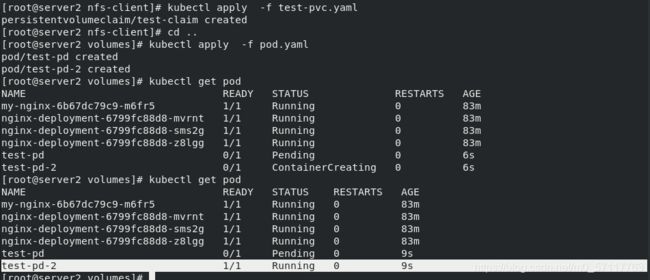
拉起pod 和pvc
kubectl apply  -f test-pvc.yaml

kubectl apply  -f  ../pod.yaml
kubectl get pv

kubectl get pvc

kubectl describe  pod test-pd-2

kubectl get pod
kubectl get pod -o wide 查看暴露的端口

curl 10.244.141.210  403没有页面
erver1

在挂载的目录下添加页面

cd /mnt/nfs/default-test-claim-pvc-6172857c-7660-46e5-96ef-bf39bf747ce6
echo  www.westos.org > index.htm
curl 10.244.141.210
vim nfs-client-provisioner.yaml ## 将删除后是否备份改为false
apiVersion: v1
kind: ServiceAccount
metadata:
  name: nfs-client-provisioner
  # replace with namespace where provisioner is deployed
  namespace: nfs-client-provisioner
---
kind: ClusterRole
apiVersion: rbac.authorization.k8s.io/v1
metadata:
  name: nfs-client-provisioner-runner
rules:
  - apiGroups: [""]
    resources: ["nodes"]
    verbs: ["get", "list", "watch"]
  - apiGroups: [""]
    resources: ["persistentvolumes"]
    verbs: ["get", "list", "watch", "create", "delete"]
  - apiGroups: [""]
    resources: ["persistentvolumeclaims"]
    verbs: ["get", "list", "watch", "update"]
  - apiGroups: ["storage.k8s.io"]
    resources: ["storageclasses"]
    verbs: ["get", "list", "watch"]
  - apiGroups: [""]
    resources: ["events"]
    verbs: ["create", "update", "patch"]
---
kind: ClusterRoleBinding
apiVersion: rbac.authorization.k8s.io/v1
metadata:
  name: run-nfs-client-provisioner
subjects:
  - kind: ServiceAccount
    name: nfs-client-provisioner
    # replace with namespace where provisioner is deployed
    namespace: nfs-client-provisioner
roleRef:
  kind: ClusterRole
  name: nfs-client-provisioner-runner
  apiGroup: rbac.authorization.k8s.io
---
kind: Role
apiVersion: rbac.authorization.k8s.io/v1
metadata:
  name: leader-locking-nfs-client-provisioner
  # replace with namespace where provisioner is deployed
  namespace: nfs-client-provisioner
rules:
  - apiGroups: [""]
    resources: ["endpoints"]
    verbs: ["get", "list", "watch", "create", "update", "patch"]
---
kind: RoleBinding
apiVersion: rbac.authorization.k8s.io/v1
metadata:
  name: leader-locking-nfs-client-provisioner
  # replace with namespace where provisioner is deployed
  namespace: nfs-client-provisioner
subjects:
  - kind: ServiceAccount
    name: nfs-client-provisioner
    # replace with namespace where provisioner is deployed
    namespace: nfs-client-provisioner
roleRef:
  kind: Role
  name: leader-locking-nfs-client-provisioner
  apiGroup: rbac.authorization.k8s.io
---
apiVersion: apps/v1
kind: Deployment
metadata:
  name: nfs-client-provisioner
  labels:
    app: nfs-client-provisioner
  # replace with namespace where provisioner is deployed
  namespace: nfs-client-provisioner
spec:
  replicas: 1
  strategy:
    type: Recreate
  selector:
    matchLabels:
      app: nfs-client-provisioner
  template:
    metadata:
      labels:
        app: nfs-client-provisioner
    spec:
      serviceAccountName: nfs-client-provisioner
      containers:
        - name: nfs-client-provisioner
          image: nfs-subdir-external-provisioner:v4.0.0
          volumeMounts:
            - name: nfs-client-root
              mountPath: /persistentvolumes
          env:
            - name: PROVISIONER_NAME
              value: westos.org/nfs
            - name: NFS_SERVER
              value: 172.25.5.1
            - name: NFS_PATH
              value: /mnt/nfs
      volumes:
        - name: nfs-client-root
          nfs:
            server: 172.25.5.1
            path: /mnt/nfs
---
apiVersion: storage.k8s.io/v1
kind: StorageClass
metadata:
  name: managed-nfs-storage
provisioner: westos.org/nfs
parameters:
  archiveOnDelete: "false"
kubectl apply -f nfs-client-provisioner.yaml
kubectl apply  -f test-pvc.yaml

kubectl apply  -f pod.yaml

kubectl get pod
查看server1的/mnt/nfs的目录下 ### 如果直接删除test-pvc.yaml 会很慢

kubectl delete -f pod.yaml

kubectl delete -f test-pvc.yaml

查看server1的/mnt/nfs的目录下


