PyTorch入门到进阶实战笔记一(慕课网)
笔记一
- PyTorch入门基础串讲
-
- PyTorch的基本概念
-
- Tensor
- Variable(autograd)
- nn.Module
- Tensor与机器学习的关系
- Tensor的类型
- Tensor的创建
-
- Tensor创建编程实例
- Tensor的属性
-
- 稀疏的张量
- Tensor的算术运算
-
- 加法运算
- 减法运算
- 乘法运算
- 除法运算
- 矩阵运算
- 幂运算
- 开方运算
- 对数运算
- in-place的概念和广播机制
-
- in-place操作
- 广播机制
- Tensor的取整/取余运算
- Tensor的比较运算/排序
- Tensor的三角函数
- Tensor中其他的数学函数
-
- ``torch.sign()``
- Tensor中统计学相关的函数
- Tensor的``torch.distributions``
- Tensor中的随机抽样
- Tensor中的范数运算
-
- 范数
- Tensor中的矩阵分解
-
- 特征值分解
- PCA与特征值分解
- 奇异值分解
- LDA与奇异值分解
- Tensor的裁剪运算
- Tensor的索引和数据筛选
- Tensor的组合/拼接
- Tensor的切片
- Tensor的变形操作
- Tensor的填充操作
- Tensor的频谱操作
- Pytorch简单编程技巧
-
- 模型的保存/加载
- 并行化
- 分布式
- Tensor on GPU
- Tensor的相关配置
- Tensor与numpy的相互转换
- Variable & Autograd
-
- 什么是导数?
- 什么是方向导数?
- 什么是偏导数?
- 什么是梯度
- 梯度与机器学习中的最优解
- Variable is Tensor
- 如何计算梯度
- 关于Autograd的几个概念(自动计算梯度)
-
- backward函数
- grad函数
- ``torch.autograd``包中的其他函数
- function
- ``torch.nn``库
-
- ``nn.Parameter``
- ``nn.Linear & nn.conv2d && nn.ReLU & nn.MaxPool2d(2) & nn.MSELoss`` 等等
- ``nn.functional``
- ``nn.Sequential``
- ``nn.ModuleList``
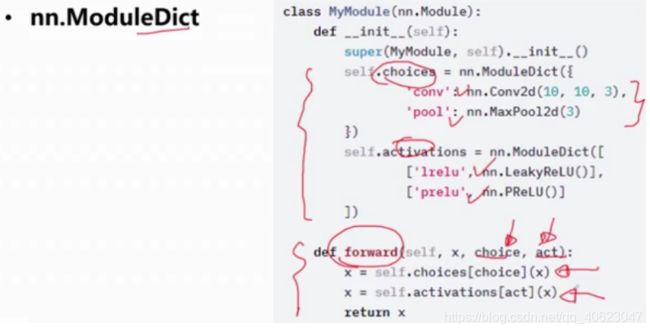
- ``nn.ModuleDict``
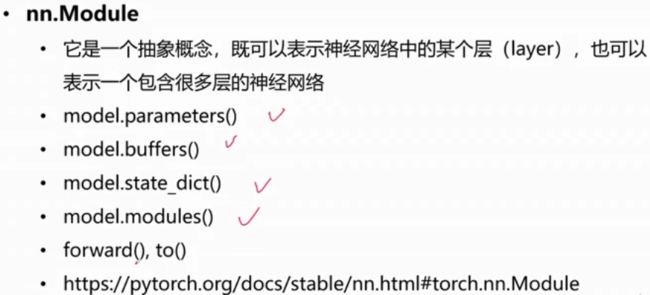
- ``nn.Module``
- ``Parameters VS buffers``
- ``state_dict() & load_state_dict``
- visdom
- tensorboardX
-
- 在pytorch中使用tensorboardX的方法:
- torchvision
PyTorch入门基础串讲
PyTorch的基本概念
Tensor
有时遇到的数据是很高维度的,很难使用矩阵或向量来描述,这时就用张量来描述任意维度的物体
Variable(autograd)
用变量来表达参数
nn.Module
封装了许多神经网络结构
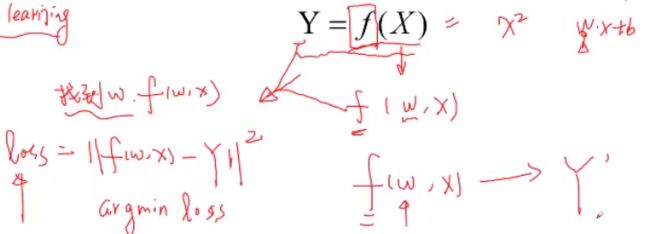
Tensor与机器学习的关系
我们使用tensor来对样本和模型进行描述
Tensor的类型
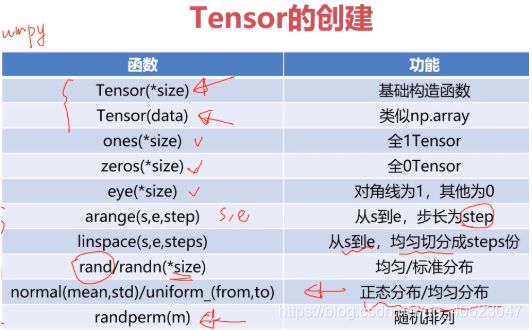
Tensor的创建
Tensor创建编程实例
import torch
'''
几种特殊的tensor
'''
a = torch.Tensor([[1,2],[3,4]])
print(a)
print(a.type())

b = torch.Tensor(2,3) #定义一个2×3的二阶tensor
#使用shape来定义时,初始值为随机值
print(b)
print(b.type())

c = torch.ones(2,2)
print(c)
print(c.type())

d = torch.eye(2,2)
print(d)
print(d.type())

e = torch.zeros(2,2)
print(e)
print(e.type())

f = torch.zeros_like(b) #跟某个tensor相同shape的全0tensor
f = torch.ones_like(b)
print(f)
print(f.type())
print("+++++++++++++++++++++++++++++++++++++++++")
'''
随机
'''
a = torch.rand(2,2)
#随机生成某个shape的tensor
print(a)
print(a.type())

b = torch.normal(mean = 0.0, std = torch.rand(5))
#构造5组不同的高斯正态分布
#生成随机满足正态分布的值
print(b)
print(b.type())

c = torch.normal(mean = torch.rand(5), std = torch.rand(5))
#随机五组均值和标准差
print(c)
print(c.type())

d = torch.Tensor(2,2).uniform_(-1,1)
#定义均匀分布
#需要先指定tensor的大小,然后再定义(-1,1)之间的均匀分布
print(d)
print(d.type())

print("+++++++++++++++++++++++++++++++++++++++++")
'''
序列
'''
a = torch.arange(0,10,2)
#定义[0,10)中步长为2的序列
print(a)
print(a.type())

b = torch.linspace(2,10,3)#拿到等间隔的n个数字
#定义一个在[2,10]之间的3个数字的等间隔序列
print(b)
print(b.type())

c = torch.randperm(10)
#生成一个[0,10)的打乱序列
print(c)
print(c.type())

print("+++++++++++++++++++++++++++++++++++++++++")
###############对比
import numpy as np

a = np.array([[1,2],[3,4]])
print(a)
tensor与numpy很相似,就像是在numpy外面套了一层tensor
Tensor的属性
每一个Tensor有torch.dtype、torch.device、torch.layout三种属性
torch.device标识了torch.Tensor对象在创建之后所存储在的设备名称(CPU/GPU(Cuda 0 1 2))
torch.layout表示torch.Tensor内存布局的对象(稠密的张量)【sparse张量以稀疏形式进行存储】
torch.tensor([1,2,3],dtype=torch.float32,device=torch.device('cpu'))
#定义稠密的张量
稀疏的张量
稀疏:描述了当前的数据中非零元素的个数
torch.sparse_coo_tensor- coo类型表示了非零元素的坐标形式
indices = torch.tensor([[0,1,1],[2,0,2]]) # 非零元素的坐标值
values = torch.tensor([3,4,5],dtype=torch.float32)# 非零元素的值
x = torch.sparse_coo_tensor(indices,values,[2,4])#shape=2×4
import torch
dev = torch.device("cpu")#将tensor放置在cpu上计算
#dev = torch.device("cuda:0") #放置在第0块显卡上
a = torch.tensor([2,2],dtype=torch.float32,device = dev)
print(a)

#定义稀疏张量
i = torch.tensor([[0,1,2],[0,1,2]])
v = torch.tensor([1,2,3])
a = torch.sparse_coo_tensor(i,v,(4,4))
print(a)
a = torch.sparse_coo_tensor(i,v,(4,4)).to_dense()#转成稠密张量
print(a)
a = torch.sparse_coo_tensor(i,v,(4,4),dtype = torch.float32,device = dev)
print(a)
Tensor的算术运算
加法运算
c = a + b
c = torch.add(a,b)
a.add(b)
#带下划线的方式在计算的同时将a的值进行修改
a.add_(b)
减法运算
c = a - b
c = torch.sub(a,b)
a.sub(b)
a.sub_(b)
乘法运算
哈达玛积(element wise,对应元素相乘【维度相同】)
c = a * b
c = torch.mul(a,b)
a.mul(b)
a.mul_(b)
除法运算
c = a / b
c = torch.div(a,b)
a.div(b)
a.div_(b)
矩阵运算
二维矩阵乘法运算操作包括torch.mm()、torch.matmul()、@
矩阵维度首尾呼应
a = torch.ones(2,1)
b = torch.ones(1,2)
print(torch.mm(a,b))
print(torch.matmul(a,b))
print(a @ b)
print(a.matmul(b))
print(a.mm(b))
- 对于高维的Tensor(dim>2),定义其矩阵乘法仅在最后的两个维度,要求前面的维度必须保持一致,就像矩阵的索引一样并且运算操作只有
torch.matmul()
a = torch.ones(1,2,3,4)
b = torch.ones(1,2,4,3)
print(a.matmul(b))
print(torch.matmul(a,b))
幂运算
print(torch.pow(a,2))
print(a.pow(2))
print(a**2)
print(a.pow_(2))
e n e^{n} en
print(torch.exp(a))
b = a.exp_()
开方运算
print(a.sqrt())
print(a.sqrt_())
对数运算
print(torch.log2(a))
print(torch.log10(a))
#底数为e
print(torch.log(a))
print(torch.log_(a))
in-place的概念和广播机制
in-place操作
in-place操作是指:计算中不允许使用临时变量,“就地”操作
也称为原位操作
-
x = x + y -
add_、sub_、mul_等等
广播机制
广播机制:运算中,张量参数可以自动扩展为相同大小
广播机制需要满足两个条件:
- 每个张量至少有一个维度
- 满足右对齐(张量维度以右边补满)【从右往左看两个张量的对应值有1或者相等即为满足右对齐】
torch.rand(2,1,1)+torch.rand(3)
#广播机制
import torch

a = torch.rand(2,3)
b = torch.rand(3)
# a , 2 * 3
# b , 1 * 3
# c , 2 * 3
c = a + b

print(a)
print(b)
print(c)
print(c.shape)

a = torch.rand(2,3)
b = torch.rand(2)
# a , 2 * 3
# b , 1 * 2
#无法进行广播,报错
c = a + b
print(a)
print(b)
print(c)
print(c.shape)

a = torch.rand(2,1)
b = torch.rand(2)
# a , 2 * 1
# b , 1 * 2
# c , 2 * 2
c = a + b
print(a)
print(b)
print(c)
print(c.shape)

a = torch.rand(2,1,1,3)
b = torch.rand(4,2,3)
# a , 2 * 1 * 1 * 3
# b , 1 * 4 * 2 * 3
# c , 2 * 4 * 2 * 3
c = a + b
print(a)
print(b)
print(c)
print(c.shape)
Tensor的取整/取余运算
.floor()向下取整数.ceil()向下取整.round()四舍五入 >=0.5向上取整 ,<=0.5向下取整.trunc()裁剪,只取整数部分.frac()只取小数部分%取余
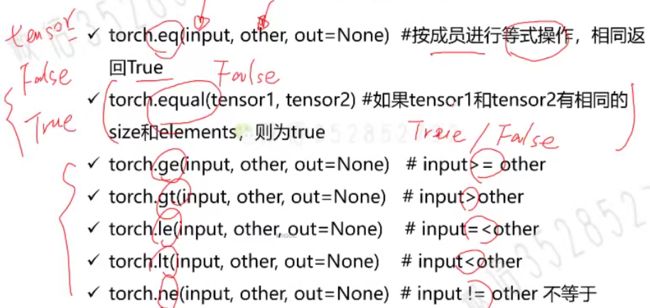
Tensor的比较运算/排序
除了equal其他返回仍为tensor
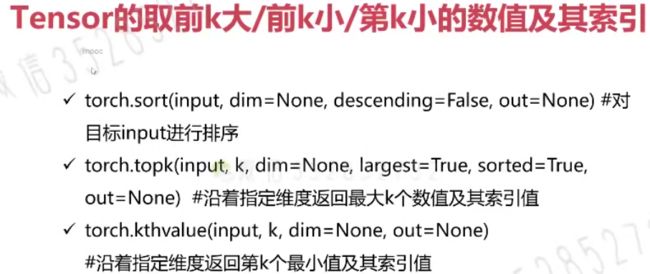
sort()排序:维度,对于二维数据:dim=0 按列排序,dim=1 按行排序,默认 dim=1
Tensor的三角函数
[外链图片转存失败,源站可能有防盗链机制,建议将图片保存下来直接上传(img-AmV0zocQ-1616415672825)(https://gitee.com/Lluvia233/cloudimages/raw/master/img/image-20210320171221787.png)]
Tensor中其他的数学函数
torch.sign()
符号函数,可以类比为分段函数
可以用于分类
Tensor中统计学相关的函数
import torch

a = torch.rand(2,2)

print(a)
print(torch.mean(a))
print(torch.mean(a,dim=0)) #对每一列求均值
print(torch.sum(a))
print(torch.prod(a))

print(torch.argmax(a,dim=0))
print(torch.argmin(a))

print(torch.std(a))
print(torch.var(a))

print(torch.median(a))
print(torch.mode(a))

#########
print("#################")
a = torch.rand(2,2) * 10 #使随机值不在01之间
print(a)
print(torch.histc(a,6,0,0))

a = torch.randint(0,10,[10])
print(torch.bincount(a)) #统计出现的频次,只能用来处理一维tensor
Tensor的torch.distributions
distributions包含可参数化的概率分布和采样函数
- 得分函数
- 强化学习中策略梯度方法的基础
- pathwise derivative估计器
- 变分自动编码器中重新参数化技巧
涉及到的分布:
对两个分布相似性的度量:KL Divergence
两个分布的转换:Transforms
对分布的约束:Constraint
Tensor中的随机抽样
-
定义随机种子
torch.manual_seed(seed)
当定义随机种子后,生成的分布的效果:
通过定义随机种子,保证随机抽样的结果相同
-
定义随机数满足的分布
torch.normal()
import torch

torch.manual_seed(1)

mean = torch.rand(1,2)
std = torch.rand(1,2)
print(torch.normal(mean,std))
Tensor中的范数运算
范数
- 在泛函分析中,它定义在赋范线性空间中,并满足一定的条件:1.非负性;2.齐次性;3.三角不等式。
- 常被用来度量某个向量空间(或矩阵)中的每个向量的长度或大小(模)
0范数/1范数/2范数/p范数/核范数(用于低秩问题的求解)
torch.dist(input,other,p=2)计算p范数torch.norm()计算2范数【针对向量或矩阵】
import torch

a = torch.rand(2,3)
b = torch.rand(2,3)

print(a,b)
print(torch.dist(a,b,p = 1)) #l1: |a-b|
print(torch.dist(a,b,p = 2)) #l2: sqrt((a-b)^{2})
print(torch.dist(a,b,p = 3)) #l3: sqrt((a-b)^{3})
print("#########")
print(torch.norm(a))
print(torch.norm(a,p = 3))
print(torch.norm(a,p="fro")) #核范数
Tensor中的矩阵分解
常见的矩阵分解:
- LU分解:将矩阵A分解成L(下三角)矩阵和U(上三角)矩阵的乘积
- QR分解:将原矩阵分解成一个正交矩阵Q和一个上三角矩阵R的乘积
- EVD分解:特征值分解 【----> PCA】
- SVD分解:奇异值分解 【-----> LDA(引入学习因素,有监督算法)】
特征值分解
- 将矩阵分解为由其特征值和特征向量表示的矩阵之积的方法
- 特征值 VS 特征向量
需要保证输入矩阵为一个方阵
PCA与特征值分解
PCA是特征值分解的重要应用
- PCA:将n维特征映射到k维上,这k维是全新的正交特征,也被称为主成分,是在原有n维特征的基础上重新构造出来的k维特征
- PCA算法的优化目标就是:
- 降维后同一维度的方差最大(特征越丰富)
- 不同维度之间的相关性为0(冗余低)
- 协方差矩阵
奇异值分解
如果当前输入矩阵不是方阵,使用奇异值分解
∑ \sum ∑是一个特征向量, U 和 V U和V U和V是左奇异矩阵和右奇异矩阵
特征值分解是奇异值分解SVD的一个特例,当左奇异矩阵 = 右奇异矩阵时,就变成了特征值分解EVD
LDA与奇异值分解
LDA算法的核心思想:同类样本之间距离尽可能小;不同类样本之间距离尽可能大
如何通过数学形式表示“距离”?
使用代价函数: J ( w ) = w T S B w w T S W w J(w)=\frac{w^{T}S_{B}w}{w^{T}S_{W}w} J(w)=wTSWwwTSBw
S B S_{B} SB不同类物体间距离(协方差矩阵)
S W S_{W} SW同类物体间间隔
S W − 1 S B w = λ w S_{W}^{-1}S_{B}w=\lambda w SW−1SBw=λw
- EVD分解 VS SVD分解(要求)
- 矩阵方阵且满秩(可对角化)【EVD】
- 矩阵分解不等于特征降维度
- 协方差矩阵描述方差和相关性
- Pytorch中的奇异值分解
torch.svd()
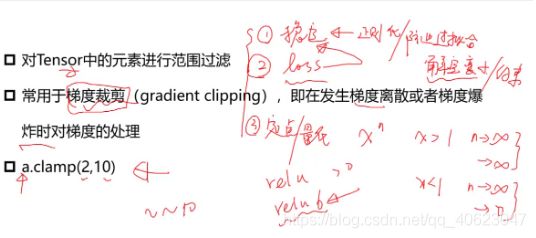
Tensor的裁剪运算
import torch

#裁剪
a = torch.rand(2,2) * 10
print(a)

a = a.clamp(1,2)
print(a)

#tensor([[1.6576, 4.8902],
#        [8.8829, 7.2525]])
#tensor([[1.6576, 2.0000],
#        [2.0000, 2.0000]])

a = a.clamp(2,5)
print(a)
#tensor([[9.4678, 1.8242],
#        [2.5214, 0.8120]])
#tensor([[5.0000, 2.0000],
#        [2.5214, 2.0000]])
Tensor的索引和数据筛选
torch.gather()是按照值来聚合的(Index tensor must have the same number of dimensions as input tensor)
torch.index_select()是按照维度来聚合的
import torch
#tensor的数据筛选
#torch.where
a = torch.rand(4,4)
b = torch.rand(4,4)
print(a)
print(b)

out = torch.where(a > 0.5,a,b) #如果a中的值>0.5就选择a;否则选择b
print(out)

#torch.index_select()
print("##########index_select#########")
a = torch.rand(4,4)
print(a)
out = torch.index_select(a,dim=0,index =torch.tensor([0,3,2])) #选择第0,3,2行数据
print(out,out.shape)

#torch.gather
print("#################gather###################")
a = torch.linspace(1,16,16).view(4,4)
print(a)
out = torch.gather(a,dim = 0,index = torch.tensor([[0,1,1,1],
                                            [0,1,2,2],
                                            [0,1,3,3]]))
print(out)
#tensor([[ 1.,  2.,  3.,  4.],
#        [ 5.,  6.,  7.,  8.],
#        [ 9., 10., 11., 12.],
#        [13., 14., 15., 16.]])
#tensor([[ 1.,  6.,  7.,  8.],
#        [ 1.,  6., 11., 12.],
#        [ 1.,  6., 15., 16.]])

#torch.masked_index
print("#################masked_select#################")
a = torch.linspace(1,16,16).view(4,4)
mask = torch.gt(a,8)
print(a)
print(mask)
out = torch.masked_select(a,mask)
print(out)
#tensor([ 9., 10., 11., 12., 13., 14., 15., 16.])


#torch.take
print("################take################")
a = torch.linspace(1,16,16).view(4,4)
print(a)
b = torch.take(a,index = torch.tensor([0,15,13,10]))
print(b)
#tensor([ 1., 16., 14., 11.])


#torch.nonzero
print("################nonzero#################")
a = torch.tensor([[0,1,2,0],[2,3,0,1]])
print(a)
out = torch.nonzero(a)
print(out)
#tensor([[0, 1],
#        [0, 2],
#        [1, 0],
#        [1, 1],
#        [1, 3]])
Tensor的组合/拼接
torch.cat()拼接后维度仍为原tensor维度
tensor.stack拼接后维度可以发生变化
import torch

## 组合拼接
## torch.cat
a = torch.zeros((2,4))
b = torch.ones((2,4))

out = torch.cat((a,b),dim=0) # 行拼接
print(out)

out = torch.cat((a,b),dim=1) # 列拼接
print(out)

## torch.stack
print("################stack####################")
a = torch.linspace(1,6,6).view(2,3)
b = torch.linspace(7,12,6).view(2,3)
print(a,b)
out = torch.stack((a,b),dim=0)
print(out)
print(out.shape)

#tensor([[1., 2., 3.],
#        [4., 5., 6.]]) tensor([[ 7.,  8.,  9.],
#        [10., 11., 12.]])
#tensor([[[ 1.,  2.,  3.],
#         [ 4.,  5.,  6.]],
#
#        [[ 7.,  8.,  9.],
#         [10., 11., 12.]]])
#torch.Size([2, 2, 3])

out = torch.stack((a,b),dim=1)
print(out)
print(out.shape)
#tensor([[[ 1.,  2.,  3.],
#         [ 7.,  8.,  9.]],
#
#        [[ 4.,  5.,  6.],
#         [10., 11., 12.]]])
torch.Size([2, 2, 3])
out = torch.stack((a,b),dim=2)
print(out)
print(out.shape)
#tensor([[[ 1.,  7.],
#         [ 2.,  8.],
#         [ 3.,  9.]],

#        [[ 4., 10.],
 #        [ 5., 11.],
#         [ 6., 12.]]])
#torch.Size([2, 3, 2])
Tensor的切片
import torch

## 切片
a = torch.rand((3,4))
print(a)
out = torch.chunk(a,2,dim=0)
print(out[0],out[0].shape)
print(out[1],out[1].shape)
#tensor([[0.0994, 0.5468, 0.4318, 0.1000],
#        [0.6685, 0.7013, 0.1311, 0.7307]]) torch.Size([2, 4])
#tensor([[0.9337, 0.4569, 0.9381, 0.0411]]) torch.Size([1, 4])

out = torch.chunk(a,2,dim=1)
print(out[0],out[0].shape)
print(out[1],out[1].shape)
#tensor([[0.4611, 0.5054],
#        [0.0859, 0.1262],
#        [0.5860, 0.9879]]) torch.Size([3, 2])
#tensor([[0.1935, 0.7539],
#        [0.7411, 0.7511],
#        [0.9148, 0.5370]]) torch.Size([3, 2])

##split
print("######################split#####################")
out = torch.split(a,2,dim=1)
print(out)

out = torch.split(a,3,dim=0)
print(out)

a = torch.rand(10,4)
print(a)
out = torch.split(a,3,dim=0)
print(len(out))
for t in out:
    print(t,t.shape)

out = torch.split(a,[1,3,6],dim=0)
print(len(out))
for t in out:
    print(t,t.shape)
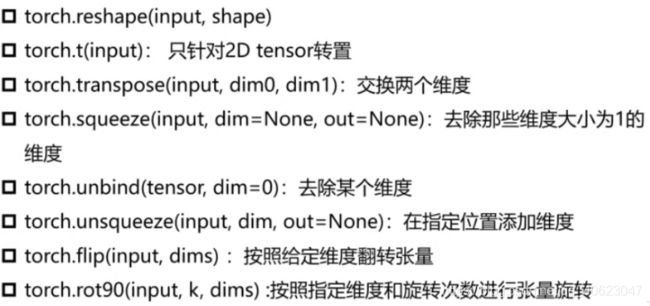
Tensor的变形操作
k为负数->顺时针
k为正数->逆时针
有几个k就旋转几个90°
import torch

##张量变形
a = torch.rand(2,3)
print(a)
out = torch.reshape(a,(3,2))
print(out)
print(torch.t(out))

print(torch.transpose(out,0,1))

print("******************")
a = torch.rand(1,2,3)
print("a= ",a)
out = torch.transpose(a,0,1) # 交换两个维度
print(out)
print(out.shape)

out = torch.squeeze(a) #去除维度大小为1的
print(out)

out = torch.unsqueeze(a,-1) #在指定位置添加维度
print(out.shape)

out = torch.unbind(a,dim=2) #去除某个维度
print(out)

print('a= ',a)
print(torch.flip(a,dims=[1])) #反转维度

print("a= ",a)
out = torch.rot90(a)
print(out)
print(out.shape)
Tensor的填充操作
定义Tensor,并填充指定的数值
torch.full((2,3),3.14)- print:
tensor([[3.14,3.14,3.14],[3.14,3.14,3.14]])
- print:
Tensor的频谱操作
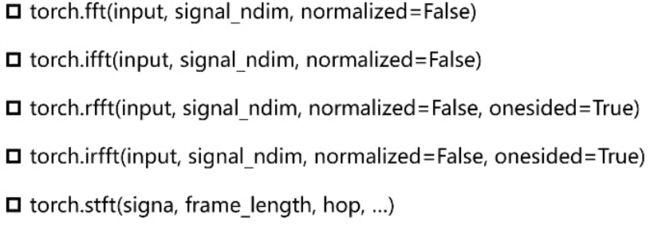
(用在傅里叶变换)
Pytorch简单编程技巧
模型的保存/加载
-
torch.saves(state,dir)保存/序列化 -
torch.load(dir)加载模型
并行化
torch.get_num_threads():获得用于并行化CPU操作的OpenMP线程数torch.set_num_threads(int):设定用于并行化CPU操作的OpenMP线程数
分布式
- python在默认情况下只使用一个GPU,在多个GPU的情况下就需要使用pytorch提供的DataParallel
- 单机多卡
- 多机多卡
Tensor on GPU
- 用方法
to()可以将Tensor在CPU和GPU(需要硬件支持)之间相互移动 - 如下示例代码:
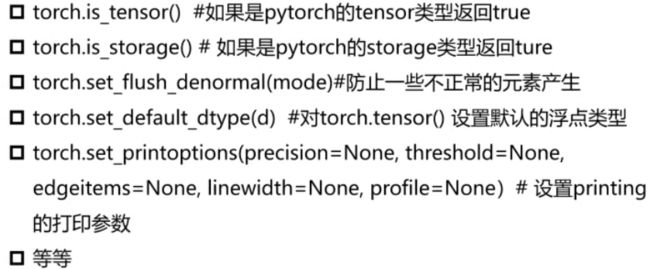
一般在处理数据时放在CPU上,处理模型时放在GPU上
Tensor的相关配置
Tensor与numpy的相互转换
torch.from_numpy(ndarry) 将numpy转为tensor
a.numpy() 将tensor转化为numpy
Variable & Autograd
什么是导数?
- 导数(一元函数)是变化率、是切线的斜率、是瞬时速度
什么是方向导数?
- 函数在A点无数个切线的斜率的定义。每一个切线都代表一个变化的方向
什么是偏导数?
- 多元函数降维时候的变化,比如:二元函数固定y,只让x单独变化,从而看成是关于x的一元函数的变化来研究
什么是梯度
函数在A点无数个变化方向中变化最快的那个方向。
记为: ∇ f \nabla f ∇f 或者 g r a d f = ( ∂ φ ∂ x , ∂ φ ∂ y , ∂ φ ∂ z ) gradf = (\frac{\partial \varphi}{\partial x},\frac{\partial \varphi}{\partial y},\frac{\partial \varphi}{\partial z}) gradf=(∂x∂φ,∂y∂φ,∂z∂φ)
( x , y , z x,y,z x,y,z分别为下降的三个方向)
梯度与机器学习中的最优解
使用监督学习为例:
代价函数的图像类似:
我们需要不停地沿着梯度下降,来寻找最低点
Variable is Tensor
目前Variable已经与Tensor合并。
每个tensor通过requires_grad来设置是否计算梯度(默认为false)
- 用来冻结某些层的参数
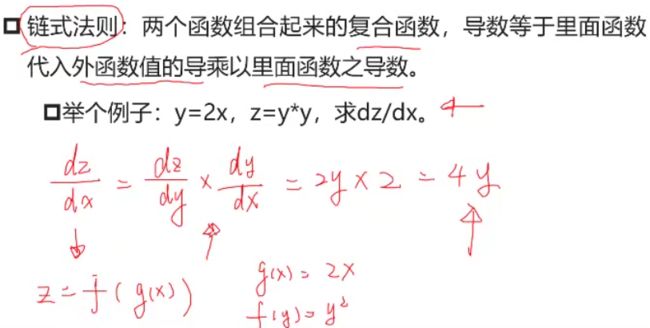
如何计算梯度
关于Autograd的几个概念(自动计算梯度)
只有叶子张量(leaf)才有梯度值,如图x有梯度值,y的梯度值为None
![]()
每次计算backward时,需要将前一时刻的梯度归零,否则梯度会一直累加。
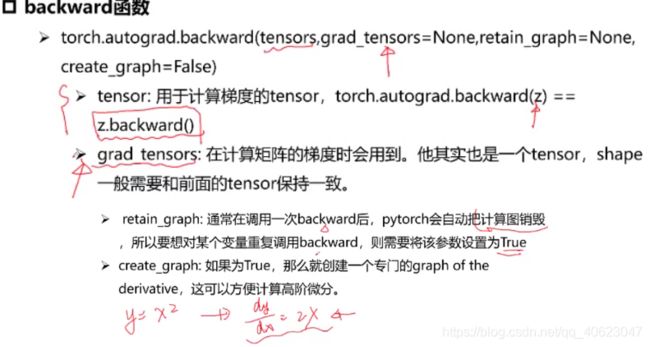
backward函数
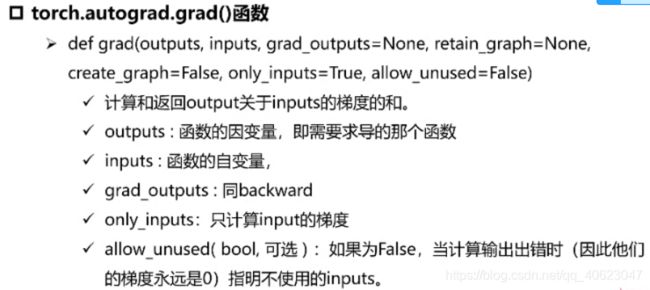
grad函数
torch.autograd包中的其他函数
function
import torch

class line(torch.autograd.Function):
    @staticmethod
    def forward(ctx,w,x,b):
        #y = w*x +b
        ctx.save_for_backward(w,x,b)
        return w * x + b

    @staticmethod
    def backward(ctx,grad_out):
        w,x,b = ctx.saved_tensors

        grad_w = grad_out * x
        grad_x = grad_out * w
        grad_b = grad_out

        return grad_w,grad_x,grad_b

w = torch.rand(2,2,requires_grad = True)
x = torch.rand(2,2,requires_grad = True)
b = torch.rand(2,2,requires_grad = True)

out = line.apply(w,x,b)
out.backward(torch.ones(2,2))

print(w,x,b)
print(w.grad,x.grad,b.grad)
torch.nn库
nn.Parameter
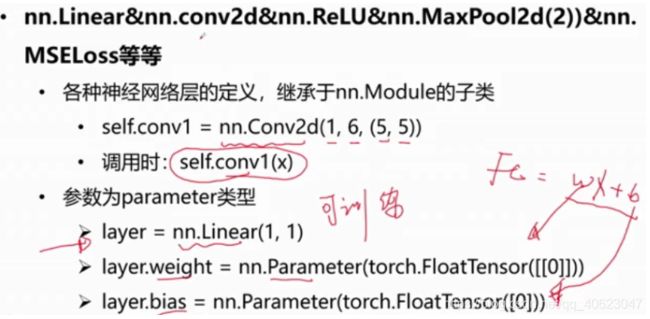
nn.Linear & nn.conv2d && nn.ReLU & nn.MaxPool2d(2) & nn.MSELoss 等等
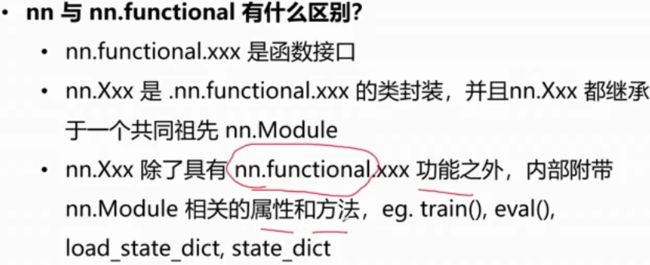
nn.functional
如果有学习参数的话,经常使用nn.Xxx
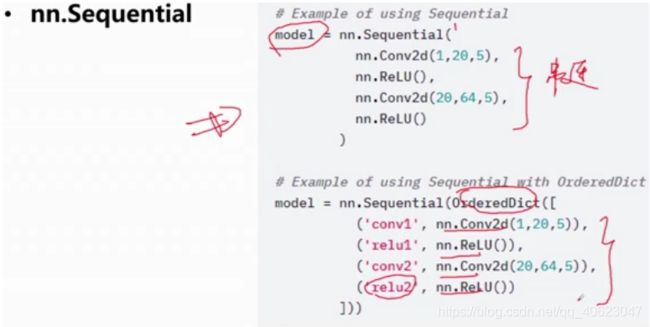
nn.Sequential
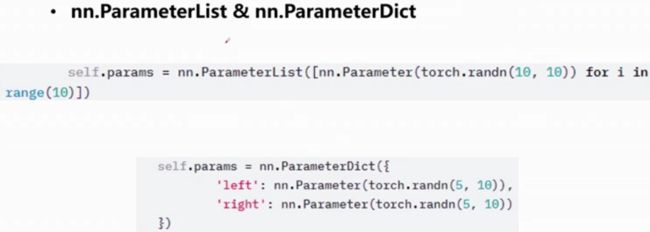
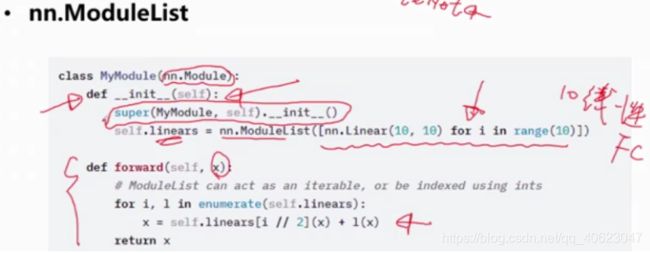
nn.ModuleList
nn.ModuleDict
nn.Module
在model.parameters()中获取可训练的参数
在model.buffers()中获取不可训练的参数
在model.state_dict()访问当前网络结构中的所有参数
Parameters VS buffers
state_dict() & load_state_dict
visdom
类似于一个库
结果展示:
tensorboardX
Pytorch数据可视化工具
在pytorch中使用tensorboardX的方法:
安装:使用conda 安装,打开anacond powershell,输入pip install tensorboard ,然后安装pip install tensorflow
使用:在程序开头加入
from torch.utils.tensorboard import SummaryWriter
例如下图在jupyter中执行一次得到的文件
在该目录前的上级目录框内cmd,输入
tensorboard --logdir=地址
之后复制路径在Chrome中运行
torchvision
一个图形处理的库

