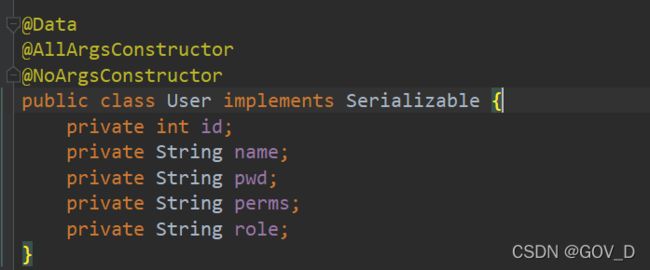
springboot整合shiro(超详细,你想要的都在这了)
Springboot整合Shiro
文章目录
- pom依赖
- 前端页面(thymeleaf整合shiro)
- thymeleaf中shiro标签解释
- 数据库(整合mybatis)
- 理解shiro的几个组成部分
- 编写Shiro配置类(shiroConfig.class)
- controller
- 记住我
- 开启缓存
- 拓展功能
pom依赖
<dependencies>

        <dependency>
            <groupId>org.springframework.bootgroupId>
            <artifactId>spring-boot-starter-thymeleafartifactId>
        dependency>
        <dependency>
            <groupId>org.springframework.bootgroupId>
            <artifactId>spring-boot-starter-webartifactId>
        dependency>
        <dependency>
            <groupId>org.projectlombokgroupId>
            <artifactId>lombokartifactId>
            <optional>trueoptional>
        dependency>
        <dependency>
            <groupId>org.springframework.bootgroupId>
            <artifactId>spring-boot-starter-testartifactId>
            <scope>testscope>
        dependency>

        <dependency>
            <groupId>org.apache.shirogroupId>
            <artifactId>shiro-springartifactId>
            <version>1.8.0version>
        dependency>

        <dependency>
            <groupId>mysqlgroupId>
            <artifactId>mysql-connector-javaartifactId>
        dependency>
        <dependency>
            <groupId>org.mybatis.spring.bootgroupId>
            <artifactId>mybatis-spring-boot-starterartifactId>
            <version>2.2.0version>
        dependency>

        <dependency>
            <groupId>com.alibabagroupId>
            <artifactId>druidartifactId>
            <version>1.2.8version>
        dependency>

        <dependency>
            <groupId>log4jgroupId>
            <artifactId>log4jartifactId>
            <version>1.2.17version>
        dependency>

        <dependency>
            <groupId>com.github.theborakompanionigroupId>
            <artifactId>thymeleaf-extras-shiroartifactId>
            <version>2.1.0version>
        dependency>

        <dependency>
            <groupId>cn.hutoolgroupId>
            <artifactId>hutool-allartifactId>
            <version>4.5.7version>
        dependency>

        <dependency>
            <groupId>org.apache.shirogroupId>
            <artifactId>shiro-ehcacheartifactId>
            <version>1.4.0version>
        dependency>
    dependencies>
前端页面(thymeleaf整合shiro)
首页index.html
DOCTYPE html>
<html lang="en" xmlns:th="http://www.thymeleaf.org" xmlns:shiro="http://www.pollix.at/thymeleaf/shiro">
<head>
    <meta charset="UTF-8">
    <title>Titletitle>
head>
<body>
<h1>首页h1>
<h2 th:text="${msg}">h2>
<div shiro:guest="">
    <a th:href="@{/toLogin}">登录a>
div>
<div shiro:hasPermission="user:add">
    <a th:href="@{/toAdd}">adda>
div>
<div shiro:hasPermission="user:update">
    <a th:href="@{/toUpdate}">updatea>
div>
<div shiro:hasRole="vip1">
    <p>vip1p>
div>
<div shiro:hasRole="vip2">
    <p>vip2p>
div>

<div shiro:user>
    <a th:href="@{/buy}">记住我能看到,但认证才能用(比如支付功能)a>
div>

<div shiro:user="true">
    记住我或认证都能看到哦
div>

<div shiro:user>
    <a th:href="@{/logout}">注销a>
div>
body>
html>
登录页login.html
DOCTYPE html>
<html lang="en" xmlns:th="http://www.thymeleaf.org">
<head>
    <meta charset="UTF-8">
    <title>Titletitle>
head>
<body>
<h1>登录h1>
<p th:text="${msg}" style="color: red">p>
<form action="/login" method="post">
    用户名:<input type="text" name="username"><br>
    密码:<input type="password" name="password"><br>
    <input type="checkbox" name="rememberMe" value="1">记住我 <br>
    <input type="submit">
form>

body>
html>
再写几个要跳转的页面,如add,update,noauth(不具有权限跳转到的页面),里面随便放点东西即可

thymeleaf中shiro标签解释
<p shiro:guest="">Please <a href="login.html">logina>p>
<p shiro:notAuthenticated="">
    Please <a href="login.html">logina> in order to update your credit card information.
p>
<p shiro:user="">
    Welcome back John! Not John? Click <a href="login.html">herea> to login.
p>
<p shiro:authenticated="">
    Hello, <span shiro:principal="">span>, how are you today?
p>
<a shiro:authenticated="" href="updateAccount.html">Update your contact informationa>
<p>Hello, <shiro:principal />, how are you today?p>
<a shiro:hasRole="admin" href="admin.html">Administer the systema>
<p shiro:lacksRole="developer">
    Sorry, you are not allowed to developer the system.
p>
<p shiro:hasAllRoles="developer, product">
    You are a developer and a admin.
p>
<p shiro:hasAnyRoles="admin, vip, developer">
    You are a admin, vip, or developer.
p>
<a shiro:hasPermission="update" href="createUser.html">添加用户a>
<p shiro:lacksPermission="delete">
    Sorry, you are not allowed to delete user accounts.
p>
<p shiro:hasAllPermissions="add, update">
    You can see or add users.
p>
<p shiro:hasAnyPermissions="add, update, delete">
    You can see or delete users.
p>
数据库(整合mybatis)
application.yml
spring:
  datasource:
    username : root
    password: 123456
    url : jdbc:mysql://localhost:3306/mybatis?serverTimezone=UTC&useUnicode=true&characterEncoding=utf-8
    driver-class-name: com.mysql.cj.jdbc.Driver
    type: com.alibaba.druid.pool.DruidDataSource # 自定义数据源

    #Spring Boot 默认是不注入这些属性值的,需要自己绑定
    #druid 数据源专有配置
    initialSize: 5
    minIdle: 5
    maxActive: 20
    maxWait: 60000
    timeBetweenEvictionRunsMillis: 60000
    minEvictableIdleTimeMillis: 300000
    validationQuery: SELECT 1 FROM DUAL
    testWhileIdle: true
    testOnBorrow: false
    testOnReturn: false
    poolPreparedStatements: true

    #配置监控统计拦截的filters,stat:监控统计、log4j:日志记录、wall:防御sql注入
    #如果允许时报错  java.lang.ClassNotFoundException: org.apache.log4j.Priority
    #则导入 log4j 依赖即可,Maven 地址:https://mvnrepository.com/artifact/log4j/log4j
    filters: stat,wall,log4j
    maxPoolPreparedStatementPerConnectionSize: 20
    useGlobalDataSourceStat: true
    connectionProperties: druid.stat.mergeSql=true;druid.stat.slowSqlMillis=500

mybatis:
  type-aliases-package: com.govd.pojo
  mapper-locations: classpath:mapper/*.xml
log4j配置文件log4j.properties
log4j.rootLogger=INFO, stdout

log4j.appender.stdout=org.apache.log4j.ConsoleAppender
log4j.appender.stdout.layout=org.apache.log4j.PatternLayout
log4j.appender.stdout.layout.ConversionPattern=%d %p [%c] - %m %n

# General Apache libraries
log4j.logger.org.apache=WARN

# Spring
log4j.logger.org.springframework=WARN

# Default Shiro logging
log4j.logger.org.apache.shiro=INFO

# Disable verbose logging
log4j.logger.org.apache.shiro.util.ThreadContext=WARN
log4j.logger.org.apache.shiro.cache.ehcache.EhCache=WARN
druid配置
@Configuration
public class DruidConfig {
    @ConfigurationProperties(prefix = "spring.datasource")
    @Bean
    public DataSource DruidDataSource(){
        return new DruidDataSource();
    }
}
UserMapper
@Mapper
@Repository
public interface UserMapper {
    public User queryUserByName(String name);
}
UserMapper.xml
DOCTYPE mapper
        PUBLIC "-//mybatis.org//DTD Mapper 3.0//EN"
        "http://mybatis.org/dtd/mybatis-3-mapper.dtd">
<mapper namespace="com.govd.mapper.UserMapper">
    <select id="queryUserByName" resultType="user">
        select * from user where name=#{name}
    select>
mapper>
之后编写对应的service即可
理解shiro的几个组成部分
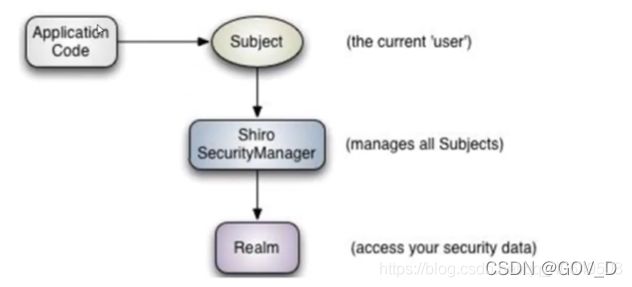
●subject: 应用代码直接交互的对象是Subject, 也就是说Shiro的对外API核心就是Subject, Subject代表了当前的用户,这个用户不-定是一个具体的人,与当前应用交互的任何东西都是Subject,如网络爬虫,机器人等,与Subject的所有交互都会委托给SecurityManager; Subject其实是一一个门面, SecurityManageer 才是
实际的执行者
●SecurityManager: 安全管理器,即所有与安全有关的操作都会与SercurityManager交互, 并且它管理着所有的Subject,可以看出它是Shiro的核心,它负责与Shiro的其他组件进行交互,它相当于SpringMVC的DispatcherServlet的角色
●Realm: Shiro从Realm获取安全数据 (如用户,角色,权限),就是说SecurityManager要验证用户身份,那么它需要从Realm获取相应的用户进行比较,来确定用户的身份是否合法;也需要从Realm得到用户相应的角色、权限,进行验证用户的操作是否能够进行,可以把Realm看DataSource;
编写Shiro配置类(shiroConfig.class)
思路:ShiroFilterFactoryBean会拦截前端请求交给DefaultWebSecurityManager,再交给MyRealm进行认证和授权处理
主要编写MyRealm、DefaultWebSecurityManager、ShiroFilterFactoryBean三个bean对象,
三个对象从前往后写。
ShiroFilterFactoryBean
内置过滤器参数说明:
anon: 无需认证即可访问
authc: 必须认证才能用
user: 必须拥有 “记住我” 功能才能用
perms: 拥有对某个资源的权限才能用
role: 拥有某个角色权限才能访问
设置登录页面
setLoginUrl("/toLogin");
注销登录用户的两种方式
第一种,在controller中处理
@RequestMapping("/logout")
    public String logout(){
        Subject subject = SecurityUtils.getSubject();
        subject.logout();
        return "index";
    }
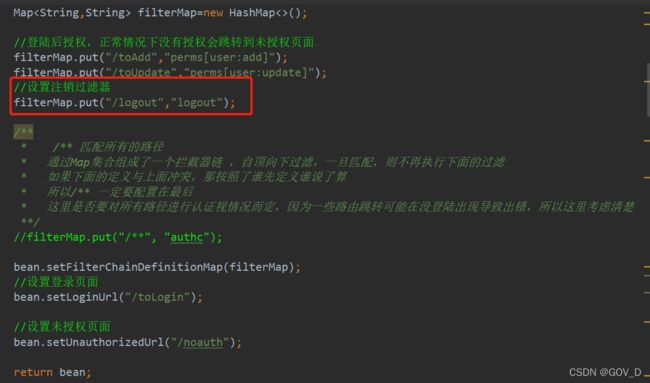
第二种,ShiroFilterFactoryBean中添加注销过滤器
设置没有权限时跳转到的页面
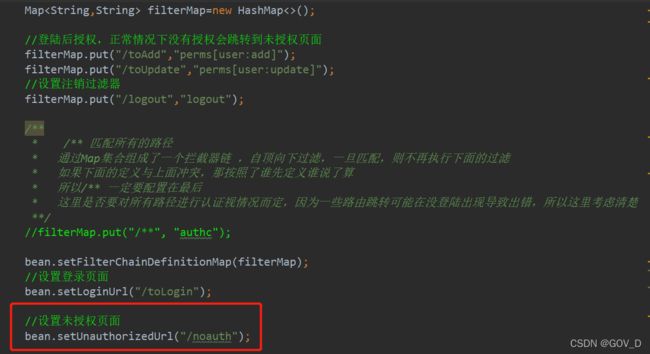
setUnauthorizedUrl("/noauth")
完整ShiroFilterFactoryBean配置
	@Bean
    public ShiroFilterFactoryBean bean(@Qualifier("securityManager") DefaultWebSecurityManager securityManager){
        ShiroFilterFactoryBean bean=new ShiroFilterFactoryBean();
        bean.setSecurityManager(securityManager);
        //添加shiro的内置过滤器
        /*
        anon: 无需认证即可访问
        authc: 必须认证才能用
        user: 必须拥有 “记住我” 功能才能用
        perms: 拥有对某个资源的权限才能用
        role: 拥有某个角色权限才能访问
        */

        Map<String,String> filterMap=new HashMap<>();

        //登陆后授权,正常情况下没有授权会跳转到未授权页面
        filterMap.put("/toAdd","perms[user:add]");
        filterMap.put("/toUpdate","perms[user:update]");
        //设置注销过滤器
        filterMap.put("/logout","logout");

        /**
         *    /** 匹配所有的路径
         *   通过Map集合组成了一个拦截器链 ,自顶向下过滤,一旦匹配,则不再执行下面的过滤
         *   如果下面的定义与上面冲突,那按照了谁先定义谁说了算
         *   所以/** 一定要配置在最后
         *   这里是否要对所有路径进行认证视情况而定,因为一些路由跳转可能在没登陆出现导致出错,所以这里考虑清楚
         **/
        //filterMap.put("/**", "authc");

		// 将拦截器链设置到shiro中
        bean.setFilterChainDefinitionMap(filterMap);
        //设置登录页面
        bean.setLoginUrl("/toLogin");
		// 登录成功后要跳转的链接
        //shiroFilterFactoryBean.setSuccessUrl("/index");

        //设置未授权页面
        bean.setUnauthorizedUrl("/noauth");

        return bean;
    }
编写DefaultWebSecurityManager
	@Bean(name = "securityManager")
    public DefaultWebSecurityManager securityManager(@Qualifier("myRealm") MyRealm myRealm){
        DefaultWebSecurityManager securityManager = new DefaultWebSecurityManager();
        securityManager.setRealm(myRealm);
        return securityManager;
    }
编写MyRealm类
public class MyRealm extends AuthorizingRealm {
    @Autowired
    UserService userService;

    //执行授权
    @Override
    protected AuthorizationInfo doGetAuthorizationInfo(PrincipalCollection principalCollection) {
        //认证之后,如果前端shiro标签中有出现需要权限的标签,或者过滤器中某个链接需要权限,就会进行认证
        System.out.println("执行了授权");
        SimpleAuthorizationInfo info = new SimpleAuthorizationInfo();
        //获得当前subject
        Subject subject = SecurityUtils.getSubject();
        //获得当前的principal,也就是认证完后我们放入的信息
        User currentUser = (User) subject.getPrincipal();
        //添加权限
        info.addStringPermission(currentUser.getPerms());
        //添加角色
        info.addRole(currentUser.getRole());

        return info;
    }

    //执行认证
    @Override
    protected AuthenticationInfo doGetAuthenticationInfo(AuthenticationToken Token) throws AuthenticationException {
        System.out.println("执行了认证");
        UsernamePasswordToken token = (UsernamePasswordToken) Token;
        //从数据库中查询该用户
        User user = userService.queryUserByName(token.getUsername());
        //如果不存在该用户,返回一个空错误,前端也可以相应显示提示
        if(user==null){
            return null;
        }
        //第一个参数为principal;第二个参数为从数据库中查出的用于验证的密码,shiro中密码验证不需要我们自己去做;第三个参数为realmName
        return new SimpleAuthenticationInfo(user,user.getPwd(),"");
    }
}
将其在shiroConfig中注册成bean
	@Bean
    public MyRealm myRealm(){
        MyRealm myShiroRealm = new MyRealm();
        return myShiroRealm;
    }
controller
编写routerController
@Controller
public class routerController {
    //跳到首页
    @RequestMapping({"/", "/index"})
    public String toIndex(Model model){
        model.addAttribute("msg","hello shiro");
        return "index";
    }
    //跳到登录页
    @RequestMapping("/toLogin")
    public String toLogin(){
        return "login";
    }

    @RequestMapping("/toAdd")
    public String toAdd(){
        return "add";
    }

    @RequestMapping("/toUpdate")
    public String toUpdate(){
        return "update";
    }

    //跳到未授权页面
    @RequestMapping("/noauth")
    public String tonoauth(){
        return "noauth";
    }

    //用于测试记住我和认证的区别
    @RequestMapping("/buy")
    public String buy(){
        Subject subject = SecurityUtils.getSubject();
        //只有认证后才能访问,如果只是记住我则需要先登录
        if(!subject.isAuthenticated()){
            return "redirect:/toLogin";
        }
        return "add";
    }

    //登录认证
    @RequestMapping("/login")
    public String login(String username,String password,Integer rememberMe,Model model){
        Subject subject = SecurityUtils.getSubject();
        //令牌
        UsernamePasswordToken token = new UsernamePasswordToken(username, password);
        if(rememberMe!=null&&rememberMe==1){
            token.setRememberMe(true);
        }

        try {
            //登录认证
            subject.login(token);
            return "index";
        }catch (UnknownAccountException e){ //返回null就会进入这里
            model.addAttribute("msg","用户名不存在!");
            return "login";
        }catch (IncorrectCredentialsException e){ //密码错误就会进入这里
            model.addAttribute("msg","密码错误!");
            return "login";
        }

    }

    //注销
    @RequestMapping("/logout")
    public String logout(){
        Subject subject = SecurityUtils.getSubject();
        subject.logout();
        return "index";
    }

//    第二种注销方式,通过过滤器链注销,这里就直接返回首页即可
//    @RequestMapping("/logout")
//    public String logout(){
//        return "index";
//    }

}
记住我
记住我功能是要在用户登录成功以后,假如关闭浏览器,下次再访问系统资源(例如首页doIndexUI)时,无需再执行登录操作。

前端:

在Controller中的login方法中基于是否选中记住我,设置token的setRememberMe方法。
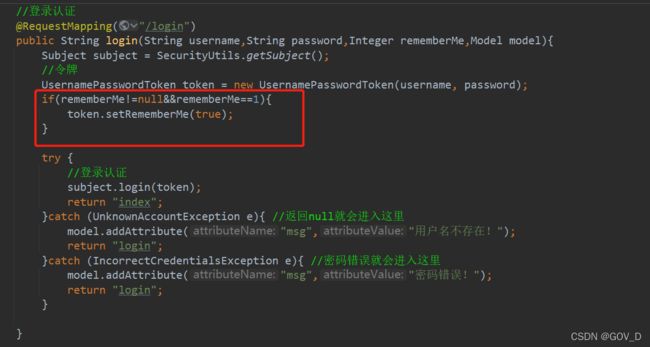
在ShiroConfig配置类中添加记住我配置,关键代码如下:
@Bean(name = "rememberMeManager")
    public CookieRememberMeManager rememberMeManager(){
        //cookie管理器
        CookieRememberMeManager cookieRememberMeManager = new CookieRememberMeManager();
        //cookie的名字
        SimpleCookie simpleCookie = new SimpleCookie("rememberMe");
        //设置有效期时间30天
        simpleCookie.setMaxAge(259200);
        cookieRememberMeManager.setCookie(simpleCookie);
        //rememberMe cookie加密的密钥 建议每个项目都不一样 默认AES算法 密钥长度(128 256 512 位)
        cookieRememberMeManager.setCipherKey(Base64.decode("6ZmI6I2j5Y+R5aSn5ZOlAA=="));

        return cookieRememberMeManager;
    }
这里要设置cookie加密的密钥是为了给他指定一种加密方式,否则会出现关闭浏览器后再打开记住我失效,得刷新网页后才正常,因为两次加密后不一样,就像拿密钥b去匹配上次的密钥a,会导致失效
这里还有一个问题,困扰了我好久,那就是用了记住我之后关闭浏览器再次打开,第一次访问的时候总会出现错误页面,刷新之后才正常,而注意到url上总有一个jsession=******** 的东西,查了好久终于解决
解决Shiro第一次重定向url携带jsessionid问题
Shiro在进行第一次重定向时会在url后携带jsessionid,导致访问400。
解决办法:
创建一个DefaultWebSessionManager类实例,并将它的sessionIdUrlRewritingEnabled属性设置成false
再在DefaultWebSecurityManager类中将上面的实例设置为它的SessionManager
//创建DefaultWebSessionManager类
@Bean
public DefaultWebSessionManager mySessionManager(){
    DefaultWebSessionManager defaultSessionManager = new DefaultWebSessionManager();
    //将sessionIdUrlRewritingEnabled属性设置成false
    defaultSessionManager.setSessionIdUrlRewritingEnabled(false);
    return defaultSessionManager;
}
修改修改securityManager的配置,为securityManager注入rememberManager对象和defaultSessionManager对象
@Bean(name = "securityManager")
    public DefaultWebSecurityManager securityManager(@Qualifier("myRealm") MyRealm myRealm, @Qualifier("rememberMeManager") CookieRememberMeManager rememberMeManager, @Qualifier("mySessionManager") DefaultWebSessionManager webSessionManager, ){
        DefaultWebSecurityManager securityManager = new DefaultWebSecurityManager();
        securityManager.setRealm(myRealm);
        securityManager.setRememberMeManager(rememberMeManager);
        securityManager.setSessionManager(webSessionManager);

        return securityManager;
    }
开启缓存
缓存是提供性能的重要手段。缓存适合那些经常不变动的数据,比如系统中用户的信息和权限不会经常改变,特别适合缓存起来供下次使用。这样减少了系统查询数据库的次数,提升了性能。shiro自身不实现缓存,而是提供缓存接口,让其他第三方实现,经常使用ehcache缓存。
有两种缓存方式,但较多使用ehcache
在resources下面新建config文件夹,并创建ehcache-shiro.xml文件
<ehcache name="es">


    <diskStore path="java.io.tmpdir"/>


    <defaultCache
            maxElementsInMemory="10000"
            eternal="false"
            timeToIdleSeconds="0"
            timeToLiveSeconds="0"
            overflowToDisk="false"
            diskPersistent="false"
            diskExpiryThreadIntervalSeconds="120"
    />


    <cache name="authorizationCache"
           maxEntriesLocalHeap="2000"
           eternal="false"
           timeToIdleSeconds="0"
           timeToLiveSeconds="0"
           overflowToDisk="false"
           statistics="true">
    cache>


    <cache name="authenticationCache"
           maxEntriesLocalHeap="2000"
           eternal="false"
           timeToIdleSeconds="0"
           timeToLiveSeconds="0"
           overflowToDisk="false"
           statistics="true">
    cache>

ehcache>
在shiroConfig中添加bean
	//  缓存配置
    //shiro自带的MemoryConstrainedCacheManager作缓存
    // 但是只能用于本机,在集群时就无法使用,需要使用ehcache
    @Bean(name = "cacheManager")
    public CacheManager cacheManager() {
        MemoryConstrainedCacheManager cacheManager=new MemoryConstrainedCacheManager();//使用内存缓存
        return cacheManager;
    }

    //配置ehcache,推荐使用
    @Bean(name = "ehCacheManager")
    public EhCacheManager ehCacheManager(){
        EhCacheManager ehCacheManager = new EhCacheManager();
        ehCacheManager.setCacheManagerConfigFile("classpath:config/ehcache-shiro.xml");
        return ehCacheManager;
    }
修改myrealm
	@Bean
    public MyRealm myRealm(){
        MyRealm myShiroRealm = new MyRealm();
        myShiroRealm.setCachingEnabled(true);
        //启用身份验证缓存,即缓存AuthenticationInfo信息,默认false
        myShiroRealm.setAuthenticationCachingEnabled(true);
        //缓存AuthenticationInfo信息的缓存名称 在ehcache-shiro.xml中有对应缓存的配置
        myShiroRealm.setAuthenticationCacheName("authenticationCache");
        //启用授权缓存,即缓存AuthorizationInfo信息,默认false
        myShiroRealm.setAuthorizationCachingEnabled(true);
        //缓存AuthorizationInfo信息的缓存名称  在ehcache-shiro.xml中有对应缓存的配置
        myShiroRealm.setAuthorizationCacheName("authorizationCache");
        //myShiroRealm.setCredentialsMatcher(hashedCredentialsMatcher);
        return myShiroRealm;

    }
修改securityManager
 @Bean(name = "securityManager")
    public DefaultWebSecurityManager securityManager(@Qualifier("myRealm") MyRealm myRealm, @Qualifier("rememberMeManager") CookieRememberMeManager rememberMeManager, @Qualifier("mySessionManager") DefaultWebSessionManager webSessionManager, @Qualifier("ehCacheManager")EhCacheManager ehCacheManager){
        DefaultWebSecurityManager securityManager = new DefaultWebSecurityManager();
        securityManager.setRealm(myRealm);
        securityManager.setRememberMeManager(rememberMeManager);
        securityManager.setSessionManager(webSessionManager);
        //设置缓存管理
        //第一种缓存
        //securityManager.setCacheManager(cacheManager);
       //ehcache缓存,推荐
        securityManager.setCacheManager(ehCacheManager);

        return securityManager;
    }
修改MyRealm(可改可不改,改了只是可以更加自定义化)
public class MyRealm extends AuthorizingRealm {
    @Autowired
    UserService userService;

    //执行授权
    @Override
    protected AuthorizationInfo doGetAuthorizationInfo(PrincipalCollection principalCollection) {
        //认证之后,如果前端shiro标签中有出现需要权限的标签,或者过滤器中某个链接需要权限,就会进行认证
        System.out.println("执行了授权");
        SimpleAuthorizationInfo info = new SimpleAuthorizationInfo();
        //获得当前subject
        Subject subject = SecurityUtils.getSubject();
        //获得当前的principal,也就是认证完后我们放入的信息
        User currentUser = (User) subject.getPrincipal();
        //添加权限
        info.addStringPermission(currentUser.getPerms());
        //添加角色
        info.addRole(currentUser.getRole());

        return info;
    }

    //执行认证
    @Override
    protected AuthenticationInfo doGetAuthenticationInfo(AuthenticationToken Token) throws AuthenticationException {
        System.out.println("执行了认证");
        UsernamePasswordToken token = (UsernamePasswordToken) Token;
        //从数据库中查询该用户
        User user = userService.queryUserByName(token.getUsername());
        //如果不存在该用户,返回一个空错误,前端也可以相应显示提示
        if(user==null){
            return null;
        }
        //第一个参数为principal;第二个参数为从数据库中查出的用于验证的密码,shiro中密码验证不需要我们自己去做;第三个参数为realmName
        return new SimpleAuthenticationInfo(user,user.getPwd(),"");
    }

    /**
     * 重写方法,清除当前用户的的 授权缓存
     * @param principals
     */
    @Override
    public void clearCachedAuthorizationInfo(PrincipalCollection principals) {
        super.clearCachedAuthorizationInfo(principals);
    }

    /**
     * 重写方法,清除当前用户的 认证缓存
     * @param principals
     */
    @Override
    public void clearCachedAuthenticationInfo(PrincipalCollection principals) {
        super.clearCachedAuthenticationInfo(principals);
    }

    @Override
    public void clearCache(PrincipalCollection principals) {
        super.clearCache(principals);
    }

    /**
     * 自定义方法:清除所有 授权缓存
     */
    public void clearAllCachedAuthorizationInfo() {
        getAuthorizationCache().clear();
    }

    /**
     * 自定义方法:清除所有 认证缓存
     */
    public void clearAllCachedAuthenticationInfo() {
        getAuthenticationCache().clear();
    }

    /**
     * 自定义方法:清除所有的  认证缓存  和 授权缓存
     */
    public void clearAllCache() {
        clearAllCachedAuthenticationInfo();
        clearAllCachedAuthorizationInfo();
    }
}
现在有了缓存,认证之后关于权限的授权就只需要走一次方法,而不需要频繁的调用,提高了性能
拓展功能
shiroConfig还可以自定义很多其他功能,思路就是创建对应功能的bean,然后相应修改securityManager和myrealm即可。
	/**
     * 密码匹配凭证管理器
     *
     * @return
     */
    @Bean(name = "hashedCredentialsMatcher")
    public HashedCredentialsMatcher hashedCredentialsMatcher() {
        log.info("hashedCredentialsMatcher()");
        HashedCredentialsMatcher hashedCredentialsMatcher = new HashedCredentialsMatcher();

        hashedCredentialsMatcher.setHashAlgorithmName("MD5");// 散列算法:这里使用MD5算法;
        hashedCredentialsMatcher.setHashIterations(1024);// 散列的次数,比如散列两次,相当于md5(md5(""));

        return hashedCredentialsMatcher;
    }

	 /**
     * 开启shiro aop注解支持
     * 使用代理方式;所以需要开启代码支持
     * @param securityManager
     */
    @Bean
    public AuthorizationAttributeSourceAdvisor authorizationAttributeSourceAdvisor(SecurityManager securityManager){
        AuthorizationAttributeSourceAdvisor authorizationAttributeSourceAdvisor = new AuthorizationAttributeSourceAdvisor();
        authorizationAttributeSourceAdvisor.setSecurityManager(securityManager);
        return authorizationAttributeSourceAdvisor;
    }
    /**
     * 开启cglib代理
     */
    @Bean
    public DefaultAdvisorAutoProxyCreator defaultAdvisorAutoProxyCreator() {
        DefaultAdvisorAutoProxyCreator creator = new DefaultAdvisorAutoProxyCreator();
        creator.setProxyTargetClass(true);
        return creator;
    }

	//在用spring管理我们的类的时候有时候希望有些属性值是来源于一些配置文件,系统属性,或者一些方法调用的结果,
    // 对于前两种使用方式可以使用spring的PropertyPlaceholderConfigurer类来注入,
    // 对于后一种则可以使用org.springframework.beans.factory.config.MethodInvokingFactoryBean类来生成需要注入的bean的属性。
    // 通过MethodInvokingFactory Bean类,可注入方法返回值。
    // MethodInvokingFactoryBean用来获得某个方法的返回值,该方法既可以是静态方法,也可以是实例方法。
    // 该方法的返回值可以注入bean实例属性,也可以直接定义成bean实例
    //可查看http://blog.sina.com.cn/s/blog_72ef7bea0102wa0v.html
    /**
     * 让某个实例的某个方法的返回值注入为Bean的实例
     * Spring静态注入
     * @param myShiroRealm
     * @param rememberMeManager
     * @param ehCacheManager
     * @return
     */
    @Bean(name = "methodInvokingFactoryBean")
    public MethodInvokingFactoryBean methodInvokingFactoryBean(
            @Qualifier("myShiroRealm") MyShiroRealm myShiroRealm,
            @Qualifier("rememberMeManager") CookieRememberMeManager rememberMeManager,
            @Qualifier("ehCacheManager")EhCacheManager ehCacheManager){
        MethodInvokingFactoryBean factoryBean = new MethodInvokingFactoryBean();
        factoryBean.setStaticMethod("org.apache.shiro.SecurityUtils.setSecurityManager");
        factoryBean.setArguments(new Object[]{securityManager(myShiroRealm, rememberMeManager,ehCacheManager)});
        return factoryBean;
    }
如果自定义了密码加密验证,则修改myRealm
注意这里如果用了加密验证,则数据库一开始存的就是加密后的密码,然后也要对前端传过来的数据进行加密处理后再进行匹配验证
 @Bean(name = "myRealm")
    public MyRealm myRealm(@Qualifier("hashedCredentialsMatcher") HashedCredentialsMatcher hashedCredentialsMatcher){
        MyShiroRealm myShiroRealm = new MyShiroRealm();
        myShiroRealm.setCachingEnabled(true);
        //启用身份验证缓存,即缓存AuthenticationInfo信息,默认false
        myShiroRealm.setAuthenticationCachingEnabled(true);
        //缓存AuthenticationInfo信息的缓存名称 在ehcache-shiro.xml中有对应缓存的配置
        myShiroRealm.setAuthenticationCacheName("authenticationCache");
        //启用授权缓存,即缓存AuthorizationInfo信息,默认false
        myShiroRealm.setAuthorizationCachingEnabled(true);
        //缓存AuthorizationInfo信息的缓存名称  在ehcache-shiro.xml中有对应缓存的配置
        myShiroRealm.setAuthorizationCacheName("authorizationCache");
        myShiroRealm.setCredentialsMatcher(hashedCredentialsMatcher);
        return new MyShiroRealm();
    }

