Spring Boot(八)Spring Boot的WebSocket实现聊天功能
你好,【程序职场】专注于:Spring Boot ,微服务 和 前端APP开发,闲暇之余一起聊聊职场规划,个人成长,还能带你一起探索 副业赚钱渠道,在提升技术的同时我们一起交流 敏捷流程 提高工作效率,从技术到管理一步步提升自我!
标签:一个执着的职场程序员!
本文是Spring Boot系列的第八篇,了解前面的文章有助于更好的理解本文:
1.Spring Boot(一)初识Spring Boot框架
2.Spring Boot(二)Spring Boot基本配置
3.Spring Boot(三)Spring Boot自动配置的原理
4.Spring Boot(四)Spring Boot web项目开发
5.Spring Boot(五)Spring Boot web开发项目(2)配置
6.Spring Boot(六)Spring Boot web开发 SSL配置
7.Spring Boot(七)Spring Boot Websocket
前言
(一). 添加 Spring Security,配置WebSocket,添加控制器
(二). 登录,聊天,页面的添加
(三). 页面控制
上篇文章为大家讲述了 Spring Boot的Websocket 广播式的消息推送,但是不能决定有谁推送的和有谁接收的,;本篇文章接着上篇内容继续为大家介绍SpringBoot中 WebSocket的聊天功能
(一). 添加 Spring Security
说到Spring Security,那么我们先说一下他的好处,在web应用开发中,安全无疑是十分重要的,选择Spring Security来保护web应用是一个非常好的选择。Spring Security 是spring项目之中的一个安全模块,可以非常方便与spring项目无缝集成。这里我们用到也是因为,在spring boot项目中加入spring security更是十分简单
了解更多的 spring security 原理 可以参考这篇文章:
Spring Security入门原理及实战:
http://www.zijin.net/news/tech/1190163.html
1.添加 Spring Security
    org.springframework.boot
    spring-boot-starter-security
    2.1.6.RELEASE
 转存失败重新上传取消
添加上面的依赖就能成功引入 Spring Security
2.配置Spring Security
新建一个配置类,代码如下:
package org.cxzc.myyoung.springbootchat;
import org.springframework.context.annotation.Configuration;
import org.springframework.security.config.annotation.authentication.builders.AuthenticationManagerBuilder;
import org.springframework.security.config.annotation.web.builders.HttpSecurity;
import org.springframework.security.config.annotation.web.builders.WebSecurity;
import org.springframework.security.config.annotation.web.configuration.EnableWebSecurity;
import org.springframework.security.config.annotation.web.configuration.WebSecurityConfigurerAdapter;
import org.springframework.security.crypto.bcrypt.BCryptPasswordEncoder;

@Configuration
@EnableWebSecurity
public class WebSecurityConfig extends WebSecurityConfigurerAdapter {
    @Override
    protected void configure(HttpSecurity http) throws Exception {
        http.authorizeRequests()
                //设置拦截规则
                .antMatchers("/")
                .permitAll()
                .anyRequest()
                .authenticated()
                .and()
                //开启默认登录页面
                .formLogin()
                //默认登录页面
                .loginPage("/login")
                //默认登录成功跳转页面
                .defaultSuccessUrl("/chat")
                .permitAll()
                .and()
                //设置注销
                .logout()
                .permitAll();
    }

    @Override
    protected void configure(AuthenticationManagerBuilder auth) throws Exception {
        auth.inMemoryAuthentication().passwordEncoder(new BCryptPasswordEncoder())
                .withUser("andy")
                .password(new BCryptPasswordEncoder().encode("111")).roles("USER").and()
                .withUser("chen")
                .password(new BCryptPasswordEncoder().encode("111")).roles("USER");

    }

    @Override
    public void configure(WebSecurity web) {
        //设置不拦截规则
        web.ignoring().antMatchers("/resources/static/**");
    }
}
1.在configure(HttpSecurity http)方法中,我们首先设置拦截规则(对 “/”和“/login”路径不拦截),设置默认登录页面以及登录成功后的跳转页面(登录访问路径/login 成功后转向/chat路径)
2.在configure(AuthenticationManagerBuilder auth)方法中,我们定义两个用户,设置用户名、密码、用户角色信息。(用户信息分别为 andy,chen,密码都是111)
注意:spring 2.0以后对密码做了编码操作,更安全
3.在configure(WebSecurity web)方法中设置指定目录先的静态资源不被拦截。(我们指定 /resources/static/
3.配置WebSocket
package org.cxzc.myyoung.springbootchat;
import org.springframework.context.annotation.Configuration;
import org.springframework.messaging.simp.config.MessageBrokerRegistry;
import org.springframework.web.socket.config.annotation.EnableWebSocketMessageBroker;
import org.springframework.web.socket.config.annotation.StompEndpointRegistry;
import org.springframework.web.socket.config.annotation.WebSocketMessageBrokerConfigurer;

@Configuration
@EnableWebSocketMessageBroker
public class WebSocketConfig implements WebSocketMessageBrokerConfigurer {
    @Override
    public void registerStompEndpoints(StompEndpointRegistry stompEndpointRegistry) {
        stompEndpointRegistry.addEndpoint("/endpointChat").withSockJS();
    }

    @Override
    public void configureMessageBroker(MessageBrokerRegistry registry) {
        registry.enableSimpleBroker("/queue");
    }
}这里和上一篇的配置基本一样有少许变化,
1. endpointChat的名字变化了2.上篇是广播式,在这里改成点对点是消息代理(/queue)
4. 添加控制器
新建一个控制器WsController,代码如下
package org.cxzc.myyoung.springbootchat;
import org.springframework.beans.factory.annotation.Autowired;
import org.springframework.messaging.handler.annotation.MessageMapping;
import org.springframework.messaging.simp.SimpMessagingTemplate;
import org.springframework.stereotype.Controller;

import java.security.Principal;

@Controller
public class WsController {
    @Autowired
    private SimpMessagingTemplate messagingTemplate;

    @MessageMapping("/chat")
    public void handleChat(Principal principal, String msg) {
        if (principal.getName().equals("andy")) {
            messagingTemplate.convertAndSendToUser("chen", "/queue/notifications", principal.getName() + "给您发来了消息:" + msg);
        }else{
            messagingTemplate.convertAndSendToUser("andy", "/queue/notifications", principal.getName() + "给您发来了消息:" + msg);
        }
    }
}说明一下这里我们使用两个用户,如果发送人是andy,接收人及时chen,如果发送人是chen,接收人就是 andy。可以修改调整。
1. SimpMessagingTemplate 引入这个类主要是实现向浏览器发送消息
2. 在spring mvc中,可以直接在参数中获得principal,这里面包含当前用户的信息
3. 通过messageingTemplate.convertAndSendToUser 向用户发送消息,参数1 是接收消息的用户,
参数2是浏览器订阅的地址,参数3是消息内容(三). 登录,聊天页面的添加
添加登录界面,在src/main/resources/templates目录下添加login.html页面
登录
无效的账号或密码
你已注销
登录页面是一个简单的from表单提交,主要看提交的操作
添加聊天页面
在src/main/resources/templates目录下添加chat.html页面,代码如下:
聊天室
聊天室
1. 链接 endpoint名称为 /endpointChat 的endpoint
2.stomp中的connect方法连接服务端,连接成功之后注册监听,在注册监听的时候,注册的地址/user/queue/notifications,这里与在控制器中的messagingTemplateconvertAndSendToUser中的地址保持一致,多了一个/user,这个/user是必不可少的,使用了它消息才会发送信息打指定用户。
2.收到消息后在handleNotification方法中处理,实际上就是把收到的内容添加到id为output的div
(四). 页面控制
这里是映射页面信息
package org.cxzc.myyoung.springbootchat;

import org.springframework.context.annotation.Configuration;
import org.springframework.web.servlet.config.annotation.ViewControllerRegistry;
import org.springframework.web.servlet.config.annotation.WebMvcConfigurer;

@Configuration
public class WebMvcConfig implements WebMvcConfigurer {
    @Override
    public void addViewControllers(ViewControllerRegistry registry) {
        registry.addViewController("/login").setViewName("/login");
        registry.addViewController("/chat").setViewName("/chat");
    }
}
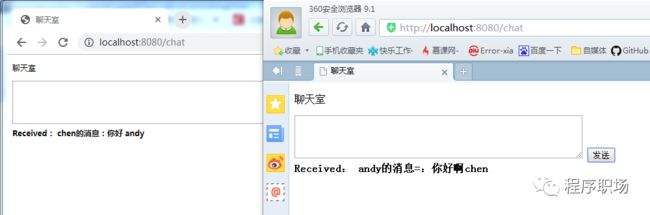
运行项目:
打开浏览器多个,输入账号 登录,当andy给发送消息的时候 chen会受到消息,同样 chen发送消息的时候andy也收到消息
注意:这里我们使用了两个用户 如果多个用户可以做选择哪个人发送。
我是用两个浏览器操作发送消息的操作,避免session共享的问题。
 转存失败重新上传取消
ok,Spring Boot 使用WebSocket实现聊天功能 到这里就完成了,如果小伙伴还有疑问,可以关注我,我们一起进步。
参考:
1. 《JavaEE开发的颠覆者 Spring Boot实战
本案例下载地址:
https://github.com/ProceduralZC/itcxzc/tree/master/springbootchat
