OpenCV总结6——stitcher
之前写过一次stitcher,但是写的不太好,这次准备一点一点的总结,可能有出错的地方,欢迎指正。
之前总结的时候忘了查看源码的版本,看的是旧版的源码,这次是新的。先从头文件开始。
在stitcer.cpp中包含的头文件是precomp.hpp,这个文件中包含了许多cuda并行计算用的类
#ifndef __OPENCV_STITCHING_PRECOMP_H__
#define __OPENCV_STITCHING_PRECOMP_H__
#include "opencv2/opencv_modules.hpp"
#include 但是上面的头文件我们自己是无法引用的,这里主要针对算法需要的类以及内容进行总结。
stitcher.hpp
需要用到的opencv的库,这些库都是stitcher管线中需要用到的一些算法库
#include 定义警告,Detected X11中可能存在相同的定义,导致构建错误,应该先包含这个文件
#if defined(Status)
#  warning Detected X11 'Status' macro definition, it can cause build conflicts.Please, include this header before any X11 headers.
#endif
头文件主体
namespace cv {

class CV_EXPORTS_W Stitcher//导出dll
{
public:
    /**
     * When setting a resolution for stitching, this values is a placeholder
     * for preserving the original resolution.
     */
     //针对不同的编译器版本,不同的编译器对于static const的初始化方式不同
#if __cplusplus >= 201103L || (defined(_MSC_VER) && _MSC_VER >= 1900/*MSVS 2015*/)
    static constexpr double ORIG_RESOL = -1.0;
#else
    // support MSVS 2013
    static const double ORIG_RESOL; // Initialized in stitcher.cpp
#endif

    enum Status//算法的完成状态
    {
        OK = 0,
        ERR_NEED_MORE_IMGS = 1,
        ERR_HOMOGRAPHY_EST_FAIL = 2,
        ERR_CAMERA_PARAMS_ADJUST_FAIL = 3
    };

    enum Mode//两种模式配置
    {
        /** Mode for creating photo panoramas. Expects images under perspective
        transformation and projects resulting pano to sphere.

        @sa detail::BestOf2NearestMatcher SphericalWarper
        */
        PANORAMA = 0,//球形映射
        /** Mode for composing scans. Expects images under affine transformation does
        not compensate exposure by default.

        @sa detail::AffineBestOf2NearestMatcher AffineWarper
        */
        SCANS = 1,//仿射变换,默认不使用光照补偿

    };

    /** @brief Creates a Stitcher configured in one of the stitching modes.

    @param mode Scenario for stitcher operation. This is usually determined by source of images
    to stitch and their transformation. Default parameters will be chosen for operation in given
    scenario.
    @return Stitcher class instance.
     */
     //CV_WRAP 用于创建Python和java的包装器
    /*
		选择一种模式进行拼接的创建
		*/
		CV_WRAP static Ptr<Stitcher> create(Mode mode = Stitcher::PANORAMA);//CV_WRAP是脚本标志,用于创建Python和java的包装器

		//设置的参数基本上是用来控制分辨率,尺度或者缩放大小的
		CV_WRAP double registrationResol() const { return registr_resol_; }
		CV_WRAP void setRegistrationResol(double resol_mpx) { registr_resol_ = resol_mpx; }//将图像的缩放率控制在0-1之间,因为图像一般为三位数的边长,所以这样计算了一个比例将图像进行了缩放,相对的图像的细节与特征点的数量也就会变化,这个值越大则图像中的细节就越多,特征点也会越多

		CV_WRAP double seamEstimationResol() const { return seam_est_resol_; }//接缝尺度计算因子
		CV_WRAP void setSeamEstimationResol(double resol_mpx) { seam_est_resol_ = resol_mpx; }

		CV_WRAP double compositingResol() const { return compose_resol_; }//曝光
		CV_WRAP void setCompostitingResol(double resol_mpx) { compose_resol_ = resol_mpx; }

		CV_WRAP double panoConfidenceThresh() const { return conf_thresh_; }//置信度
		CV_WRAP void setPanoConfidenceThresh(double conf_thresh) { conf_thresh_ = conf_thresh; }

		CV_WRAP bool waveCorrection() const { return do_wave_correct_; }//波形校正
		CV_WRAP void setWaveCorrection(bool flag) { do_wave_correct_ = flag; }

		CV_WRAP InterpolationFlags interpolationFlags() const { return interp_flags_; }//插值
		CV_WRAP void setInterpolationFlags(InterpolationFlags interp_falgs) { interp_flags_ = interp_falgs; }

		detail::WaveCorrectKind waveCorrectionKind() const { return wave_correct_kind_; }
		void setWavecorrectKind(detail::WaveCorrectKind kind) { wave_correct_kind_ = kind; }//波形校正

		Ptr<Feature2D> featuresFinder() { return features_finder_; }
		const Ptr<Feature2D> featuresFinder() const { return features_finder_; }//特征查找
		void setFeaturesFinder(Ptr<Feature2D> features_finder) { features_finder_ = features_finder; }

		Ptr<detail::FeaturesMatcher> featuresMatcher() { return features_matcher_; }//特征配准器
		const Ptr<detail::FeaturesMatcher> featuresMatcher() const { return features_matcher_; }
		void setFeaturesMatcher(Ptr<detail::FeaturesMatcher> features_matcher) { features_matcher_ = features_matcher; }

		const cv::UMat& matchingMask() const { return matching_mask_; }//配准遮罩
		void setMatchingMask(const cv::UMat &mask)
		{
			CV_Assert(mask.type() == CV_8U&&mask.cols == mask.rows);
			matching_mask_ = mask.clone();
		}

		Ptr<detail::BundleAdjusterBase> bundleAdjuster() { return bundle_adjuster_; }//相机参数优化
		const Ptr<detail::BundleAdjusterBase> bundleAdjuster() const { return bundle_adjuster_; }
		void setBundleAdjuster(Ptr<detail::BundleAdjusterBase> bundle_adjuster) { bundle_adjuster_ = bundle_adjuster; }

		Ptr<detail::Estimator> estimator() { return estimator_; }//相机旋转估计类,它根据所有图像的特征,针对所有成对匹配的图像进行相机旋转的估计坐标原点取决于实现,例如可以始终相对于第一个摄像机标准化旋转
		const Ptr<detail::Estimator> estimator() const { return estimator_; }
		void setEstimator(Ptr<detail::Estimator> estimator) { estimator_ = estimator; }

		Ptr<WarperCreator> warper() { return warper_; }//图像扭曲变换工厂基类
		const Ptr<WarperCreator> warper() const { return warper_; }
		void setWarper(Ptr<WarperCreator> creator) { warper_ = creator; }

		Ptr<detail::ExposureCompensator> exposureCompensator() { return exposure_comp_; }//曝光补偿器
		const Ptr<detail::ExposureCompensator> exposureCompensator() const { return exposure_comp_; }
		void setExposureCompensator(Ptr<detail::ExposureCompensator> exposure_comp) { exposure_comp_ = exposure_comp; }

		Ptr<detail::SeamFinder> seamFinder() { return seam_finder_; }//接缝
		const Ptr<detail::SeamFinder> seamFinder() const { return seam_finder_; }
		void setSeamFinder(Ptr<detail::SeamFinder> seam_finder) { seam_finder_ = seam_finder; }

		Ptr<detail::Blender> blender() { return blender_; }//混合器
		const Ptr<detail::Blender> blender() const { return blender_; }
		void setBlender(Ptr<detail::Blender> b) { blender_ = b; }

		/** @brief These functions try to match the given images and to estimate rotations of each camera.

		@note Use the functions only if you're aware of the stitching pipeline, otherwise use
		Stitcher::stitch.

		@param images Input images.
		@param masks Masks for each input image specifying where to look for keypoints (optional).
		@return Status code.
		*/
		//估计相机变换,也可以指定特征点的查找位置
		CV_WRAP Status estimateTransform(InputArrayOfArrays images, InputArrayOfArrays masks = noArray());

   /** @overload */
		//全景拼接函数存在重载函数
		CV_WRAP Status composePanorama(OutputArray pano);//在得到变换估计后,通过这些函数进行变换和拼接
		/** @brief These functions try to compose the given images (or images stored internally from the other function
         calls) into the final pano under the assumption that the image transformations were estimated
         before.

         @note Use the functions only if you're aware of the stitching pipeline, otherwise use
         Stitcher::stitch.

         @param images Input images.
         @param pano Final pano.
         @return Status code.
         */
		Status composePanorama(InputArrayOfArrays images, OutputArray pano);
		/** @brief These functions try to stitch the given images.

		@param images Input images.
		@param masks Masks for each input image specifying where to look for keypoints (optional).
		@param pano Final pano.
		@return Status code.
		*/
		CV_WRAP Status stitch(InputArrayOfArrays images, InputArrayOfArrays masks, OutputArray pano);//拼接管线接口,调用整个过程

		std::vector<int> component() const { return indices_; }//用于拼接图像的索引
		std::vector<detail::CameraParams> cameras() const { return cameras_; }//返回所有的相机参数
		CV_WRAP double workScale() const { return work_scale_; }//返回配准的尺度
		UMat resultMask() const { return result_mask_; }//结果遮罩

private:
    Status matchImages();
    Status estimateCameraParams();

   double registr_resol_;//误差
   double seam_est_resol;//接缝
   double compose_resol;//光照
   double conf_thresh_;//置信度
   InterpolationFlags interp_flags_;//插值算法
   Ptr<Feature2D> features_finder_;//特征
   Ptr<detail::FeaturesMatcher> features_matcher_;//特征匹配
   cv::UMat matching_mask_;//遮罩,opencl加速
   Ptr<detail::BundleAdjusterBase> bundle_adjuster_;//相机参数估计
   Ptr<detail::Estimator> estimator_;//参数估计
   bool do_wave_correct_;//是否进行波形校正
   detail::WaveCorrectKind wave_correct_kind_;//波形校正,使图像更加的水平或者垂直
   Ptr<WarperCreator> warper_;//图像变换基类
   Ptr<detail::ExposureCompensator> exposure_comp_;//所有曝光补偿器的基类
   Ptr<detail::SeamFinder> seam_finder_;//估计缝隙
   Ptr < detail::Blender> blender_;//混合

   std::vector<cv::UMat> imgs_;
		std::vector<cv::UMat> masks_;
		std::vector<cv::Size> full_img_sizes_;//图像的尺寸
		std::vector<detail::ImageFeatures> features_;//图像特征结构
		std::vector<detail::MatchesInfo> pairwise_matches_;//包含两个图像匹配信息的结构,假设这些图像具有单应性
		std::vector<cv::UMat> seam_est_imgs_;//缝隙估计图像
		std::vector<int> indices_;//剔除置信度低的图像后的图像的索引
		std::vector<detail::CameraParams> cameras_;//相机参数
		UMat result_mask_;//结果遮罩
		double work_scale_;//工作尺度
		double seam_scale_;//接缝尺度
		double seam_work_aspect_;//接缝工作尺度
		double warped_image_scale_;//变换尺度
};

//将要被弃用的接口,旧版本接口,暂时保留用于兼容,后期可能删除
/**
 * @deprecated use Stitcher::create
 */
CV_DEPRECATED Ptr<Stitcher> createStitcher(bool try_use_gpu = false);//CV_DEPRECATED opencv的不建议使用的关键字

/**
 * @deprecated use Stitcher::create
 */
CV_DEPRECATED Ptr<Stitcher> createStitcherScans(bool try_use_gpu = false);

//! @} stitching

} // namespace cv
可以看到这个算法涉及到的过程还是很多的,是一个比较复杂的算法,当然效果还是不错的。对于不熟悉整个算法的人而言,提供了简单的调用方法,stitch函数直接调用拼接的管线,可以不用管内部的具体过程与实现,程序会按照固定的管线直接执行。对于要求不高的情况足够,但是因为我在使用的过程中会出现一些奇怪的错误,包括图像提前释放和图像大小越界等,所以决定好好研究一下代码,总结一下这个算法的整个过程。
stitcher.cpp
这里头文件包含的是precomp.hpp,其中包含了包括cuda的所有类
#include "precomp.hpp"

namespace cv {
//不同的编译器的变量初始化
#if __cplusplus >= 201103L || (defined(_MSC_VER) && _MSC_VER >= 1900/*MSVS 2015*/)
// Stitcher::ORIG_RESOL is initialized in stitching.hpp.
#else
const double Stitcher::ORIG_RESOL = -1.0;//负数代表不进行缩放
#endif
create()
stitcher的对象通过Ptr智能指针获得对象,其他方式获得对象运行时各个参数都没有初始化,运行管线时会报错。
Ptr<Stitcher> Stitcher::create(Mode mode)
{
    Ptr<Stitcher> stitcher = makePtr<Stitcher>();

   //设置拼接图像对象的默认参数
		stitcher->setRegistrationResol(0.6);//配准分辨率,这个值越小速度越快,但是特征就越少
		stitcher->setSeamEstimationResol(0.1);//接缝分辨率
		stitcher->setCompostitingResol(ORIG_RESOL);//光照补偿分辨率
		stitcher->setPanoConfidenceThresh(1);//置信度
		stitcher->setSeamFinder(makePtr<detail::GraphCutSeamFinder>(detail::GraphCutSeamFinder::COST_COLOR));//利用图割查找接缝线,图割有直接法和间接法,默认是直接法
		stitcher->setBlender(makePtr<detail::MultiBandBlender>(false));//多段混合算法
		stitcher->setFeaturesFinder(ORB::create());//利用orb特征提取,速度比较快,但是sift和surf好更精确
		stitcher->setInterpolationFlags(INTER_LINEAR);//插值方法

		stitcher->work_scale_ = 1;
		stitcher->seam_scale_ = 1;
		stitcher->seam_work_aspect_ = 1;
		stitcher->warped_image_scale_ = 1;

		switch (mode)
		{
		case topi::topi_stitcher::PANORAMA://默认
			stitcher->setEstimator(makePtr<detail::HomographyBasedEstimator>());//基于单应性的旋转估计器
			stitcher->setWaveCorrection(true);
			stitcher->setWavecorrectKind(detail::WAVE_CORRECT_HORIZ);//水平校正
			stitcher->setFeaturesMatcher(makePtr<detail::BestOf2NearestMatcher>(false));
			stitcher->setBundleAdjuster(makePtr<detail::BundleAdjusterRay>());//相机参数细化,通过相机中心的光线与特征之间的距离的和的最小值
			stitcher->setWarper(makePtr<SphericalWarper>());//球状变换
			stitcher->setExposureCompensator(makePtr<detail::BlocksGainCompensator>());
			break;

		case topi::topi_stitcher::SCANS:
			stitcher->setEstimator(makePtr<detail::AffineBasedEstimator>());//仿射变换
			stitcher->setWaveCorrection(false);//不进行波形校正
			stitcher->setFeaturesMatcher(makePtr<detail::AffineBestOf2NearestMatcher>(false, false));//最好最近匹配器,用于仿射变换,使用4自由度和不适用GPU
			stitcher->setBundleAdjuster(makePtr<detail::BundleAdjusterAffinePartial>());//4自由度的仿射变换,齐次坐标表示,实现最小化冲投影的误差平方和相机优化算法,精细掩码被忽略
			stitcher->setWarper(makePtr<AffineWarper>());//仿射变换工厂类
			stitcher->setExposureCompensator(makePtr<detail::NoExposureCompensator>());//不进行曝光补偿
			break;
		default:
			CV_Error(Error::StsBadArg, "Invalid stitching mode. Must be one of Stitcher::Mode");//错误处理

			break;
		}

    return stitcher;
}
estimateTransform
这个函数是用来估计相机变换参数的,需要先将特征点进行一一的配对,然后利用这些成对的特征点进行相机参数的估计。
Stitcher::Status Stitcher::estimateTransform(InputArrayOfArrays images, InputArrayOfArrays masks)
{
    CV_INSTRUMENT_REGION();//位于private.hpp中,我们自己写代码时是无法使用的,用于监控内部执行情况,默认情况下是关闭的。

    images.getUMatVector(imgs_);//将图像转为Umat,Umat是opencl的格式,这里采用的的是getMat()函数进行获得,这个函数不复制数据,底层数据只有一份,有可能会因为数据提前释放导致报错,采用引用计数,比copyTo要快,考虑开销的时候要将拷贝开销之类的都考虑进去才能看出是否有性能的提升
	masks.getUMatVector(masks_);

	Status status;

	if ((status = matchImages()) != OK)//图像配准
		return status;

	if ((status = estimateCameraParams()) != OK)//估计相机参数
		return status;
    return OK;
}
matchImages
配准步骤,特征点检测与匹配,这里需要注意工作尺度这个变量,它其实是控制缩放大小的,图像的缩放大小决定图像所包含的信息以及细节,进行了插值的图像会丢失一部分信息。这里可以看到接缝的尺度和图像的尺度是不同的。
Stitcher::Status Stitcher::matchImages()
{
    if ((int)imgs_.size() < 2)//图像要进行配准最少地两张图才行
    {
        LOGLN("Need more images");
        return ERR_NEED_MORE_IMGS;
    }

    work_scale_ = 1;
    seam_work_aspect_ = 1;
    seam_scale_ = 1;
    bool is_work_scale_set = false;
    bool is_seam_scale_set = false;
    features_.resize(imgs_.size());//特征描述
	seam_est_imgs_.resize(imgs_.size());//接缝图像的数量
	full_img_sizes_.resize(imgs_.size());//原始图像的尺寸

    LOGLN("Finding features...");
#if ENABLE_LOG
    int64 t = getTickCount();
#endif

   std::vector<UMat> feature_find_imgs(imgs_.size());//用于查找特征的图像,这些图像是在work_scale尺度下缩放后的图像,不同尺度特征数量不同,通过尺度控制配准的精确度
		std::vector<UMat> feature_find_masks(masks_.size());

		for (size_t i = 0; i < imgs_.size(); ++i)
		{
			full_img_sizes_[i] = imgs_[i].size();//获得每张图像的原始尺寸并进行保存
			if (registr_resol_ < 0)//小于0默认不缩放
			{
				feature_find_imgs[i] = imgs_[i];
				work_scale_ = 1;
				is_work_scale_set = true;
			}
			else
			{
				if (!is_work_scale_set)//如果没进行缩放尺寸的计算,则计算缩放尺寸
				{
					work_scale_ = std::min(1.0, std::sqrt(registr_resol_*1e6 / full_img_sizes_[i].area()));//计算的结果位于0-1之间
					is_work_scale_set = true;//计算完成
				}
				resize(imgs_[i], feature_find_imgs[i], Size(), work_scale_, work_scale_, INTER_LINEAR_EXACT);
			}
       if (!is_seam_scale_set)//是否进行了接缝尺度的计算
			{
				seam_scale_ = std::min(1.0, std::sqrt(seam_est_resol_*1e6 / full_img_sizes_[i].area()));
				seam_work_aspect_ = seam_scale_ / work_scale_;//这里计算了接缝和图像的比例
				is_seam_scale_set = true;
			}

			if (!masks_.empty())
			{
				resize(masks_[i], feature_find_masks[i], Size(), work_scale_, work_scale_, INTER_NEAREST);//最邻近插值
			}

			features_[i].img_idx = (int)i;//给图像特征编号
        LOGLN("Features in image #" << i+1 << ": " << features_[i].keypoints.size());

        resize(imgs_[i], seam_est_imgs_[i], Size(), seam_scale_, seam_scale_, INTER_LINEAR_EXACT);//接缝图像缩放
    }

    // find features possibly in parallel
    //尽可能并行查找特征
		detail::computeImageFeatures(features_finder_, feature_find_imgs, features_, feature_find_masks);//默认的查找器是orb

		//释放图像节约内存,采用的是指针计数,计数器减一
		feature_find_imgs.clear();
		feature_find_masks.clear();

    LOGLN("Finding features, time: " << ((getTickCount() - t) / getTickFrequency()) << " sec");

    LOG("Pairwise matching");
#if ENABLE_LOG
    t = getTickCount();
#endif
    (*features_matcher_)(features_, pairwise_matches_, matching_mask_);//通过提供的配对信息进行匹配,这个函数是继承自featureMatcher的操作符重载,不同的类可能存在重写
		features_matcher_->collectGarbage();//内存的释放
    LOGLN("Pairwise matching, time: " << ((getTickCount() - t) / getTickFrequency()) << " sec");

    // Leave only images we are sure are from the same panorama
   //保留在同一场景下的图像,保证图像是有重叠的
		indices_ = detail::leaveBiggestComponent(features_, pairwise_matches_, (float)conf_thresh_);//通过置信度值来判断图像之间是否存在关系,有则保留,利用并查集,返回值数组保留的是保留下来的图像的索引
		std::vector<UMat> seam_est_imgs_subset;//图像的子集
		std::vector<UMat> imgs_subset;
		std::vector<Size> full_img_sizes_subset;

		for (size_t i = 0; i < indices_.size(); ++i)
		{
			//获取子集图像
			imgs_subset.push_back(imgs_[indices_[i]]);
			seam_est_imgs_subset.push_back(seam_est_imgs_[indices_[i]]);
			full_img_sizes_subset.push_back(full_img_sizes_[indices_[i]]);
		}
		//之后所有的计算都是针对具有重叠的图像
		seam_est_imgs_ = seam_est_imgs_subset;
		imgs_ = imgs_subset;
		full_img_sizes_ = full_img_sizes_subset;

    if ((int)imgs_.size() < 2)
    {
        LOGLN("Need more images");
        return ERR_NEED_MORE_IMGS;//剩余图像不足两个的时候无法进行拼图
    }

    return OK;
}
estimateCameraParams
完成配准之后要进行相机变换参数的估计,通过相机的变换才能实现全景的拼接。
Stitcher::Status Stitcher::estimateCameraParams()
{
   //在全局框下估计单应变换
		if (!(*estimator_)(features_, pairwise_matches_, cameras_))//estimator的运算符重载函数,返回的是相机参数数组
		{
			return ERR_HOMOGRAPHY_EST_FAIL;
		}

		for (size_t i = 0; i < cameras_.size();++i)//++i会比另一种写法快
		{
			Mat R;//相机的旋转矩阵
			cameras_[i].R.convertTo(R, CV_32F);
			cameras_[i].R = R;//将旋转矩阵转化为浮点数类型
		}

		bundle_adjuster_->setConfThresh(conf_thresh_);//与配准类似,通过置信度剔除不需要计算相机参数的图像对
		if (!(*bundle_adjuster_)(features_, pairwise_matches_, cameras_))//函数返回bool值
		{
			return ERR_CAMERA_PARAMS_ADJUST_FAIL;
		}

		//找到中间焦距,并使用它作为最终的图像比例
		std::vector<double> focals;//焦距
		for (size_t i = 0; i < cameras_.size(); ++i)
		{
			focals.push_back(cameras_[i].focal);//从相机中提取所有的焦距
		}

		std::sort(focals.begin(), focals.end());//默认升序排序
		if (focals.size() % 2 == 1)//图像焦点的数量是奇数
			warped_image_scale_ = static_cast<float>(focals[focals.size() / 2]);//最终变换用的图像比例,使用中间的焦距大小
		else
			warped_image_scale_ = static_cast<float>(focals[focals.size() - 1] + focals[focals.size() / 2])*0.5f;//偶数使用中间两个焦距的平均值

		if (do_wave_correct_)//波形校正,将图像拉伸至水平或竖直
		{
			std::vector<Mat> rmats;
			for (size_t i = 0; i < cameras_.size(); ++i)
			{
				rmats.push_back(cameras_[i].R.clone());//将旋转矩阵复制
			}
			detail::waveCorrect(rmats, wave_correct_kind_);//进行波形校正,对传入的旋转矩阵进行调整,输入输出为同一个数组
			for (size_t i = 0; i < cameras_.size(); ++i)
			{
				cameras_[i].R = rmats[i];//将调整后的旋转矩阵保存会相机
			}
		}
		return OK;
}
在上面的代码中我们可以看到一个运算符重载的函数(*estimator_)(features_, pairwise_matches_, cameras_),这个函数设计到了相机的标定过程,我查看了计算机视觉——算法与应用这本书,这本书中写的过于理论,如果没有一定的基础看起来比较吃力。本人水平有限所以理论上的内容没有理解的那么深刻,只是大致了解了以下,这里觉得通过看代码理解起来更容易一些。
简单的说一下自己的理解,相机标定简单的来说就是需要你自己虚拟一个相机,如果用你虚拟的这个相机拍照的话,可以得到你用来标定相机的这些图像。相机标定主要是为了求解代表相机的参数,分为内参和外参。内参就是相机本身的一些参数内容,包括焦距,现实距离与像素距离的比例映射,坐标平移的距离,外参主要是相机的姿态旋转和平移(相机在世界坐标系的位置)。相机标定就是求解这些参数,有了这些参数就可以进行拼图之类的操作了。
相机参数估计相关类
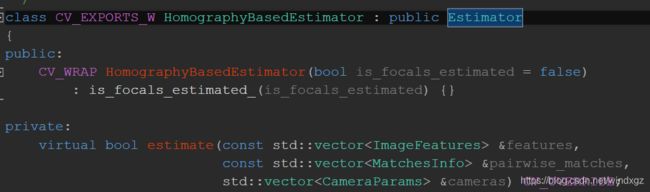
相机估计参数的默认类型是HomographyBasedEstimator,从上面可以看到是继承Estimator类,在HomographyBasedEstimator中没有运算符重载函数,运算符重载在Estimator中,然后在运算符重载中调用estimate函数。

在HomographyBasedEstimator::estimate 中进行相机的估计。

焦距估计
上面的代码中有estimateFocal函数用于焦距的估计。
void estimateFocal(const std::vector<ImageFeatures> &features, const std::vector<MatchesInfo> &pairwise_matches,
                       std::vector<double> &focals)//传入图像的特征点和配对信息,以及焦距的数组
{//因为是多张图像,所以相当于多个相机拍摄

    const int num_images = static_cast<int>(features.size());//图像的数量就是相机的数量
    focals.resize(num_images);

    std::vector<double> all_focals;

    for (int i = 0; i < num_images; ++i)
    {
        for (int j = 0; j < num_images; ++j)
        {
            const MatchesInfo &m = pairwise_matches[i*num_images + j];//特征点匹配信息,查看下方解释
            if (m.H.empty())//变换矩阵为空,则不具备计算条件,因为需要通过两个点的映射关系进行求解
                continue;
            double f0, f1;
            bool f0ok, f1ok;
            focalsFromHomography(m.H, f0, f1, f0ok, f1ok);//计算焦距的函数,单应矩阵可以有内参矩阵和旋转矩阵组合得到,因为旋转矩阵有正交性所以正交矩阵可以转化为有焦距表达的式子,求解可以得到焦距。下方有代码
            if (f0ok && f1ok)
                all_focals.push_back(std::sqrt(f0 * f1));//这里应该是计算得到的整体焦距,因为使用了两个内参,这里焦距的数量可能是nxn,因为对全体点进行了组合遍历
        }
    }

    if (static_cast<int>(all_focals.size()) >= num_images - 1)
    {
        double median;

        std::sort(all_focals.begin(), all_focals.end());//排序,默认升序
        if (all_focals.size() % 2 == 1)
            median = all_focals[all_focals.size() / 2];
        else
            median = (all_focals[all_focals.size() / 2 - 1] + all_focals[all_focals.size() / 2]) * 0.5;

        for (int i = 0; i < num_images; ++i)
            focals[i] = median;// 取中值焦距
    }
    else
    {
        LOGLN("Can't estimate focal length, will use naive approach");
        double focals_sum = 0;//无法估计焦距时,使用朴素法
        for (int i = 0; i < num_images; ++i)
            focals_sum += features[i].img_size.width + features[i].img_size.height;
        for (int i = 0; i < num_images; ++i)
            focals[i] = focals_sum / num_images;
    }
}
MatchesInfo
用来保存配对后的特征点的匹配信息。这些匹配信息可以用来做相机的标定。
struct CV_EXPORTS_W_SIMPLE MatchesInfo
{
    MatchesInfo();
    MatchesInfo(const MatchesInfo &other);
    MatchesInfo& operator =(const MatchesInfo &other);

    CV_PROP_RW int src_img_idx;//图像的索引,确定是哪两张图像为一对
    CV_PROP_RW int dst_img_idx;       //!< Images indices (optional)
    std::vector<DMatch> matches;//用于查找特征的类,用于返回特征信息,详细看下方
    std::vector<uchar> inliers_mask;    //!< Geometrically consistent matches mask,几何一致匹配蒙版
    CV_PROP_RW int num_inliers;                    //!< Number of geometrically consistent matches,集合一致匹配数目
    CV_PROP_RW Mat H;                              //!< Estimated transformation,变换矩阵
    CV_PROP_RW double confidence;                  //!< Confidence two images are from the same panorama,判断两张图像是否来自同一个全景图
    CV_WRAP std::vector<DMatch> getMatches() { return matches; };
    CV_WRAP std::vector<uchar> getInliers() { return inliers_mask; };
};
DMatch

focalsFromHomography
数学不好就不推了,单应矩阵可以转化为有焦距组成的方程,解方程得到焦距,具体过程可以查看下方的计算过程。
void focalsFromHomography(const Mat& H, double &f0, double &f1, bool &f0_ok, bool &f1_ok)
{
    CV_Assert(H.type() == CV_64F && H.size() == Size(3, 3));

    const double* h = H.ptr<double>();

    double d1, d2; // Denominators
    double v1, v2; // Focal squares value candidates

    f1_ok = true;
    d1 = h[6] * h[7];
    d2 = (h[7] - h[6]) * (h[7] + h[6]);
    v1 = -(h[0] * h[1] + h[3] * h[4]) / d1;
    v2 = (h[0] * h[0] + h[3] * h[3] - h[1] * h[1] - h[4] * h[4]) / d2;
    if (v1 < v2) std::swap(v1, v2);
    if (v1 > 0 && v2 > 0) f1 = std::sqrt(std::abs(d1) > std::abs(d2) ? v1 : v2);
    else if (v1 > 0) f1 = std::sqrt(v1);
    else f1_ok = false;

    f0_ok = true;
    d1 = h[0] * h[3] + h[1] * h[4];
    d2 = h[0] * h[0] + h[1] * h[1] - h[3] * h[3] - h[4] * h[4];
    v1 = -h[2] * h[5] / d1;
    v2 = (h[5] * h[5] - h[2] * h[2]) / d2;
    if (v1 < v2) std::swap(v1, v2);
    if (v1 > 0 && v2 > 0) f0 = std::sqrt(std::abs(d1) > std::abs(d2) ? v1 : v2);
    else if (v1 > 0) f0 = std::sqrt(v1);
    else f0_ok = false;
}
相机其他参数
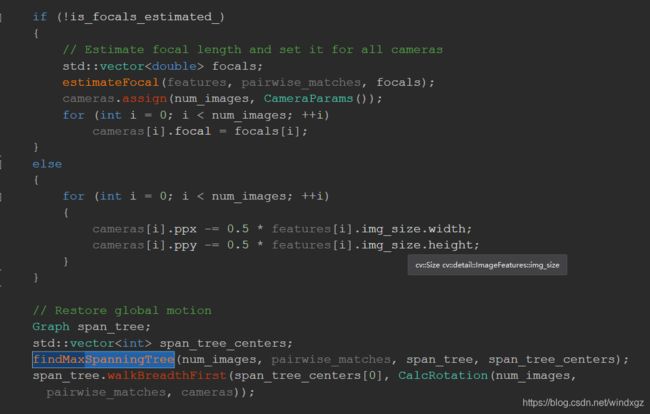
相机的ppx和ppy代表的相机中心,默认一般为图像的中心,图像原点在左上角,所以需要进行移动。
恢复全体的旋转用的应该是最大生成树进行计算R。
光束平差法
利用光束平差法进行参数的优化,光束平差法的核心是最小二乘,相机估计中许多 都用到了最小二乘法。默认采用BundleAdjusterRay进行校正。使用相机中心光线和特征之间的距离之和最小进行优化,可以进行焦距的估计,忽略细化掩码。继承自BundleAdjusterBase,这是所有优化类的一个基类,这个基类继承自Estimator。
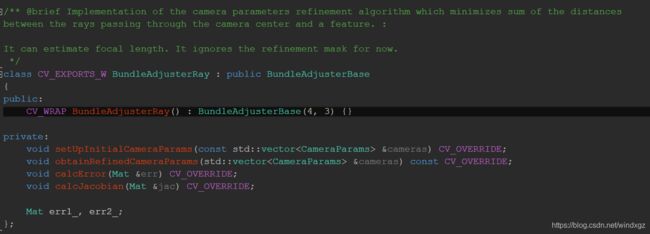
设置置信度后,会剔除一部分的图像,然后调用上层的操作符重载调用estimate函数。
estimate
bool BundleAdjusterBase::estimate(const std::vector<ImageFeatures> &features,
                                  const std::vector<MatchesInfo> &pairwise_matches,
                                  std::vector<CameraParams> &cameras)
{
    LOG_CHAT("Bundle adjustment");
#if ENABLE_LOG
    int64 t = getTickCount();
#endif

    num_images_ = static_cast<int>(features.size());//特征图像的数量
    features_ = &features[0];//这里获得的是数组的指针,下方结构
    pairwise_matches_ = &pairwise_matches[0];//数组指针

    setUpInitialCameraParams(cameras);//设置初始化参数,下方有源码

    // Leave only consistent image pairs
    edges_.clear();//连接图像
    for (int i = 0; i < num_images_ - 1; ++i)
    {
        for (int j = i + 1; j < num_images_; ++j)
        {
            const MatchesInfo& matches_info = pairwise_matches_[i * num_images_ + j];//图像两两对应,需要全部遍历
            if (matches_info.confidence > conf_thresh_)//只有图像对之间的置信度大于设置的置信度才认为图像之间是有关联的,这里可以认为图像是相交的,保存有关联的图像
                edges_.push_back(std::make_pair(i, j));
        }
    }

    // Compute number of correspondences
    total_num_matches_ = 0;
    for (size_t i = 0; i < edges_.size(); ++i)
        total_num_matches_ += static_cast<int>(pairwise_matches[edges_[i].first * num_images_ +
                                                                edges_[i].second].num_inliers);//计算所有边的数量,也就是没两幅图中匹配成功的特征点的数量

    CvLevMarq solver(num_images_ * num_params_per_cam_,
                     total_num_matches_ * num_errs_per_measurement_,
                     cvTermCriteria(term_criteria_));//LM算法进行非线性优化,解决非线性最小二乘法,这个函数没有针对稀疏矩阵进行优化,这个部分找机会在其他的总结中写,下面只做简单说明

    Mat err, jac;
    CvMat matParams = cvMat(cam_params_);//将mat转化为cvMat,cvMat是结构体其中没有进行处理的函数
    cvCopy(&matParams, solver.param);//将相机的参数拷贝给LM算法的参数对象

    int iter = 0;
    for(;;)//迭代计算
    {
        const CvMat* _param = 0;
        CvMat* _jac = 0;
        CvMat* _err = 0;

        bool proceed = solver.update(_param, _jac, _err);//更新参数,对参数进行优化

        cvCopy(_param, &matParams);//优化完成的参数,再拷贝回去

        if (!proceed || !_err)//判断是否进行下面的过程
            break;

        if (_jac)//目标函数的偏导数
        {
            calcJacobian(jac);//计算雅克比
            CvMat tmp = cvMat(jac);
            cvCopy(&tmp, _jac);
        }

        if (_err)
        {
            calcError(err);//计算误差
            LOG_CHAT(".");
            iter++;
            CvMat tmp = cvMat(err);
            cvCopy(&tmp, _err);
        }
    }

    LOGLN_CHAT("");
    LOGLN_CHAT("Bundle adjustment, final RMS error: " << std::sqrt(err.dot(err) / total_num_matches_));
    LOGLN_CHAT("Bundle adjustment, iterations done: " << iter);

    // Check if all camera parameters are valid
    bool ok = true;
    for (int i = 0; i < cam_params_.rows; ++i)
    {
        if (cvIsNaN(cam_params_.at<double>(i,0)))//确定相机的所有参数都是有效参数
        {
            ok = false;
            break;
        }
    }
    if (!ok)
        return false;

    obtainRefinedCameraParams(cameras);//修改相机的参数,将优化后的参数重新复制给相机

	//将运动归一化到中心图像,这里应该可以理解为所有运动都是相对于中心图像进行的
    // Normalize motion to center image
    Graph span_tree;//这里用到了最大生成树,具体的有机会再研究
    std::vector<int> span_tree_centers;
    findMaxSpanningTree(num_images_, pairwise_matches, span_tree, span_tree_centers);
    Mat R_inv = cameras[span_tree_centers[0]].R.inv();
    for (int i = 0; i < num_images_; ++i)
        cameras[i].R = R_inv * cameras[i].R;//所有的相机旋转都是针对中心图像的

    LOGLN_CHAT("Bundle adjustment, time: " << ((getTickCount() - t) / getTickFrequency()) << " sec");
    return true;
}
ImageFeatures
图像特征结构体,保存图像的特征点和描述子。

setUpInitialCameraParams
初始化相机参数
void BundleAdjusterRay::setUpInitialCameraParams(const std::vector<CameraParams> &cameras)
{
    cam_params_.create(num_images_ * 4, 1, CV_64F);//一个相机有四个内参,将所有相机当做一个矩阵进行计算
    SVD svd;//奇异值分解类,下方可以查看
    for (int i = 0; i < num_images_; ++i)
    {
        cam_params_.at<double>(i * 4, 0) = cameras[i].focal;//每个相机的第一个参数是焦距

        svd(cameras[i].R, SVD::FULL_UV);//全尺寸正交方阵
        Mat R = svd.u * svd.vt;//得到旋转矩阵R
        if (determinant(R) < 0)//行列式要求大于等于0
            R *= -1;

        Mat rvec;
        Rodrigues(R, rvec);//利用罗德里格斯公式实现旋转矩阵和旋转向量的转换,罗德里格斯公式也可以用来推导四元数,罗德里格斯旋转向量,坐标表示旋转轴,模表示绕轴逆时针旋转角度的大小
        CV_Assert(rvec.type() == CV_32F);//相当于将旋转矩阵转成旋转向量进行保存
        cam_params_.at<double>(i * 4 + 1, 0) = rvec.at<float>(0, 0);
        cam_params_.at<double>(i * 4 + 2, 0) = rvec.at<float>(1, 0);
        cam_params_.at<double>(i * 4 + 3, 0) = rvec.at<float>(2, 0);
    }
}
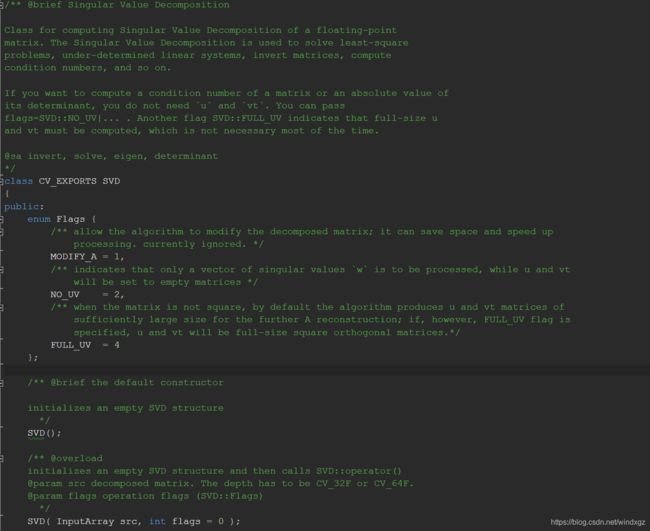
SVD
代码比较长,这里就不贴了,可以自己去查看OpenCV的源代码,这个类主要是用于奇异值分解计算的,矩阵通过奇异值分解之后求特征值,然后估计相机的参数。下面只是一部分的代码,代码在core中。
CvLevMarq
LM算法,针对参数进行非线性的优化。这里不做详细的说明,只要知道它是用来做非线性优化的就行了,第一个参数为参数的个数,构造函数中给的是4,第二个参数是样本的数量,构造函数中给的是3,第三个参数代表结束条件,因为使用的是迭代的算法。

composePanorama
全景拼接函数,存在两个重载函数。
Stitcher::Status Stitcher::composePanorama(OutputArray pano)
{
    CV_INSTRUMENT_REGION();

   //没有新输入图像的拼接

   return  composePanorama(std::vector<UMat>(), pano);//调用另一个重载的函数,输入图像为空
}
全景拼接的具体实现,需要输入图像数组和图像输出图像的数组。拼接全景图是一个很复杂的过程,这个过程中还包含了很多复杂的算法,只不过OpenCV已经提前实现好了。
Stitcher::Status Stitcher::composePanorama(InputArrayOfArrays images, OutputArray pano)
{
CV_INSTRUMENT_REGION();
LOGLN("Warping images (auxiliary)... ");//位于util_log.hpp我们无法引用
std::vector<UMat> imgs;
images.getUMatVector(imgs);//获得传入图像的UMat
if (!imgs.empty())
{
CV_Assert(imgs.size() == imgs_.size());//如果图像数量不符,则报错,这个地方不是很明白,因为之前有舍弃一部分图像,那么imgs_有可能已经是子集,所以可能不相等
UMat img;
seam_est_imgs_.resize(imgs.size());//接缝图像的数量
for (size_t i = 0; i < imgs.size(); ++i)
{
imgs_[i] = imgs[i];//新图片覆盖旧图片,这个拼接步骤是在最后执行的,所以确保之前的图像已经得到了完整的变换所需的参数,之前的图像就可以被替换掉了
resize(imgs[i], img, Size(), seam_scale_, seam_scale_, INTER_LINEAR_EXACT);//位精确双线性插值,按接缝比例缩放
seam_est_imgs_[i] = img.clone();//接缝图像。这里可以认为将图像缩放到了一个接缝的大小然后进行赋值
}
//获取子集图像的时候,需要与之前的图像一一对应,因为是通过之前保留图像的索引来进行图像的保留的
std::vector<UMat> seam_est_imgs_subset;//子集图像
std::vector<UMat> imgs_subset;
for (size_t i = 0; i < indices_.size(); ++i)
{
imgs_subset.push_back(imgs_[indices_[i]]);
seam_est_imgs_subset.push_back(seam_est_imgs_[indices_[i]]);
}
seam_est_imgs_ = seam_est_imgs_subset;
imgs_ = imgs_subset;
}
UMat pano_;//全景图
#if ENABLE_LOG
int64 t = getTickCount();
#endif
std::vector<Point> corners(imgs_.size());//获得图像左上角的坐标
std::vector<UMat> masks_warped(imgs_.size());
std::vector<UMat> images_warped(imgs_.size());
std::vector<Size> sizes(imgs_.size());
std::vector<UMat> masks(imgs_.size());
//准备图像遮罩
for (size_t i = 0; i < imgs_.size(); ++i)
{
masks[i].create(seam_est_imgs_[i].size(), CV_8U);
masks[i].setTo(Scalar::all(255));
}
//扭曲图像和遮罩
Ptr<detail::RotationWarper> w = warper_->create(float(warped_image_scale_*seam_work_aspect_));//这里的创建函数实际上是利用多态调用的SphericalWarper的构造器
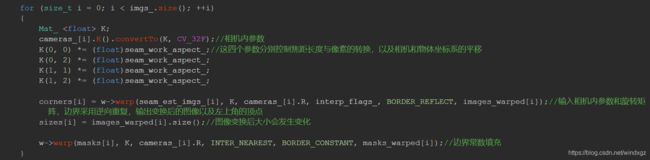
for (size_t i = 0; i < imgs_.size(); ++i)
{
Mat_ <float> K;
cameras_[i].K().convertTo(K, CV_32F);//相机内参数
K(0, 0) *= (float)seam_work_aspect_;//这四个参数分别控制焦距长度与像素的转换,以及相机和物体坐标系的平移
K(0, 2) *= (float)seam_work_aspect_;
K(1, 1) *= (float)seam_work_aspect_;
K(1, 2) *= (float)seam_work_aspect_;
corners[i] = w->warp(seam_est_imgs_[i], K, cameras_[i].R, interp_flags_, BORDER_REFLECT, images_warped[i]);//输入相机内参数和旋转矩阵,边界采用逆向重复,输出变换后的图像以及左上角的顶点
sizes[i] = images_warped[i].size();//图像变换后大小会发生变化
w->warp(masks[i], K, cameras_[i].R, INTER_NEAREST, BORDER_CONSTANT, masks_warped[i]);//边界常数填充
}
LOGLN("Warping images, time: " << ((getTickCount() - t) / getTickFrequency()) << " sec");
//在查找缝隙之前做曝光补偿
exposure_comp_->feed(corners, images_warped, masks_warped);//传入参数,计算Gainmap
for (size_t i = 0; i < imgs_.size(); ++i)
{
exposure_comp_->apply(int(i), corners[i], images_warped[i], masks_warped[i]);//对每一张图像进行曝光补偿,输入图像为输出图像
}
//查找缝隙
std::vector<UMat> images_warped_f(imgs_.size());
for (size_t i = 0; i < imgs_.size(); ++i)
{
images_warped[i].convertTo(images_warped_f[i], CV_32F);//将补偿后的图像转化为浮点型图像
}
seam_finder_->find(images_warped_f, corners, masks_warped);//求图像之间的重叠部分,并将结果保存在遮罩中
//释放内存
seam_est_imgs_.clear();
images_warped.clear();
images_warped_f.clear();
masks.clear();
LOGLN("Compositing...");
#if ENABLE_LOG
t = getTickCount();
#endif
UMat img_warped, img_warped_s;//存储变换后的图像
UMat dilated_mask, seam_mask, mask, mask_warped;
double compose_work_aspect = 1;//合成比例
bool is_blender_prepared = false;//是否准备好进行混合
double compose_scale = 1;
bool is_compose_scalse_set = false;
std::vector<detail::CameraParams> cameras_scaled(cameras_);
UMat full_img, img;
for (size_t img_idx = 0; img_idx < imgs_.size(); ++img_idx)
{
LOGLN("Compositing image #" << indices_[img_idx] + 1);
#if ENABLE_LOG
int64 compositing_t = getTickCount();
#endif
//读取图像并对图像进行一定的缩放
full_img = imgs_[img_idx];//原始大小图像
if (!(is_compose_scalse_set))//这里感觉做了一个假设,假设每张图像的大小是相同的
{
if (compose_resol_ > 0)//需要进行图像的缩放
compose_scale = std::min(1.0, std::sqrt(compose_resol_*1e6 / full_img.size().area()));
is_compose_scalse_set = true;
//计算相关的比例
compose_work_aspect = compose_scale / work_scale_;
//更新扭曲图像的尺度
float warp_scale = static_cast<float>(warped_image_scale_*compose_work_aspect);
w = warper_->create(warp_scale);
//更新左上角的点的坐标和大小
for (size_t i = 0; i < imgs_.size(); ++i)
{
//更新相机的参数
cameras_scaled[i].ppx *= compose_work_aspect;//坐标系平移乘以比例
cameras_scaled[i].ppy *= compose_work_aspect;
cameras_scaled[i].focal *= compose_work_aspect;//焦距乘以比例
//顶点和尺寸
Size sz = full_img_sizes_[i];
if (std::abs(compose_scale - 1) > 1e-1)//compose_scale与1相差较大
{
sz.width = cvRound(full_img_sizes_[i].width*compose_scale);//返回最接近的整数值
sz.height = cvRound(full_img_sizes_[i].height*compose_scale);
}
Mat K;
cameras_scaled[i].K().convertTo(K, CV_32F);//内参矩阵转化为浮点数的形式
Rect roi = w->warpRoi(sz, K, cameras_scaled[i].R);//通过相机和大小计算出区域的左上角和右下角的坐标,然后计算得到roi
corners[i] = roi.tl();//得到的新区的左上角更新
sizes[i] = roi.size();
}
}
if (std::abs(compose_scale - 1) > 1e-1)
{
#if ENABLE_LOG
int64 resize_t = getTickCount();
#endif
resize(full_img, img, Size(), compose_scale, compose_scale, INTER_LINEAR_EXACT);
LOGLN(" resize time: " << ((getTickCount() - resize_t) / getTickFrequency()) << " sec");
}
else
img = full_img;
full_img.release();//释放计数指针计数
Size img_size = img.size();
LOGLN(" after resize time: " << ((getTickCount() - compositing_t) / getTickFrequency()) << " sec");
Mat K;
cameras_scaled[img_idx].K().convertTo(K, CV_32F);
#if ENABLE_LOG
int64 pt = getTickCount();
#endif
//变换当前图像
w->warp(img, K, cameras_[img_idx].R, interp_flags_, BORDER_REFLECT, img_warped);//逆向边界重复,变换后的图像存储在img_warped中
LOGLN(" warp the current image: " << ((getTickCount() - pt) / getTickFrequency()) << " sec");
#if ENABLE_LOG
pt = getTickCount();
#endif
//变换当前的遮罩
mask.create(img_size, CV_8U);
mask.setTo(Scalar::all(255));
w->warp(mask, K, cameras_[img_idx].R, INTER_NEAREST, BORDER_CONSTANT, mask_warped);//对遮罩进行变换
LOGLN(" warp the current image mask: " << ((getTickCount() - pt) / getTickFrequency()) << " sec");
#if ENABLE_LOG
pt = getTickCount();
#endif
//曝光补偿
exposure_comp_->apply((int)img_idx, corners[img_idx], img_warped, mask_warped);//对缩放后的图像进行光照补偿,利用之前计算得到的gainmap进行光照补偿feed的时候得到gainmap
LOGLN(" compensate exposure: " << ((getTickCount() - pt) / getTickFrequency()) << " sec");
#if ENABLE_LOG
pt = getTickCount();
#endif
img_warped.convertTo(img_warped_s, CV_16S);//转化为short类型
img_warped.release();
img.release();
mask.release();
//确保接缝遮罩有适当的大小
dilate(masks_warped[img_idx], dilated_mask, Mat());//对得到的接缝遮罩进行膨胀,默认膨胀是3x3的矩形,这里应该是防止图像缩放的过程中缝隙消失
resize(dilated_mask, seam_mask, mask_warped.size(), 0, 0, INTER_LINEAR_EXACT);//缩放到最终遮罩的大小
bitwise_and(seam_mask, mask_warped, mask_warped);//将接缝mask与图像遮罩进行交运算,得到最终的接缝的mask
LOGLN(" other: " << ((getTickCount() - pt) / getTickFrequency()) << " sec");
#if ENABLE_LOG
pt = getTickCount();
#endif
if (!is_blender_prepared)//混合器是否准备好了
{
blender_->prepare(corners, sizes);
is_blender_prepared = true;
}
LOGLN(" other2: " << ((getTickCount() - pt) / getTickFrequency()) << " sec");
LOGLN(" feed...");
#if ENABLE_LOG
int64 feed_t = getTickCount();
#endif
//混合当前图像
blender_->feed(img_warped_s, mask_warped, corners[img_idx]);//这个函数中计算了两个金子塔高斯和拉普拉斯
LOGLN(" feed time: " << ((getTickCount() - feed_t) / getTickFrequency()) << " sec");
LOGLN("Compositing ## time: " << ((getTickCount() - compositing_t) / getTickFrequency()) << " sec");
}
#if ENABLE_LOG
int64 blend_t = getTickCount();
#endif
UMat result;
blender_->blend(result, result_mask_);//图像混合
LOGLN("blend time: " << ((getTickCount() - blend_t) / getTickFrequency()) << " sec");
LOGLN("Compositing, time: " << ((getTickCount() - t) / getTickFrequency()) << " sec");
//初步结果是CV_16SC3格式,但是所有值都在[0,255]范围内,因此进行转换以避免用户混淆
result.convertTo(pano, CV_8U);
return OK;
}
RotationWarper
旋转图像使用的变换器,默认使用SphericalWarper,将坐标映射到一个单位球上,利用像素进行计量。一张图像展开到球上应该有2 * scale * PI pixels个像素。
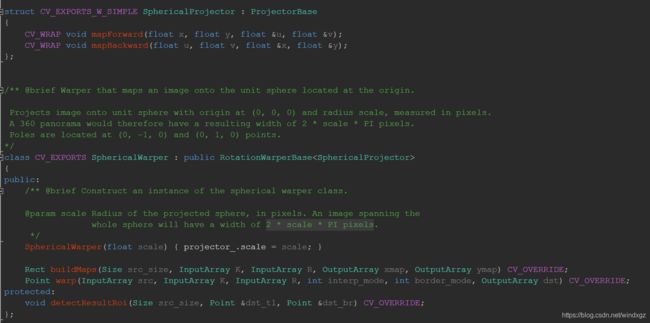
SphericalWarper
![]()
这里可以看到调用的实际上是SphericalWarper的构造器,传入一个比值,这个比值是平均焦距乘以接缝尺度除以图像尺度,当做球的半径。
warp
在这里可以看到使用了一个warp变换的函数,这个函数的源码如下图:
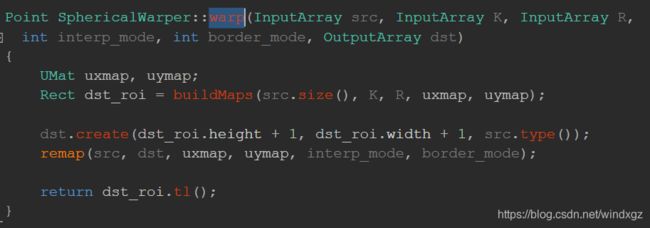
这里看到返回值是一个点,这个点是图像显示的左上角的点。这里有一个buildMaps函数,用来根据相机 的参数侯建投影映射,其中uxmap代表x轴的投影,uymap代表y轴的投影,返回投影图像的最小边界框(实际上是最小的边界框)。
BuildMaps

ocl是opencl的命名空间,看代码opencl已经定义了一些默认的核,通过名字就可以调用,我看了以下后台的源代码,其实就是类似glsl语言一样,写了一个文本文件(代码中是一个很长的字符串),通过调用编译解析程序进行调用。图只是一部分,有过OpenGL经验的人应该比较熟悉这个东西。

这个库还要判断一下是哪个厂商的CPU,有一些函数不支持AMD。
detectResultRoi
这个等看一下原理再总结。
remap
这个函数稍微注意一下,这个函数通过之前得到的x,y轴的映射将原始图像映射得到结果图像,结果图像与uxmap一样大小。这里需要注意的是结果图像有限制32767*32767,大于这个范围的图像将报错(我在使用的时候就有好几次报了越界的错误,后来发现可能是这个位置引起的,因为拼接的图像计算后被拉的过于长)。
ExposureCompensator
曝光补偿,曝光补偿有多种形式,这里使用的是块增益补偿。(这里曾经遇到过数组被提前释放的bug,但是不知道为什么)。

可以看到这里有一个键值对,这个对初始的uchar都是255,最后会根据这个值进行等级的分配。这里会对每一张图像计算一个曝光补偿的图谱,对每张图像都进行曝光补偿。
apply
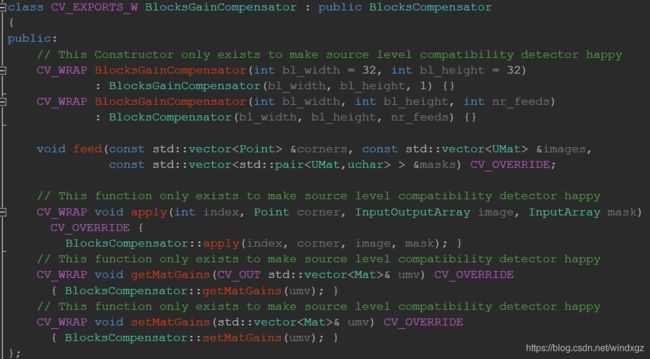
可以看到上面的apply函数调用的是父类的apply函数。父类如下:
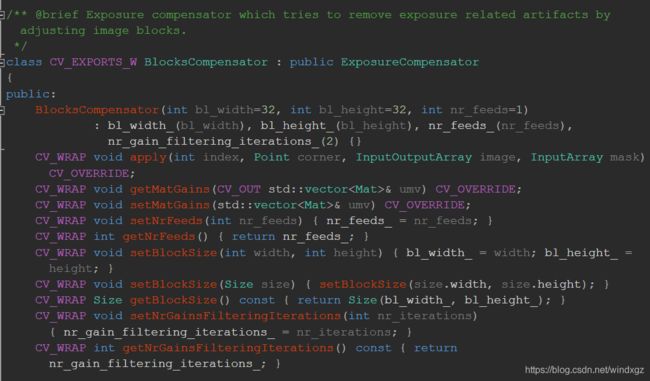

通过之前计算得到的补偿图谱进行补偿。
SeamFinder
查找接缝.

run
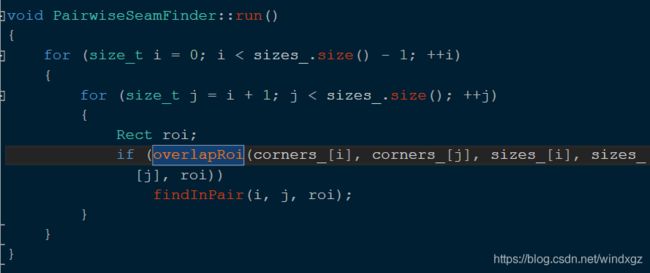
overlapRoi查找的是两个图像的相交的位置,也就是两个roi取交集。findInPair用来查找两幅图像的roi交集中的缝隙。
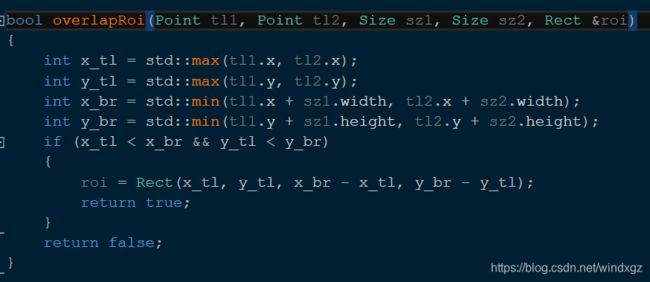
如果两个roi存在交集,则放回true,否则返回false。
以上是OpenCV4.1中图像拼接函数的源代码,其中会涉及到许多的复杂理论性的知识,推荐可以参考计算机视觉——算法与应用,这本书中花了大量的篇幅来介绍关于拼接配准相关的理论,(适合有理论基础的人,没有理论基础的看起来会比较困难)。我觉得我有必要找到OpenCV参考的那篇论文,只看代码的话在算法设计和原理上总想问为什么是这么设计的。(视觉SLAM十四讲感觉比较友好,读起来还是比较容易理解的,同样有一定理论基础会更顺畅)。
这次先写到这,最近没时间搞这个,下次可能会更深的挖掘一下,再重新写。