手把手教你springboot整合bootstrap-table、pagehelper实现表格生成、页面美化、客户端和服务端分页
![]()
文章目录
- 关于Bootstrap-table实战项目用法
-
- 准备工作
-
- 编译工具
- 使用技术
- 项目目标
- pom依赖
- 数据库的表
- 实体对象
- 进度要求
- 操作流程
-
- 1.第一个实现界面
- 2.引用bootstrap
- 3.实现数据表格化
- 4.小工具展示
- 5.客户端分页
- 6.服务端分页
关于Bootstrap-table实战项目用法
准备工作
编译工具
- IDEA
使用技术
- mybatis、springboot、bootstraper、mysql、jsp、pagehelper 等等
项目目标
- 使用BootStrap和Bootstrap-table对数据进行美化处理和分页,初步掌握客户端和服务端分页
pom依赖
        <dependency>
            <groupId>javax.servletgroupId>
            <artifactId>javax.servlet-apiartifactId>
        dependency>

        <dependency>
            <groupId>javax.servletgroupId>
            <artifactId>jstlartifactId>
        dependency>

        <dependency>
            <groupId>org.springframework.bootgroupId>
            <artifactId>spring-boot-starter-tomcatartifactId>
        dependency>

        <dependency>
            <groupId>org.apache.tomcat.embedgroupId>
            <artifactId>tomcat-embed-jasperartifactId>
       dependency>


        <dependency>
            <groupId>org.mybatisgroupId>
            <artifactId>mybatisartifactId>
            <version>3.4.6version>
        dependency>
        <dependency>
            <groupId>org.mybatis.spring.bootgroupId>
            <artifactId>mybatis-spring-boot-starterartifactId>
            <version>2.1.3version>
        dependency>
        <dependency>
            <groupId>mysqlgroupId>
            <artifactId>mysql-connector-javaartifactId>
            <version>8.0.22version>
        dependency>


        <dependency>
            <groupId>com.github.pagehelpergroupId>
            <artifactId>pagehelper-spring-boot-starterartifactId>
            <version>1.4.1version>
        dependency>
数据库的表
/*
Navicat MySQL Data Transfer

Source Server         : sunjiahui
Source Server Version : 50730
Source Host           : localhost:3306
Source Database       : exam

Target Server Type    : MYSQL
Target Server Version : 50730
File Encoding         : 65001

Date: 2022-04-21 15:31:05
*/

SET FOREIGN_KEY_CHECKS=0;

-- ----------------------------
-- Table structure for user
-- ----------------------------
DROP TABLE IF EXISTS `user`;
CREATE TABLE `user` (
  `id` int(255) NOT NULL,
  `userid` varchar(255) NOT NULL,
  `pwd` varchar(255) NOT NULL DEFAULT 'e10adc3949ba59abbe56e057f20f883e',
  `accounttype` varchar(255) NOT NULL COMMENT '1:学生   2:老师'
) ENGINE=InnoDB DEFAULT CHARSET=gbk;

-- ----------------------------
-- Records of user
-- ----------------------------
INSERT INTO `user` VALUES ('1', 'Nick', 'e10adc3949ba59abbe56e057f20f883e', '1');
INSERT INTO `user` VALUES ('2', 'Lucy', 'e10adc3949ba59abbe56e057f20f883e', '2');
INSERT INTO `user` VALUES ('3', '孙嘉辉', 'e10adc3949ba59abbe56e057f20f883e', '1');
INSERT INTO `user` VALUES ('4', '小米', 'e10adc3949ba59abbe56e057f20f883e', '2');
INSERT INTO `user` VALUES ('5', '小红', 'e10adc3949ba59abbe56e057f20f883e', '2');
INSERT INTO `user` VALUES ('6', '小兰', 'e10adc3949ba59abbe56e057f20f883e', '1');
INSERT INTO `user` VALUES ('7', '小张', 'e10adc3949ba59abbe56e057f20f883e', '2');
实体对象
package com.example.a1.pojo;

public class User {
    private Integer id;
    private String userid;
    private String pwd;
    private Integer accounttype;
    //此处省略get、set 和 toString方法
}
进度要求
- 我从查询所有前端显示JSON数据开始写用法
- 搭建springboot环境和连接数据库驱动自己去配
操作流程
1.第一个实现界面
package com.sunjiahui.page.bootstrap01.controller;

import com.sunjiahui.page.bootstrap01.pojo.User;
import com.sunjiahui.page.bootstrap01.service.UserService;
import org.springframework.stereotype.Controller;
import org.springframework.web.bind.annotation.RequestMapping;
import org.springframework.web.bind.annotation.ResponseBody;
import javax.annotation.Resource;
import java.util.List;

@Controller
public class UserController {
    @Resource
    private UserService userService;

    @RequestMapping("/")
    public String index(){
        return "login.jsp";
    }

    @ResponseBody
    @RequestMapping("findAll")
    public List<User> findAll(){
        return userService.findAll();
    }
}
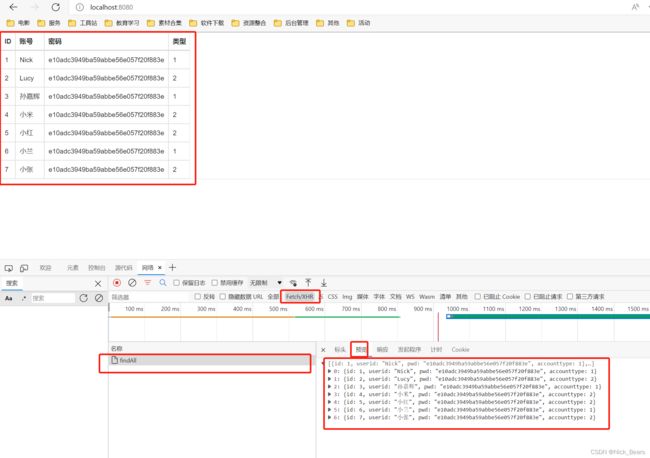
通过数据库查询全部数据,我输入localhost:8080/findAll 让数据在前段页面显示如下
2.引用bootstrap
- 首先我们创建一个测试的页面(我在webapp下创建了login.jsp)
- 创建一个元素定义一个选择器(我这里用的是id选择器),注意我们是定义在 table标签(表格上的)
- 导入(bootstrap) 、 bootstrap Table 、 jQuery 的相关文件
- 运行测试是否导入成功
第1、2步
<%@ page language="java" contentType="text/html; charset=utf-8" pageEncoding="utf-8" %>
<%
    String path = request.getContextPath();
    String basepath = request.getScheme() + "://" + request.getServerName() + ":" + request.getServerPort() + path + "/";
%>
<html>
<head>
    <base href="<%=basepath %>"/>
    <meta charset="utf-8"/>
    <title>Insert title heretitle>
head>
<body>
<div id="table">div>
body>
html>
第3步
将bootstrap,bootstrap-table,还有jquery导进来,并引用他们(总共写五个引用语句,前两个对应的css和js,还有后面的jquery,引用jquery是为了支持前者的语法)
<%@ page language="java" contentType="text/html; charset=utf-8" pageEncoding="utf-8" %>
<%
    String path = request.getContextPath();
    String basepath = request.getScheme() + "://" + request.getServerName() + ":" + request.getServerPort() + path + "/";
%>
doctype html>
<head>
    <base href="<%=basepath %>"/>
    <meta charset="utf-8"/>
    <title>Insert title heretitle>
    <link rel="stylesheet" href="/static/bootstrap-3.4.1-dist/css/bootstrap.css">
    <link rel="stylesheet" href="/static/bootstrap-table-master/dist/bootstrap-table.css">
    <script src="/static/js/jquery.js">script>
    <script src="/static/bootstrap-3.4.1-dist/js/bootstrap.js">script>
    <script src="/static/bootstrap-table-master/dist/bootstrap-table.js">script>
    <script>此处写测试数据script>
head>
<body>
<div>
    <table id="table">table>
div>
body>
html>
第4步,写一下测试数据验证是否引用成功,data是显示的数据
<script>
        $(function () {
            //下面这个是运用bootstrapTable的公式要记住哦!
            $("#table").bootstrapTable({
                data: [
                    //一个括号表示一行
                    {
                        id: 1,
                        price: '$1'
                    },
                    {
                        id: 2,
                        price: '$2'
                    }
                ],
                columns:[
                    //一个括号表示一列
                    {
                        title:'ID',
                        field:'id'
                    },
                    {
                        title:'价格',
                        field:'price'
                    }
                ]

        })});
出现下面这个现实就说明引用成功了,接下来我们就要从数据库里调用这个data,通过观察不难发现,data[{}{}{}…]的格式就是一个数据的集合,因此我们数据库里传来一个集合,与之配对即可。
3.实现数据表格化
- 写好提交方式 method ,url,对应好 column
- 测试是否成功
第1步
我们先通过 findAll 找一组集合中的数据复制到login.jsp界面方便填写title
    <script>
        $(function () {
            $("#table").bootstrapTable({
                //有密码,我就选post了
                method:'Post',
                //返回到前端数据的方法的RequestMapping路径,就是它的url
                url:'findAll',
            // {"id":7,"userid":"小张","pwd":"e10adc3949ba59abbe56e057f20f883e","accounttype":2}]
                columns:[
                    {
                        title:'ID',
                        field:'id'
                    },
                    {
                        title:'账号',
                        field:'userid'
                    },
                    {
                        title:'密码',
                        field:'pwd'
                    },
                    {
                        title:'类型',
                        field:'accounttype'
                    }
                ]
        })});
    script>
第2步
重新运行,测试下输入localhost:8080看看是否显示如下图,其实大家看到这里会很奇怪,为什么我的数据列那么小,你们的是占着整屏幕的呢!因为你们把id定义在table上了,你是正确的,相信自己!!我的教程写到现在才发现我定义在了div上,出现了列固定宽度的这种错误情况,警记,要定义在table标签上!!
4.小工具展示
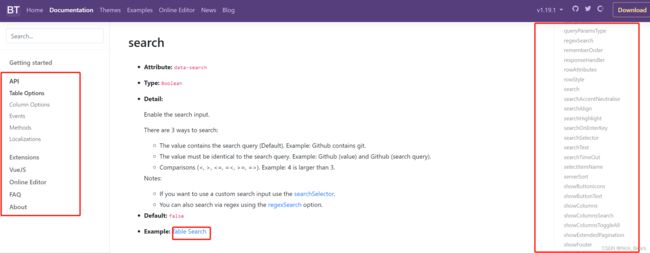
这里有好多小工具,操作行,列,更改表格样式,或者添加一些工具等等,大家可以去官网看看,我这里简单使用一些哈…具体代码和操作官网都有(bootstrap-table-API)
    <script>
        $(function () {
            $("#table").bootstrapTable({
                method:'post',
                url:'findAll',
            // {"id":7,"userid":"小张","pwd":"e10adc3949ba59abbe56e057f20f883e","accounttype":2}]
                columns:[
                    {
                        title:'ID',
                        field:'id'
                    },
                    {
                        title:'账号',
                        field:'userid'
                    },
                    {
                        title:'密码',
                        field:'pwd'
                    },
                    {
                        title:'类型',
                        field:'accounttype'
                    }
                ],
                //----------------样式设置--------------------
                search:true, //搜索栏(界面的查询)
                showSearchButton:true, //查询按钮
                showFullscreen:true, //全屏显示
                showRefresh:true, //刷新按钮
                showColumns:true, //显示列的搜索
                showColumnsToggleAll:true, //显示所有列
                height:400//设置底线距离表格高度
        })});
    </script>
简单的写一些些,实现的效果如下
5.客户端分页
- 实现客户端分页
- 字体英文转中文
第1步
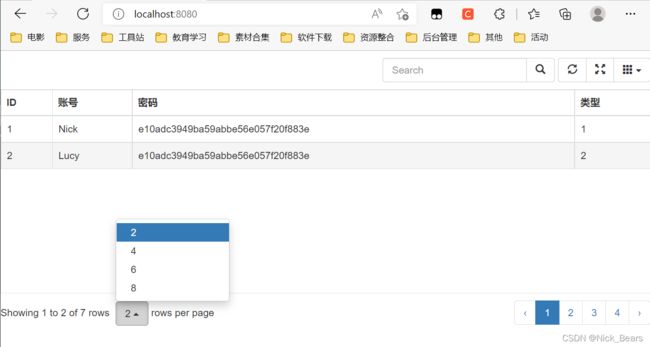
默认就是客户端分页,其实很简单就是添加一个属性 pagination:true开启分页,然后我们在设置条数选择和显示条数
    <script>
        $(function () {
            $("#table").bootstrapTable({
                method:'post',
                url:'findAll',
            // {"id":7,"userid":"小张","pwd":"e10adc3949ba59abbe56e057f20f883e","accounttype":2}]
                columns:[
                    {
                        title:'ID',
                        field:'id'
                    },
                    {
                        title:'账号',
                        field:'userid'
                    },
                    {
                        title:'密码',
                        field:'pwd'
                    },
                    {
                        title:'类型',
                        field:'accounttype'
                    }
                ],
                //----------------样式设置--------------------
                search:true, //搜索栏(界面的查询)
                showSearchButton:true, //查询按钮
                showFullscreen:true, //全屏显示
                showRefresh:true, //刷新按钮
                showColumns:true, //显示列的搜索
                showColumnsToggleAll:true, //显示所有列
                height:400, //设置底线距离表格高度
                //---------------- 分页-----------------------
                pagination:true,
                pageList:[2,4,6,8,10], //显示条数选择
                pageSize:2,  //当前显示条数
        })});
    script>
效果显示如下:
第2步
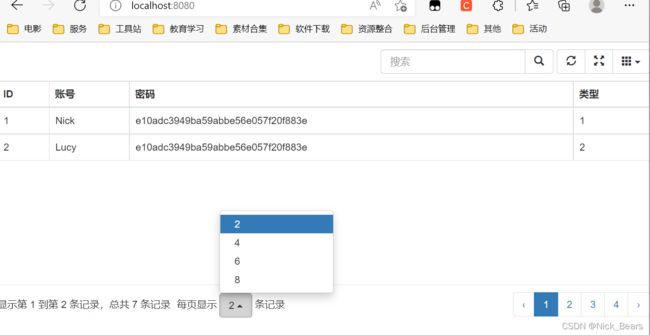
我们发现他下面是英文版本的看起来不舒服,因此我们要引用一个文件使它变成中文,Nick用的是静态资源引用,你们直接放webapp的话static可以去掉哦(文件在/bootstrap-table有,自带的)
效果展示一下,是不是极度舒适呢?
6.服务端分页
- 设置服务端分页
- 设置分页的参数
- 格式化
- 引入pagehelper依赖
- 匹配后端的传值方式
第1步
我们先设置服务端分页
    <script>
        $(function () {
            $("#table").bootstrapTable({
                method:'post',
                url:'findAll',
            // {"id":7,"userid":"小张","pwd":"e10adc3949ba59abbe56e057f20f883e","accounttype":2}]
                columns:[
                    {
                        title:'ID',
                        field:'id'
                    },
                    {
                        title:'账号',
                        field:'userid'
                    },
                    {
                        title:'密码',
                        field:'pwd'
                    },
                    {
                        title:'类型',
                        field:'accounttype'
                    }
                ],
                //----------------样式设置--------------------
                search:true, //搜索栏(界面的查询)
                showSearchButton:true, //查询按钮
                showFullscreen:true, //全屏显示
                showRefresh:true, //刷新按钮
                showColumns:true, //显示列的搜索
                showColumnsToggleAll:true, //显示所有列
                height:400, //设置底线距离表格高度
                //---------------- 分页-----------------------
                pagination:true,
                pageList:[2,4,6,8,10], //显示条数选择
                pageSize:2,  //当前显示条数
                sidePagination:'server',//设置服务端分页
        })});
    script>
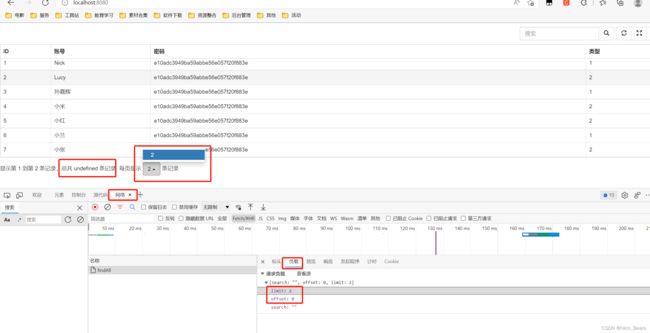
看看发生了什么?
原先客户端分页只有serch,现在多了一个offset 和 limit,总页数和分页条数也不对劲了,不要慌,继续往下看
设置分页参数
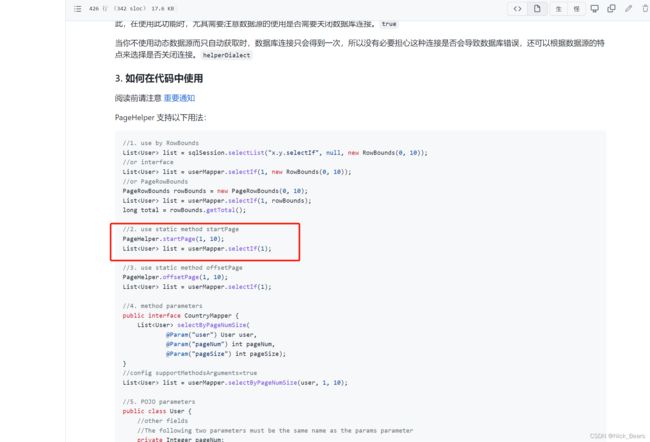
这篇文章不讲 offset 和 limit 这两个参数进行分页,我们使用mybatis自带的更加高效的pagehelper分页,我这里就随便挑一种自己喜欢的方法(网址:pagehelper使用方法 )
第2步
他的1代表第几页,他的2代表这一页有几条,我们要在刚刚那个负载里显示的参数改成这两个值,怎么做嘞?
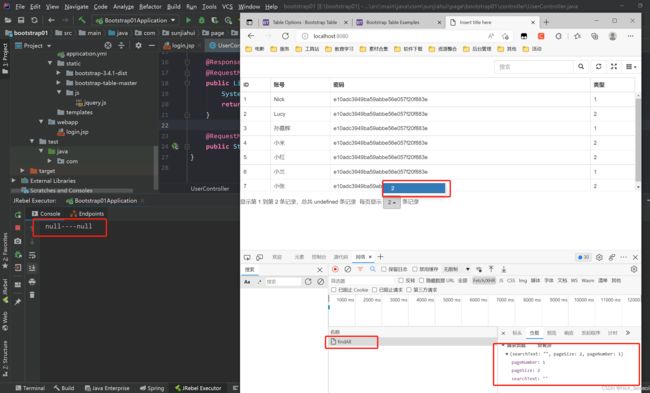
设置 queryParamsType属性,limit是默认的,我们设置它为空;
queryParamsType:''//设置传回参数
就这样我们得到了,当前页数:pageNumber,和每页显示条数:pageSize
第三步
我们后端接收试试看,能不能把这个值传过来,这样就能给pageHelper处理分页问题咯
package com.sunjiahui.page.bootstrap01.controller;

import com.sunjiahui.page.bootstrap01.pojo.User;
import com.sunjiahui.page.bootstrap01.service.UserService;
import org.springframework.stereotype.Controller;
import org.springframework.web.bind.annotation.RequestMapping;
import org.springframework.web.bind.annotation.ResponseBody;
import javax.annotation.Resource;
import java.util.List;

@Controller
public class UserController {
    @Resource
    private UserService userService;

    @ResponseBody
    @RequestMapping("findAll")
    public List<User> findAll(Integer pageNumber,Integer pageSize){
        //测试有没有传过来
        System.out.println(pageNumber+"----"+pageSize);
        return userService.findAll();
    }

    @RequestMapping("/")
    public String index(){
        return "login.jsp";
    }
}
问题来了,为啥我的数据还是没过来,明明好像前端显示还是有的??大坑:发现serchText:“” 没有?还有一个这玩意儿呢!
如何去掉这个多余的“”,添加一句代码即可
contentType:'application/x-www-form-urlencoded'
极度舒适的画面,传过来了

到这一步我们的login.jsp的任务已经全部完成了,现在只要把那两个参数提交给pageHelper处理返回给前端就可以啦!!
现在展示一下login.jsp的完整代码
<%@ page language="java" contentType="text/html; charset=utf-8" pageEncoding="utf-8" %>
<%
    String path = request.getContextPath();
    String basepath = request.getScheme() + "://" + request.getServerName() + ":" + request.getServerPort() + path + "/";
%>

doctype html>
<head>
    <base href="<%=basepath %>"/>
    <meta charset="utf-8"/>
    <title>Insert title heretitle>
    <link rel="stylesheet" href="/static/bootstrap-3.4.1-dist/css/bootstrap.css">
    <link rel="stylesheet" href="/static/bootstrap-table-master/dist/bootstrap-table.css">
    <script src="/static/js/jquery.js">script>
    <script src="/static/bootstrap-3.4.1-dist/js/bootstrap.js">script>
    <script src="/static/bootstrap-table-master/dist/bootstrap-table.js">script>
    <script src="static/bootstrap-table-master/dist/locale/bootstrap-table-zh-CN.js">script>
    <script>
        $(function () {
            $("#table").bootstrapTable({
                method:'post',
                url:'findAll',
            // {"id":7,"userid":"小张","pwd":"e10adc3949ba59abbe56e057f20f883e","accounttype":2}]
                columns:[
                    {
                        title:'ID',
                        field:'id'
                    },
                    {
                        title:'账号',
                        field:'userid'
                    },
                    {
                        title:'密码',
                        field:'pwd'
                    },
                    {
                        title:'类型',
                        field:'accounttype'
                    }
                ],
                //----------------样式设置--------------------
                search:true, //搜索栏(界面的查询)
                showSearchButton:true, //查询按钮
                showFullscreen:true, //全屏显示
                showRefresh:true, //刷新按钮
                showColumns:true, //显示列的搜索
                showColumnsToggleAll:true, //显示所有列
                height:400, //设置底线距离表格高度
                //---------------- 分页-----------------------
                pagination:true,
                pageList:[2,4,6,8,10], //显示条数选择
                pageSize:2,  //当前显示条数
                sidePagination:'server',//设置服务端分页
                queryParamsType:'',//设置传回参数
                contentType:'application/x-www-form-urlencoded'//格式化
        })});
    script>
head>
<body>
<div>
    <table id="table">table>
div>
body>
html>
第4步
这个我就不多说了,自己去挂网找,值得注意的是要引入有start结尾的pagehelper依赖,这样可以不用手动配置,我这里直接提供一个。
        <dependency>
            <groupId>com.github.pagehelpergroupId>
            <artifactId>pagehelper-spring-boot-starterartifactId>
            <version>1.4.1version>
        dependency>
第5步
其实做到这里我们单个分页已经实现了,现在我们要把总页数传过去,还有全部的数据,经验://client:[{},{},{}] server [total:,rows[{},{}.{}]],前面是客户端的分页数据提交方式,就是一个集合,后者是服务端的数据提交方式,是总页数加上数据集合的一个对象,那么我们可以把定义为一个类,传给前端。
package com.sunjiahui.page.bootstrap01.pojo;

import java.util.List;

public class Pages<T> {
    private Integer total;
    private List<T> rows;

    public Pages() {
    }

    public Pages(Integer total, List<T> rows) {
        this.total = total;
        this.rows = rows;
    }

    public Integer getTotal() {
        return total;
    }

    public void setTotal(Integer total) {
        this.total = total;
    }

    public List<T> getRows() {
        return rows;
    }

    public void setRows(List<T> rows) {
        this.rows = rows;
    }
}
接着我们就要往当中传我们想要的值,顺带着把pageHelper也给用上,他的作用类似于给你写的sql语句后面加上limit分页通过前端传来的那两个值进行自动分页(有点像拦截器),那么首先把接口和实现类都改一下,因为已经传来两个值了
package com.sunjiahui.page.bootstrap01.service;

import com.sunjiahui.page.bootstrap01.pojo.User;

import java.util.List;

//接口
public interface UserService {
    List<User> findAll(Integer pageNumber,Integer pageSize);
}
package com.sunjiahui.page.bootstrap01.service.impl;
import com.sunjiahui.page.bootstrap01.dao.UserDao;
import com.sunjiahui.page.bootstrap01.pojo.User;
import com.sunjiahui.page.bootstrap01.service.UserService;
import org.springframework.stereotype.Service;
import javax.annotation.Resource;
import java.util.List;
//实现类
@Service
public class UserServiceImpl implements UserService {
    @Resource
    private UserDao userDao;


    @Override
    public List<User> findAll(Integer pageNumber, Integer pageSize) {
        return userDao.findAll();
    }
}
接着在实现类中用pagehelper进行分页,然后将对应的数值设置在pages对象类,并返回该对象,那么返回值这里接口和实现类又是都要改
package com.example.a1.service;
import com.example.a1.pojo.Pages;
import com.example.a1.pojo.User;
//接口
public interface UserService {
    Pages<User> findAll(Integer pageNumber, Integer pageSize);
}
package com.example.a1.service.impl;

import com.example.a1.mapper.UserMapper;
import com.example.a1.pojo.Pages;
import com.example.a1.pojo.User;
import com.example.a1.service.UserService;
import com.github.pagehelper.PageHelper;
import com.github.pagehelper.PageInfo;
import org.springframework.stereotype.Service;

import javax.annotation.Resource;
import java.util.List;
//实现类
@Service
public class UserServiceImpl implements UserService {
    @Resource
    UserMapper userMapper;


    @Override
    public Pages<User> findAll(Integer pageNumber, Integer pageSize) {
        PageHelper.startPage(pageNumber,pageSize);
        List<User> all = userMapper.findAll();
// PageInfo里面有很多东西,你可以打印一下,贼牛逼啥都有
        PageInfo<User> pageInfo = new PageInfo<>(all);

        //将需要的值装进去
        Pages<User> pages = new Pages<>();
        pages.setRows(all);
        pages.setTotal((int)pageInfo.getTotal());
        //返回值到Controller
        return pages;
    }
}
package com.sunjiahui.page.bootstrap01.controller;

import com.sunjiahui.page.bootstrap01.pojo.Pages;
import com.sunjiahui.page.bootstrap01.pojo.User;
import com.sunjiahui.page.bootstrap01.service.UserService;
import org.springframework.stereotype.Controller;
import org.springframework.web.bind.annotation.RequestMapping;
import org.springframework.web.bind.annotation.ResponseBody;
import javax.annotation.Resource;

@Controller
public class UserController {
    @Resource
    private UserService userService;

    @ResponseBody
    @RequestMapping("findAll")
    //接收并返回至前端
    public Pages<User> findAll(Integer pageNumber, Integer pageSize){
//        System.out.println(pageNumber+"----"+pageSize);
        return userService.findAll(pageNumber, pageSize);
    }

    @RequestMapping("/")
    public String index(){
        return "login.jsp";
    }
}
这个时候你跑一下代码极度舒适
好啦,今天的客户端和服务端分页就讲到这里啦,若还是有不懂的小伙伴可以戳后面的项目链接尝试哦,下载免费,项目链接~
![]()


