Ubuntu下tensorflow2.2 object detection api训练环境的搭建
Ubuntu下tensorflow2.2 object detection api训练环境的搭建
年初早些时候因为疫情在家,偶然看到一篇在Android手机端实时运行深度学习目标检测模型,很感兴趣。网上搜集了一些有关的论文和资料,结合正在做的实验室工作开始了应用Tensorflow object detection API做自己的深度学习项目,由于电脑里的anaconda环境中先安装了tensorflow2,配置object detection api过程中遇到各种奇怪的问题,后来发现是tensorflow2不支持运行Tensorflow object detection api训练自己的数据集,不得不又装了一个tensorflow1.15版本。最近又因为实验室项目需要再次使用tensorflow object detection api 训练自己的数据集做实时检测,发现tensorflow2终于支持object detection api了,不仅兼容tensorflow1.x支持的预训练模型而且有加入了一些新的模型,如比较新的CenterNet和EfficientDet,又可以探索一番了,在此欢呼…
Tensorflow2.2 object detection api训练环境的搭建进行深度学习模型训练的前期工作,由于网上相关教程不多,所以在此根据自己的安装过程写的一些经验,仅供学习参考,不足之处还请指正。此过程中参考的资料在下列出,并资料的发布者致以感谢!
1,环境设置
系统环境 Ubuntu 16.4 LTS
Anaconda3 2020.07_linux版本
Python 3.8
Tensorflow-gpu 2.2
CUDA 10.1
CuDnn 7.6.5
2 安装
2.1 Anaconda安装
Anaconda并不是安装和使用Tensorflow必须配置的,但它可以帮助管理安装包和设置新的虚拟环境,并且让工作文件显得非常有序,可以帮助节约大量的时间和精力以应对开发过程中遇到的种种难题,(可能还没遇到,但它们会来的,经验告诉我们困难可能会迟到但绝不会缺席!)。总而言之Anaconda是个非常有用的工具,不仅适用于Tensorflow,而且适用于使用Python的开发者。安装Tensorflow,网络上有很多教程,这里简要说一下
- 去Anaconda官方网站,根据自己的系统选择相应的版本点击下载,会下载一个.sh的脚本文件,把它放到想安装的文件夹里。也可以使用清华镜像网站下载,会快一点。
Anaconda官方网站
Anaconda清华镜像网站 - 打开Terminal终端,要根据.sh的下载位置,运行如下命令。
bash ~/******/Anaconda3-2020.07-Linux-x86_64.sh
- 安装过程如下
“Enter”

“yes”, "Enter"选择默认路径;“CTRC-C”设置安装路径

“yes”

- 安装完成后,在命令行输入source ~/.bashrc可查看安装版本,显示安装版本,则安装成功。
2.2 创建虚拟环境
- 完成2.1,在命令窗口键入命令**
conda create -n tensorflow2 pip python=3.8 **,将在anaconda3/envs文件夹下新建一个名为tensorflow2的虚拟环境,环境中会安装一些包和指定的python版本,这里的python版本选择3.6及以上均可,Detection Model Zoo上推荐使用python3.6,但这里我用的是python3.8. - 使用命令
** conda activate tensorflow2 **激活新建的tensorflow2环境,以后使用pip install 安装命令安装指定的包,都会放到这个虚拟环境下。 - 若想要删除这个环境,可更换到base环境中执行
**conda env remove -n tensorflow2** - 列举所见所有环境,可执行
**conda env list**
2.3 安装Tensorflow2.2
- 在tensorflow2环境中执行命令,这里提供几个安装镜像源,个人安装安装Tensoflow2.2,使用的是豆瓣源,下载速度比较快。
清华源:https://pypi.tuna.tsinghua.edu.cn/simple/
豆瓣源:https://pypi.douban.com/simple/
阿里云:https://mirrors.aliyun.com/pypi/simple/
中科大:https://pypi.mirrors.ustc.edu.cn/simple/
和tensorflow1.x不同,tensorflow2.x安装时不需要指定tensorflow或者tensorflow-gpu,而只要写tensorflow,安装时会自动检测系统是否适合安装gpu版本。
pip install --ignore-installed --upgrade tensorflow-gpu==2.2.0 -i https://pypi.douban.com/simple/
2.4 验证安装
验证安装是否成功,运行如下代码
python -c "import tensorflow as tf;print(tf.reduce_sum(tf.random.normal([1000, 1000])))"
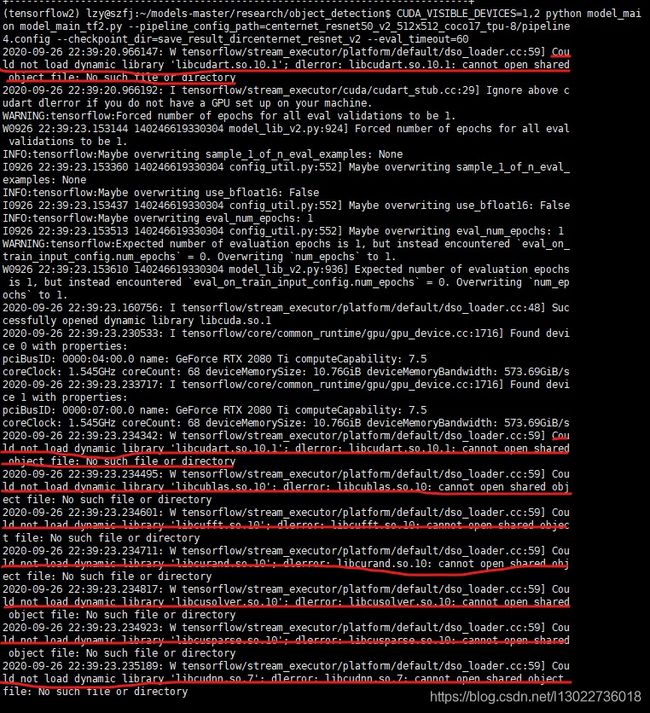
运行结果如下

运行发现,此过程中出现很多划红线的错误,错误均和cuda相关即无法加载cuda相关的动态,报错的原因是在新创建的虚拟环境中缺少cudatoolkit和cudnn库文件。解决办法就是在虚拟环境中安装cudatoolkit和cudnn包。需要注意的是不同版本的tensorflow适配不同的cuda,cudnn。我的tensorflow版本是2.2,搭配cudatoolkit 10.0,cudnn 7.6.5,下面使用清华源在虚拟环境中安装cudnn 和cudatoolkit。
conda install cudatoolkit=10.0 -c https://mirrors.tuna.tsinghua.edu.cn/anaconda/pkgs/free/linux-64/
conda install cudnn=7.6.5 -c https://mirrors.tuna.tsinghua.edu.cn/anaconda/pkgs/main/linux-64/
等待下载安装成功,再次验证。
注:有人看到第三节可能会疑问,在2.4部分已经安装了CUDA和Cudnn为什么还要安装CUDA和cudnn,,我的理解是,2.4中是安装在虚拟环境中的,安装的cudatoolkit和Cudnn的作用范围仅限于安装的环境,安装过程简便快捷。第三节讲述的是在大环境中安装。
3 安装CUDA和CuDnn
为了让Tensorflow 运行在GPU上,必须安装cuda和cudnn,配置环境。由于我的训练是在实验室远程服务器上进行的,cuda和cudnn是安装好的,所以不在详细叙述,以下为安装连接,可供参考,已经安装好的可以直接跳过这3.1,3.2。
3.1 安装CUDA
- 下载CUDA Toolkit 官方下载链接
- 安装指示说明 安装指南
3.2 安装CUDNN
- 下载cudnn,选择cuDNN v7.6.5 配适CUDA 10.1 官方下载链接
- 下载 cuDNNv7.6.5库 官方下载链接
- 安装指示说明 安装指南
3.3 安装Tensorflow object detection API
按照步骤安装完以上必需的软件,下面开始安装tensorflow object detection api,离建立自己目标检测项目又更近一步。
- 创建一个新的文件夹用于放api项目文件,进入新建文件夹,使用git命令下载项目文件,也可以直接到github上下载压缩包,解压后拷贝到新建文件夹里,直接下载zip压缩文件,文件名是models-master,网上很多教程的此文件名是models,注意一下就好。
git clone https://github.com/tensorflow/models.git
3.3.1 Protobuf的安装配置
Tensorflow object detection api使用Protobuf对模型和参数进行管理,在使用框架前必须下载编译Protobuf库,库文件都放在object_detection/protos文件夹下。建议使用3.0版本以上的Protobuf
- 在激活的环境中运行命令行
conda install -c anaconda protobuf - 进入models/research/目录下,运行编译命令如下,将protos文件夹下
.proto文件编译为.py文件
protoc object_detection/protos/*.proto --python_out=.
运行结束后可查看protos文件内,是否新生成很多.py文件。
3.3.2 配置PYTHONPATH路径
简要说一下为什么配置PYTHONPATH的路径,配置该API的路径,代表python搜索的路径,把编写的python模块添加到PYTHON上,想要python解释器找到自己编写的模块,则该模块的路径必须添加到PYTHON上,具体做法如下
- 可以在research目录下运行命令行
export PYTHONPATH=$PYTHON:/home/****/models-master/research/slim(****根据自己的目录更改)
- windows下运行如下命令
set PYTHONPATH=$PYTHON:/home/****/models-master/research/slim(****根据自己的目录更改)
3.3.3 COCO API的安装
对于tensorflow2.x, 需要安装coco api,并且要在tensorflow2.x object detection api安装之前安装,因为pycocotools 包是object detection api的依赖 不然可能出错。在tensorflow环境终端下运行
pip install cython
pip install git+https://github.com/cocodataset/cocoapi.git#subdirectory=PythonAPI
3.3.4 Object detection api 的安装
进入models-master/research/文件目录下,运行如下命令
cp object_detection/packages/tf2/setup.py .
python -m pip install --use-feature=2020-resolver .
3.4 验证安装结果
research/文件目录下运行model_builder_tf2_test.py
python object_detection/builders/model_builder_tf2_test.py
若出现以下运行结果则表示Object detection api训练环境搭建成功
..
[ OK ] ModelBuilderTF2Test.test_create_ssd_models_from_config
[ RUN ] ModelBuilderTF2Test.test_invalid_faster_rcnn_batchnorm_update
[ OK ] ModelBuilderTF2Test.test_invalid_faster_rcnn_batchnorm_update
[ RUN ] ModelBuilderTF2Test.test_invalid_first_stage_nms_iou_threshold
[ OK ] ModelBuilderTF2Test.test_invalid_first_stage_nms_iou_threshold
[ RUN ] ModelBuilderTF2Test.test_invalid_model_config_proto
[ OK ] ModelBuilderTF2Test.test_invalid_model_config_proto
[ RUN ] ModelBuilderTF2Test.test_invalid_second_stage_batch_size
[ OK ] ModelBuilderTF2Test.test_invalid_second_stage_batch_size
[ RUN ] ModelBuilderTF2Test.test_session
[ SKIPPED ] ModelBuilderTF2Test.test_session
[ RUN ] ModelBuilderTF2Test.test_unknown_faster_rcnn_feature_extractor
[ OK ] ModelBuilderTF2Test.test_unknown_faster_rcnn_feature_extractor
[ RUN ] ModelBuilderTF2Test.test_unknown_meta_architecture
[ OK ] ModelBuilderTF2Test.test_unknown_meta_architecture
[ RUN ] ModelBuilderTF2Test.test_unknown_ssd_feature_extractor
[ OK ] ModelBuilderTF2Test.test_unknown_ssd_feature_extractor
----------------------------------------------------------------------
Ran 20 tests in 68.510s

OK (skipped=1)
至此,可以撒花小小的庆祝一下了,环境搭设完毕,我们已经铺好了使用Tensorflow2 Object detection API进行深度学习训练的道路,下面将在此基础上开始模型的训练。
4 参考
https://github.com/tensorflow/models/blob/master/research/object_detection/g3doc/tf2.md
https://tensorflow-object-detection-api-tutorial.readthedocs.io/en/latest/install.html#tf-models-install-coco
https://www.bilibili.com/read/cv7618917
https://blog.csdn.net/csdn_6105/article/details/82933628