【视觉SLAM十四讲源码解读】VIZ Pangolin 实现SLAM的可视化
VIZ可视化
创建一个可视化窗口
cv::viz::Viz3d vis("Visual Odometry");
vis.spin();
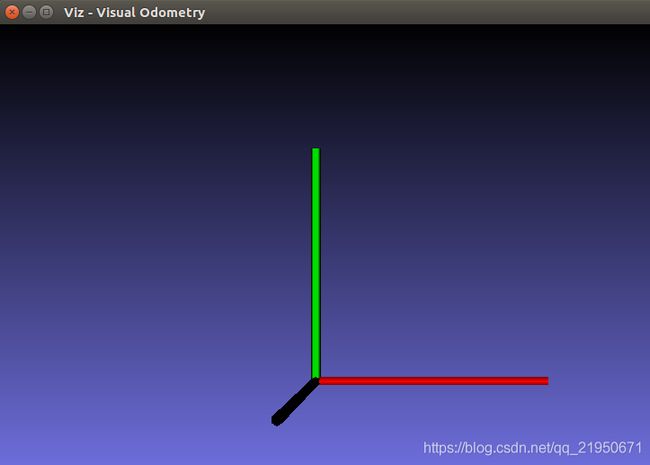
运行后结果
![]()
VIZ 使用CoordinateSystemWidget在窗口中显示坐标轴
  cv::viz::Viz3d vis("Visual Odometry");
    cv::viz::WCoordinateSystem world_coor(1.0), camera_coor(0.5);
    vis.showWidget("Coordinate", world_coor);
    vis.spinOnce();
    // 创建三个点 三维点 cam_pos cam_focal_point cam_y_dir
    cv::Point3d cam_pos( 0, -1.0, -1.0 ), cam_focal_point(0,0,0), cam_y_dir(0,1,0);
    // 3D姿态 Affine3d位姿参数 利用罗德里格斯公式将较为直观的旋转向量转换为旋转矩阵
    // makeCameraPose()构造相机在世界坐标系下位姿
    // cam_pos 相机的世界坐标,cam_focal_point 相机中心点坐标,
    cv::Affine3d cam_pose = cv::viz::makeCameraPose( cam_pos, cam_focal_point, cam_y_dir );
    vis.setViewerPose( cam_pose );

    world_coor.setRenderingProperty(cv::viz::LINE_WIDTH, 2.0);
    camera_coor.setRenderingProperty(cv::viz::LINE_WIDTH, 1.0);
    vis.showWidget( "World", world_coor );
    vis.showWidget( "Camera", camera_coor );

    // 开启永久循环暂留
    // spinOnce(1,false)函数给定时间内循环
    vis.spinOnce();
Launching Viz
#include CMakeLists.txt
cmake_minimum_required(VERSION 3.8)
project(chunqiushenye)

set(CMAKE_CXX_STANDARD 11)
set(SOURCE_FILES src/Launching_Viz.cpp)

set(OpenCV_DIR /home/q/packages/opencv-3.2.0/build/share/OpenCV)
find_package(OpenCV 3.2.0)
find_package(Eigen3  REQUIRED)

include_directories(${EIGEN3_INCLUDE_DIR})
include_directories(${OPENCV_INCLUDE_DIR})

MESSAGE("OPENCV_INCLUDE_DIR " ${OPENCV_INCLUDE_DIR})
add_executable(Launching_Viz ${SOURCE_FILES})
target_link_libraries(Launching_Viz ${OpenCV_LIBS})
Pose of a widget
#include CMakeLists.txt
cmake_minimum_required(VERSION 3.8)
project(chunqiushenye)

set(CMAKE_CXX_STANDARD 11)
set(SOURCE_FILES src/Pose_of_a_widget.cpp)

set(OpenCV_DIR /home/q/packages/opencv-3.2.0/build/share/OpenCV)
find_package(OpenCV 3.2.0)
find_package(Eigen3  REQUIRED)

include_directories(${EIGEN3_INCLUDE_DIR})
include_directories(${OPENCV_INCLUDE_DIR})

MESSAGE("OPENCV_INCLUDE_DIR " ${OPENCV_INCLUDE_DIR})
add_executable(Pose_of_a_widget ${SOURCE_FILES})
target_link_libraries(Pose_of_a_widget ${OpenCV_LIBS})
Transformations
/**
* @file transformations.cpp
* @brief Visualizing cloud in different positions, coordinate frames, camera frustums
* @author Ozan Cagri Tonkal
*/
#include CMakeLists.txt
cmake_minimum_required(VERSION 3.8)
project(chunqiushenye)

set(CMAKE_CXX_STANDARD 11)
set(SOURCE_FILES src/transformations.cpp)

set(OpenCV_DIR /home/q/packages/opencv-3.2.0/build/share/OpenCV)
find_package(OpenCV 3.2.0)
find_package(Eigen3  REQUIRED)

include_directories(${EIGEN3_INCLUDE_DIR})
include_directories(${OPENCV_INCLUDE_DIR})

MESSAGE("OPENCV_INCLUDE_DIR " ${OPENCV_INCLUDE_DIR})
add_executable(transformations ${SOURCE_FILES})
target_link_libraries(transformations ${OpenCV_LIBS})
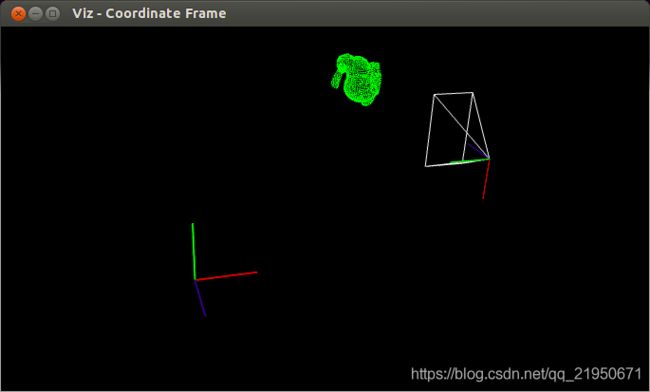
Here is the result from the camera point of view.
 Here is the result from global point of view.

Pangolin 可视化

将坐标从一个坐标系转换到另一个坐标系,需要用到模型(Model)、视图(View)、投影(Projection)三个矩阵。
首先顶点坐标开始于局部空间(Local Space),称为局部坐标(Local Coordinate),
然后经过世界坐标(World Coordinate),
观察坐标(View Coordinate),
裁剪坐标(Clip Coordinate),
最后以屏幕坐标(Screen Coordinate)结束。
局部空间
局部空间是指物体所在的坐标空间,即对象最开始所在的地方。
世界空间
如果你希望将物体分散在世界上摆放(特别是非常真实的那样),这就是你希望物体变换到的空间。
物体的坐标将会从局部变换到世界空间
观察空间
观察空间经常被人们称之OpenGL的摄像机(Camera)。
观察空间是将世界空间坐标转化为用户视野前方的坐标而产生的结果。
因此观察空间就是从摄像机的视角所观察到的空间。
摄像机/观察空间
观察矩阵把所有的世界坐标变换为相对于摄像机位置与方向的观察坐标。
要定义一个摄像机,我们需要它在世界空间中的位置、观察的方向、一个指向它右侧的向量以及一个指向它上方的向量。
细心的读者可能已经注意到我们实际上创建了一个三个单位轴相互垂直的、以摄像机的位置为原点的坐标系。
摄像机位置
摄像机位置简单来说就是世界空间中一个指向摄像机位置的向量。
正z轴是从屏幕指向你的,如果我们希望摄像机向后移动,我们就沿着z轴的正方向移动。
摄像机方向
我们让摄像机指向场景原点:(0, 0, 0)。用场景原点向量减去摄像机位置向量的结果就是摄像机的指向向量。
由于我们知道摄像机指向z轴负方向,但我们希望方向向量(Direction Vector)指向摄像机的z轴正方向。
如果我们交换相减的顺序,我们就会获得一个指向摄像机正z轴方向的向量:
方向向量(Direction Vector)并不是最好的名字,因为它实际上指向从它到目标向量的相反方向
注意看前面的那个图,蓝色的方向向量大概指向z轴的正方向,与摄像机实际指向的方向是正好相反的
右轴
右向量(Right Vector),代表摄像机空间的x轴的正方向。
为获取右向量我们先定义一个上向量(Up Vector)。
接下来把上向量和第二步得到的方向向量进行叉乘。
两个向量叉乘的结果会同时垂直于两向量,
因此我们会得到指向x轴正方向的那个向量
如果我们交换两个向量叉乘的顺序就会得到相反的指向x轴负方向的向量
上轴
现在我们已经有了x轴向量和z轴向量,
获取一个指向摄像机的正y轴向量就相对简单了
我们把右向量和方向向量进行叉乘
Look At
使用矩阵的好处之一是如果你使用3个相互垂直(或非线性)的轴定义了一个坐标空间,
你可以用这3个轴外加一个平移向量来创建一个矩阵,
并且你可以用这个矩阵乘以任何向量来将其变换到那个坐标空间。
这正是LookAt矩阵所做的,现在我们有了3个相互垂直的轴和一个定义摄像机空间的位置坐标,
我们可以创建我们自己的LookAt矩阵了:


我们定义一个摄像机位置,一个目标位置和一个表示世界空间中的上向量的向量(我们计算右向量使用的那个上向量)。
接着GLM就会创建一个LookAt矩阵,我们可以把它当作我们的观察矩阵:
glm::mat4 view;
view = glm::lookAt(glm::vec3(0.0f, 0.0f, 3.0f),
           glm::vec3(0.0f, 0.0f, 0.0f),
           glm::vec3(0.0f, 1.0f, 0.0f));
glm::LookAt函数需要一个位置、目标和上向量。它会创建一个和在上一节使用的一样的观察矩阵。
把我们的摄像机在场景中旋转。我们会将摄像机的注视点保持在(0, 0, 0)。
我们需要用到一点三角学的知识来在每一帧创建一个x和z坐标,它会代表圆上的一点,我们将会使用它作为摄像机的位置。
通过重新计算x和y坐标,我们会遍历圆上的所有点,这样摄像机就会绕着场景旋转了。
我们预先定义这个圆的半径radius,在每次渲染迭代中使用GLFW的glfwGetTime函数重新创建观察矩阵,来扩大这个圆。
float radius = 10.0f;
float camX = sin(glfwGetTime()) * radius;
float camZ = cos(glfwGetTime()) * radius;
glm::mat4 view;
view = glm::lookAt(glm::vec3(camX, 0.0, camZ), glm::vec3(0.0, 0.0, 0.0), glm::vec3(0.0, 1.0, 0.0));
OpenGL: 一个定义了函数布局和输出的图形API的正式规范。
GLAD: 一个拓展加载库,用来为我们加载并设定所有OpenGL函数指针,从而让我们能够使用所有(现代)OpenGL函数。
视口(Viewport): 我们需要渲染的窗口。
图形管线(Graphics Pipeline): 一个顶点在呈现为像素之前经过的全部过程。
着色器(Shader): 一个运行在显卡上的小型程序。很多阶段的图形管道都可以使用自定义的着色器来代替原有的功能。
标准化设备坐标(Normalized Device Coordinates, NDC): 顶点在通过在剪裁坐标系中剪裁与透视除法后最终呈现在的坐标系。所有位置在NDC下-1.0到1.0的顶点将不会被丢弃并且可见。
顶点缓冲对象(Vertex Buffer Object): 一个调用显存并存储所有顶点数据供显卡使用的缓冲对象。
顶点数组对象(Vertex Array Object): 存储缓冲区和顶点属性状态。
索引缓冲对象(Element Buffer Object): 一个存储索引供索引化绘制使用的缓冲对象。
Uniform: 一个特殊类型的GLSL变量。它是全局的(在一个着色器程序中每一个着色器都能够访问uniform变量),并且只需要被设定一次。
纹理(Texture): 一种包裹着物体的特殊类型图像,给物体精细的视觉效果。
纹理缠绕(Texture Wrapping): 定义了一种当纹理顶点超出范围(0, 1)时指定OpenGL如何采样纹理的模式。
纹理过滤(Texture Filtering): 定义了一种当有多种纹素选择时指定OpenGL如何采样纹理的模式。这通常在纹理被放大情况下发生。
多级渐远纹理(Mipmaps): 被存储的材质的一些缩小版本,根据距观察者的距离会使用材质的合适大小。
stb_image.h: 图像加载库。
纹理单元(Texture Units): 通过绑定纹理到不同纹理单元从而允许多个纹理在同一对象上渲染。
向量(Vector): 一个定义了在空间中方向和/或位置的数学实体。
矩阵(Matrix): 一个矩形阵列的数学表达式。
GLM: 一个为OpenGL打造的数学库。
局部空间(Local Space): 一个物体的初始空间。所有的坐标都是相对于物体的原点的。
世界空间(World Space): 所有的坐标都相对于全局原点。
观察空间(View Space): 所有的坐标都是从摄像机的视角观察的。
裁剪空间(Clip Space): 所有的坐标都是从摄像机视角观察的,但是该空间应用了投影。这个空间应该是一个顶点坐标最终的空间,作为顶点着色器的输出。OpenGL负责处理剩下的事情(裁剪/透视除法)。
屏幕空间(Screen Space): 所有的坐标都由屏幕视角来观察。坐标的范围是从0到屏幕的宽/高。
LookAt矩阵: 一种特殊类型的观察矩阵,它创建了一个坐标系,其中所有坐标都根据从一个位置正在观察目标的用户旋转或者平移。
欧拉角(Euler Angles): 被定义为偏航角(Yaw),俯仰角(Pitch),和滚转角(Roll)从而允许我们通过这三个值构造任何3D方向。
https://learnopengl-cn.readthedocs.io/zh/latest/01%20Getting%20started/08%20Coordinate%20Systems/
https://learnopengl-cn.github.io/01%20Getting%20started/08%20Coordinate%20Systems/
https://learnopengl-cn.readthedocs.io/zh/latest/01%20Getting%20started/09%20Camera/


