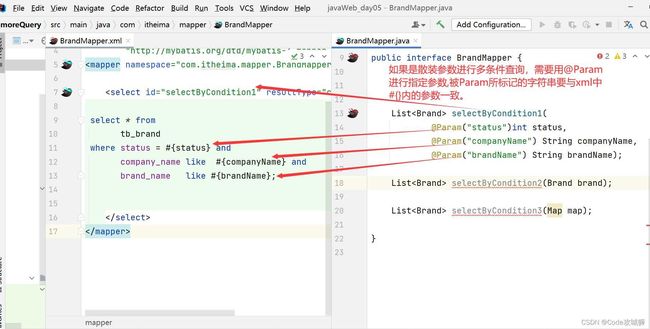
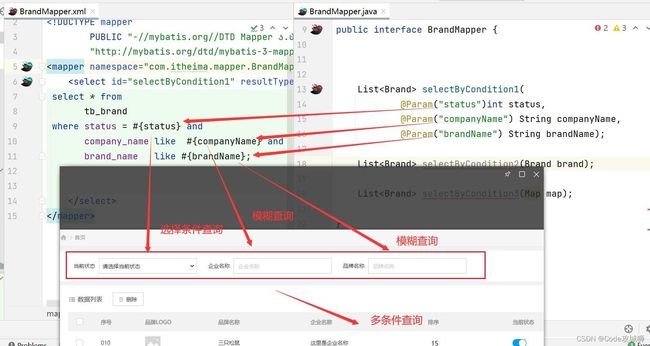
一、Sql语句设置多个参数有几种方式
1、散装参数:需要使用@Param标记Sql语句中占位符处的名称例如 #{name}
2、实体类封装参数
只需要保证Sql中的参数名和实体类属性名对应上,即可设置成功
BrandMapper.xml中的SQL语句不用动,把TestBrandMapper中的代码修改即可
3、Map集合
只需要保证Sql中的参数名和Map集合的键的名称对应上,即可设置成功。
BrandMapper.xml中Sql语句不用改
定义一个默认的map即可
二、代码附上
0、pom.xml中依赖
            org.mybatis
            mybatis
            3.5.5


            mysql
            mysql-connector-java
            5.1.46


            junit
            junit
            4.13
            test


            org.slf4j
            slf4j-api
            1.7.20


            ch.qos.logback
            logback-classic
            1.2.3


            ch.qos.logback
            logback-core
            1.2.3
1、数据库创建
-- 删除tb_brand表
drop table if exists tb_brand;
-- 创建tb_brand表
create table tb_brand
(
    -- id 主键
    id           int primary key auto_increment,
    -- 品牌名称
    brand_name   varchar(20),
    -- 企业名称
    company_name varchar(20),
    -- 排序字段
    ordered      int,
    -- 描述信息
    description  varchar(100),
    -- 状态:0:禁用  1:启用
    status       int
);
-- 添加数据
insert into tb_brand (brand_name, company_name, ordered, description, status)
values ('三只松鼠', '三只松鼠股份有限公司', 5, '好吃不上火', 0),
       ('华为', '华为技术有限公司', 100, '华为致力于把数字世界带入每个人、每个家庭、每个组织,构建万物互联的智能世界', 1),
       ('小米', '小米科技有限公司', 50, 'are you ok', 1);
2、Brand实体类
package com.ligong.popj;

public class Brand {
    // id 主键
    private Integer id;
    // 品牌名称
    private String brandName;
    // 企业名称
    private String companyName;
    // 排序字段
    private Integer ordered;
    // 描述信息
    private String description;
    // 状态:0:禁用  1:启用
    private Integer status;

    public Brand() {
    }

    public Brand(Integer id, String brandName, String companyName, Integer ordered, String description, Integer status) {
        this.id = id;
        this.brandName = brandName;
        this.companyName = companyName;
        this.ordered = ordered;
        this.description = description;
        this.status = status;
    }

    /**
     * 获取
     * @return id
     */
    public Integer getId() {
        return id;
    }

    /**
     * 设置
     * @param id
     */
    public void setId(Integer id) {
        this.id = id;
    }

    /**
     * 获取
     * @return brandName
     */
    public String getBrandName() {
        return brandName;
    }

    /**
     * 设置
     * @param brandName
     */
    public void setBrandName(String brandName) {
        this.brandName = brandName;
    }

    /**
     * 获取
     * @return companyName
     */
    public String getCompanyName() {
        return companyName;
    }

    /**
     * 设置
     * @param companyName
     */
    public void setCompanyName(String companyName) {
        this.companyName = companyName;
    }

    /**
     * 获取
     * @return ordered
     */
    public Integer getOrdered() {
        return ordered;
    }

    /**
     * 设置
     * @param ordered
     */
    public void setOrdered(Integer ordered) {
        this.ordered = ordered;
    }

    /**
     * 获取
     * @return description
     */
    public String getDescription() {
        return description;
    }

    /**
     * 设置
     * @param description
     */
    public void setDescription(String description) {
        this.description = description;
    }

    /**
     * 获取
     * @return status
     */
    public Integer getStatus() {
        return status;
    }

    /**
     * 设置
     * @param status
     */
    public void setStatus(Integer status) {
        this.status = status;
    }

    public String toString() {
        return "Brand{id = " + id + ", brandName = " + brandName + ", companyName = " + companyName + ", ordered = " + ordered + ", description = " + description + ", status = " + status + "}";
    }

    //省略 setter and getter。自己写时要补全这部分代码
}
3、BrandMap接口
package com.ligong.mapper;

import com.ligong.popj.Brand;
import org.apache.ibatis.annotations.Param;

import java.util.List;
import java.util.Map;

public interface BrandMapper {


    List selectByCondition1(
            @Param("status")int status,
            @Param("companyName") String companyName,
            @Param("brandName") String brandName);

    List selectByCondition2(Brand brand);

    List selectByCondition3(Map map);

}
4、BrandMapper.xml映射代码
5、封装好的连接数据库的工具类
package com.ligong.util;

import org.apache.ibatis.io.Resources;
import org.apache.ibatis.session.SqlSession;
import org.apache.ibatis.session.SqlSessionFactory;
import org.apache.ibatis.session.SqlSessionFactoryBuilder;

import java.io.IOException;
import java.io.InputStream;

public class SqlSessionUtils {
    private static SqlSession sqlSession=null;
    private SqlSessionUtils() {

    }
    static {
        try {
            String resource = "mybatis-config.xml";
            InputStream inputStream = Resources.getResourceAsStream(resource);
            SqlSessionFactory sqlSessionFactory = new SqlSessionFactoryBuilder().build(inputStream);
          sqlSession = sqlSessionFactory.openSession();
        } catch (IOException e) {
            e.printStackTrace();
        }

    }
    public static SqlSession getSqlSession(){


        return sqlSession;

    }
}
6、Test类中的特使代码
package com.ligong.mapper;

import com.itheima.popj.Brand;
import com.itheima.popj.Dept;
import com.itheima.util.SqlSessionUtils;
import org.apache.ibatis.session.SqlSession;
import org.junit.After;
import org.junit.Before;
import org.junit.Test;

import java.util.HashMap;
import java.util.List;
import java.util.Map;

public class TestBrandMapper {
    private static BrandMapper mapper = null;
    private static SqlSession sqlSession = null;

    @Before
    public void init() {
        sqlSession = SqlSessionUtils.getSqlSession();
        mapper = sqlSession.getMapper(BrandMapper.class);
    }

    @After
    public void finallyOp() {
        sqlSession.close();
    }

    @Test
    public void selectByCondition3() {
        int status = 1;
        String brand_name = "华";
        String company_name = "华";

        String brandName = "%" + brand_name + "%";
        String companyName = "%" + company_name + "%";

        Map map = new HashMap();
        map.put("status", status);
        map.put("brandName", companyName);
        map.put("companyName", brandName);

        List brands = mapper.selectByCondition3(map);

        for (Brand brand1 : brands) {
            System.out.println(brand1);
        }
    }

    @Test
    public void selectByCondition2() {
        int status = 1;
        String brand_name = "华";
        String company_name = "华";

        String brandName = "%" + brand_name + "%";
        String companyName = "%" + company_name + "%";

        Brand brand = new Brand();
        brand.setStatus(1);
        brand.setBrandName(brandName);
        brand.setCompanyName(companyName);

        List brands = mapper.selectByCondition2(brand);

        for (Brand brand1 : brands) {
            System.out.println(brand1);
        }
    }

    @Test
    public void selectByCondition1() {
        int status = 1;
        String brand_name = "华为";
        String company_name = "华";

        String brandName = "%" + brand_name + "%";
        String companyName = "%" + company_name + "%";

        List brands = mapper.selectByCondition1(
                status,
                companyName,
                brandName);

        for (Brand brand : brands) {
            System.out.println(brand);
        }
    }

    @Test
    public void findAll() {
        SqlSession sqlSession = SqlSessionUtils.getSqlSession();
        DeptMapper mapper = sqlSession.getMapper(DeptMapper.class);
        List all = mapper.findAll();
        for (Dept dept : all) {
            System.out.println(dept);
        }
    }
}
到此这篇关于MyBatis中多条件查询商品的三种方法及区别的文章就介绍到这了,更多相关MyBatis 多条件查询内容请搜索脚本之家以前的文章或继续浏览下面的相关文章希望大家以后多多支持脚本之家!


