前言
增强现实(Augmented Reality,简称AR)浪潮正滚滚而来,各种AR应用层出不穷——AR导航、AR购物、AR教学、AR游戏……可以说,AR正在深刻的改变我们的生活。
而支撑AR的底层技术也在不断升级。AI技术的普及,让AI能力得以轻松的接入实际应用,TensorFlow.js(tfjs)的出现,则让前端也能在AI领域大展身手。浏览器和移动设备的升级,也使得Web应用具有更多的可能性。
Web 浏览器作为人们最唾手可得的人机交互终端,具有不必安装APP,“开箱即用”的天然优势,且能够支持手机、平板、PC等多种终端运行。在这场AR技术的浪潮中,Web AR必将无可限量。
第一章 工具介绍
TensorFlow.js是Google发布的用于使用 JavaScript 进行机器学习开发的库,自2018年发布以来就受到广泛关注,有了tfjs,我们就可以使用 JavaScript 开发机器学习模型,并直接在浏览器或 Node.js 中训练或使用机器学习模型。
Three.js是一个用于在浏览器中创建和展示3D图形的js工具库,由Ricardo Cabello在2010四月于GitHub首次发布。它基于WebGL,能够调用硬件加速,这使得在浏览器中显示复杂的三维图形和动画成为可能。
第二章 重要概念
我们先来了解一些重要的概念。
Face Mesh
Face Mesh是一种脸部几何解决方案,包含468个人脸特征点。每个点具有编号,可以根据编号获取各个部位对应的特征点。(编号查询)
UV Map
UV是二维纹理坐标,U代表水平方向,V代表垂直方向。UV Map用来描述三维物体表面与图像纹理(Texture) 的映射关系,有了UV Map,我们就可以将二维的图像纹理粘贴到三维的物体表面。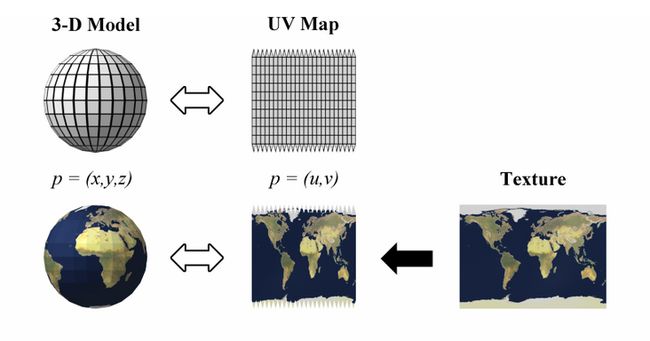
Matrix
Matrix即矩阵,可以描述物体的平移,旋转和缩放。Three.js使用matrix来进行3D变换。
形态键
形态键(morph target)在3D制作软件中,通常用来制作物体形变动画,例如一些面部动作——眨眼、张嘴等等。形态键的取值范围是0.0到1.0,对应形变动画的起始和终止状态。通过改变形态键的取值,就可以精确的控制形变动画。
第三章 架构设计

程序的架构如图所示,过程描述如下:
首先我们需要调取Camera,获得相机画面
然后通过tfjs加载人脸识别模型,并生成Face Mesh
根据Face Mesh生成三角网格,并进行UV贴图,绘制面部图案
通过人脸特征点计算出Matrix,和面部动作识别
加载3D模型,并对其应用Matrix,使其出现在正确的位置
控制模型做出眨眼、张嘴等面部动作
第四章 功能拆解
调取Camera
通过navigator.mediaDevices.enumerateDevices获取设备列表,找到videoinput,即摄像头
export async function getVideoDevices() {
  const devices = await navigator.mediaDevices.enumerateDevices()
  const videoDevices = devices.filter(item => item.kind === 'videoinput')
  return videoDevices
}
获取video stream
export async function getVideoStream(deviceId: string, width?: number, height?: number) {
  try {
    const stream = await navigator.mediaDevices.getUserMedia({
      video: { deviceId, width, height }
    })
    return stream
  } catch (error) {
    return Promise.reject(error)
  }
}
我们提前放置一个
video.autoplay = true
video.playsInline = true
video.srcObject = stream
人脸识别
这里我们用的是tensorflow提供的开源模型face-landmarks-detection
import * as faceLandmarksDetection from '@tensorflow-models/face-landmarks-detection'
import * as tf from '@tensorflow/tfjs-core'
import '@mediapipe/face_mesh'
import '@tensorflow/tfjs-backend-webgl'
tensorflow提供了多种运行后端(cpu, webgl, wasm),性能对比可以看这里。这里我们选用webgl
await tf.setBackend('webgl')
// await tf.setBackend('wasm')
加载人脸识别模型
const model = await faceLandmarksDetection.load(
  faceLandmarksDetection.SupportedPackages.mediapipeFacemesh,
  {
    // 瞳孔识别
    shouldLoadIrisModel: true,
    // 人脸数量,为节省性能,我们设置为1
    maxFaces: 1,
    // 模型加载地址
    // modelUrl: '/tfjs/facemesh/model.json',
    // detectorModelUrl: '/tfjs/blazeface/model.json',
    // irisModelUrl: '/tfjs/iris/model.json'
  }
)tfjs默认会从tfhub加载模型,不幸的是这个地址在国内无法访问。如果你没有的话,需要去镜像网站下载你需要的模型,然后自行部署
将
const predictions = await model.estimateFaces({
  input: video,
  predictIrises: true
})

if (predictions.length > 0) {
  // console.log(predictions[0])
}
渲染函数
由于人脸识别以及渲染的过程会比较耗时,为了避免画面卡顿,我们需要借助requestAnimationFrame来提高性能。将人脸识别和后续的渲染过程(render3D)集中放到frame callback中,重新组织代码如下
async function render(model: MediaPipeFaceMesh) {
  const predictions = await model.estimateFaces({
    input: video,
    predictIrises: true
  })

  if (predictions.length > 0) {
    // console.log(predictions[0])
  }

  render3D(predictions[0])

  requestAnimationFrame(() => {
    render(model)
  })
}

render(model)
3D场景
在进行3D模型渲染之前,我们需要先创造一个3D场景
import * as THREE from 'three'

const scene = new THREE.Scene()
根据你的需要,也可以把camera画面当作scene的背景
const vw = video.videoWidth
const vh = video.videoHeight

const backgroundTexture = new THREE.VideoTexture(video)
const background = new THREE.Mesh(
  new THREE.PlaneGeometry(vw, vh),
  new THREE.MeshBasicMaterial({
    map: backgroundTexture
  })
)
background.position.set(0, 0, -1000)
scene.add(background)
放置camera,这里选用的是正交相机(OrthographicCamera)
let w = window.innerWidth
let h = window.innerHeight

const camera = new THREE.OrthographicCamera(
  w / -2,
  w / 2,
  h / 2,
  h / -2,
  0.1,
  2000
)
camera.position.set(0, 0, 1000)
camera.lookAt(scene.position)
添加一些光照
const hemiLight = new THREE.HemisphereLight(0xffffff, 0xffffff, 0.3)
scene.add(hemiLight)
const ambientLight = new AmbientLight(0xffffff, 0.7)
scene.add(ambientLight)
const directionalLight = new THREE.DirectionalLight(0xffffff, 0.7)
directionalLight.position.set(0.5, 0, 0.866)
scene.add(directionalLight)
创建渲染器
const renderer = new THREE.WebGLRenderer({
  canvas,
  alpha: true,
  antialias: true
})
renderer.setPixelRatio(window.devicePixelRatio)
renderer.setSize(w, h)
至此,3D场景就创建好了,最后我们需要把渲染过程放置在上文提到的渲染函数中
function render3D(prediction: AnnotatedPrediction | undefined) {
  renderer.render(scene, camera)
}
面部贴图
Three.js中有各种3D几何模型,其中Mesh表示三角网格模型,它可以用三角网格来模拟复杂的3D物体,例如人脸。geometry是物体的几何属性,material是物体的材质属性
const mesh = new THREE.Mesh(geometry, material)
scene.add(mesh)创建geometry,将468个人脸特征点按照一定的顺序(TRIANGULATION)组成三角网格,并加载uv map
const geometry = new THREE.BufferGeometry()
geometry.setIndex(TRIANGULATION)
geometry.setAttribute('uv', new THREE.Float32BufferAttribute(uvs.map((item, index) => index % 2 ? item : 1 - item), 2))
geometry.computeVertexNormals()
根据face mesh实时更新geometry
function updateGeometry(prediction: AnnotatedPrediction) {
  const faceMesh = resolveMesh(prediction.scaledMesh as Coords3D, vw, vh)
  const positionBuffer = faceMesh.reduce((acc, pos) => acc.concat(pos), [] as number[])
  geometry.setAttribute('position', new THREE.Float32BufferAttribute(positionBuffer, 3))
  geometry.attributes.position.needsUpdate = true
}

function resolveMesh(faceMesh: Coords3D, vw: number, vh: number): Coords3D {
  return faceMesh.map(p => [p[0] - vw / 2, vh / 2 - p[1], -p[2]])
}
创建material
const textureLoader = new THREE.TextureLoader()
const texture = textureLoader.load(pathToYourTexturePic)
texture.encoding = THREE.sRGBEncoding
texture.anisotropy = 16
const material = new THREE.MeshBasicMaterial({
  map: texture,
  transparent: true,
  color: new THREE.Color(0xffffff),
  reflectivity: 0.5
});
最后将geometry的计算过程放置在渲染函数中
function render3D(prediction: AnnotatedPrediction | undefined) {
  if (prediction) {
    updateGeometry(prediction)
  }
  renderer.render(scene, camera)
}
至此,我们就可以在面部绘制各种图案了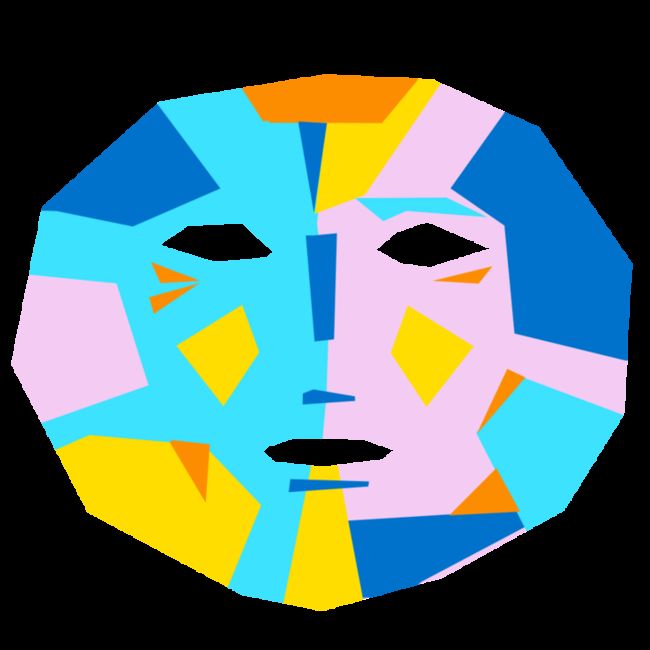
如果你需要制作更多的素材,可以对照这张标准脸模型绘制你想要的图案
接下来我们开始制作3D卡通头像效果
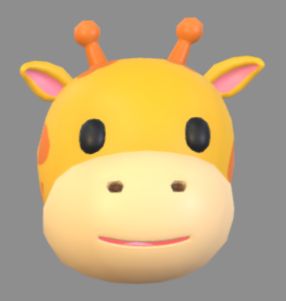
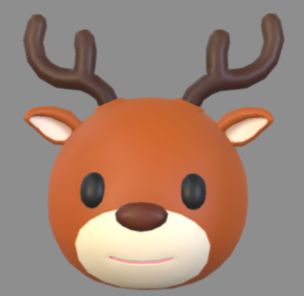
加载3D模型
我们使用gltf格式的3d素材,在加载3D模型之后,需要对物体的位置、尺寸等属性进行调整,使其回到画面中央
const loader = new GLTFLoader()
const 3dModel = new THREE.Object3D()
model.position.set( 0, 0, 0 )
loader.load('/models/animal_head/bear.glb', (gltf) => {
  const object = gltf.scene
  const box = new Box3().setFromObject(object)
  const size = box.getSize(new Vector3()).length()
  const center = box.getCenter(new Vector3())
  object.position.x += (object.position.x - center.x);
  object.position.y += (object.position.y - center.y + 1);
  object.position.z += (object.position.z - center.z - 15);
  3dModel.add(object)
})
计算Matrix
根据人脸识别的结果,计算出面部的position, scale, rotation等信息,然后将其应用到3D模型上。
position: 以眉心(midwayBetweenEyes)作为位置基准
scale: 以最左侧(234)和最右侧(454)的距离作为缩放基准(编号查询)
rotation: 以头顶(10)左脸颊(50)右脸颊(280)作为旋转基准
function track(object: Object3D, prediction: AnnotatedPrediction) {
  const annotations: Annotations = (prediction as any).annotations
  const position = annotations.midwayBetweenEyes[0]
  const scale = getScale(prediction.scaledMesh as Coords3D, 234, 454)
  const rotation = getRotation(prediction.scaledMesh as Coords3D, 10, 50, 280)
  object.position.set(...position)
  object.scale.setScalar(scale / 18)
  object.scale.x *= -1
  object.rotation.setFromRotationMatrix(rotation)
  object.rotation.y = -object.rotation.y
  object.rotateZ(Math.PI)
}
将跟踪过程放置到渲染函数中,就可以看到3D头像效果了
function render3D(prediction: AnnotatedPrediction | undefined) {
  if (prediction) {
    // updateGeometry(prediction)
    track(3dModel, prediction)
  }
  renderer.render(scene, camera)
}
面部动作
面部动作需要借助形态键来实现,在模型加载之后,递归查找出模型内部所有的形态键。(关于3D模型的形态动画如何制作,这需要一定的3D绘图基础,有兴趣的同学可以自己找资料学习。过段时间我也会整理一篇教程)
const morphTarget = findMorphTarget(gltf.scene)

export function findMorphTarget(nodes: THREE.Object3D): Record void> {
  const morphTarget = {} as Record void>
  const traverse = (node: THREE.Object3D) => {
    if (node.type === 'Mesh' && (node as Mesh).morphTargetInfluences) {
      const mesh = node as Mesh
      Object.keys(mesh.morphTargetDictionary!).forEach(key => {
        morphTarget[key] = (value: number) => {
          mesh.morphTargetInfluences![mesh.morphTargetDictionary![key]] = value
        }
      })
    }
    node.children.forEach(traverse)
  }
  traverse(nodes)
  return morphTarget
} 然后我们来计算眨眼,张嘴的幅度,这里借助了第三方库kalidokit
import * as Kalidokit from "kalidokit"

export function getFaceRig(prediction: AnnotatedPrediction, video: HTMLVideoElement) {
  const faceRig = Kalidokit.Face.solve(coordsToXYZ(prediction.scaledMesh as Coords3D), {
    runtime: "tfjs", // `mediapipe` or `tfjs`
    video,
    imageSize: { height: 480, width: 640 },
    smoothBlink: false, // smooth left and right eye blink delays
    blinkSettings: [0.25, 0.75], // adjust upper and lower bound blink sensitivity
  })
  return faceRig
}

export function coordsToXYZ(coords: Coords3D) {
  return coords.map(item => ({
    x: item[0],
    y: item[1],
    z: item[2]
  }))
}
计算结果示例如下
{
    eye: {l: 1,r: 1},
    mouth: {
        x: 0,
        y: 0,
        shape: {A:0, E:0, I:0, O:0, U:0}
    },
    head: {
        x: 0,
        y: 0,
        z: 0,
        width: 0.3,
        height: 0.6,
        position: {x: 0.5, y: 0.5, z: 0}
    },
    brow: 0,
    pupil: {x: 0, y: 0}
}
根据计算结果,设置形态键的取值,即可精确控制眨眼,张嘴的幅度
function track(object: Object3D, prediction: AnnotatedPrediction, faceRig: TFace) {
  // ...

  if (morphTarget) {
    // flipped
    morphTarget['leftEye'] && morphTarget['leftEye'](1 - faceRig.eye.r)
    morphTarget['rightEye'] && morphTarget['rightEye'](1 - faceRig.eye.l)
    morphTarget['mouth'] && morphTarget['mouth'](faceRig.mouth.shape.A)
  }
}
第五章 效果展示
面部贴图
3D卡通头像
更多效果可以查看Demo: https://caiwenlie.github.io/A...
以上。
参考文档
mediapipe: https://google.github.io/medi...
TensorFlow.js: https://www.tensorflow.org/js...
three.js: https://threejs.org/