DCGAN 源码解析
为什么写Blog现在还没找到理由。不过用心看下去你会觉得更有意义。
我们以生成图片为例子:
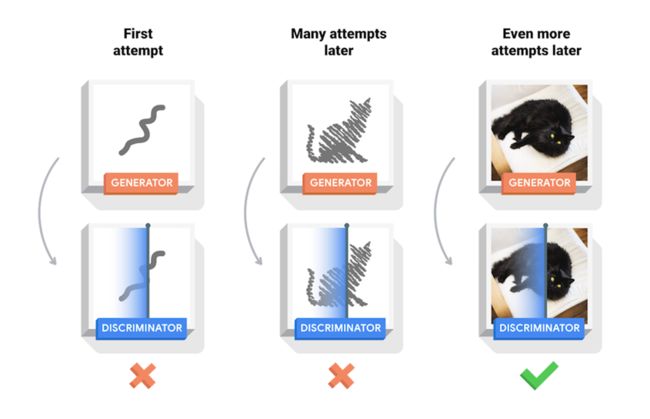
- G就是一个生成图片的网络,它接受一个随机的噪声z,然后通过这个噪声生成图片,生成的数据记做G(z)。
- D是一个判别网络,判别一张图片是不是“真实的”(是否是捏造的)。它的输入参数是x,x代表一张图片,输出D(x)代表x为真实图片的概率,如果为1,就代表绝逼是真实的图片,而输出为0,就代表不可能是真实的图片。
在训练的过程中,生成网络G的目标就是生成假的图片去骗过判别网络D,而判别网络D的目标就是能够分辨出某一张图片是不是由G生成的。这就变成了一个博弈的过程。同时G和D的能力也在训练的过程中逐渐提高。在最理想的情况下, 则就是D(G(z))=0.5
一、实现 Implementation
1.权重初始化
在DCGAN的论文中,作者指定所有模型的初始化权重是一个均值为0,标准差为0.02的正态分布。weights_init函数的输入是一个初始化的模型,然后按此标准重新初始化模型的卷积层、卷积转置层和BN层的权重。模型初始化后应立即应用此函数。
# custom(自定义) initial weight,called on netG and netD
def weights_init(m):
    classname = m.__class__.__name__  # return m's name
    if classname.find('Conv') != -1:  # find():find 'classname' whether contains "Conv" character,if not,return -1;otherwise,return 0
        torch.nn.init.normal_(m.weight, 0.0, 0.02)  # nn.init.normal_():the initialization weigts used Normally Distributed,mean=0.0,std=0.02
    elif classname.find('BatchNorm') != -1:
        torch.nn.init.normal_(m.weight, 1.0, 0.02)
        torch.nn.init.zeros_(m.bias)
2. 生成器Generator
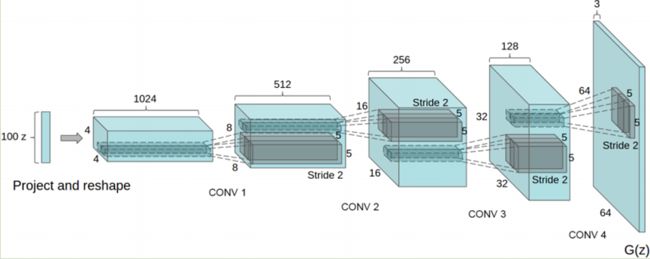
生成器G, 用于将隐向量 (z)映射到数据空间。 由于我们的数据是图片,也就是通过隐向量z生成一张与训练图片大小相同的RGB图片 (比如 3x64x64). 在实践中,这是通过一系列的ConvTranspose2d,BatchNorm2d,ReLU完成的。 生成器的输出,通过tanh激活函数把数据映射到[−1,1]。需要注意的是,在卷积转置层之后紧跟BN层,这是DCGAN论文的重要贡献。这些层(即BN层)有助于训练过程中梯度的流动。DCGAN论文中的生成器如下图所示:
生成器代码如下:
class Generator(nn.Module):  # father:nn.Module   son:Generator
    def __init__(self, ngpu):  # initialize the properties of the father
        super(Generator, self).__init__()  # jointly father and son,call the method of father's __init__(),let son include all the properties of father
        self.ngpu = ngpu
        self.main = nn.Sequential(  # construct neural layers in order
            # input is Z, going into a convolution;state size:4 x 4 x (ngf*8)
            nn.ConvTranspose2d(nz, ngf * 8, 4, 1, 0, bias=False),  # in_channels=nz, out_channels=ngf*8, kernel_size=4, stride=1, padding=0
            nn.BatchNorm2d(ngf * 8),
            nn.ReLU(True),
            # state size: 8 x 8 x (ngf*4)
            nn.ConvTranspose2d(ngf * 8, ngf * 4, 4, 2, 1, bias=False),
            nn.BatchNorm2d(ngf * 4),
            nn.ReLU(True),
            # state size: 16 x 16 x (ngf*2)
            nn.ConvTranspose2d(ngf * 4, ngf * 2, 4, 2, 1, bias=False),
            nn.BatchNorm2d(ngf * 2),
            nn.ReLU(True),
            # state size: 32 x 32 x (ngf)
            nn.ConvTranspose2d(ngf * 2, ngf, 4, 2, 1, bias=False),
            nn.BatchNorm2d(ngf),
            nn.ReLU(True),
            # state size: 64 x 64 x (nc)
            nn.ConvTranspose2d(ngf, nc, 4, 2, 1, bias=False),
            nn.Tanh()
        )

    def forward(self, input):
        if input.is_cuda and self.ngpu > 1:
            output = nn.parallel.data_parallel(self.main, input, range(self.ngpu))
        else:
            output = self.main(input)
        return output
然后,我们可以实例化生成器,并应用weights_init方法,代码如下:
netG = Generator(ngpu).to(device)  # create the generator
netG.apply(weights_init)  # apply the weight_init function,randomly initialize all weights to means=0,std=0.2
if opt.netG != '':
    netG.load_state_dict(torch.load(opt.netG))
print(netG)
3.判别器Discriminator
如前所述,判别器D是一个二分类网络,它将图片作为输入,输出其为真的标量概率。这里,D的输入是一个3*64*64的图片,通过一系列的 Conv2d, BatchNorm2d,和 LeakyReLU 层对其进行处理,最后通过Sigmoid 激活函数输出最终概率。如有必要,你可以使用更多层对其扩展。DCGAN 论文提到使用跨步卷积而不是池化进行降采样是一个很好的实践,因为它可以让网络自己学习池化方法。BatchNorm2d层和LeakyReLU层也促进了梯度的健康流动,这对生成器G和判别器D的学习过程都是至关重要的。判别器代码如下:
class Discriminator(nn.Module):  # father:nn.Module   son:Discriminator
    def __init__(self, ngpu):  # initialize the properties of the father
        super(Discriminator, self).__init__()  # jointly father and son,call the method of father's __init__(),let son include all the properties of father
        self.ngpu = ngpu
        self.main = nn.Sequential(  # construct neural layers in order
            # input is 64 x 64 x (nc)
            nn.Conv2d(nc, ndf, 4, 2, 1, bias=False),  # in_channels=nz, out_channels=ngf, kernel_size=4, stride=2, padding=1
            nn.LeakyReLU(0.2, inplace=True),
            # state size. 32 x 32 x (ndf)
            nn.Conv2d(ndf, ndf * 2, 4, 2, 1, bias=False),
            nn.BatchNorm2d(ndf * 2),
            nn.LeakyReLU(0.2, inplace=True),
            # state size.  16 x 16 x (ndf*2)
            nn.Conv2d(ndf * 2, ndf * 4, 4, 2, 1, bias=False),
            nn.BatchNorm2d(ndf * 4),
            nn.LeakyReLU(0.2, inplace=True),
            # state size.  8 x 8 x (ndf*4)
            nn.Conv2d(ndf * 4, ndf * 8, 4, 2, 1, bias=False),
            nn.BatchNorm2d(ndf * 8),
            nn.LeakyReLU(0.2, inplace=True),
            # state size.   4 x 4 x (ndf*8)
            nn.Conv2d(ndf * 8, 1, 4, 1, 0, bias=False),
            nn.Sigmoid()
        )

    def forward(self, input):
        if input.is_cuda and self.ngpu > 1:
            output = nn.parallel.data_parallel(self.main, input, range(self.ngpu))
        else:
            output = self.main(input)

        return output.view(-1, 1).squeeze(1)  # .view(-1,1):redefining the shape of the matrix;  .squeeze(1):remove the dimensions of 1 in the matrix
然后,我们同样可以实例化判别器,并应用weights_init方法,代码如下:
netD = Discriminator(ngpu).to(device)  # # create the discriminator
netD.apply(weights_init)  # apply the weight_init function,randomly initialize all weights to means=0,std=0.2
if opt.netD != '':
    netD.load_state_dict(torch.load(opt.netD))
print(netD)
4.损失函数和优化器
有了生成器D和判别器G,我们可以为其指定损失函数和优化器来进行学习。这里将使用Binary Cross Entropy损失函数 (BCELoss)。其在PyTorch中的定义为:
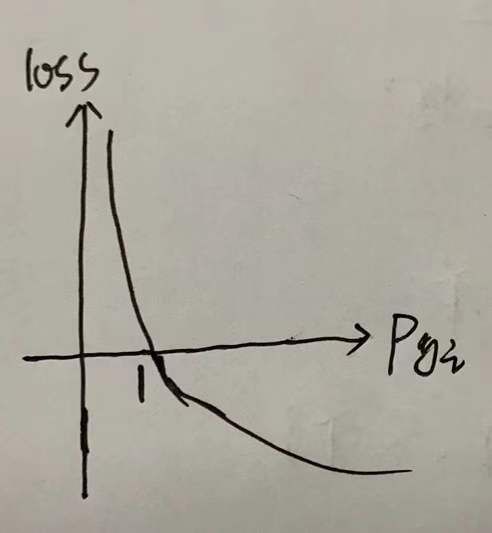
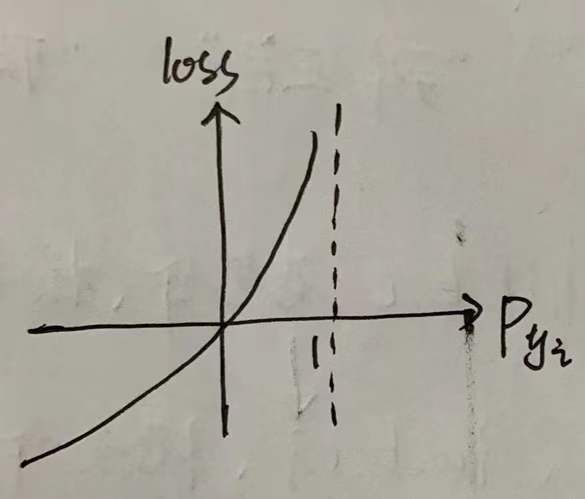
其中,y_i是标签,p_yi是样本为positive的概率,我们约定1代表positive points,0代表negative points。我们来分析一下这个公式:
①对于positive样本,y=1,loss=-logp_yi,当p_yi越大,loss越小;理想情况下,p_yi=1,loss=0;
②对于negative样本,y=0,loss=-log(1-p_yi) ,当p_yi越大,loss越大;理想情况下,p_yi=0,loss=0;
DCGAN中咱们的损失函数为:
关于这个公式的含义,我在上篇博客已经讲过了,这里不再赘述。注意这个损失函数需要你提供两个log组件 (比如 log(D(x))和log(1−D(G(z))))。我们可以指定BCE的哪个部分使用输入y标签。但我们可以通过改变y标签来指定使用哪个log部分。
接下来,我们定义真实标签为1,假标签为0。这些标签用来计算生成器D和判别器G的损失,这也是原始GAN论文的惯例。最后,我们将设置两个独立的优化器,一个用于生成器G,另一个判别器D。如DCGAN 论文所述,两个Adam优化器学习率都为0.0002,Beta1都为0.5。为了记录生成器的学习过程,我们将会生成一批符合高斯分布的固定的隐向量(即fixed_noise)。在训练过程中,我们将周期性地把固定噪声作为生成器G的输入,通过输出看到由噪声生成的图像。
# Initialize BCELoss Function
criterion = nn.BCELoss()

fixed_noise = torch.randn(opt.batchSize, nz, 1, 1, device=device)  # torch.randn(*size):return a tensor containing a set of random numbers drawn from the standard Normal Distribution
real_label = 1
fake_label = 0

# set up optimizer for both netG and netD
optimizerD = optim.Adam(netD.parameters(), lr=opt.lr, betas=(opt.beta1, 0.999))
optimizerG = optim.Adam(netG.parameters(), lr=opt.lr, betas=(opt.beta1, 0.999))
5.训练Training
最后,我们已经定义了GAN网络的所有结构,可以开始训练它了。请注意,训练GAN有点像一种艺术形式,因为不正确的超参数会导致模式崩溃,却不会提示超参数错误的信息。接下来,我们将会“为真假数据构造不同的mini-batches数据”,同时调整判别器G的目标函数以最大化logD(G(z))。训练分为两个部分。第一部分更新判别器,第二部分更新生成器。
第一部分——训练判别器(Part 1 - Train the Discriminator)
回想一下,判别器的训练目的是最大化输入正确分类的概率。实际上,我们想要最大化log(D(x))+log(1−D(G(z)))。为了区别mini-batches,分两步计算。第一步,我们将会构造一个来自训练数据的真图片batch,作为判别器D的输入,计算其损失loss(log(D(x)),调用backward方法计算梯度。第二步,我们将会构造一个来自生成器G的假图片batch,作为判别器D的输入,计算其损失loss(log(1−D(G(z))),调用backward方法累计梯度。最后,调用判别器D优化器的step方法更新一次模型(即判别器D)的参数。
第二部分——训练生成器(Part 2 - Train the Generator)
如原论文所述,我们希望通过最小化log(1−D(G(z)))训练生成器G来创造更好的假图片。作为解决方案,我们希望最大化log(D(G(z)))。通过以下方法来实现这一点:使用判别器D来分类在第一部分G的输出图片,计算损失函数的时候用真实标签(记做GT),调用backward方法更新生成器G的梯度,最后调用生成器G优化器的step方法更新一次模型(即生成器G)的参数。使用真实标签作为GT来计算损失函数看起来有悖常理,但是这允许我们可以使用BCELoss的log(x)部分而不是log(1−x)部分,这正是我们想要的。
for epoch in range(opt.niter):  # For each epoch
    for i, data in enumerate(dataloader, 0):  # For each batch in the dataloader
        ############################
        # (1) Update D network: maximize log(D(x)) + log(1 - D(G(z)))
        ###########################
        # train with all-real batch
        netD.zero_grad()
        # format batch
        real_cpu = data[0].to(device)  # data[a,b]:a means to take all the data in row a, b means take all data in column b
        batch_size = real_cpu.size(0)
        label = torch.full((batch_size,), real_label,
                           dtype=real_cpu.dtype, device=device)
        #############################
        output = netD(real_cpu)  # Forward,pass all-real batch through netD
        errD_real = criterion(output, label)  # calculate loss on all-real batch
        errD_real.backward()  # calculate gradient for netD in backward propagation
        D_x = output.mean().item()  # .item():return a float point data when output loss

        # train with fake
        noise = torch.randn(batch_size, nz, 1, 1, device=device)  # generate batch of z-vectors
        fake = netG(noise)  # generate fake image batch with netG
        label.fill_(fake_label)
        output = netD(fake.detach())  # Forward,pass all-fake image batch through netD
        errD_fake = criterion(output, label)  # calculate loss on all-fake image batch
        errD_fake.backward()  # calculate gradient for this batch(all-fake image)
        D_G_z1 = output.mean().item()
        errD = errD_real + errD_fake  # add the loss
        optimizerD.step()  # update the netD model by update discriminator's optimizer's step() method

        ############################
        # (2) Update G network: maximize log(D(G(z)))
        ###########################
        netG.zero_grad()
        label.fill_(real_label)  # fill real_label
        output = netD(fake)  # Forward,pass fake images through netD
        errG = criterion(output, label)  # calculate the loss between output and real_lable,why?because we want use BECLOSS's logP_y part
        errG.backward()
        D_G_z2 = output.mean().item()
        optimizerG.step()
参考:https://www.codetd.com/article/13228021


