yolov5 解析
YoloV5 搬运记录
- 参数详解
-
- `--quad`参数,
- `--multi_scale` 参数
- 超参文件的理解`hyp.scratch.yaml`
-
- shear的理解
- HSV变换
- 构建模型
- 输入图片缩放
- 更改模型结构
- 数据增强
- 如何训练出好的模型
-
- 数据集
- 模型选择
- 训练设置
参数详解
--quad参数,
当我们设置--imgsz 为640 的时候,有时候查看训练输出的img_size 仍为1280 why???
 查看代码
查看代码datasets.py 有如下操作
dataloader = loader(dataset,
                        batch_size=batch_size,
                        num_workers=nw,
                        sampler=sampler,
                        pin_memory=False,
                        collate_fn=LoadImagesAndLabels.collate_fn4 if quad else LoadImagesAndLabels.collate_fn)
collate_fn4 的代码
@staticmethod
    def collate_fn4(batch):
        img, label, path, shapes = zip(*batch)  # transposed
        n = len(shapes) // 4
        img4, label4, path4, shapes4 = [], [], path[:n], shapes[:n]

        ho = torch.tensor([[0., 0, 0, 1, 0, 0]])
        wo = torch.tensor([[0., 0, 1, 0, 0, 0]])
        s = torch.tensor([[1, 1, .5, .5, .5, .5]])  # scale
        for i in range(n):  # zidane torch.zeros(16,3,720,1280)  # BCHW
            i *= 4
            if random.random() < 0.5:
                im = F.interpolate(img[i].unsqueeze(0).float(), scale_factor=2., mode='bilinear', align_corners=False)[
                    0].type(img[i].type())
                l = label[i]
            else:
                im = torch.cat((torch.cat((img[i], img[i + 1]), 1), torch.cat((img[i + 2], img[i + 3]), 1)), 2)
                l = torch.cat((label[i], label[i + 1] + ho, label[i + 2] + wo, label[i + 3] + ho + wo), 0) * s
            img4.append(im)
            label4.append(l)

        for i, l in enumerate(label4):
            l[:, 0] = i  # add target image index for build_targets()

        return torch.stack(img4, 0), torch.cat(label4, 0), path4, shapes4
结论 --quad为True 会进行插值,扩大2倍
那么为什么有这个参数呢?看看官方的回答
这是一个实验性的参数,他们认为可能会对大的img_size 有益,
collate_fn4会根据概率把 batch from16x3x640x640reshape成4x3x1280x1280
他是把batch 内的一些图像2倍的上采样(4 mosaics 中的一个上采用,其他3个会删除)
我们还没有进行更多的实验,但是我们训练了一个正常的yolov5l 和yolov5 带--quad,--quad的模型可以在--img-sizes大于640 的图片上推理,正常的模型在--img-sizes大于640 的图片上推理更差(两个模型都在--img 640下训练)而--quad的模型在在640的尺寸上推理有一点点差,因此你可以考虑--img 640 --quad训练作为一个折中 的选择,享受--img 640带来的训练速度的同时获得高一点点的MAP(正常来讲,--img 1280会消耗4倍长时间比--img 640)
--multi_scale 参数
multi scale训练在目标检测中使用的非常广泛。首先确定一个最小到最大尺寸的范围,比如没用multi scale前resize=640,那么可以确定一个范围[0.5,1.5],乘以640之后就是最小到最大尺寸的范围。然后,选择一个stride长度,比如yolov5是32,找出最小到最大尺寸中所有能被stride长度整除的尺寸。最后,随机选择一个尺寸,将所有图片resize到该尺寸再填充成正方形图片就可以送入网络训练了。
多尺度训练一个明显的好处是:不增加推理时间。所以不管是业务还是竞赛,大胆上多尺度训练就对了。还有一些值得一说的地方:
1). 最后输出是全连接的网络不能用多尺度。原因很简单,尺度变了,最后一层的权重数量就对不上输入数量了。比如yolov1和带有flatten接fc的分类网络(如VGG)。
2). 多尺度训练,在合理范围内扩大多尺度的范围,是能获得更高收益的。比如上文中FCOS的短边范围[640, 800]。这个域扩充到[480, 960],还可以获得非常可观的收益。当然什么是合理的范围,需要各位自己去把控品味了。可以看看这个博主的分享
超参文件的理解hyp.scratch.yaml
shear的理解
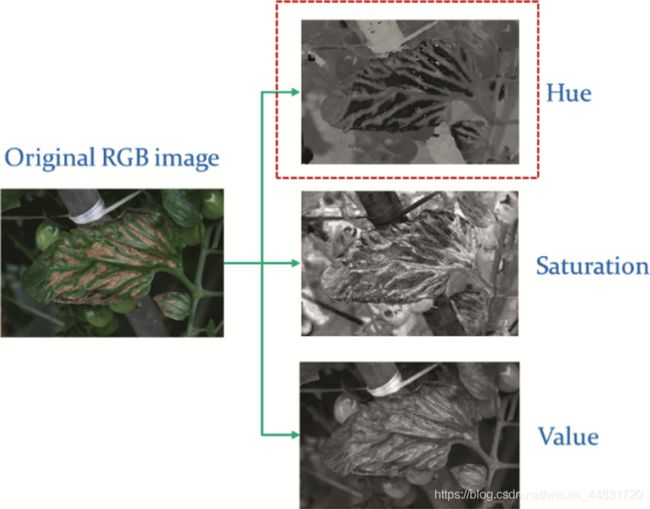
HSV变换
构建模型
parse_model(d, ch):
d 的输入为 yaml字典,ch为[3]
with open("models/yolov5s.yaml") as f:
    yaml = yaml.safe_load(f)
yaml
{'nc': 80,
# depth_multiple表示number的缩放系数。而width_multiple表示channel的缩放系数,就是将配置里面的backbone和head部分有关通道的设置
 'depth_multiple': 0.33,
 'width_multiple': 0.5,
 'anchors': [[10, 13, 16, 30, 33, 23],
  [30, 61, 62, 45, 59, 119],
  [116, 90, 156, 198, 373, 326]],
 'backbone':
 # [from, number, module, args]
 # from意思是当前模块输入来自哪一层输出,number是本模块重复次数,后面对应的是模块名称和输入参数。由于本份配置其实没有分neck模块,故spp也写在了backbone部分
  [[-1, 1, 'Focus', [64, 3]],
  [-1, 1, 'Conv', [128, 3, 2]],
  [-1, 3, 'C3', [128]],
  [-1, 1, 'Conv', [256, 3, 2]],
  [-1, 9, 'C3', [256]],
  [-1, 1, 'Conv', [512, 3, 2]],
  [-1, 9, 'C3', [512]],
  [-1, 1, 'Conv', [1024, 3, 2]],
  [-1, 1, 'SPP', [1024, [5, 9, 13]]],
  [-1, 3, 'C3', [1024, False]]],
 'head':
 # 作者没有分neck模块,所以head部分包含了PANet+head(Detect)部分
 [[-1, 1, 'Conv', [512, 1, 1]],
  [-1, 1, 'nn.Upsample', ['None', 2, 'nearest']],
  [[-1, 6], 1, 'Concat', [1]],
  [-1, 3, 'C3', [512, False]],
  [-1, 1, 'Conv', [256, 1, 1]],
  [-1, 1, 'nn.Upsample', ['None', 2, 'nearest']],
  [[-1, 4], 1, 'Concat', [1]],
  [-1, 3, 'C3', [256, False]],
  [-1, 1, 'Conv', [256, 3, 2]],
  [[-1, 14], 1, 'Concat', [1]],
  [-1, 3, 'C3', [512, False]],
  [-1, 1, 'Conv', [512, 3, 2]],
  [[-1, 10], 1, 'Concat', [1]],
  [-1, 3, 'C3', [1024, False]],
  [[17, 20, 23], 1, 'Detect', ['nc', 'anchors']]]}
yaml[‘backbone’] + yaml[‘head’]
[[-1, 1, 'Focus', [64, 3]],
 [-1, 1, 'Conv', [128, 3, 2]],
 [-1, 3, 'C3', [128]],
 [-1, 1, 'Conv', [256, 3, 2]],
 [-1, 9, 'C3', [256]],
 [-1, 1, 'Conv', [512, 3, 2]],
 [-1, 9, 'C3', [512]],
 [-1, 1, 'Conv', [1024, 3, 2]],
 [-1, 1, 'SPP', [1024, [5, 9, 13]]],
 [-1, 3, 'C3', [1024, False]],
 [-1, 1, 'Conv', [512, 1, 1]],
 [-1, 1, 'nn.Upsample', ['None', 2, 'nearest']],
 [[-1, 6], 1, 'Concat', [1]],
 [-1, 3, 'C3', [512, False]],
 [-1, 1, 'Conv', [256, 1, 1]],
 [-1, 1, 'nn.Upsample', ['None', 2, 'nearest']],
 [[-1, 4], 1, 'Concat', [1]],
 [-1, 3, 'C3', [256, False]],
 [-1, 1, 'Conv', [256, 3, 2]],
 [[-1, 14], 1, 'Concat', [1]],
 [-1, 3, 'C3', [512, False]],
 [-1, 1, 'Conv', [512, 3, 2]],
 [[-1, 10], 1, 'Concat', [1]],
 [-1, 3, 'C3', [1024, False]],
 [[17, 20, 23], 1, 'Detect', ['nc', 'anchors']]]
#这个for 循环就是遍历上面的每一层组成layers
for i, (f, n, m, args) in enumerate(yaml['backbone'] + yaml['head']):
输入图片缩放
# 缩放后的图片必须是stride 的倍数
def letterbox(im, new_shape=(640, 640), color=(114, 114, 114), auto=True, scaleFill=False, scaleup=True, stride=32):
    shape = im.shape[:2]  # current shape [height, width] 输入图片尺寸(1080,810)
    if isinstance(new_shape, int):
        new_shape = (new_shape, new_shape)

    # Scale ratio (new / old) min(640/1080,640/810)=0.5925
    r = min(new_shape[0] / shape[0], new_shape[1] / shape[1])
    if not scaleup:  # only scale down, do not scale up (for better val mAP)小的话直接灰色填充到640
        r = min(r, 1.0)

    # Compute padding
    ratio = r, r  # width, height ratios
    new_unpad = int(round(shape[1] * r)), int(round(shape[0] * r))#(480,640)最短边到640,长边变短
    dw, dh = new_shape[1] - new_unpad[0], new_shape[0] - new_unpad[1]#wh padding dw=640-480,dh=0
    if auto:  # minimum rectangle
        dw, dh = np.mod(dw, stride), np.mod(dh, stride)  # wh padding
    elif scaleFill:  # stretch
        dw, dh = 0.0, 0.0
        new_unpad = (new_shape[1], new_shape[0])
        ratio = new_shape[1] / shape[1], new_shape[0] / shape[0]  # width, height ratios

    dw /= 2  # divide padding into 2 sides 两边填充一样的像素 dw=16
    dh /= 2 # dh=0

    if shape[::-1] != new_unpad:  # resize
        im = cv2.resize(im, new_unpad, interpolation=cv2.INTER_LINEAR)
    top, bottom = int(round(dh - 0.1)), int(round(dh + 0.1))#0,0 上下不填充
    left, right = int(round(dw - 0.1)), int(round(dw + 0.1))#16,16 左右填充
    im = cv2.copyMakeBorder(im, top, bottom, left, right, cv2.BORDER_CONSTANT, value=color)  # add border (640,16+480+16)
    return im, ratio, (dw, dh)
更改模型结构
https://www.cnblogs.com/pprp/p/12241054.html
https://blog.csdn.net/Q1u1NG/article/details/107511465
数据增强
yolo中的数据增强分两个阶段实施 datasets.py
第一个阶段,判断是否采用mosaic增强,mosaic增强之后再随机mixup
并且
image_weights=True时,rect自动为False,rect=False并且augment为True时才会调用mosaic增强
所以
mosaic = self.mosaic and random.random() < hyp['mosaic']
if mosaic:
	# Load mosaic
    img, labels = load_mosaic(self, index)
    shapes = None

    # MixUp augmentation
    if random.random() < hyp['mixup']:
         img, labels = mixup(img, labels, *load_mosaic(self, random.randint(0, self.n - 1)))
如果不用mosaic增强,则随机映射random_perspective
第一阶段完成之后再进入第二阶段
第二阶段albumentations的增强
self.transform = A.Compose([
                A.Blur(p=0.1),
                A.MedianBlur(p=0.1),
                A.ToGray(p=0.01)],
                bbox_params=A.BboxParams(format='yolo', label_fields=['class_labels']))
如何训练出好的模型
数据集
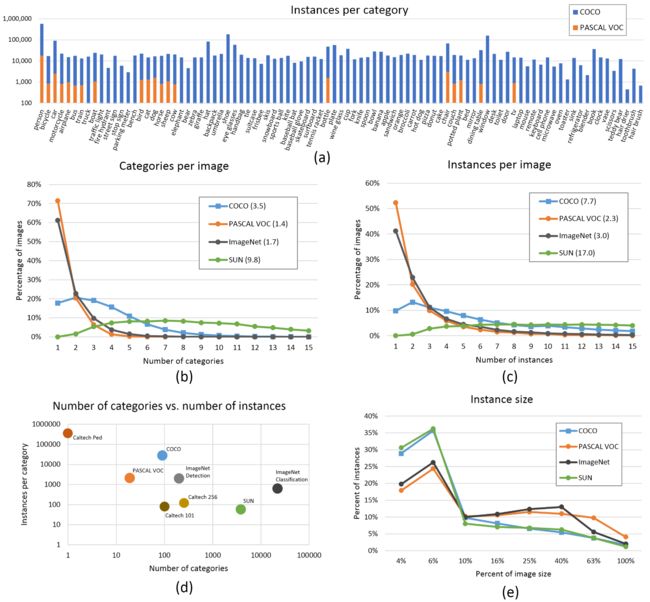
- 图片数量,每一类的图片数量 >1500
- 实例数量,每一类的数量 >10000
- 图像多样性,必须代表部署的环境。对于真实的用例,我们建议我们从不同时间,不同的季节,不同的天气,不同的照明,不同角度,不同来源(在线,当地收集的不同的摄像机)等照片
- 标签一致性,所有图像中的所有类的所有实例都必须标注,部分标注将无法使用
- 标注准确,标签必须贴紧每个对象。 box和对象之间没有空隙。不应该漏标物体
- 背景图片,数据集中增加0-10%的背景图片(没有物体的背景图),以减少FP(False Positives)

模型选择
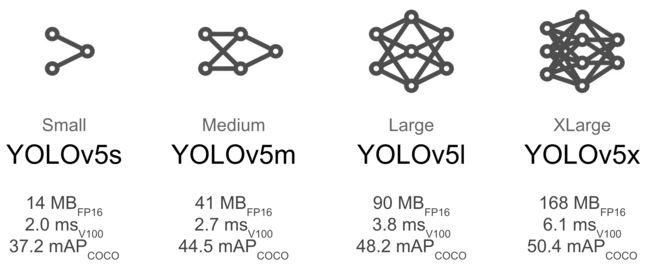
yolov5x和yolov5x6这样的较大模型在几乎所有情况下都能产生更好的结果,但这些模型参数更多,需要更多的cuda内存来训练,并且运行较慢。对于移动部署,我们推荐yoliv5s/m,对于云部署我们推荐yolov5l/x,模型比较可以参考下图

训练设置
更改任何训练参数之前,先用默认参数训练一遍
- Epochs,推荐300,如果更早的过拟合了,可以减少,如果300个epoch之后没有发生过拟合,可以训练600,1200个epoch 等等
- Image size,设置更大的图片尺寸有助于识别到小目标
--img 1280,默认是--img 640,推理时候使用与训练尺寸相同的尺寸, - Batch size,使用硬件支持的最大batch size,
- Hyperparameters, 推荐默认超参数,一般来说,调整数据增强的超参数以减少或者推迟过拟合,可以使得训练过程更长,以获得更高的mAP。减少 loss中其他损失的比重,比如
hyp['obj']能减少过拟合

