PyTorch学习笔记——(8)模型构造(层和块),以多层感知机为例介绍
目录
- 1、层和块的概念:
- 2、模型构造:
- 2.1 继承Module来构造模型:
- 2.2 Module的子类:
- (1)Sequential类:
- (2)ModuleList类:
- (3)ModuleDict类:
- 3、构造复杂模型:
来源:《动手深度学习2》
1、层和块的概念:
当我们刚开始学习神经⽹络时,我们关注的是具有单⼀输出的线性模型。在这⾥,整个模型只由⼀个神经元组成。注意,单个神经元(1)接受⼀些输⼊;(2)⽣成相应的标量输出;(3)具有⼀组相关参数(parameters),这些参数可以更新以优化某些感兴趣的⽬标函数。然后,当我们开始考虑具有多个输出的⽹络,我们就利⽤⽮量化算法来描述整层神经元。像单个神经元⼀样,层(1)接受⼀组输⼊,(2)⽣成相应的输出,(3)由⼀组可调整参数描述。当我们使⽤softmax回归时,⼀个单层本⾝就是模型。然而,即使我们随后引⼊了多层感知机,我们仍然可以认为该模型保留了上⾯所说的基本结构。
有趣的是,对于多层感知机而⾔,整个模型及其组成层都是这种结构。整个模型接受原始输⼊(特征),⽣成输出(预测),并包含⼀些参数(所有组成层的参数集合)。同样,每个单独的层接收输⼊(由前⼀层提供)⽣成输出(到下⼀层的输⼊),并且具有⼀组可调参数,这些参数根据从下⼀层反向传播的信号进⾏更新。虽然你可能认为神经元、层和模型为我们的业务提供了⾜够的抽象,但事实证明,我们经常发现谈论⽐单个层⼤但⽐整个模型小的组件更⽅便。例如,在计算机视觉中⼴泛流⾏的ResNet-152结构就有数百层。这些层是由层组的重复模式组成。⼀次只实现⼀层这样的⽹络会变得很乏味。这种问题不是我们幻想出来的,这种设计模式在实践中很常⻅。上⾯提到的ResNet结构赢得了2015年ImageNet和COCO计算机视觉⽐赛的识别和检测任务,⽬前ResNet结构仍然是许多视觉任务的⾸选结构。在其他的领域,如⾃然语⾔处理和语⾳,层以各种重复模式排列的类似结构现在也是普遍存在。
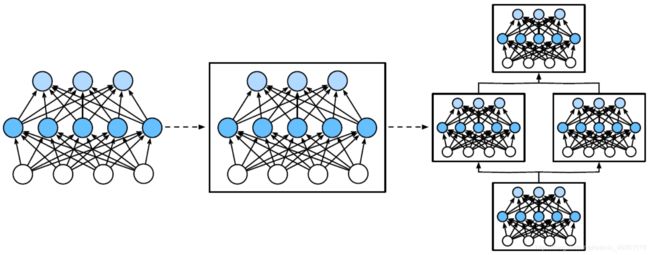
为了实现这些复杂的⽹络,我们引⼊了神经⽹络块的概念。块可以描述单个层、由多个层组成的组件或整个模型本⾝。使⽤块进⾏抽象的⼀个好处是可以将⼀些块组合成更⼤的组件,这⼀过程通常是递归的。这⼀点在 下图 中进⾏了说明。通过定义代码来按需⽣成任意复杂度的块,我们可以通过简洁的代码实现复杂的神经⽹络。
从编程的⻆度来看,块由类(class)表⽰。它的任何⼦类都必须定义⼀个将其输⼊转换为输出的正向传播函数,并且必须存储任何必需的参数。注意,有些块不需要任何参数。最后,为了计算梯度,块必须具有反向传播函数。幸运的是,在定义我们⾃⼰的块时,由于⾃动微分提供了⼀些后端实现,我们只需要考虑正向传播函数和必需的参数。
2、模型构造:
2.1 继承Module来构造模型:
import torch
from torch import nn
class MLP(nn.Module):
	# 申明带有模型参数的层,这里申明了两个全连接层
	def __init__(self, **kwargs):
		# 调用MLP父类Block的构造函数进行必要的初始化,这样在构造实例时还可以指定其他函数
		super(MLP, self).__init__(**kwargs)
		self.hidden = nn.Linear(784, 256) # 隐藏层
		self.act = nn.ReLU()
		self.output = nn.Linear(256, 10) # 输出层
		# 定义模型的前向计算,即如何根据输入x计算返回所需要的模型输出
	def forward(self, x):
		a = self.act(self.hidden(x))
		return self.output(a)
X = torch.rand(2, 784)
net = MLP()
print(net)
net(X)
输出:
MLP(
(hidden): Linear(in_features=784, out_features=256, bias=True)
(act): ReLU()
(output): Linear(in_features=256, out_features=10, bias=True)
)
tensor([[-0.1798, -0.2253, 0.0206, -0.1067, -0.0889, 0.1818,
-0.1474, 0.1845,
-0.1870, 0.1970],
[-0.1843, -0.1562, -0.0090, 0.0351, -0.1538, 0.0992,
-0.0883, 0.0911,
-0.2293, 0.2360]], grad_fn=<ThAddmmBackward>)
2.2 Module的子类:
(1)Sequential类:
⾸先,我们看⼀下多层感知机的代码,看完这个例子之后,在进行介绍Sequential类。
下⾯的代码⽣成⼀个⽹络,其中包含⼀个具有256个单元和ReLU激活函数的全连接的隐藏层,然后是⼀个具有10个隐藏单元且不带激活函数的全连接的输出层。
import torch
import torch.nn as nn
from torch.nn import functional as F

net = nn.Sequential(nn.Linear(20, 256), nn.ReLU(), nn.Linear(256, 10))

X = torch.rand(2, 20)
net(X)
输出:
tensor([[-0.1586,  0.1161, -0.1529, -0.2617,  0.1806, -0.1712,  0.0619,  0.1187,
          0.1115, -0.2267],
        [-0.1393,  0.0495, -0.0175, -0.3081,  0.1623, -0.2207,  0.0959,  0.1289,
          0.2379, -0.1523]], grad_fn=<AddmmBackward>)
在这个例⼦中,我们通过实例化nn.Sequential来构建我们的模型,返回的对象赋给net变量,然后就可以把数据传给net,得出结果了。
注意:nn.Sequential定义了一种特殊的Module
现在我们再回过头来,看看Sequential类:
class MySequential(nn.Module):
	from collections import OrderedDict
	def __init__(self, *args):
		super(MySequential, self).__init__()
		if len(args) == 1 and isinstance(args[0], OrderedDict): # 如果传入的是一个OrderedDict
			for key, module in args[0].items():
				self.add_module(key, module) # add_module方法会将module添加进self._modules(一个OrderedDict)
		else: # 传入的是一些Module
			for idx, module in enumerate(args):
				self.add_module(str(idx), module)
	def forward(self, input):
		# self._modules返回一个 OrderedDict,保证会按照成员添加时的顺序遍历
		for module in self._modules.values():
			input = module(input)
		return input
net = MySequential(
				nn.Linear(784, 256),
				nn.ReLU(),
				nn.Linear(256, 10),
				)
print(net)
net(X)
输出:
MySequential(
	(0): Linear(in_features=784, out_features=256, bias=True)
	(1): ReLU()
	(2): Linear(in_features=256, out_features=10, bias=True)
)
tensor([[-0.0100, -0.2516, 0.0392, -0.1684, -0.0937, 0.2191, -0.1448, 0.0930, 0.1228, -0.2540],
		[-0.1086, -0.1858, 0.0203, -0.2051, -0.1404, 0.2738,-0.0607, 0.0622, 0.0817, -0.2574]], grad_fn=<ThAddmmBackward>)
(2)ModuleList类:
net = nn.ModuleList([nn.Linear(784, 256), nn.ReLU()])
net.append(nn.Linear(256, 10)) # # 类似于List的append操作
print(net[-1]) # 类似于List的索引访问
print(net)
输出:
Linear(in_features=256, out_features=10, bias=True)
ModuleList(
	(0): Linear(in_features=784, out_features=256, bias=True)
	(1): ReLU()
	(2): Linear(in_features=256, out_features=10, bias=True)
)
(3)ModuleDict类:
net = nn.ModuleDict({
				'linear': nn.Linear(784, 256),
				'act': nn.ReLU(),
})
net['output'] = nn.Linear(256, 10) # 访问
print(net['linear']) # 添加
print(net.output)
print(net)
输出:
Linear(in_features=784, out_features=256, bias=True)
Linear(in_features=256, out_features=10, bias=True)
ModuleDict(
	(act): ReLU()
	(linear): Linear(in_features=784, out_features=256, bias=True)
	(output): Linear(in_features=256, out_features=10, bias=True)
)
3、构造复杂模型:
class FancyMLP(nn.Module):
	def __init__(self, **kwargs):
		super(FancyMLP, self).__init__(**kwargs)

		self.rand_weight = torch.rand((20, 20), requires_grad=False) # 不可训练参数(常数参数)
		self.linear = nn.Linear(20, 20)

	def forward(self, x):
		x = self.linear(x)
		# 使用创建的常数参数,以及nn.functional中的relu函数和mm函数
		x = nn.functional.relu(torch.mm(x, self.rand_weight.data) + 1)
		# 复用全连接层。等价于两个全连接层共享参数
		x = self.linear(x)
		# 控制流,这里我们需要调用item函数来返回标量进行比较
		while x.norm().item() > 1:
			x /= 2
		if x.norm().item() < 0.8:
			x *= 10
		return x.sum()
X = torch.rand(2, 20)
net = FancyMLP()
print(net)
net(X)
输出:
FancyMLP(
	(linear): Linear(in_features=20, out_features=20, bias=True))
tensor(0.8432, grad_fn=<SumBackward0>)
![]()
class NestMLP(nn.Module):
	def __init__(self, **kwargs):
		super(NestMLP, self).__init__(**kwargs)

		self.net = nn.Sequential(nn.Linear(40, 30), nn.ReLU())

	def forward(self, x):
		return self.net(x)

net = nn.Sequential(NestMLP(), nn.Linear(30, 20), FancyMLP())

X = torch.rand(2, 40)
print(net)
net(X)
输出:
Sequential(
	(0): NestMLP(
		(net): Sequential(
			(0): Linear(in_features=40, out_features=30, bias=True)
			(1): ReLU()
		)
	)
	(1): Linear(in_features=30, out_features=20, bias=True)
	(2): FancyMLP(
		(linear): Linear(in_features=20, out_features=20, bias=True)
	)
)
tensor(14.4908, grad_fn=<SumBackward0>)


