Python数据分析——Pandas基础入门+代码(三)之索引与切片
系列文章目录
Chapter 1:创建与探索DF、排序、子集化:Python数据分析——Pandas基础入门+代码(一)
Chapter 2:聚合函数,groupby,统计分析:Python数据分析——Pandas基础入门+代码(二)
Chapter 3:索引和切片:Python数据分析——Pandas基础入门+代码(三)
Chapter 4: 可视化与读写csv文件:Python数据分析——Pandas基础入门+代码(四)
Chapter 5:数据透视表:Python数据分析——Pandas基础入门+代码之数据透视表
文章目录
- 系列文章目录
- 前言
- 一、索引
-
- 1.1 Index处理
- 1.2 使用 .loc() 进行子集化
- 1.3 分层索引
- 1.4 按索引排序
- 二、切片
-
- 2.1 切片索引值
- 2.2 双向切片
- 2.3 时序切片
- 2.4 以“行”“列”号进行切片
- Reference
前言
这一篇主要讲的是:
索引 Indexing 和 切片 Slicing
一开始会从索引开始说起,然后再讲解一下切片,这两部分包看包会。
一、索引
1.1 Index处理
这里主要用到的是两个methods,分别是:
- 设置索引
- 删除索引
# 表示以xxx为索引
set_index('xxx')

# 重置索引,如果又drop表示,会先重置索引再对刚刚索引的那列进行删除
reset_index(drop = True)
1.2 使用 .loc() 进行子集化
这里的翻译是:
- 索引的杀手级功能是 .loc[]:一种接受索引值的子集方法。当您向其传递单个参数时,它将采用行的子集。
- 使用 .loc[] 进行子集化的代码比标准的方括号子集化更容易阅读,这可以减少您的代码维护的负担。
说白了就是最好用.loc[]去找我们要的东西,这不仅方便索引,也方便我们阅读结果。同时,.loc()也能用于切片处理,这会在后面讲解。
For example, 下面的代码做了一个对比,得到的结果是一样的。
首先,给定一个城市的list
然后,利用isin()进行查找返回一个布林值,再要求pandas将布林值为True的找出来并打印
最后一行呢,是直接让loc去定位查找,包含了list中的数据,从而筛选出来并打印
# Make a list of cities to subset on
cities = ["Moscow", "Saint Petersburg"]
# Subset temperatures using square brackets
print(temperatures[temperatures["city"].isin(cities)])
# Subset temperatures_ind using .loc[]
print(temperatures_ind.loc[cities])
1.3 分层索引
分层索引的直接意思就是,可以一次索引多列,不想前面只索引了一列。分层索引的好处就是可以更好的推理嵌套分类变量。图中的例子就说对照组和实验组。
我们可以先看下原数据temperatures_ind 的前几行内容是什么样的:国家、城市、日期、平均温度
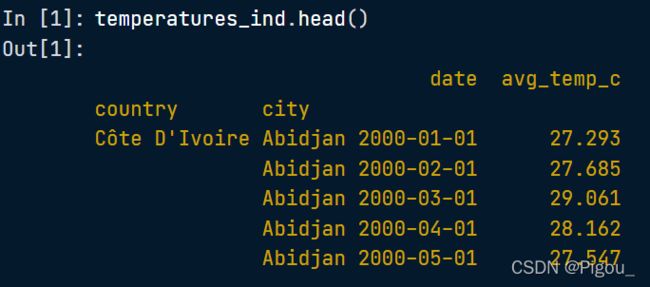
得到temperatures_ind 之后,我们建立一个元组,让loc去定位索引。
# Index temperatures by country & city
temperatures_ind = temperatures.set_index(['country', 'city'])

# List of tuples: Brazil, Rio De Janeiro & Pakistan, Lahore
## 这里还教了下怎么在list里面建立一个tuples元组
rows_to_keep = [('Brazil', 'Rio De Janeiro'), ('Pakistan', 'Lahore')]

# Subset for rows to keep
print(temperatures_ind.loc[rows_to_keep])

我们可以看到country:Brazil和Pakistan他们的城市被loc找了出来。
1.4 按索引排序
这里再复习一遍 sort_values()(在前面的一篇文章提到了)以及一个新出现的sort_index()。也就是两种数据排序的方法
sort_values() 主体
DataFrame.sort_values(by, axis=0, ascending=True, inplace=False, kind='quicksort', na_position='last')

'''
axis:default 0,默认按照列排序,即纵向排序;如果为1,则是横向排序。

by:指定按照某一行或者某一列;如果axis=0,那么by="列名";如果axis=1,那么by="行名"。

ascending:布尔型,True则升序,如果by=['列名1','列名2'],
						则该参数可以是[True, False],即第一字段升序,第二个降序。

inplace:布尔型,是否用排序后的数据框替换现有的数据框。

kind:排序方法,{‘quicksort’, ‘mergesort’, ‘heapsort’}, default ‘quicksort’。

na_position:{‘first’, ‘last’}, default ‘last’,默认缺失值排在最后面。
'''
sort_index() 主体:
DataFrame.sort_index(axis=0, level=None, ascending=True, inplace=False, kind='quicksort',
					 na_position='last', sort_remaining=True, ignore_index=False, key=None)
'''
axis:0 行排序;1 列排序

level:默认None,可以指定某一列,按指定的列进行排序;这里就和sort_value的‘by’差不多
				如果level=['列名1','列名2'],该参数可以是[True, False],即第一字段升序,第二个降序。

ascending:默认True升序排列;False降序排列

inplace:默认False,否则排序之后的数据直接替换原来的数据框

kind:排序方法,{‘quicksort’, ‘mergesort’, ‘heapsort’}, default ‘quicksort’。似乎不用太关心。

na_position:缺失值默认排在最后{"first","last"}
'''

## Example
# Sort temperatures_ind by country then descending city
print(temperatures_ind.sort_index(level = ['country','city'], ascending = [True, False]))
同样也是1.3中的数据,得到的结果如下。如果我们将sort_index转换为sort_values(),里面的参数level改成by,也能得到同样的结果。
那么他们二者到底有什么区别呢?
| Methods | .sort_values() | .sort_index() |
|---|---|---|
| 作用 | 既可以根据列数据,也可根据行数据排序。 | 默认根据行标签对所有行排序,或根据列标签对所有列排序,或根据指定某列或某几列对行排序。 |
| 注意事项 | 必须指定by参数,即必须指定哪几行或哪几列;无法根据index名和columns名排序(由.sort_index()执行) | df. sort_index()可以完成和df. sort_values()完全相同的功能,但python更推荐用只用df. sort_index()对“根据行标签”和“根据列标签”排序,其他排序方式用df.sort_values()。 |
| 官方文档 | https://pandas.pydata.org/pandas-docs/stable/reference/api/pandas.DataFrame.sort_values.html | https://pandas.pydata.org/pandas-docs/stable/reference/api/pandas.DataFrame.sort_index.html |
说白了,直接用sort_index()完事!!
PS: sort_values和index的一些内容是看了这个大佬的blog(作者:马尔代夫Maldives
链接:https://www.jianshu.com/p/f0ed06cd5003)的,但是他有一些细节记录的不对的地方,我根据官方的文档进行了修正
二、切片
2.1 切片索引值
[外链图片转存失败,源站可能有防盗链机制,建议将图片保存下来直接上传(img-Tq8AFwaB-1648963499251)(Slicing%20an%20b02bb/Untitled%204.png)]
这里讲了四点需要注意的事项
- 如果索引已排序(使用 .sort_index()),则只能对索引进行切片。
- 要在外层切片,first 和 last 可以是字符串。
- 要在内层切片,first 和 last 应该是元组。(这里非常值得注意!!是元组!!)
- 如果将单个切片传递给 .loc[],它将对行进行切片。
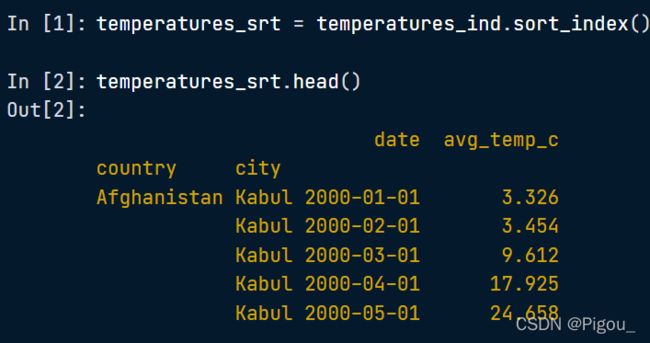
怎么解释上面4个注意事项?先看看源数据 temperatures_srt 长什么样
# Sort the index of temperatures_ind
temperatures_srt = temperatures_ind.sort_index()
# Subset rows from Pakistan to Russia
print(temperatures_srt.loc['Pakistan':'Russia']) # 这里就是外层切片
# Try to subset rows from Lahore to Moscow
print(temperatures_srt.loc['Lahore':'Moscow'])

相当于,之前1.4描述的,筛选和定位。
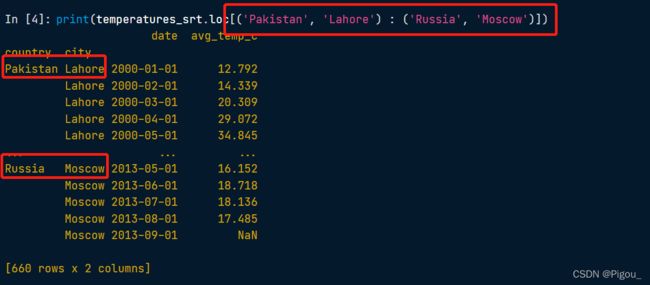
内层切片呢就是,我们指定了多列,且一定要是元组才能切的出来。
# Subset rows from Pakistan, Lahore to Russia, Moscow
print(temperatures_srt.loc[('Pakistan', 'Lahore') : ('Russia', 'Moscow')]) # 这里就是内层切片
2.2 双向切片
双向切片就是,你同时对 行 和 列 进行了切片
Slice rows with code like df.loc[("a", "b"):("c", "d")].
Slice columns with code like df.loc[:, "e":"f"].
Slice both ways with code like df.loc[("a", "b"):("c", "d"), "e":"f"]
举个简单的例子,这里再看一下源数据

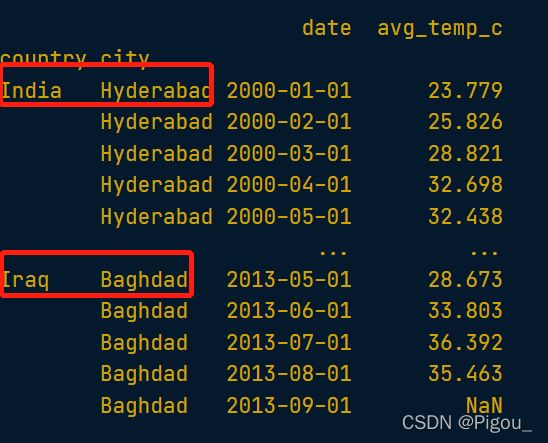
然后展示一下横向切片,纵向切片以及横纵切片的不同。首先是横向切片,
# Subset rows from India, Hyderabad to Iraq, Baghdad
print(temperatures_srt.loc[("India", "Hyderabad"):("Iraq", "Baghdad")])
# 这就是横向切片,按行
然后是纵向切片
# Subset columns from date to avg_temp_c
print(temperatures_srt.loc[:, "date":"avg_temp_c"])
# 纵向切片
这结果看着似乎和源数据一样对吧。那是因为源数据只有这两列。纵向就是按列column来筛选,忽略掉了rows
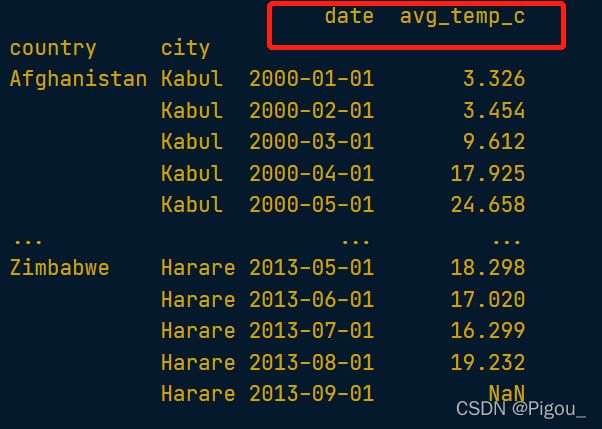
最后是横纵切片。我们rows和column都给予了特定的筛选范围。这里需要额外注意一下语法格式。
# Subset in both directions at once
print(temperatures_srt.loc[("India", "Hyderabad"):("Iraq", "Baghdad"), "date":"avg_temp_c"])
# 横纵切片
2.3 时序切片
这里主要是想将 .loc[] 与日期索引结合使用提供了一种简单的方法来对某个日期之前或之后的行进行子集化。
然后我在这里使用loc的时候出了点小问题,使用 df[‘date’] == ‘2011’ 或 df[‘date’] <= ‘2011’ 之类的检查不会检查 2011 年的所有日期,而只会检查日期 2011-01-01。使用布尔条件时写出完整的日期(例如 2011-12-31)。
# Use Boolean conditions to subset temperatures for rows in 2010 and 2011
temperatures_bool = temperatures[(temperatures['date'] >= '2010-01-01') & (temperatures['date'] <= '2011-12-31')]
print(temperatures_bool)

# Set date as the index and sort the index
temperatures_ind = temperatures.set_index('date').sort_index()

# Use .loc[] to subset temperatures_ind for rows in 2010 and 2011
print(temperatures_ind.loc['2010' : '2011'])

# Use .loc[] to subset temperatures_ind for rows from Aug 2010 to Feb 2011
print(temperatures_ind.loc['2010-08' : '2011-02'])
2.4 以“行”“列”号进行切片
这里就主要区分与iloc和loc之间的差别了!二者都可以切片和筛选,但是iloc主要用与行列号进行切片。不像loc可以直接对数据或者行列名称切片。
另外,如果需要看看loc和iloc之间的区别在哪可以看看别人的blog,非常的清楚。
ATTENTION: iloc主要是对索引号做选择,和loc不同的是,iloc是左开右闭的,loc是左开右开
'''
Request:
Get the 23rd row, 2nd column (index positions 22 and 1).
Get the first 5 rows (index positions 0 to 5).
Get all rows, columns 3 and 4 (index positions 2 to 4).
Get the first 5 rows, columns 3 and 4.
'''

# Get 23rd row, 2nd column (index 22, 1)
print(temperatures.iloc[22, 1])

# Use slicing to get the first 5 rows
print(temperatures.iloc[:5])

# Use slicing to get columns 3 to 4
print(temperatures.iloc[:, 2:4])

# Use slicing in both directions at once
print(temperatures.iloc[:5, 2:4])
Reference
学习网站: DataCamp


