从RNN到Attention到Transformer系列-Encode-Decode(Seq2Seq)介绍及代码实现
深度学习知识点总结
专栏链接:
深度学习知识点总结_Mr.小梅的博客-CSDN博客本专栏主要总结深度学习中的知识点,从各大数据集比赛开始,介绍历年冠军算法;同时总结深度学习中重要的知识点,包括损失函数、优化器、各种经典算法、各种算法的优化策略Bag of Freebies (BoF)等。
本章介绍从RNN到Attention到Transformer系列-Decode-Encode(Seq2Seq)
目录
3.3 Encode-Decode(Seq2Seq)
3.3.1 Encode-Decode(Seq2Seq)介绍
3.3.2 Encode
3.3.3 Decode
3.3.4 Seq2Seq
3.3.5 全部训练代码
3.3 Encode-Decode(Seq2Seq)
参考2014年论文《Sequence to Sequence Learning with Neural Networks》。
3.3.1 Encode-Decode(Seq2Seq)介绍
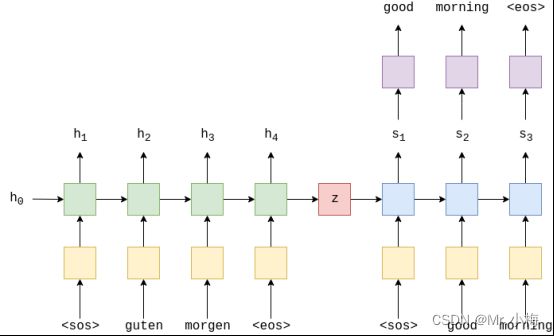
最常见的序列到序列(seq2seq)模型是编码器 - 解码器模型,它们通常使用递归神经网络(RNN)将源(输入)句子编码到单个向量中。在此次介绍中,我们将把这个单一的向量称为上下文向量。我们可以将上下文向量视为整个输入句子的抽象表示。然后,该向量由第二个RNN解码,该RNN通过一次生成一个单词来学习输出目标(输出)句子。
上图显示了一个示例翻译。输入/源句子“guten morgen”通过嵌入层(黄色),然后输入到编码器(绿色)。我们还将序列的开头
![]()
这里的RNN同样也可以使用LSTM(Long Short-Term Memory)和GRU(Gated Recurrent Unit)等。现在有了![]() 还有初始的隐藏状态h0一般默认为0,可以得到隐藏状态st:
还有初始的隐藏状态h0一般默认为0,可以得到隐藏状态st:
![]()
虽然输入/源嵌入层e和输出/目标嵌入层d,在图中均以黄色显示,它们是两个不同的嵌入层,具有自己的参数。
在解码器中,我们需要从隐藏状态转到实际单词,因此在每个时间步长中,我们使用st预测(通过一个线性层,以紫色显示)我们认为是序列中的下一个单词,y^t
![]()
解码器中的单词总是一个接一个地生成,每个时间步长一个。我们总是使用解码器的第一个输入
在训练/测试我们的模型时,我们总是知道目标句子中有多少个单词,因此一旦我们命中了那么多单词,我们就会停止生成单词。在推理过程中,通常不断生成单词,直到模型输出
一旦我们有了预测的目标句子,![]() ,我们将它与实际的目标句子进行比较,
,我们将它与实际的目标句子进行比较,![]() ,来计算我们的损失。然后,我们使用此损失来更新模型中的所有参数。
,来计算我们的损失。然后,我们使用此损失来更新模型中的所有参数。
3.3.2 Encode
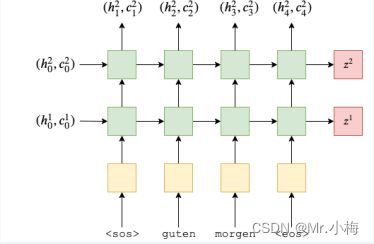
构建一个双层的LSTM,输入句子X,编码后进入RNN第一层,使用隐藏状态![]() ,输出结果作为下一层的输入,用上标表示第几次,第一层隐藏状态由以下公式得出:
,输出结果作为下一层的输入,用上标表示第几次,第一层隐藏状态由以下公式得出:
![]()
第二层中的隐藏状态由下式给出:
![]()
另外我们还需要一个初始隐藏状态作为每层的输入![]() ,我们还将输出每层的上下文向量
,我们还将输出每层的上下文向量![]() 。
。
对于LSTM,它不仅仅是采用隐藏状态并按时间步长返回新的隐藏状态,还接收并返回一个单元状态,ct,每个时间步长:
我们可以把ct当做是另一种类型的隐藏状态,类似于![]() ,
,![]() 将被初始化为所有零的张量。此外,我们的上下文向量现在既是最终的隐藏状态,也是最终的单元格状态,即
将被初始化为所有零的张量。此外,我们的上下文向量现在既是最终的隐藏状态,也是最终的单元格状态,即![]() ,将我们的多层方程扩展到 LSTM,我们得到:
,将我们的多层方程扩展到 LSTM,我们得到:
请注意,只有来自第一层的隐藏状态作为输入传递到第二层,而不是单元格状态。所以我们的编码器看起来像这样:
使用PyTorch实现代码如下:
import torch
import torch.nn as nn


class Encoder(nn.Module):
    def __init__(self, input_dim, emb_dim, hid_dim, n_layers, dropout):
        '''
        :param input_dim: 将one-hot矢量输入到编码器的大小/维数,是输入(源)词汇大小
        :param emb_dim: 嵌入层的维数。此图层将one-hot矢量转换为具有维度的密集矢量
        :param hid_dim: 隐藏状态和单元格状态的维度
        :param n_layers: RNN 中的层数
        :param dropout: dropout防止过拟合
        '''
        super().__init__()

        self.hid_dim = hid_dim
        self.n_layers = n_layers

        self.embedding = nn.Embedding(input_dim, emb_dim)

        self.rnn = nn.LSTM(emb_dim, hid_dim, n_layers, dropout=dropout)

        self.dropout = nn.Dropout(dropout)

    def forward(self, src):
        # src = [src len, batch size]

        embedded = self.dropout(self.embedding(src))
        # embedded = [src len, batch size, emb dim]

        outputs, (hidden, cell) = self.rnn(embedded)
        # outputs = [src len, batch size, hid dim * n directions]
        # hidden = [n layers * n directions, batch size, hid dim]
        # cell = [n layers * n directions, batch size, hid dim]

        # outputs are always from the top hidden layer

        return hidden, cell
3.3.3 Decode
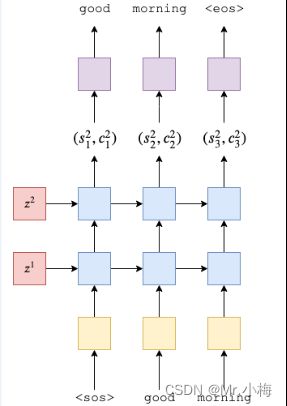
解码器中也使用2层的LSTM。
每个时间步长输出单个令牌。第一层将接收来自上一个时间步长的隐藏和单元格状态![]() ,和当前词的token yt,以产生新的隐藏和单元格状态
,和当前词的token yt,以产生新的隐藏和单元格状态![]() ,,后续图层将使用下面图层中的隐藏状态
,,后续图层将使用下面图层中的隐藏状态![]() 以及其图层中的先前隐藏和单元格状态
以及其图层中的先前隐藏和单元格状态![]() ,解码器公式如下:
,解码器公式如下:
解码器的初始隐藏和cell状态是我们的上下文向量,它们是来自同一层的编码器的最终隐藏和单元格状态,即![]()
然后,我们从RNN的顶层传递隐藏状态![]() ,通过线性层f,以预测目标(输出)序列中的下一个标记应该是什么
,通过线性层f,以预测目标(输出)序列中的下一个标记应该是什么![]()
![]()
使用PyTorch实现代码如下:
class Decoder(nn.Module):
    def __init__(self, output_dim, emb_dim, hid_dim, n_layers, dropout):
        super().__init__()

        self.output_dim = output_dim
        self.hid_dim = hid_dim
        self.n_layers = n_layers

        self.embedding = nn.Embedding(output_dim, emb_dim)

        self.rnn = nn.LSTM(emb_dim, hid_dim, n_layers, dropout=dropout)

        self.fc_out = nn.Linear(hid_dim, output_dim)

        self.dropout = nn.Dropout(dropout)

    def forward(self, input, hidden, cell):
        # input = [batch size]
        # hidden = [n layers * n directions, batch size, hid dim]
        # cell = [n layers * n directions, batch size, hid dim]

        # n directions in the decoder will both always be 1, therefore:
        # hidden = [n layers, batch size, hid dim]
        # context = [n layers, batch size, hid dim]

        input = input.unsqueeze(0)

        # input = [1, batch size]

        embedded = self.dropout(self.embedding(input))
        # embedded = [1, batch size, emb dim]

        output, (hidden, cell) = self.rnn(embedded, (hidden, cell))

        # output = [seq len, batch size, hid dim * n directions]
        # hidden = [n layers * n directions, batch size, hid dim]
        # cell = [n layers * n directions, batch size, hid dim]

        # seq len and n directions will always be 1 in the decoder, therefore:
        # output = [1, batch size, hid dim]
        # hidden = [n layers, batch size, hid dim]
        # cell = [n layers, batch size, hid dim]

        prediction = self.fc_out(output.squeeze(0))
        # prediction = [batch size, output dim]

        return prediction, hidden, cell
3.3.4 Seq2Seq
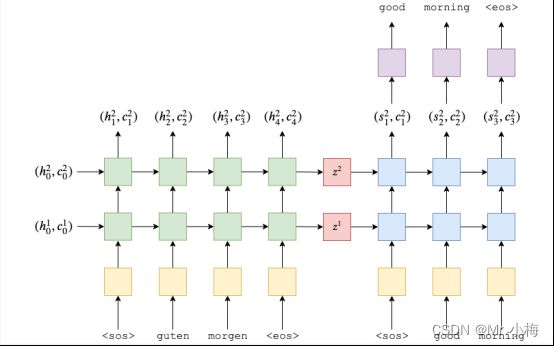
对于实现的最后一部分,我们将实现 seq2seq 模型。这将处理:
-
接收输入/源句子
-
使用编码器生成上下文向量
- 使用解码器生成预测的输出/目标句子
- 我们的完整模型将如下所示:
使用PyTorch实现代码如下:
class Seq2Seq(nn.Module):
    def __init__(self, encoder, decoder, device):
        super().__init__()

        self.encoder = encoder
        self.decoder = decoder
        self.device = device

        # 要确保编码器隐藏层维度和解码器隐藏层维度相等
        assert encoder.hid_dim == decoder.hid_dim, \
            "Hidden dimensions of encoder and decoder must be equal!"
        # 要确保编码器隐藏层层数和解码器相等
        assert encoder.n_layers == decoder.n_layers, \
            "Encoder and decoder must have equal number of layers!"

    def forward(self, src, trg, teacher_forcing_ratio=0.5):
        # src = [src len, batch size]
        # trg = [trg len, batch size]
        # teacher_forcing_ratio is probability to use teacher forcing
        # e.g. if teacher_forcing_ratio is 0.75 we use ground-truth inputs 75% of the time

        batch_size = trg.shape[1]
        trg_len = trg.shape[0]
        trg_vocab_size = self.decoder.output_dim

        # tensor to store decoder outputs
        outputs = torch.zeros(trg_len, batch_size, trg_vocab_size).to(self.device)

        # last hidden state of the encoder is used as the initial hidden state of the decoder
        hidden, cell = self.encoder(src)

        # first input to the decoder is the  tokens
        input = trg[0, :]

        for t in range(1, trg_len):
            # insert input token embedding, previous hidden and previous cell states
            # receive output tensor (predictions) and new hidden and cell states
            output, hidden, cell = self.decoder(input, hidden, cell)    # output.shape=[64, 5893]

            # place predictions in a tensor holding predictions for each token
            outputs[t] = output

            # decide if we are going to use teacher forcing or not
            teacher_force = random.random() < teacher_forcing_ratio

            # get the highest predicted token from our predictions
            top1 = output.argmax(1) # 取预测结果中最好的一个 top1.shape=[64]

            # if teacher forcing, use actual next token as next input
            # if not, use predicted token
            # 强制教学,就是使用真实gt去训练,否则就是使用预测结果去训练
            input = trg[t] if teacher_force else top1

        return outputs
3.3.5 全部训练代码
见下载链接


