STM32运行深度学习指南基础篇(2)(STM32CubeMX.AI+Tensorflow)
STM32运行深度学习指南基础篇(2)(STM32CubeMX.AI+Tensorflow)
由于实现的是简单的逻辑运算 ( A ∩ B ) ∪ ( C ∩ D ) (A\cap B)\cup (C\cap D) (A∩B)∪(C∩D),因此使用最简单的一个带有两层全连接层的网络,结构图如下:
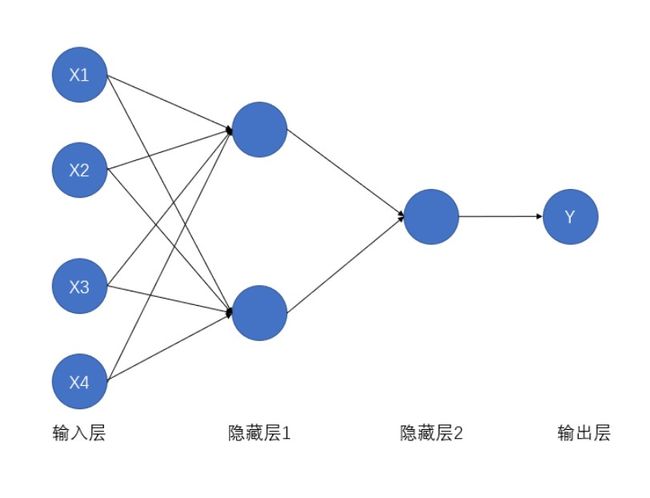
X1,X2,X3,X4分别代表A,B,C,D,隐藏层1和隐藏层2均采用Sigmoid激活函数。实现代码如下:
import csv
import numpy as np
import tensorflow as tf
import os

# 采用2号GPU,单GPU可注释
os.environ["CUDA_VISIBLE_DEVICES"] = "2"

# 声明输入输出变量
x_d = np.zeros((80, 4), dtype='float32')
y_d = np.zeros((80, 1), dtype='float32')

# 导入训练集
f = csv.reader(open('dataset/train_data.csv', 'r'))

for i in f:
    x_d[int(i[0])][0] = float(i[1])
    x_d[int(i[0])][1] = float(i[2])
    x_d[int(i[0])][2] = float(i[3])
    x_d[int(i[0])][3] = float(i[4])
    y_d[int(i[0])] = float(i[6])

# 训练模型搭建
# 输入层
x = tf.compat.v1.placeholder(tf.float32, shape=[None, 4], name='x')
y = tf.compat.v1.placeholder(tf.float32, shape=[None, 1], name='y')
# 隐藏层1
w1 = tf.Variable(tf.truncated_normal([4, 2]), name='w1')
b1 = tf.Variable(tf.truncated_normal([2], 0.1), name='b1')
l1 = tf.sigmoid(tf.matmul(x, w1) + b1, name='l1')
# 隐藏层2
w = tf.Variable(tf.truncated_normal([2, 1]), name='w')
b = tf.Variable(tf.truncated_normal([1], 0.1), name='b')
# 输出层
o = tf.sigmoid(tf.matmul(l1, w) + b, name='o')
loss = tf.reduce_mean(tf.square(o - y))
train = tf.train.GradientDescentOptimizer(0.9).minimize(loss)

# 初始化
init = tf.global_variables_initializer()
saver = tf.train.Saver(max_to_keep=4)

# 创建
with tf.Session() as sess:
    writer = tf.summary.FileWriter("logs/", sess.graph)
    sess.run(init)
    max_step = 9000
    for i in range(max_step + 1):
        sess.run(train, feed_dict={x: x_d, y: y_d})
        cost = sess.run(loss, feed_dict={x: x_d, y: y_d})
        if i % 1000 == 0:
            print("------------------------------------------------------")
            # 保存模型
            saver.save(sess, "model/ckpt/model", global_step=i)
            print("------------------------------------------------------")
        print('step: ' + str(i) + '  loss:' + "{:.3f}".format(cost))

print('训练结束')
运行之后将会得到一个ckpt格式文件,之后运行代码将该ckpt模型固化为pb格式,代码如下:
import tensorflow as tf
import os

# 采用4号GPU,单GPU可注释
os.environ["CUDA_VISIBLE_DEVICES"] = "4"

# 输入ckpt模型路径
input_ckpt_path = 'model/ckpt/model-9000'
# 输出pb模型的路径
out_pb_path = "model/pb/pb_model.pb"

# 初始化
output_node_names = "o"
saver = tf.train.import_meta_graph(input_ckpt_path+'.meta', clear_devices=True)

with tf.Session() as sess:
    saver.restore(sess, input_ckpt_path)
    output_graph_def = tf.compat.v1.graph_util.convert_variables_to_constants(
          sess=sess,
          input_graph_def=sess.graph_def,
          output_node_names=output_node_names.split(","))
    with tf.io.gfile.GFile(out_pb_path, "wb") as f:
        f.write(output_graph_def.SerializeToString())
print('转换结束')
将固化的pb模型转换为单片机要用的tflite文件,由于模型简单不需要进行轻量化,直接进行转换即可代码如下:
import tensorflow as tf
import os

# 采用1号GPU,单GPU可注释
os.environ["CUDA_VISIBLE_DEVICES"] = "1"

# 输入pb模型的路径
input_pb_path = "model/pb/pb_model.pb"
# 输出tflie模型的路径
out_tflie_path = "model/tflite/tflite_model.tflite"

# 模型输入节点
input_tensor_name = ["x"]
input_tensor_shape = {input_tensor_name[0]:[1,4]}
# 模型输出节点
out_tensor_name = ['o']

converter = tf.lite.TFLiteConverter.from_frozen_graph(
    input_pb_path,
    input_tensor_name,
    out_tensor_name,
    input_tensor_shape)
converter.allow_custom_ops=True
converter.post_training_quantize = True
tflite_model = converter.convert()
open(out_tflie_path, "wb").write(tflite_model)
print('转换结束')
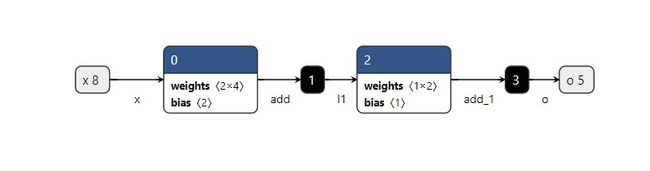
我们可以用Netron可视化一下之前的pb和最终的tflite,如下图

以上的代码包括训练集均在Gitee上:
https://gitee.com/shibwoen/stm32_tensorflow/tree/master/train_model