TypeScript封装axios——Vue3+TypeScript实践
TypeScript封装axios
-
-
-
-
- 简介
-
- 1. 认识axios
-
- 1.1 为什么选择axios
- 2. axios基本使用
- 3. 用面向对象的思想封装axios
-
- 3.1 为什么要对axios进行封装?
- 3.2 用面向对象的思想封装axios
-
- 3.2.1 基础封装
- 3.2.2 支持传入自定义拦截器功能
- 4. 使用封装后的HRequest
-
-
简介
最近在用Vue3 + TypeScript 重构一个Vue2项目,之前项目中用到axios来发送网络请求,进行前后端交互,但并未对axios库做过多的封装,导致代码重复度较高,维护起来比较麻烦,乘此机会对axios进行一次较为完整的封装,这里我考虑用面向对象的思想来进行实践。
1. 认识axios
1.1 为什么选择axios
选择axios库有两个原因:
- axios是Vue给官方推荐的网络请求库,尤雨溪16年有在微博上公告;
- axios库功能强大,具备以下功能特点;
- 在浏览器中发送XMLHttpRequests请求
- 在nodejs中发送http请求
- 支持Promise API
- 拦截请求和响应
- 转换请求和响应数据
- 等等
2. axios基本使用
因axios基础使用十分简单,可参考axios官方文档 https://axios-http.com/,这里不在啰嗦axios的其他基本用法,主要说说拦截器。
拦截器主要分为两种,请求拦截器和响应拦截器。
请求拦截器:请求发送之前进行拦截,应用于我们在请求发送前需要对请求数据做一些处理。例如:
- 携带token
- 当请求时间过长时,设置loading
响应拦截器:在响应到达时进行拦截,应用于在我们业务代码中拿到数据之前,需要对数据做一定处理。例如: - 转换数据格式
- 移除loading
3. 用面向对象的思想封装axios
3.1 为什么要对axios进行封装?
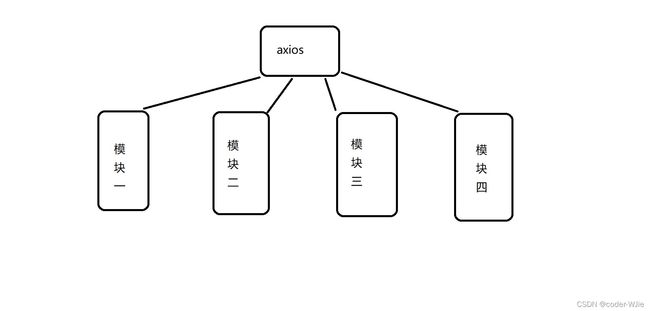
在项目中会有很多的模块都需要发送网络请求,常见的比如登录模块,首页模块等,如果我们项目中直接使用诸如axios.get(), axios.post(),会存在很多弊端,哪些弊端呢?
- 首先这样做会导致我们每个模块对axios依赖性太强,意味着我们项目中的每个模块都和一个第三方库耦合度较高,这样的话,如果axios不在维护,我们要更换库的时候将非常麻烦,我们可以假设一下,随着时间的推移,axios可能因为浏览器的升级,Webpack的改变而出现一些bug, 然而axios已不再维护,这时我们往往需要切换库,这就意味着我们需要去修改每个模块中的请求相关的代码,显而易见,非常繁琐。
- 还有一点,在我们发送网络请求的时候,往往会有很多共同的特性,比如说,在我们成功登录之后的其他请求中,我们往往需要在请求头中添加token,然后发送请求;在每次请求中,我们想展示一个loading… 这些功能如果在每次请求的逻辑中都写一遍,很明显,我们的代码重复度太高了。
封装带来的好处:
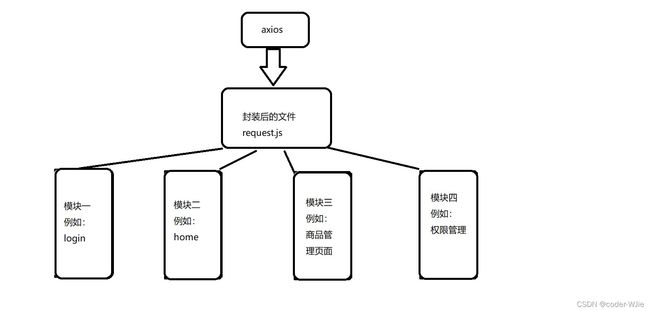
- 解决以上弊端,降低与第三方库的耦合度,这样我们将来需要更换库时,只需要修改我们封装后的request即可,这样我们往往只是修改封装后一两个文件,而不再需要每个模块每个模块的修改。
在我们开发中,并不一定会用这种思想来封装axios,对get,post,delete等请求方法分别封装然后分别导出封装后的函数也很常见,但我认为class的相关语法封装性会更好,因此这里我选择尝试用类相关的概念来封装axios.
我想要的封装后达到的效果:可以直接在其他项目使用。
3.2 用面向对象的思想封装axios
3.2.1 基础封装
创建一个request.ts文件,导入axios库,由于axios实例,请求需要传入的数据以及响应返回的数据都有各自定义好的类型,因此我们除了导入axios类之外,还需导入所需的类型接口。
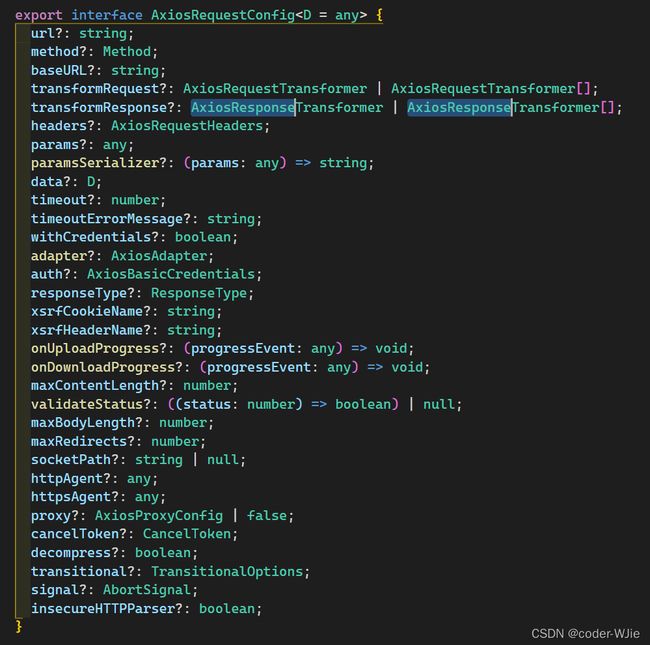
从axios源码中可知,axios实例的类型为AxiosInstance,响应的数据类型为AxiosResponse,请求需要传入的参数类型为AxiosRequestConfig
// request.ts
import axios, { AxiosInstance, AxiosRequestConfig, AxiosResponse } from 'axios';

// 自定义请求返回数据的类型
interface HData<T> {
  data: T;
  returnCode: string;
  success: boolean;
}

class HRequest {
  config: AxiosRequestConfig;
  instance: AxiosInstance;

  constructor(options: AxiosRequestConfig ) {
    this.config = options;
    this.instance = axios.create(options);
  }

  // 类型参数的作用,T决定AxiosResponse实例中data的类型
  request<T = any>(config: AxiosRequestConfig ): Promise<T> {
    return new Promise((resolve, reject) => {
      this.instance
        .request<any, HData<T>>(config)
        .then((res) => {
          resolve(res.data);
        })
        .catch((err) => {
          reject(err);
        });
    });
  }

  get<T = any>(config: AxiosRequestConfig ): Promise<T> {
    return this.request({ ...config, method: 'GET' });
  }

  post<T = any>(config: AxiosRequestConfig ): Promise<T> {
    return this.request({ ...config, method: 'POST' });
  }

  delete<T = any>(config: AxiosRequestConfig ): Promise<T> {
    return this.request({ ...config, method: 'DELETE' });
  }

  patch<T = any>(config: AxiosRequestConfig ): Promise<T> {
    return this.request({ ...config, method: 'PATCH' });
  }
}

export default HRequest
如上,基本的封装工作已经完成。但由于AxiosRequestConfig类型中并未定义拦截器相关的属性,因此我们需要扩展AxiosRequestConfig接口。
如图,axios中AxiosRequestConfig的定义:

3.2.2 支持传入自定义拦截器功能
之前我们说的携带token,显示loading需要拦截器功能的支持
- 每个 请求拦截的不一样
- 一些请求拦截的一样
为了可扩展性更强,除了基本的配置之外,我们还希望传入一些hooks,而hooks里对应的是一个一个拦截器,而我们现在是不能传入hooks的,因为AxiosRequestConfig类型中并未定义相关的配置项,如图
为了解决这个问题,我们可以利用ts中的interface的能力:
我们可以定义一个接口 ,接口中包含了各种拦截器,例如 :
interface InterceptorHooks {
  requestInterceptor?: (config: AxiosRequestConfig) => AxiosRequestConfig;
  requestInterceptorCatch?: (error: any) => any;
  responseInterceptor?: (response: AxiosResponse) => AxiosResponse;
  responseInterceptorCatch?: (error: any) => any;
}
定义了InterceptorHooks接口还不够,我们还需要重新定义传入数据的类型以扩展AxiosRequestConfig类型,从而支持个性化设置拦截器,如下:
interface HRequestConfig extends AxiosRequestConfig {
  interceptorHooks?: InterceptorHooks;
}
并不是每次请求都需要设置拦截器,因此interceptorHooks应设置为可选属性
接下来我们将HRequest中的AxiosRequestConfig都修改为HRequestConfig。
现在我们可以传入拦截器相关的hooks了,但我们并未对传入的拦截器进行使用。
axios实例的interceptors.request.use(fn1, fn2)方法可以使请求拦截器生效,interceptors.response.use(fn1, fn2)可使响应拦截器生效
为此,我们可将设置拦截器的方法封装为HRequest类的一个方法:
setupInterceptor(): void {
    this.instance.interceptors.request.use(
      this.interceptorHooks?.requestInterceptor,
      this.interceptorHooks?.requestInterceptorCatch
    )
    this.instance.interceptors.response.use(
      this.interceptorHooks?.responseInterceptor,
      this.interceptorHooks?.responseInterceptorCatch
    )

 }
然后在HRequest类的构造函数中调用此方法,拦截器即可生效。
在此方法中我们还可以定义所有请求共用的拦截器,比如你想在发送每一个请求时都显示loading,这块逻辑即可写在这个共用的拦截器中,
setupInterceptor(): void {
    this.instance.interceptors.request.use(
      this.interceptorHooks?.requestInterceptor,
      this.interceptorHooks?.requestInterceptorCatch
    )
    this.instance.interceptors.response.use(
      this.interceptorHooks?.responseInterceptor,
      this.interceptorHooks?.responseInterceptorCatch
    )

    this.instance.interceptors.request.use((config) => {
        //设置loading
      if (this.showLoading) {
        this.loading = ElLoading.service({
          lock: true,
          text: 'Loading',
          spinner: 'el-icon-loading',
          background: 'rgba(0, 0, 0, 0.7)'
        })
      }
      return config
    })

    this.instance.interceptors.response.use(
        // 请求完毕,关闭loading
      (res) => {
        this.loading?.close()
        return res
      },
      (err) => {
        this.loading?.close()
        return err
      }
    )
  }
loading功能和拦截器一样,AxiosRequestConfig类型中并未提供支持,需要在之前定义的扩展接口中添加控制loading是否加载的属性:
interface HRequestConfig extends AxiosRequestConfig {
  showLoading?: boolean
  interceptorHooks?: InterceptorHooks
}
并在HRequest类中设置控制loading属性,如下,showloading决定本请求是否显示loading,loading控制loading渲染。loading设置时机见上文公用拦截器中逻辑。
class HYRequest {
  config: AxiosRequestConfig
  interceptorHooks?: InterceptorHooks
  showLoading: boolean
  loading?: ILoadingInstance
  instance: AxiosInstance
   //方法略....
}
至此 Axios 封装任务就算完成了。
4. 使用封装后的HRequest
我们可以在封装的request.ts文件中创建HRequest的实例对象并导出,然后在项目中使用,也可以创建一个文件来管理实例相关的逻辑。我这里创建一个index.ts来负责导出HRequest的实例。
// index.ts
import HYRequest from './request/request'
import { API_BASE_URL, TIME_OUT } from './request/config'
import localCache from '@/utils/cache'

/*
为什么要创建 axios 的实例(instance)
当我们从 axios 模块中导入对象时,使用的实例是默认的实例
当给该实例设置一些默认配置时,这些配置就被固定下俩了
但是后续开发中,某些配置可能会不太一样
比如某些请求需要使用特定的 baseURL 或者 timeout 或者 content-Type 等
这个时候,我们就可以创建新的实例,并且传入属于该实例的配置信息
*/

/*
 一般情况下,只需创建一个实例
 什么时候需要创建多个实例?
 比如baseURL不同,且在这个baseURL下请求多次,这个时候创建一个公用的请求实例能够提升代码的可维护性
 */

const hRequestOne = new HYRequest({
  baseURL: API_BASE_URL,
  timeout: TIME_OUT,
  interceptorHooks: {
    requestInterceptor: (config) => {
      const token = localCache.getCache('token')
      if (token) {
        config.headers.Authorization = `Bearer ${token}`
      }
      return config
    },
    requestInterceptorCatch: (err) => {
      return err
    },
    responseInterceptor: (res) => {
      return res.data
    },
    responseInterceptorCatch: (err) => {
      return err
    }
  }
})


const hRequestTwo = new HRequest({...})

export { hRequestOne, hRequestTwo }
为什么要创建 axios 的实例(instance)?
当我们从 axios 模块中导入对象时,使用的实例是默认的实例,当给该实例设置一些默认配置时,这些配置就被固定了,但是后续开发中,某些配置可能会不太一样,比如某些请求需要使用特定的 baseURL 或者 timeout 或者 content-Type 等
这个时候,我们就可以创建新的实例,并且传入属于该实例的配置信息。这个时候创建一个公用的请求实例能够降低代码重复度,提升代码的可维护性。
未经授权,请勿转载。

