CGAN及代码实现
前言
- 本文主要介绍CGAN及其代码实现
- 阅读本文之前,建议先阅读GAN(生成对抗网络)
- 本文基于一次课程实验,代码仅上传了需要补充部分
CGAN
全称: C o n d i t i o n a l G e n e r a t i v e A d v e r s a r i a l N e t w o r k Conditional \,Generative\, Adversarial\, Network ConditionalGenerativeAdversarialNetwork
我们知道, G A N GAN GAN 其实又叫做 U n c o n d i t i o n a l G e n e r a t i v e A d v e r s a r i a l N e t w o r k Unconditional\, Generative\, Adversarial\, Network UnconditionalGenerativeAdversarialNetwork
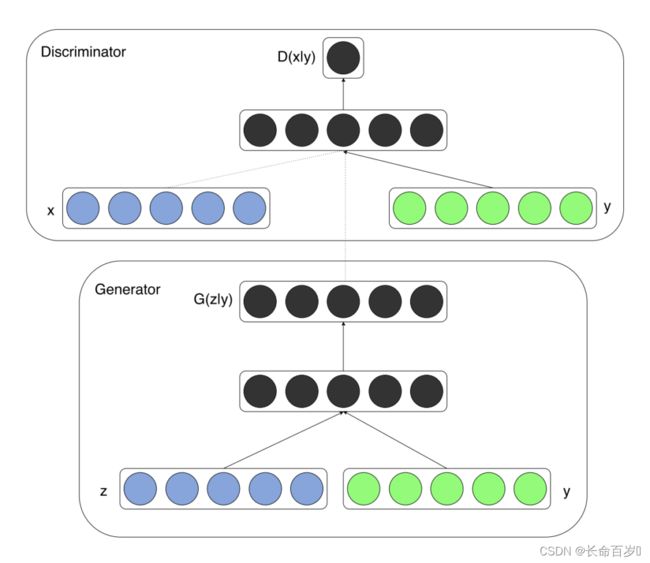
在基本的 G A N GAN GAN 上对 G e n e r a t o r Generator Generator 和 D i s c r i m i n a t o r Discriminator Discriminator 的输入都添加了 l a b e l s labels labels,使得我们可以针对类别训练,控制生成图片的类别,而使得结果不那么随机
- z z z 为服从一定分布的随机向量
- x x x 为图像
- y y y 为控制类别的 l a b l e s lables lables
Genarator
- 输入:潜在空间的一批点(向量)和一批 label
- 输出:一批图片
代码整体如下
class Generator(nn.Module):
    def __init__(self):
        super(Generator, self).__init__()

        # 将label编码成向量
        self.label_embedding = nn.Embedding(opt.n_classes, opt.label_dim) #10 , 50
        ## TODO: There are many ways to implement the model,  one alternative
        ## architecture is (100+50)--->128--->256--->512--->1024--->(1,28,28)

        ### START CODE HERE
        def block(in_feat, out_feat, normalize=True):
            layers = [nn.Linear(in_feat, out_feat)]
            if normalize:
                layers.append(nn.BatchNorm1d(out_feat, 0.8))
            layers.append(nn.LeakyReLU(0.2, inplace=True))
            return layers

        self.model = nn.Sequential(
            *block(opt.latent_dim + opt.label_dim, 128, normalize=False),
            *block(128, 256),
            *block(256, 512),
            *block(512, 1024),
            nn.Linear(1024, int(np.prod(img_shape))),
            nn.Tanh()
        )
        ### END CODE HERE

    def forward(self, noise, labels):

        ### START CODE HERE
        # Concatenate label embedding and image to produce input
        gen_input = torch.cat((self.label_embedding(labels), noise), -1) #拼接两个向量
        img = self.model(gen_input)
        img = img.view(img.size(0), *img_shape)
        return img
        ### END CODE HERE

        return
详细解读
- nn.Embedding(num_embeddings , embedding_dim)
- 将输入信息编码成向量
- num_embeddings 代表最多可以编码几个数据
- embedding_dim 代表将每个数据编码成一个几维向量
import torch.nn as nn embedding = nn.Embedding(10, 3) a = torch.LongTensor([[1,2,4,5],[4,3,2,9]]) b = torch.LongTensor([1 , 2 , 3]) print(embedding(a)) >>tensor([[[-0.3592, -2.2254, -1.7580], [ 1.7920, -0.6600, -1.1435], [-0.8874, 0.2585, -1.0378], [ 0.4861, 0.3025, -1.0556]], [[-0.8874, 0.2585, -1.0378], [-0.0752, -0.1548, -0.7140], [ 1.7920, -0.6600, -1.1435], [-2.5180, 0.2028, -1.4452]]], grad_fn=<EmbeddingBackward>) print(embedding(b)) >>tensor([[-0.3592, -2.2254, -1.7580], [ 1.7920, -0.6600, -1.1435], [-0.0752, -0.1548, -0.7140]], grad_fn=<EmbeddingBackward>) - nn.Linear()
layers = [nn.Linear(in_feat, out_feat)]- nn.Linear()用于设置网络中的全连接层。全连接层的输入与输出可以是多维的
- in_feat 决定了输入张量的 size
- out_feat 决定了输出张量的 size
- nn.Sequential()
- 用于设置模型顺序执行的部分
- 前向传播
- 拼接 label 和 noise 向量,得到输入向量
- 直接调用 self.model,对 gen_inupt 进行系列操作
- 转成二维向量返回
Discriminator
- 输入:一批图片和图片对应的label
- 输出:real or fake(1 / 0)
代码整体如下
class Discriminator(nn.Module):
    def __init__(self):
        super(Discriminator, self).__init__()

        self.label_embedding = nn.Embedding(opt.n_classes, opt.label_dim)#10,50
        ## TODO: There are many ways to implement the discriminator,  one alternative
        ## architecture is (100+784)--->512--->512--->512--->1

        ### START CODE HERE
        self.model = nn.Sequential(
            nn.Linear(opt.label_dim + int(np.prod(img_shape)), 512),
            nn.LeakyReLU(0.2, inplace=True),
            nn.Linear(512, 512),
            nn.Dropout(0.4),
            nn.LeakyReLU(0.2, inplace=True),
            nn.Linear(512, 512),
            nn.Dropout(0.4),
            nn.LeakyReLU(0.2, inplace=True),
            nn.Linear(512, 1),
        )
        ### END CODE HERE


    def forward(self, img, labels):
        ### START CODE HERE
        # Concatenate label embedding and image to produce input
        d_in = torch.cat((img.view(img.size(0), -1), self.label_embedding(labels)), -1)
        validity = self.model(d_in)
        ### END CODE HERE

        return validity
- 和Generator类似
- 输入是一批图像和对应标签
- 训练过程写在 nn.Sequential 里
- 返回的结果是一批图像的判断(真为1,假为0)
训练过程
- 代码讲解写在注释里了
## TODO: implement the training process

for epoch in range(opt.n_epochs):
    for i, (imgs, labels) in enumerate(dataloader):

        batch_size = imgs.shape[0]

        # Adversarial ground truths
        #创建一个大小为(batch_size,1),数值全为 1.0 的 tensor
        valid = FloatTensor(batch_size, 1).fill_(1.0)

        #创建一个大小为(batch_size,1),数值全为 0.0 的 tensor
        fake = FloatTensor(batch_size, 1).fill_(0.0)

        # Configure input
        real_imgs = imgs.type(FloatTensor)
        labels = labels.type(LongTensor)

        # -----------------
        #  Train Generator
        # -----------------

        ### START CODE HERE
        optimizer_G.zero_grad()

        # Sample noise and labels as generator input
        #生成一批 noise
        z = Variable(FloatTensor(np.random.normal(0, 1, (batch_size, opt.latent_dim))))
        #生成一批 label
        gen_labels = Variable(LongTensor(np.random.randint(0, opt.n_classes, batch_size)))

        # 输入 z 和 gen_labels ,通过生成器,生成一批图片
        gen_imgs = generator(z, gen_labels)

        # Loss measures generator's ability to fool the discriminator
        # 通过判别器,判断生成图像的真假,返回一批图像的判别结果
        validity = discriminator(gen_imgs, gen_labels)
        # 判别为假的产生loss,这里计算生成器的loss
        g_loss = adversarial_loss(validity, valid)
		# BP + 更新
        g_loss.backward()
        optimizer_G.step()
        ### END CODE HERE

        # ---------------------
        #  Train Discriminator
        # ---------------------

        ### START CODE HERE
        optimizer_D.zero_grad()

        # 计算真实图片的 loss
        validity_real = discriminator(real_imgs, labels)
        d_real_loss = adversarial_loss(validity_real, valid)

        # 计算生成图片的 loss
        validity_fake = discriminator(gen_imgs.detach(), gen_labels)
        d_fake_loss = adversarial_loss(validity_fake, fake)

        # Total loss
        d_loss = (d_real_loss + d_fake_loss) / 2

        # BP + 更新
        d_loss.backward()
        optimizer_D.step()
        ### END CODE HERE

        print(
            "[Epoch %d/%d] [Batch %d/%d] [D loss: %f] [G loss: %f]"
            % (epoch, opt.n_epochs, i, len(dataloader), d_loss.item(), g_loss.item())
        )
    if (epoch+1) % 20 ==0:
        torch.save(generator.state_dict(), "./cgan_generator %d.pth" % (epoch))
最后测试,生成图像
def generate_latent_points(latent_dim, n_samples, n_classes):
    # Sample noise

    ### START CODE HERE
    # 随机生成向量和标签,作为测试使用
    z = Variable(FloatTensor(np.random.normal(0, 1, (n_samples, latent_dim))))
    gen_labels = Variable(LongTensor(np.random.randint(0, n_classes, n_samples)))
    ### END CODE HERE

    return z,gen_labels

