4.tensorflow基础知识体系
tensorflow框架介绍

数据流图

图与TensorBoard
图包含了一组tf.Operation代表的计算单元对象和tf.Tensor代表的计算单元之间流动的数据
默认图
通常tensorflow会默认帮我们创建一张图
查看默认图的两种方法:
- 通过调用**tf.get_default_graph()**访问,要将操作添加到默认图形中,直接创建OP即可
- op、sess都含有graph属性,默认都在一张图中
import tensorflow as tf
import os
os.environ['TF_CPP_MIN_LOG_LEVEL'] = '2'  # 去警告


def graph_demo():
    """
    图的演示
    :return:
    """
    # tensorflow实现加法运算
    a_t = tf.constant(2)
    b_t = tf.constant(3)
    c_t = a_t + b_t
    print("c_t:", c_t)

    # 查看默认图
    # 方法1:调用方法
    default_g = tf.get_default_graph()
    print("default_g:", default_g)

    # 方法2:查看属性
    print("a_t的图属性:", a_t.graph)
    print("c_t的图属性:", c_t.graph)

    # 开启会话
    with tf.Session() as sess:
        c_t_value = sess.run(c_t)
        print("c_t_value:", c_t_value)
        print("sess的图属性:", sess.graph)

    return None


if __name__ == "__main__":
    graph_demo()

创建图
- 可以通过**tf.Graph()**自定义创建图
- 如果要在这张图中创建OP,典型用法是使用**tf.Graph.as_default()**上下文管理器
import tensorflow as tf
import os
os.environ['TF_CPP_MIN_LOG_LEVEL'] = '2'  # 去警告

def graph_demo():
    """
    图的演示
    :return:
    """
    # tensorflow实现加法运算
    a_t = tf.constant(2)
    b_t = tf.constant(3)
    c_t = a_t + b_t
    print("c_t:", c_t)

    # 查看默认图
    # 方法1:调用方法
    default_g = tf.get_default_graph()
    print("default_g:", default_g)

    # 方法2:查看属性
    print("a_t的图属性:", a_t.graph)
    print("c_t的图属性:", c_t.graph)

    # 开启会话
    with tf.Session() as sess:
        c_t_value = sess.run(c_t)
        print("c_t_value:", c_t_value)
        print("sess的图属性:", sess.graph)
    print("--------------------------------")

    # 自定义图
    new_g = tf.Graph()
    # 在自己的图中定义数据和操作
    with new_g.as_default():
        a_new = tf.constant(20)
        b_new = tf.constant(30)
        c_new = a_new + b_new
        print("c_new:", c_new)
        print("a_new的图属性:", a_new.graph)
        print("c_new的图属性:", c_new.graph)

    # 开启new_g的会话
    with tf.Session(graph=new_g) as new_sess:
        # 试图运行自定义图中的数据,操作
        c_new_value = new_sess.run(c_new)
        print("c_new_value:", c_new_value)
        print("new_sess的图属性:", new_sess.graph)

    return None


if __name__ == "__main__":
    graph_demo()

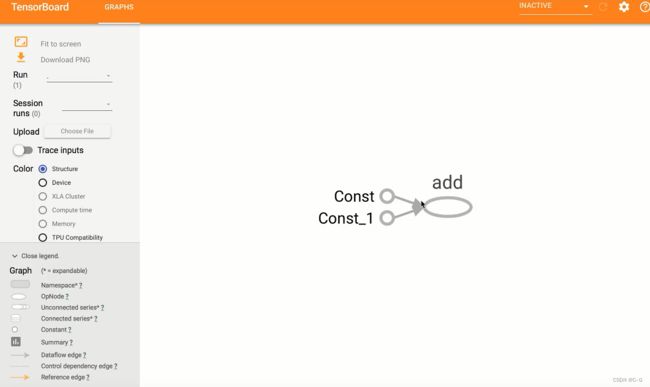
TensorBoard可视化
tensorflow可用于训练大规模深度神经网络所需的计算,使用该工具设计的计算往往复杂而深奥。为了更方便tensorflow程序的理解、调试与优化,tensorflow提供了TensorBoard可视化工具
- 数据序列化-events文件
TensorBoard通过读取TensorFlow的事件文件来运行,需要将数据生成一个序列化的Summary protobuf对象
tf.summary.FileWriter(path, graph=sess.graph)
- 启动TensorBoard
tensorboard --logdir=path
import tensorflow as tf
import os
os.environ['TF_CPP_MIN_LOG_LEVEL'] = '2'  # 去警告

def graph_demo():
    """
    图的演示
    :return:
    """
    # tensorflow实现加法运算
    a_t = tf.constant(2)
    b_t = tf.constant(3)
    c_t = a_t + b_t
    print("c_t:", c_t)

    # 查看默认图
    # 方法1:调用方法
    default_g = tf.get_default_graph()
    print("default_g:", default_g)

    # 方法2:查看属性
    print("a_t的图属性:", a_t.graph)
    print("c_t的图属性:", c_t.graph)

    # 开启会话
    with tf.Session() as sess:
        c_t_value = sess.run(c_t)
        print("c_t_value:", c_t_value)
        print("sess的图属性:", sess.graph)
        # 1)将图写入本地生成events文件
        tf.summary.FileWriter("summary", graph=sess.graph)  # tmp文件夹下
    print("--------------------------------")

    # 自定义图
    new_g = tf.Graph()
    # 在自己的图中定义数据和操作
    with new_g.as_default():
        a_new = tf.constant(20)
        b_new = tf.constant(30)
        c_new = a_new + b_new
        print("c_new:", c_new)
        print("a_new的图属性:", a_new.graph)
        print("c_new的图属性:", c_new.graph)

    # 开启new_g的会话
    with tf.Session(graph=new_g) as new_sess:
        # 试图运行自定义图中的数据,操作
        c_new_value = new_sess.run(c_new)
        print("c_new_value:", c_new_value)
        print("new_sess的图属性:", new_sess.graph)

    return None

if __name__ == "__main__":
    graph_demo()

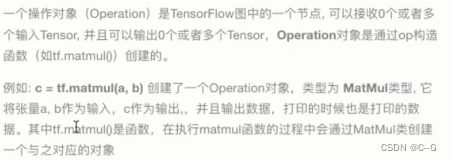
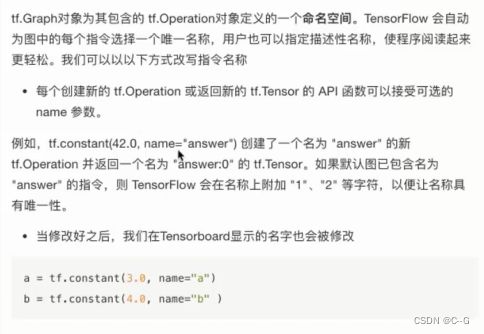
OP
即操作对象
- 常见OP
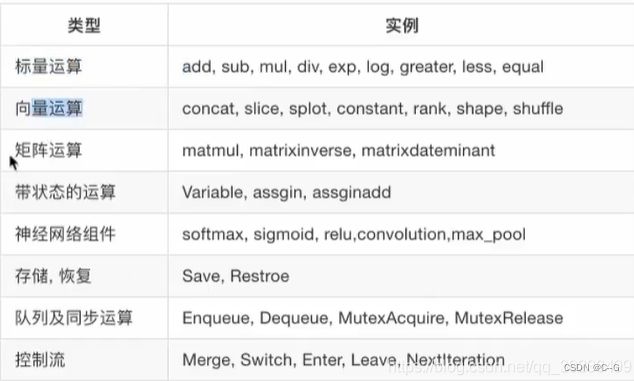
一个图一个命名空间,互不干扰影响
import tensorflow as tf
import os
os.environ['TF_CPP_MIN_LOG_LEVEL'] = '2' # 去警告
def graph_demo():
"""
图的演示
:return:
"""
# tensorflow实现加法运算
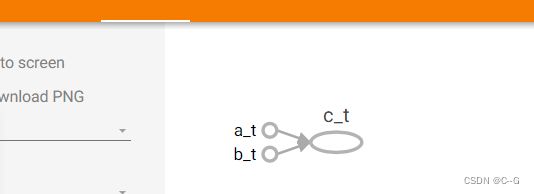
a_t = tf.constant(2, name="a_t")
b_t = tf.constant(3, name="b_t")
c_t = tf.add(a_t, b_t, name="c_t")
print("c_t:", c_t)
# 查看默认图
# 方法1:调用方法
default_g = tf.get_default_graph()
print("default_g:", default_g)
# 方法2:查看属性
print("a_t的图属性:", a_t.graph)
print("c_t的图属性:", c_t.graph)
# 开启会话
with tf.Session() as sess:
c_t_value = sess.run(c_t)
print("c_t_value:", c_t_value)
print("sess的图属性:", sess.graph)
# 1)将图写入本地生成events文件
tf.summary.FileWriter("logs", graph=sess.graph)
print("--------------------------------")
# 自定义图
new_g = tf.Graph()
# 在自己的图中定义数据和操作
with new_g.as_default():
a_new = tf.constant(20, name="a_new")
b_new = tf.constant(30, name="b_new")
c_new = tf.add(a_new, b_new, name="c_new")
print("c_new:", c_new)
print("a_new的图属性:", a_new.graph)
print("c_new的图属性:", c_new.graph)
tf.summary.FileWriter("log2", graph=sess.graph)
# 开启new_g的会话
with tf.Session(graph=new_g) as new_sess:
# 试图运行自定义图中的数据,操作
c_new_value = new_sess.run(c_new)
print("c_new_value:", c_new_value)
print("new_sess的图属性:", new_sess.graph)
return None
if __name__ == "__main__":
graph_demo()
会话


上下文管理器
with tf.Session() as sess:
	sess.run(sth)
# 运行会话并打印设备信息
sess = tf.Session(config=tf.ConfigProto(allow_soft_placement=True, log_device_placement=True))
run()
通过使用sess.run(0)来运行operation
run(fetches, feed_dict=None, options=None, run_metadata=None)
- fetches:单一的operation,或者列表、元组(其他不属于tensorflow的类型不行)
- feed_dict:参数运行调用者覆盖图中张量的值,运行时赋值,与tf.placeholder搭配使用,则会检查值的形式是否与占位符兼容
# 创建图
a = tf.constant(5.0)
b = tf.constant(6.0)
c = a + b

# 创建会话
sess = tf.Session()

# 计算C的值
print(sess.run(c))
print(c.eval(session=sess))
feed操作
placeholder提供占位符,run时候通过feed_dict指定参数
import tensorflow as tf
import os
os.environ['TF_CPP_MIN_LOG_LEVEL'] = '2'  # 去警告


def session_demo():
    """
    会话的演示:打印设备信息
    :return:
    """
    # tensorflow实现加法运算
    a_t = tf.constant(2, name="a_t")
    b_t = tf.constant(3, name="b_t")
    c_t = tf.add(a_t, b_t, name="c_t")
    print("a_t", a_t)
    print("b_t", b_t)
    print("c_t:", c_t)
    print("------------------------------")

    # 定义占位符
    a_ph = tf.placeholder(tf.float32)
    b_ph = tf.placeholder(tf.float32)
    c_ph = tf.add(a_ph, b_ph)
    print("a_ph:", a_ph)
    print("b_ph:", b_ph)
    print("c_ph:", c_ph)
    print("------------------------------")

    # 查看默认图
    # 方法1:调用方法
    default_g = tf.get_default_graph()
    print("default_g:", default_g)
    # 方法2:查看属性
    print("a_t的图属性:", a_t.graph)
    print("c_t的图属性:", c_t.graph)
    print("-------------------------------")

    # 开启会话
    with tf.Session(config=tf.ConfigProto(allow_soft_placement=True,
                                          log_device_placement=True)) as sess:
        # 运行placeholder
        c_ph_value = sess.run(c_ph, feed_dict={a_ph:3.9, b_ph:4.8})
        print('c_ph_value', c_ph_value)
        print("------------------------------")
        abc = sess.run([a_t, b_t, c_t])  # 传入列表,返回列表
        print("abc:", abc)
        print("c_t_value;", c_t.eval())
        print("sess的图属性:", sess.graph)
        #tf.summary.FileWriter("logs", graph=sess.graph)  # 1)将图写入本地生成events文件


if __name__ == "__main__":
    session_demo()

张量
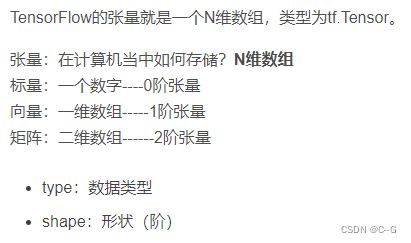
张量类型

张量的阶

张量指令
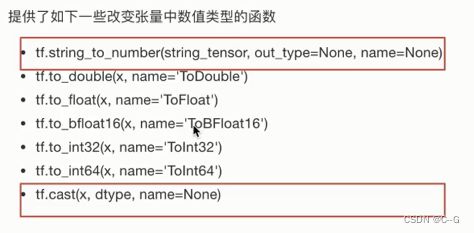
类型改变
形状改变
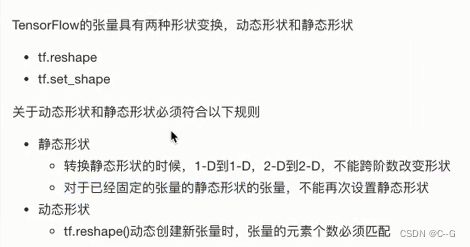
什么情况下可以改变静态形状:只有在形状还没有完全固定下来的情况下;转换形状的时候,只能一维到一维,二维到二维,而不能跨维度改变形状
形状还没有完全固定下来的情况:使用placeholder占位
import tensorflow as tf
import os
os.environ['TF_CPP_MIN_LOG_LEVEL'] = '2'  # 去警告

def tensor_demo():
    """
    张量的演示
    :return:
    """

    tensor1 = tf.constant(4.0)
    tensor2 = tf.constant([1,2,3,4])  # 未指定类型,默认类型
    linear_squares = tf.constant([[4],[9],[16],[25]],dtype=tf.int32)
    print("tensor1:", tensor1)
    print("tensor2:", tensor2)
    print("linear_square:", linear_squares)

    print("----------------")
    # 张量类型的修改:不会改变原始的Tensor
    l_cast = tf.cast(linear_squares, dtype=tf.float32)
    print("linear_square_after:", linear_squares)
    print('l_cast:', l_cast)

    print('------------------')
    # 更新、改变静态形状
    # 定义占位符
    a_p = tf.placeholder(dtype=tf.float32, shape=[None, None])  # 形状没有完全固定下来的静态形状
    b_p = tf.placeholder(dtype=tf.float32, shape=[None, 10])
    c_p = tf.placeholder(dtype=tf.float32, shape=[3, 2])
    print("a_p:", a_p)
    print("b_p:", b_p)
    print("c_p:", c_p)

    print("-----------------------")
    # 更新形状未确定的部分
    a_p.set_shape([2,3])
    b_p.set_shape([2,10])
    print("a_p:", a_p)
    print("b_p:", b_p)

    print('-------------')
    # 动态形状修改
    a_p_reshape = tf.reshape(a_p, shape=[2, 3, 1])
    print("a_p:", a_p)
    print("a_p_reshape:", a_p_reshape)

    c_p_reshape = tf.reshape(c_p, shape=[2, 3, 1])  # 必须保持改变前后元素的数量一致
    print("c_p:", c_p)
    print("c_p_reshape:", c_p_reshape)

    return None


if __name__ == "__main__":
    tensor_demo()
张量的数学运算
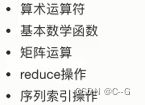
https://tensorflow.google.cn/versions/r2.0/api_docs/python/tf
变量OP
tf.Variable(initia_value=None, trainable=True, collections=None, name=None)
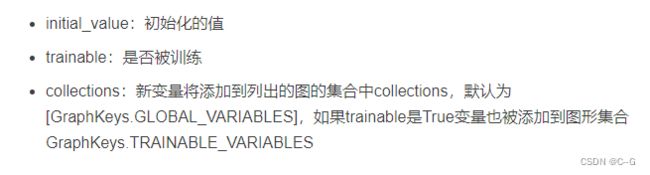
变量需要显示初始化,才能运行值
import tensorflow as tf
import os
os.environ['TF_CPP_MIN_LOG_LEVEL'] = '2'  # 去警告

def variable_demo():
    """
    变量的演示
    :return:
    """
    # 创建变量
    a = tf.Variable(initial_value=50)
    b = tf.Variable(initial_value=40)
    c = tf.add(a, b)
    print("a:", a)
    print("b", b)
    print("c", c)
    print('----------------------')

    # 初始化变量
    init = tf.global_variables_initializer()

    # 开启会话
    with tf.Session() as sess:
        # 运行初始化
        sess.run(init)
        a_value, b_value, c_value = sess.run([a,b,c])
        print("a_value:", a_value)
        print("b_value", b_value)
        print("c_value", c_value)

    return None


if __name__ == "__main__":
    variable_demo()
修改变量命名空间(tf.variable_scope())
import tensorflow as tf
import os
os.environ['TF_CPP_MIN_LOG_LEVEL'] = '2'  # 去警告

def variable_demo():
    """
    变量的演示
    :return:
    """
    # 创建变量
    with tf.variable_scope("my_scope"):
        a = tf.Variable(initial_value=50)
        b = tf.Variable(initial_value=40)
    with tf.variable_scope("your_scope"):
        c = tf.add(a, b)
    print("a:", a)
    print("b", b)
    print("c", c)
    print('----------------------')

    # 初始化变量
    init = tf.global_variables_initializer()

    # 开启会话
    with tf.Session() as sess:
        # 运行初始化
        sess.run(init)
        a_value, b_value, c_value = sess.run([a,b,c])
        print("a_value:", a_value)
        print("b_value", b_value)
        print("c_value", c_value)

    return None


if __name__ == "__main__":
    variable_demo()
高级api
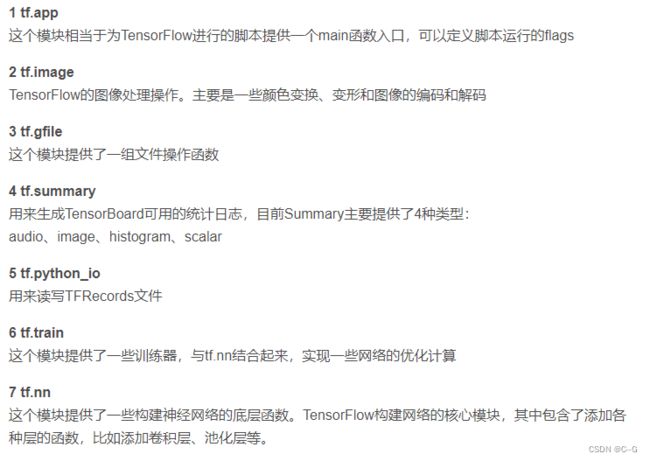


数据读取、神经网络(tensorflow1.x)
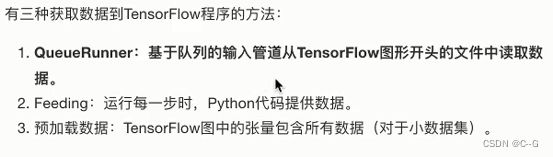
文件读取流程

- 构造文件名队列
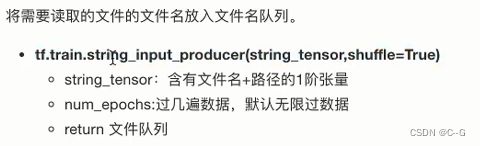
- 读取与解码
读取文件内容
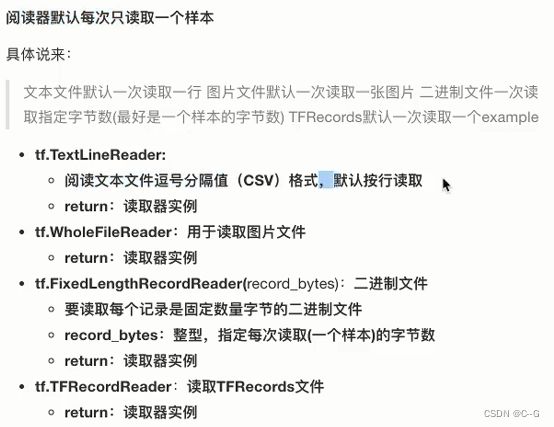
内容解码

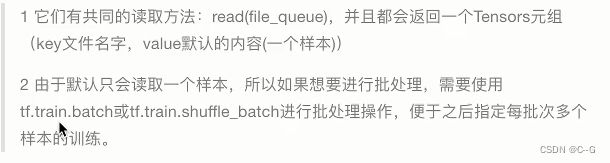
- 批处理

- 线程操作

图片数据
- 图片三要素

- 张量形状
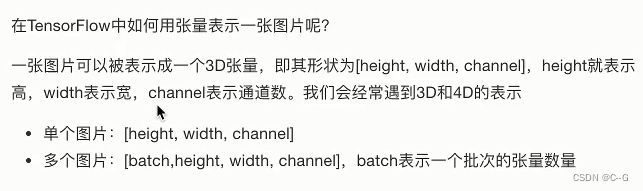
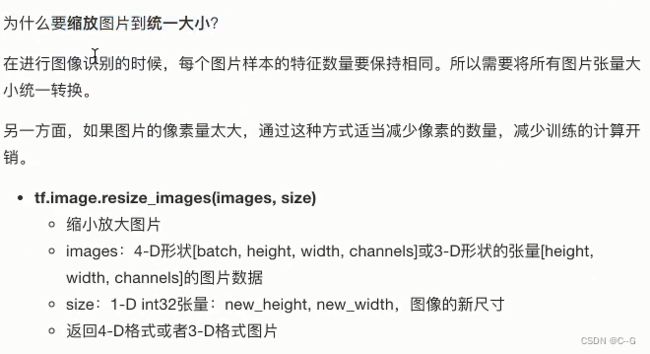
- 图片特征值处理
import tensorflow as tf
import os

def picture_read(file_list):
    """
    狗图片读取案例
    :return:
    """
    # 1、构造文件名队列
    file_queue = tf.train.string_input_producer(file_list)

    # 2、读取与解码
    # 读取阶段
    reader = tf.WholeFileReader()
    # key文件名, value一张图片的原始编码形式
    key, value = reader.read(file_queue)
    print("key:", key)
    print("value:", value)

    # 解码阶段
    image = tf.image.decode_jpeg(value)
    print("image;", image)

    # 图像的形状、类型修改
    image_resize = tf.image.resize_images(image, [200,200])
    print("image_resize:", image_resize)

    # 静态形状修改
    image_resize.set_shape(shape=[200,200,3])

    # 3、批处理
    image_batch = tf.train.batch([image_resize], batch_size=100, num_threads=1, capacity=100)
    print("image_batch:", image_batch)

    # 开启会话
    with tf.Session() as sess:
        # 创建线程协调员
        coord = tf.train.Coordinator()
        # 开启线程
        threads = tf.train.start_queue_runners(sess=sess, coord=coord)

        key_new, value_new, image_new, image_resize_new, image_batch_new = \
            sess.run([key, value, image, image_resize, image_batch])
        print("key_new:", key_new)
        print("value_new:", value_new)
        print("image_new:", image_new)
        print("image_resize_new:", image_resize_new)
        print("image_batch_new:", image_batch_new)

        # 回收线程
        coord.request_stop()
        coord.join(threads)

    return None


if __name__ == "__main__":
    # 构造路径 + 文件名的列表
    filename = os.listdir("./dog")
    #print(filename)
    # 拼接路径 + 文件名
    file_list = [os.path.join("dog", file) for file in filename]
    #print(file_list)
    picture_read(file_list)
二进制文件读取
CIFAR10二进制数据集


CIFAR10二进制数据读取
class Cifar():
def __init__(self):
# 设置图像大小
self.height = 32
self.width = 32
self.channel = 3
# 设置图像字节数
self.image = self.height * self.width * self.channel
self.label = 1
self.sample = self.image + self.label
def read_binary(self):
"""
读取二进制文件
:return:
"""
# 1、构造文件名队列
filename_list = os.listdir("./cifar-10-batches-bin")
# print("filename_list:\n", filename_list)
file_list = [os.path.join("./cifar-10-batches-bin/", i) for i in filename_list if i[-3:]=="bin"]
# print("file_list:\n", file_list)
file_queue = tf.train.string_input_producer(file_list)
# 2、读取与解码
# 读取
reader = tf.FixedLengthRecordReader(self.sample)
# key文件名 value样本
key, value = reader.read(file_queue)
# 解码
image_decoded = tf.decode_raw(value, tf.uint8)
print("image_decoded:\n", image_decoded)
# 切片操作
label = tf.slice(image_decoded, [0], [self.label])
image = tf.slice(image_decoded, [self.label], [self.image])
print("label:\n", label)
print("image:\n", image)
# 调整图像的形状
image_reshaped = tf.reshape(image, [self.channel, self.height, self.width])
print("image_reshaped:\n", image_reshaped)
# 三维数组的转置
image_transposed = tf.transpose(image_reshaped, [1, 2, 0])
print("image_transposed:\n", image_transposed)
# 3、构造批处理队列
image_batch, label_batch = tf.train.batch([image_transposed, label], batch_size=100, num_threads=2, capacity=100)
# 开启会话
with tf.Session() as sess:
# 开启线程
coord = tf.train.Coordinator()
threads = tf.train.start_queue_runners(sess=sess, coord=coord)
label_value, image_value = sess.run([label_batch, image_batch])
print("label_value:\n", label_value)
print("image:\n", image_value)
coord.request_stop()
coord.join(threads)
return image_value, label_value
def write_to_tfrecords(self, image_batch, label_batch):
"""
将样本的特征值和目标值一起写入tfrecords文件
:param image:
:param label:
:return:
"""
with tf.python_io.TFRecordWriter("cifar10.tfrecords") as writer:
# 循环构造example对象,并序列化写入文件
for i in range(100):
image = image_batch[i].tostring()
label = label_batch[i][0]
# print("tfrecords_image:\n", image)
# print("tfrecords_label:\n", label)
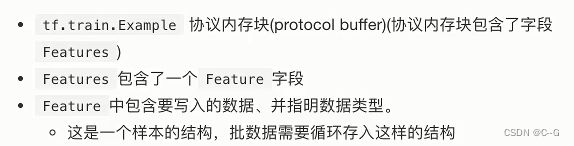
example = tf.train.Example(features=tf.train.Features(feature={
"image": tf.train.Feature(bytes_list=tf.train.BytesList(value=[image])),
"label": tf.train.Feature(int64_list=tf.train.Int64List(value=[label])),
}))
# example.SerializeToString()
# 将序列化后的example写入文件
writer.write(example.SerializeToString())
return None
def read_tfrecords(self):
"""
读取TFRecords文件
:return:
"""
# 1、构造文件名队列
file_queue = tf.train.string_input_producer(["cifar10.tfrecords"])
# 2、读取与解码
# 读取
reader = tf.TFRecordReader()
key, value = reader.read(file_queue)
# 解析example
feature = tf.parse_single_example(value, features={
"image": tf.FixedLenFeature([], tf.string),
"label": tf.FixedLenFeature([], tf.int64)
})
image = feature["image"]
label = feature["label"]
print("read_tf_image:\n", image)
print("read_tf_label:\n", label)
# 解码
image_decoded = tf.decode_raw(image, tf.uint8)
print("image_decoded:\n", image_decoded)
# 图像形状调整
image_reshaped = tf.reshape(image_decoded, [self.height, self.width, self.channel])
print("image_reshaped:\n", image_reshaped)
# 3、构造批处理队列
image_batch, label_batch = tf.train.batch([image_reshaped, label], batch_size=100, num_threads=2, capacity=100)
print("image_batch:\n", image_batch)
print("label_batch:\n", label_batch)
# 开启会话
with tf.Session() as sess:
# 开启线程
coord = tf.train.Coordinator()
threads = tf.train.start_queue_runners(sess=sess, coord=coord)
image_value, label_value = sess.run([image_batch, label_batch])
print("image_value:\n", image_value)
print("label_value:\n", label_value)
# 回收资源
coord.request_stop()
coord.join(threads)
return None
if __name__ == "__main__":
cifar = Cifar()
# image_value, label_value = cifar.read_binary()
# cifar.write_to_tfrecords(image_value, label_value)
cifar.read_tfrecords()
TFRecords

结构