windows下编译caffe(VS2015+Python3.5+CPU)
前言
为了缩减本文篇幅,相应的软件仅提供下载地址,不赘述下载过程!
windows 下编译 caffe 所需软件或工具(针对本文):
- Anaconda 3-4.1.1
- cmake 3.23.2
- VS 2015
- caffe-windows
注意所使用的版本要和本文相对应,本文使用【Anaconda 3-4.1.1】来替代【Python 3.5】,直接使用Python会遇到很多问题,而且【Anaconda 3-4.1.1】内置的就是【Python 3.5】!
Anaconda 3-4.1.1 安装及配置
下载地址
Anaconda3-4.1.1-Windows-x86_64.exe
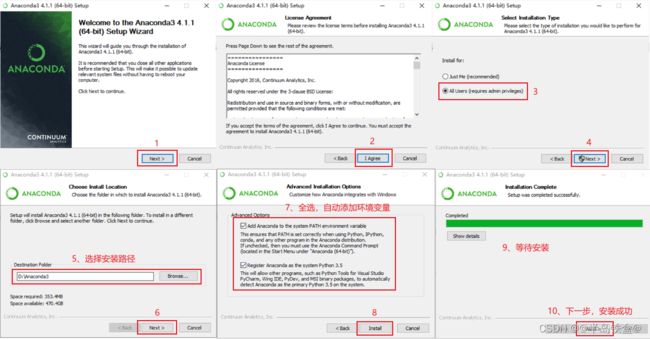
安装步骤
环境配置
安装时会自动进行配置,无需手动配置。
验证是否配置成功
【win + R】输入【cmd】回车打开命令行窗口,分别输入以下命令:
conda --version // 输出:conda 4.1.6
python --version    //输出:Python 3.5.2 :: Anaconda 4.1.1 (64-bit)
cmake 安装及配置
下载地址
cmake-3.23.2-windows-x86_64.zip
环境配置
下载的是压缩包版本,先解压至自己喜欢的位置(我直接放在了 D 盘的根目录),路径中最好不要出现中文和空格!!
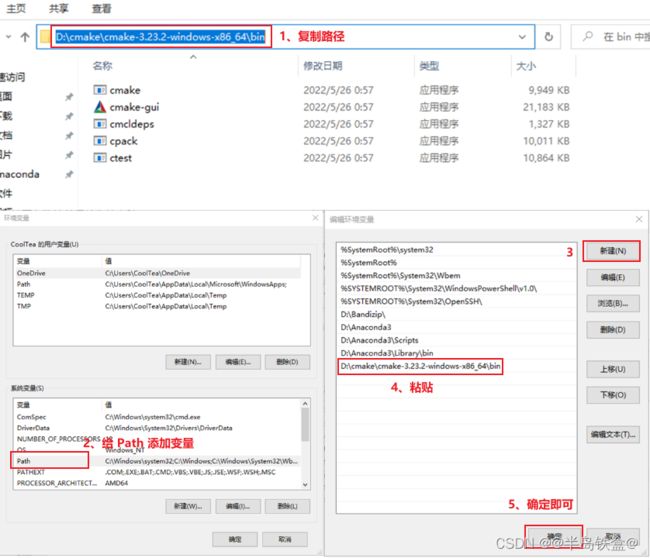
将该文件夹的【bin】目录添加至系统环境的【Path】变量中。
验证是否配置成功
在 cmd 中输入:
cmake -version // 输出:cmake version 3.23.2
VS 2015 安装及配置
下载地址
Visual Studio Community 2015 with Update 3
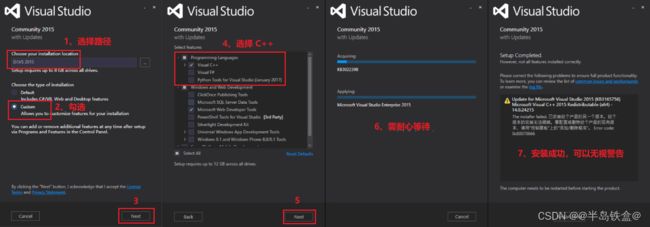
安装步骤
双击下载好的 【.iso】 文件,再双击 【vs_community.exe】文件开始安装:

caffe 下载及编译
下载地址
caffe-windows.zip
编译步骤
将下载好的压缩包解压至自己喜欢的位置(我放在了D盘的根目录)。
用编辑器修改构建文件(编辑器我用的是VS code),文件路径:
D:\caffe-windows\scripts\build_win.cmd
修改内容如下(四处中文注释的地方,从第70行左右开始):
:: Change the settings here to match your setup
:: Change MSVC_VERSION to 12 to use VS 2013
if NOT DEFINED MSVC_VERSION set MSVC_VERSION=14
:: Change to 1 to use Ninja generator (builds much faster)
:: 将下面的值改为 0
if NOT DEFINED WITH_NINJA set WITH_NINJA=0
:: Change to 1 to build caffe without CUDA support
:: 将下面的值改为 1
if NOT DEFINED CPU_ONLY set CPU_ONLY=1
:: Change to generate CUDA code for one of the following GPU architectures
:: [Fermi  Kepler  Maxwell  Pascal  All]
if NOT DEFINED CUDA_ARCH_NAME set CUDA_ARCH_NAME=Auto
:: Change to Debug to build Debug. This is only relevant for the Ninja generator the Visual Studio generator will generate both Debug and Release configs
if NOT DEFINED CMAKE_CONFIG set CMAKE_CONFIG=Release
:: Set to 1 to use NCCL
if NOT DEFINED USE_NCCL set USE_NCCL=0
:: Change to 1 to build a caffe.dll
if NOT DEFINED CMAKE_BUILD_SHARED_LIBS set CMAKE_BUILD_SHARED_LIBS=0
:: Change to 3 if using python 3.5 (only 2.7 and 3.5 are supported)
:: 将下面的值改为 3
if NOT DEFINED PYTHON_VERSION set PYTHON_VERSION=3
:: Change these options for your needs.
if NOT DEFINED BUILD_PYTHON set BUILD_PYTHON=1
if NOT DEFINED BUILD_PYTHON_LAYER set BUILD_PYTHON_LAYER=1
if NOT DEFINED BUILD_MATLAB set BUILD_MATLAB=0
:: If python is on your path leave this alone
if NOT DEFINED PYTHON_EXE set PYTHON_EXE=python
:: Run the tests
if NOT DEFINED RUN_TESTS set RUN_TESTS=0
:: Run lint
if NOT DEFINED RUN_LINT set RUN_LINT=0
:: Build the install target
:: 将下面的值改为 1
if NOT DEFINED RUN_INSTALL set RUN_INSTALL=1
打开【cmd】窗口,使用【cd】命令切换至【caffe-windows】下的【scripts】文件夹内,运行【build_win.cmd】文件:
// 我放在了D盘,下面演示我的切换方式
D:
cd D:\caffe-windows\scripts
build_win.cmd
构建过程中会下载一个依赖包,如果下载失败,可以自己下载依赖包并放在指定的文件中。
依赖包地址:https://github.com/willyd/caffe-builder/releases
选择:libraries_v140_x64_py35_1.1.0.tar.bz2// 压缩包下载完成后,放在下面的目录中(如果文件已存在则替换): C:\用户\当前登录的用户名\.caffe\dependencies\download // 我的目录结构如下所示: C:\Users\CoolTea\.caffe\dependencies\download然后重新构建。
整个构建过程会花费一定的时间,最终结果如下图所示(不出现红色报错就行):
caffe 使用
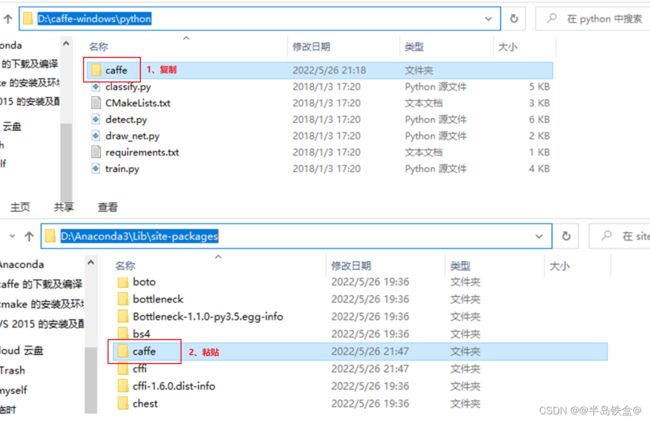
将 【caffe-windows/python】 下的整个【caffe】文件夹复制到【Anaconda/Lib/site-packages】文件夹下,如下图所示:
在这之前需要先使用【conda】安装一个库,代码如下:
conda install protobuf


