Vue学习基础版汇总V5.0.0
Vue2.0-学习知识基础版汇总
一、Vue之动态组件
1.1、什么是动态组件
- 动态组件指的是动态切换组件的显示与隐藏
1.2、实现动态组件渲染
- vue提供了一个内置的组件,专门用来实现动态组件的渲染。
- 【案例】
data(){
	//1.当前要渲染的组件名称
	return{
		comName: 'Left'
	}
}

<component :is="comName">component>

<button @click="comName = 'Left'">展示Left组件button>
<button @click="comName = 'Right'">展示 Right组件button>
- 【小结】
- component 标签是vue内置的,作用:组件的占位符
- is属性的值,表示要渲染的组件的名字,进行动态绑定
1.3、keep-alive保持状态
- 【概念】默认情况下,切换动态组件时
无法保持组件的状态,此时可以使用vue内置的组件保持动态组件的状态。 - 【格式】
<keep-alive>
	<component :is="comName">component>
keep-alive>
- 【小结】keep-alive 可以把内部的组件进行缓存,而不是销毁组件
1.4、keep-alive的生命周期
- 当组件
被缓存时,会自动触发组件的deactivated生命周期函数。 - 当组件
被激活时,会自动触发组件的activated生命周期函数。
<script>
export default {
  //数据区
  data(){
    return {
      number:0
    }
  },
  //vue生命周期-创建周期
  created() {
    console.log('Left 组件被创建了')
  },
  //vue生命周期-销毁周期
  destroyed(){
    console.log('Left 组件被销毁了')
  },
  //keep-alive生命周期函数
  activated(){
    console.log('Left 组件被激活了-actived')
  },
  //keep-alive生命周期函数
  deactivated(){
    console.log('Left 组件被缓存了-deactivated')
  }
}
script>
- 【小结】当组件第一次被创建的时候,即会执行created生命周期,也会执行activated生命周期。
- 但是当组件被激活的时候,只会触发activated生命周期,不再触发created,因为组件没有被重新创建。
1.5、keep-alive的include属性
- 【概念】include属性用来指定:只有名称匹配的组件会被缓存,多个组件名之间使用
英文的逗号分隔。 - 【案例】(缓存指定的组件)
<keep-alive include="Left,Right">
	<component :is="comName">component>
keep-alive>
- 【exclude】排除一些不需要缓存的组件
<keep-alive exclude="Left">
	<component :is="comName">component>
keep-alive>
- 【小结】
- 在使用keep-alive的时候,可以通过include指定哪些组件需要被缓存。
- 或者可以使用exclude属性指定哪些组件不需要被缓存。
但是:两个属性不能同时被使用
1.6、组件的名称属性name
- 【概念】每一个组件都可以设置自己的独有name
- 【案例】设置组件的名称,通过name属性
<script>
	export default {
        //当设置了name属性后,组件的名称就是name属性的值
        name: 'MyRight'
    }
script>
- 【小结】
- 组件的"注册名称"的主要应用场景是:以标签的形式,把注册好的组件,渲染和使用到页面结构之中。
- 组件声明时候的"name"名称的主要应用场景:结合标签实现组件缓存功能,以及在调试工具中看到组件的name名称
二、Vue之插槽
2.1、什么是插槽
<template>
  <div class="left-container">
      <h2>Left组件h2>


      <slot>slot>
  div>
template>

<template>
  <div class="app-container">
    <h1>App根组件h1>
    <hr/>
    <div class="box">

        <Left>
          <p>这是在使用Left组件时,内容区域插入的p标签p>
        Left>
    div>
  div>
template>
2.2、多个插槽使用命名
- 【作用】把内容要填充到指定的插槽中,需要指定对应插槽的名称
- 【定义插槽名称】使用name属性标识插槽名称
<slot name="defaukt">这里是插槽默认的内容(后备内容)slot>
- 【使用指定插槽】
<template>
  <div class="app-container">
    <h1>App根组件h1>
    <hr/>
    <div class="box">

        <Left>


          <template #default>
            <p>这是在使用Left组件时,内容区域插入的p标签p>
          template>
        Left>
    div>
  div>
template>
- 【小结】
- 如果要把内容填充到指定名称的插槽中,需要使用v-slot:这个指令。
- v-slot:后面要更上插槽的名字。
- v-slot:指令不能直接用在元素身上,必须用在template标签上,或者组件标签上。
- template 这个标签,它是一个虚拟的标签,只起到包裹性质的作用,但是,不会被渲染为任何实质性的html元素。
- v-slot: 可以简写为:‘#’
- 后备内容:如果使用这给插槽没有传入数据,插槽也可以自定义一些默认内容
2.3、具名插槽
- 【概念】封装组件预留多个插槽标签传入动态值。
- 【代码实现】自定义组件预留多个插槽与使用多个插槽传入值
<template>
  <div class="article-container">

      <div class="header-box">
        <slot name="title">标题slot>
      div>

      <div class="content-box">
          <slot name="content">内容slot>
      div>

      <div class="footer-box">
          <slot name="author">作者slot>
      div>
  div>
template>

<Article>
      <template #title>
        <h3>诗歌一首h3>
      template>
      <template #content>
        <div>
          <p>啊,你好呀,北京人p>
          <p>啊,你好呀,湖北人p>
          <p>啊,你好呀,新疆人p>
          <p>啊,你好呀,甘肃人p>
        div>
      template>
      <template #author>
        <h4>douglash4>
      template>
    Article>
2.4、作用域插槽
- 【概念】在封装组件时,为预留的提供属性对应的值,这种用法,叫做"作用域插槽"
- 【代码实现】使用插槽获取插槽返回的值展示
<template>
  <div class="article-container">

      <div class="content-box">
          <slot name="content" msg="我是content插槽返回的内容">内容slot>
      div>
  div>
template>

<Article>
      <template #content="obj">
        <div>
          <p>啊,你好呀,北京人p>
          <p>啊,你好呀,湖北人p>
          <p>啊,你好呀,新疆人p>
          <p>啊,你好呀,甘肃人p>
          <p>{{obj.msg}}p>
        div>
      template>
Article>
三、Vue之自定义指令
3.1、Vue中的自定义指令分为两类
3.1.1、私有自定义指令
-
【概念】在每个Vue组件中,可以再directives节点下声明私有自定义指令。
-
【案例】使用私有自定义属性(给标题添加一个字体颜色)
- 第一步:在需要使用自定义属性的html标签上增加自定义属性,如下:
<h1 v-color="color" >App根组件h1> <h2 v-color="'red'" >App根组件h2>- 第二步:在directives节点下声明color自定义属性,如下:
export default { //私有自定义指令的节点区 directives:{ //定义名为color的指令,指向一个配置对象 color:{ //为绑定到的HTML元素设置红色的文字 bind(el,binding){ // 形参中的el是绑定了此指令的,原生的DOM对象 // 形参中的binding是自定义属性对象,包含自定义属性的所有内容,可以从中获取到传入的值 el.style.color = binding.value } } }, //数据区 data(){ return{ color:'blue' } }, } -
【小结】 (只触发一次)
- 当指令第一次被绑定到元素上的时候,会立即触发bind函数
- 形参中的el表示当前指令所绑定到的那个DOM对象
-
【自定义属性之update函数】
- bind函数只调用1次:当指令第一次绑定到元素时调用,当DOM更新时bind函数不会被触发。
- update函数会在每次DOM更新时被调用。案例如下:
//私有自定义指令的节点区 directives:{ //定义名为color的指令,指向一个配置对象 color:{ //为绑定到的HTML元素设置红色的文字 bind(el,binding){ // 形参中的el是绑定了此指令的,原生的DOM对象 // 形参中的binding是自定义属性对象,包含自定义属性的所有内容,可以从中获取到传入的值 el.style.color = binding.value }, // 每次 DOM 更新时被调用 update(el,binding){ el.style.color = binding.value } } } -
【函数简写】bind与update共存,且函数体一致时可以简写如下:
//私有自定义指令的节点区
  directives:{
    //定义名为color的指令,指向一个配置对象
    // color:{
    //   //为绑定到的HTML元素设置红色的文字
    //   bind(el,binding){
    //     // 形参中的el是绑定了此指令的,原生的DOM对象
    //     el.style.color = binding.value
    //   },
    //   // 每次 DOM 更新时被调用
    //   update(el,binding){
    //       el.style.color = binding.value
    //   }
    // }
    color(el,binding){
      el.style.color = binding.value
    }
  }
3.1.2、全局自定义指令
- 【概念】全局共享的自定义指令需要通过"Vue.directive()"进行声明。
- 【案例】声明全局自定义指令
//在main.js中声明
//参数1:字符串,表示全局自定义指令的名字
//参数2:对象,用来接受指令的参数值
Vue.directive('color',function(el,binding){
    el.style.color = binding.value
})
四、Vue之eslintrc.js
4.1、创建eslintrc.js的vue项目
- 第一步:创建项目命令如下:
vue create demo-2
- 第二步:选择创建方式:

- 第三步:选择需要安装的组件

- 第四步:选择vue版本,本次选择2.0版本

- 第五步:选择预处理器,本次选择Less

- 第六步:选择ESLint的配置

- 第七步:选择什么时候触发ESLint检查代码规范

- 第八步:选择配置文件存放的目录

- 第九步:是否保存当前创建项目的配置作为模板,是输入:y回车(给模板起个名字),否则输入:n

4.2、配置ESLint的插件
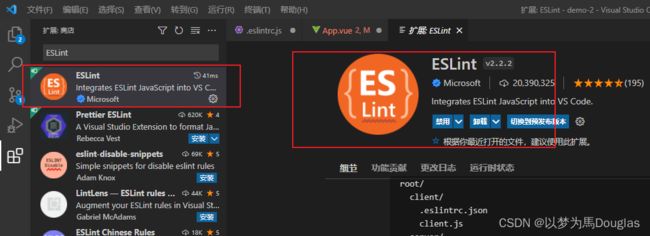
4.2.1、安装ESLint插件
- 【配置settings】内容如下:
//ESLint插件配置
    "editor.codeActionsOnSave": {
        "source.fixAll": true
    },
4.2.2、安装Prettier插件
- 【配置settings】内容如下:配置到settings文件的{}内即可
  "eslint.alwaysShowStatus": true,
    "prettier.trailingComma": "none",
    "prettier.semi": false,
    //每行文字个数超出此限制将会被换行
    "prettier.printWidth": 300,
    //使用单引号替换双引号
    "prettier.singleQuote": true,
    "prettier.arrowParens": "avoid",
    //设置.vue文件中,HTML代码的格式化插件
    "vetur.format.defaultFormatter.html": "js-beautify-html",
     //忽略项目的警告弹窗
    "vetur.ignoreProjectWarning": true,
    "vetur.format.defaultFormatterOptions": {
        "prettier": {
            "trailingComma":"none",
            "semi":false,
            "singleQuote":true,
            "arrowParens":"avoid",
            "printWidth": 300
        },
        "js-beautify-html": {
            "wrap_attributes": "false"
        }
    },
五、Vue之axios的基本用法
5.1、使用axios项目安装包
- 【作用】发送请求
- 【安装包】安装axios
//项目目录下执行安装命令
npm i axios -S
5.2、全局配置使用axios
- 【全局配置】在main.js进行axios组件挂在,配置如下:
//第一步: 引入axios
import axios from 'axios'
//第二步: 全局配置 axios 的请求根路径
axios.defaults.baseURL = 'http://www.liulongbin.top:3006'
//第三步: 把axios 挂载到 Vue.prototype 上,供每个.vue组件的实例直接使用
// $http : 这个可以自定义,但是一般建议为 $http
Vue.prototype.$http = axios
- 【使用】在任意vue组件中使用,案例如下:
 // 方法区
  methods: {
    async getInfo () {
        // 使用当前vue实例:this调用全局配置的 $http 发送get请求,省略已经配置过的公共url
      const { data: res } = await this.$http.get('/api/get')
      console.log(res)
    }
  }


