【Pytorch】21. RNN代码分析
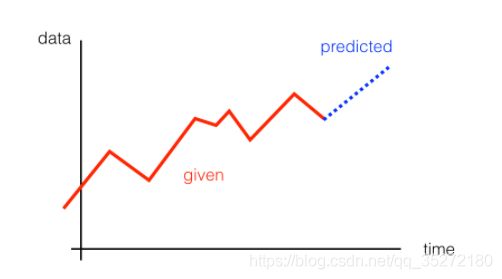
本节会学习用一个简单的RNN来做时间序列本节会学习用一个简单的RNN来做时间序列的预测。如图所示,给定一些输入数据,然后可以产生下一个事件的预测
我们会按照下面的步骤
- First, we’ll create our data
- Then, define an RNN in PyTorch
- Finally, we’ll train our network and see how it performs
创建数据
import torch
from torch import nn
import numpy as np
import matplotlib.pyplot as plt
%matplotlib inline

plt.figure(figsize=(8,5))

# how many time steps/data pts are in one batch of data
seq_length = 20

# generate evenly spaced data pts
time_steps = np.linspace(0, np.pi, seq_length + 1)
data = np.sin(time_steps)
data.resize((seq_length + 1, 1)) # size becomes (seq_length+1, 1), adds an input_size dimension

x = data[:-1] # all but the last piece of data
y = data[1:] # all but the first

# display the data
plt.plot(time_steps[1:], x, 'r.', label='input, x') # x
plt.plot(time_steps[1:], y, 'b.', label='target, y') # y

plt.legend(loc='best')
plt.show()
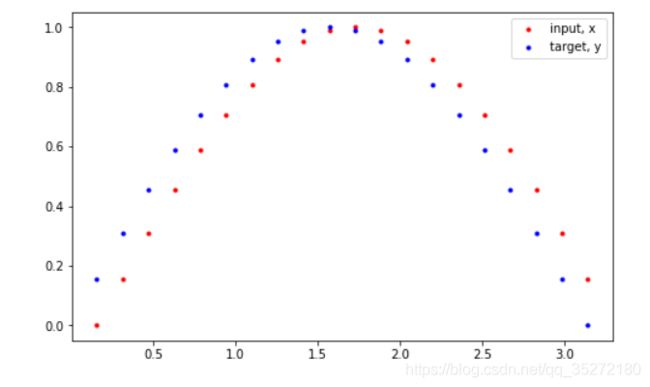
以上的代码创建了一个下图的数据
定义RNN
接下来,我们在pytorch中定义rnn,需要用到一个 nn.RNN 模块来创建RNN layer,有以下的参数:
- input_size - the size of the input
- hidden_dim - the number of features in the RNN output and in the hidden state
- n_layers - the number of layers that make up the RNN, typically 1-3; greater than 1 means that you’ll create a stacked RNN
- batch_first - whether or not the input/output of the RNN will have the batch_size as the first dimension (batch_size, seq_length, hidden_dim)
可以参考这篇文档 RNN documentation
class RNN(nn.Module):
    def __init__(self, input_size, output_size, hidden_dim, n_layers):
        super(RNN, self).__init__()

        self.hidden_dim=hidden_dim

        # define an RNN with specified parameters
        # batch_first means that the first dim of the input and output will be the batch_size
        self.rnn = nn.RNN(input_size, hidden_dim, n_layers, batch_first=True)

        # last, fully-connected layer
        self.fc = nn.Linear(hidden_dim, output_size)

    def forward(self, x, hidden):
        # x (batch_size, seq_length, input_size)
        # hidden (n_layers, batch_size, hidden_dim)
        # r_out (batch_size, time_step, hidden_size)
        batch_size = x.size(0)

        # get RNN outputs
        r_out, hidden = self.rnn(x, hidden)
        # shape output to be (batch_size*seq_length, hidden_dim)
        r_out = r_out.view(-1, self.hidden_dim)

        # get final output
        output = self.fc(r_out)

        return output, hidden
检查一下输入和输出的维度
# test that dimensions are as expected
test_rnn = RNN(input_size=1, output_size=1, hidden_dim=10, n_layers=2)

# generate evenly spaced, test data pts
time_steps = np.linspace(0, np.pi, seq_length)
data = np.sin(time_steps)
data.resize((seq_length, 1))

test_input = torch.Tensor(data).unsqueeze(0) # give it a batch_size of 1 as first dimension
print('Input size: ', test_input.size())

# test out rnn sizes
test_out, test_h = test_rnn(test_input, None)
print('Output size: ', test_out.size())
print('Hidden state size: ', test_h.size())
训练RNN
设置一些超参举个例子看看
# decide on hyperparameters
input_size=1
output_size=1
hidden_dim=32
n_layers=1

# instantiate an RNN
rnn = RNN(input_size, output_size, hidden_dim, n_layers)
print(rnn)
loss和优化器的设置,由于这是一个回归问题,我们就用mean square error,然后recurrent通常用Adam优化器
# MSE loss and Adam optimizer with a learning rate of 0.01
criterion = nn.MSELoss()
optimizer = torch.optim.Adam(rnn.parameters(), lr=0.01)
定义训练函数,这个函数的做好用就是将一个rnn作为输入,经过几个步骤的训练之后,返回一个训练好的rnn。
其中hidden state每次更新后都把最新的hidden state作为下一轮的输入
# train the RNN
def train(rnn, n_steps, print_every):

    # initialize the hidden state
    hidden = None

    for batch_i, step in enumerate(range(n_steps)):
        # defining the training data
        time_steps = np.linspace(step * np.pi, (step+1)*np.pi, seq_length + 1)
        data = np.sin(time_steps)
        data.resize((seq_length + 1, 1)) # input_size=1

        x = data[:-1]
        y = data[1:]

        # convert data into Tensors
        x_tensor = torch.Tensor(x).unsqueeze(0) # unsqueeze gives a 1, batch_size dimension
        y_tensor = torch.Tensor(y)

        # outputs from the rnn
        prediction, hidden = rnn(x_tensor, hidden)

        ## Representing Memory ##
        # make a new variable for hidden and detach the hidden state from its history
        # this way, we don't backpropagate through the entire history
        hidden = hidden.data

        # calculate the loss
        loss = criterion(prediction, y_tensor)
        # zero gradients
        optimizer.zero_grad()
        # perform backprop and update weights
        loss.backward()
        optimizer.step()

        # display loss and predictions
        if batch_i%print_every == 0:
            print('Loss: ', loss.item())
            plt.plot(time_steps[1:], x, 'r.') # input
            plt.plot(time_steps[1:], prediction.data.numpy().flatten(), 'b.') # predictions
            plt.show()

    return rnn
# train the rnn and monitor results
n_steps = 75
print_every = 15

trained_rnn = train(rnn, n_steps, print_every)
完整代码:
git clone https://github.com/udacity/deep-learning-v2-pytorch.git
转到 recurrent-neural-networks > time-series
RNN和LSTM的讲解,请看【Pytorch】21. 循环神经网络RNN和LSTM
本系列笔记来自Udacity课程《Intro to Deep Learning with Pytorch》
全部笔记请关注微信公众号【阿肉爱学习】,在菜单栏点击“利其器”,并选择“pytorch”查看


