对象存储介绍(腾讯云cos)
什么是对象存储
对象存储是一种将数据作为对象进行管理的计算机数据存储体系结构,与其他存储体系结构(例如将数据作为文件层级管理的文件系统)以及将数据作为块和扇区内的块进行管理的块存储相对。每个对象通常包括数据本身,可变数量的元数据和全局唯一标识符。
对象存储可以在多个级别实现,包括设备级别(对象存储设备),系统级别和接口级别。在每种情况下,对象存储都试图实现其他存储架构无法解决的功能,例如可以由应用程序直接编程的接口,可以跨越多个物理硬件实例的命名空间,以及数据管理功能,如数据复制和数据分发在对象级粒度。
相比于数据库这种面向结构化数据存储的技术,对象存储主要面向存储大量的非结构化数据,通俗来说,我们日常生活中生成的照片、视频、音频、文档等都属于非结构化数据。这些日常产生的数据都适合存储在对象存储中。
现在几乎所有公有云服务商都提供对象存储服务,如果要在企业内部使用,也可以采用元核云、紫光西数这类专业存储公司提供的企业级对象存储产品。
腾讯云cos使用指南
阿里云对象存储:oss
腾讯云对象存储:cos
本文主要对腾讯云cos进行介绍
1、进入管理控制台
开通OSS服务还会额外赠送50G半年的免费容量

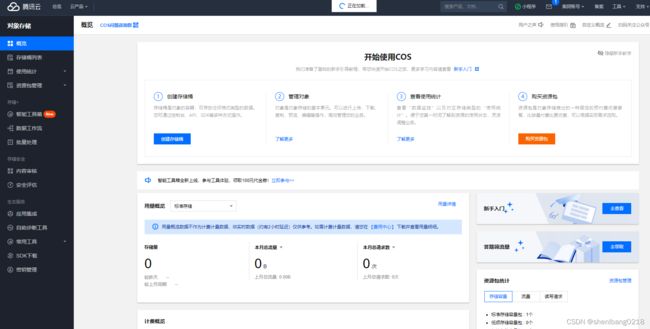
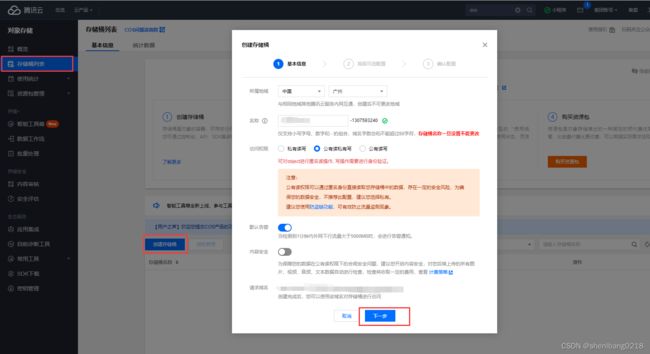
开通服务之后首先要创建一个存储桶,我理解应该就是类似于一个独立的存储空间,你可以针对这个存储桶设置访问权限,我这里是要用来做图床,所以是设定了私有写和公有读。
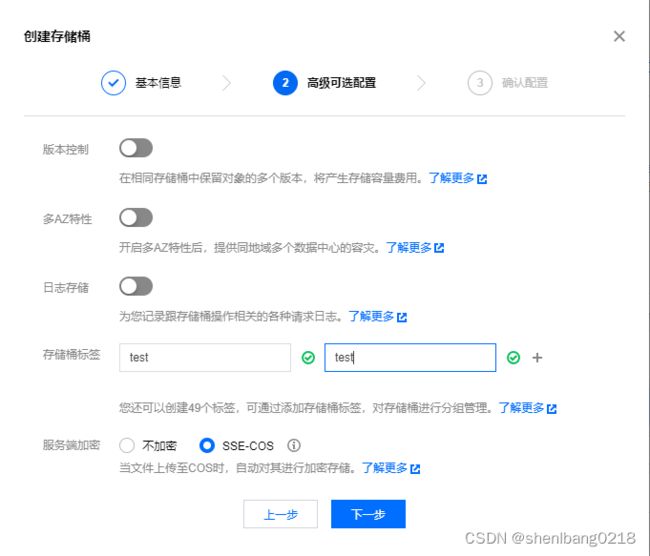
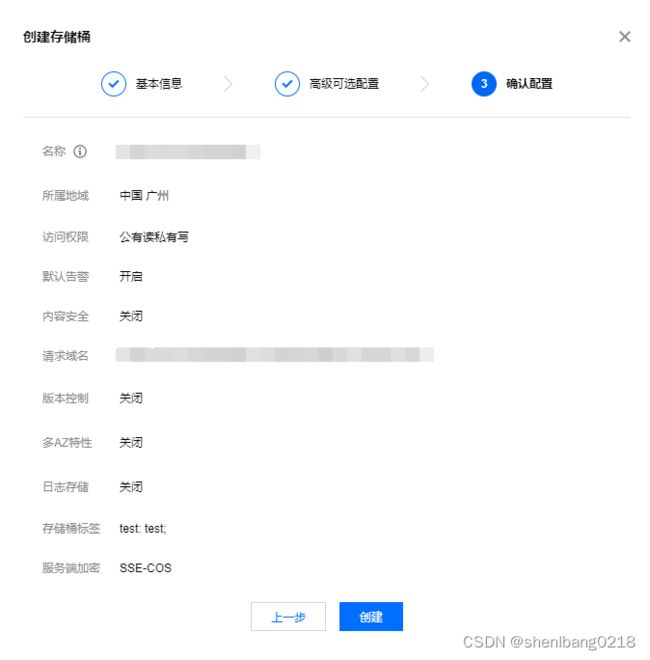
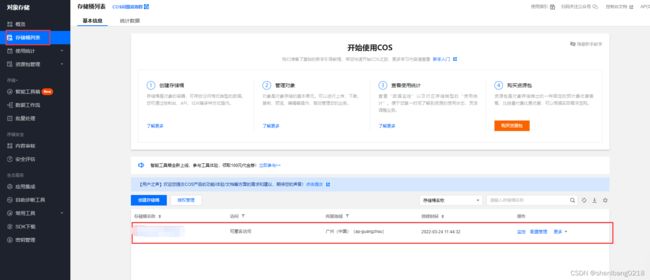
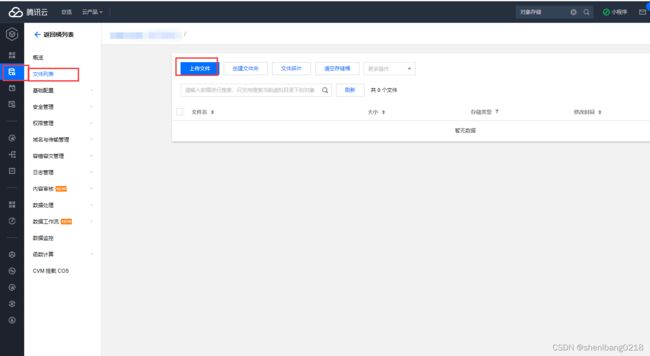
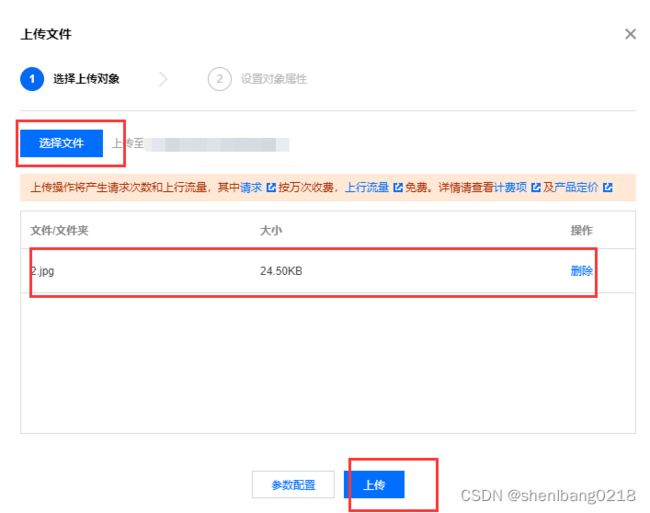
2、测试通过控制台,上传文件
集成腾讯云cos
腾讯云OSS的SDK文档
此处作者使用的开发语言为java,腾讯云OSS的javaSDK文档
使用SDK需要一些必要信息,比如secret_key和secret_id,这个可以从API密钥管理页面获取。

环境依赖
SDK 支持 JDK 1.7、1.8及以上版本。
1、修改配置
        <dependency>
            <groupId>com.qcloudgroupId>
            <artifactId>cos_apiartifactId>
            <version>5.6.54version>
        dependency>


        <dependency>
            <groupId>joda-timegroupId>
            <artifactId>joda-timeartifactId>
        dependency>
2、添加配置文件内容
# 服务端口
server.port=8205
# 服务名
spring.application.name=service-oss

#返回json的全局时间格式
spring.jackson.date-format=yyyy-MM-dd HH:mm:ss
spring.jackson.time-zone=GMT+8

#腾讯云api秘钥id
tencent.yun.secretid=
#腾讯云api秘钥key
tencent.yun.secretkey=
3、创建初始化配置的工具类
/**
 * 在主启动类启动时初始化配置文件中的内容
 *
 * 创建时间: 2022-03-24 14:46
 *
 * @author v_fuxshen
 * @version v1.0.0
 * @since v1.0.0
 */
@Component
public class ConstantOssPropertiesUtils implements InitializingBean {

	@Value("${tencent.yun.secretid}")
	private String secretId;

	@Value("${tencent.yun.secretkey}")
	private String secretKey;


	public static String Tencent_secretId;
	public static String Tencent_secretKey;


	@Override
	public void afterPropertiesSet() throws Exception {
		Tencent_secretId = secretId;
		Tencent_secretKey = secretKey;
	}
}
4、测试如何创建存储桶
public class OssTest {
	public static void main(String[] args) {
// 1 初始化用户身份信息(secretId, secretKey)。
        // SECRETID和SECRETKEY请登录访问管理控制台 https://console.cloud.tencent.com/cam/capi 进行查看和管理
		String secretId = "";
		String secretKey = "";
		COSCredentials cred = new BasicCOSCredentials(secretId, secretKey);
        // 2 设置 bucket 的地域, COS 地域的简称请参照 https://cloud.tencent.com/document/product/436/6224
       // clientConfig 中包含了设置 region, https(默认 http), 超时, 代理等 set 方法, 使用可参见源码或者常见问题 Java SDK 部分。
		Region region = new Region("ap-guangzhou");//此处设置的地域为广州
		ClientConfig clientConfig = new ClientConfig(region);
       // 这里建议设置使用 https 协议
       // 从 5.6.54 版本开始,默认使用了 https
		clientConfig.setHttpProtocol(HttpProtocol.https);
       // 3 生成 cos 客户端。
		COSClient cosClient = new COSClient(cred, clientConfig);


		//创建存储桶  如果腾讯云cos中已经存在存储通,那么此步骤可省略
		String bucket = ""; //存储桶名称,格式:BucketName-APPID
		CreateBucketRequest createBucketRequest = new CreateBucketRequest(bucket);
        // 设置 bucket 的权限为 Private(私有读写)、其他可选有 PublicRead(公有读私有写)、PublicReadWrite(公有读写)
		createBucketRequest.setCannedAcl(CannedAccessControlList.PublicRead);
		try{
			Bucket bucketResult = cosClient.createBucket(createBucketRequest);
		} catch (CosServiceException serverException) {
			serverException.printStackTrace();
		} catch (CosClientException clientException) {
			clientException.printStackTrace();
		}
	}
}
5、编写接口实现
controller
@RestController
@RequestMapping("/api/oss/file")
@Api(tags = "腾讯云cos接口")
public class FileApiController {

	@Autowired
	private FileService fileService;

	@PostMapping("fileUpload")
	@ApiOperation(value = "上传文件到腾讯云")
	public Result fileUpload(MultipartFile file){
		//获取上传文件(返回的为文件存储的路径)
		String url = fileService.fileUpload(file);
        return Result.success(url);
	}
}
@Service
@Slf4j
public class FileServiceImpl implements FileService {
	@Override
	public String fileUpload(MultipartFile file) {

		// 1 初始化用户身份信息(secretId, secretKey)。
		// SECRETID和SECRETKEY请登录访问管理控制台 https://console.cloud.tencent.com/cam/capi 进行查看和管理
		String secretId = ConstantOssPropertiesUtils.Tencent_secretId;

		String secretKey = ConstantOssPropertiesUtils.Tencent_secretKey;

		COSCredentials cred = new BasicCOSCredentials(secretId, secretKey);
		// 2 设置 bucket 的地域, COS 地域的简称请参照 https://cloud.tencent.com/document/product/436/6224
		// clientConfig 中包含了设置 region, https(默认 http), 超时, 代理等 set 方法, 使用可参见源码或者常见问题 Java SDK 部分。
		Region region = new Region("ap-guangzhou");
		ClientConfig clientConfig = new ClientConfig(region);

		// 这里建议设置使用 https 协议
		// 从 5.6.54 版本开始,默认使用了 https
		clientConfig.setHttpProtocol(HttpProtocol.https);

		// 3 生成 cos 客户端。
		COSClient cosClient = new COSClient(cred, clientConfig);

		// 指定文件将要存放的存储桶
		String bucketName = "yygh-bucket-1307593240";

        //文件名称 为了保证文件名称唯一,此处使用uuid来设置文件名称
		String filename = UUID.randomUUID().toString().replaceAll("-","") +"_"+file.getOriginalFilename();

        //目录的生成 当前日期
		SimpleDateFormat dateFormat = new SimpleDateFormat("yyyy-MM-dd");
		String date = dateFormat.format(new Date());

		// 指定文件上传到 COS 上的路径,即对象键。例如对象键为folder/picture.jpg,则表示将文件 picture.jpg 上传到 folder 路径下
		//此处目录规则为  当前日期/文件名称
		String key = date+"/"+filename;
		PutObjectRequest putObjectRequest = new PutObjectRequest(bucketName, key, multipartFileToFile(file));
		PutObjectResult putObjectResult = cosClient.putObject(putObjectRequest);
		log.info("putObjectResult:"+putObjectResult);

		//删除本地上传资源
		delteTempFile(multipartFileToFile(file));

		Date expiration = new Date(new Date().getTime() + 5 * 60 * 10000);

		GeneratePresignedUrlRequest req =
				new GeneratePresignedUrlRequest(bucketName, key, HttpMethodName.GET);
		// 设置签名过期时间(可选), 若未进行设置, 则默认使用 ClientConfig 中的签名过期时间(1小时)
		// 可以设置任意一个未来的时间,推荐是设置 10 分钟到 3 天的过期时间
		req.setExpiration(expiration);

		URL url = cosClient.generatePresignedUrl(req);

		//关闭客户端
		cosClient.shutdown();

		//拼接文件地址
		StringBuffer stringBuffer = new StringBuffer()
				.append(url.getProtocol())
				.append("://")
				.append(url.getHost())
				.append(url.getPath());

		return stringBuffer.toString();
	}

	/**
	 * 此方法将multipartFile转为file
	 *
	 * @param file
	 * @return java.io.File
	 * @author v_fuxshen
	 * @date 2022-03-24 15:10:03
	 **/
	private File multipartFileToFile(MultipartFile file)  {

		File toFile = null;
		if (file.equals("") || file.getSize() <= 0) {
			file = null;
		} else {

			try {
				InputStream ins = null;
				ins = file.getInputStream();
				toFile = new File(file.getOriginalFilename());
				inputStreamToFile(ins, toFile);
				ins.close();
			} catch (IOException e) {
				e.printStackTrace();
			}
		}
		return toFile;
	}

	/**
	 * 获取流文件
	 * @param ins
	 * @param file
	 */
	private static void inputStreamToFile(InputStream ins, File file) {
		try {
			OutputStream os = new FileOutputStream(file);
			int bytesRead = 0;
			byte[] buffer = new byte[8192];
			while ((bytesRead = ins.read(buffer, 0, 8192)) != -1) {
				os.write(buffer, 0, bytesRead);
			}
			os.close();
			ins.close();
		} catch (Exception e) {
			e.printStackTrace();
		}
	}


	/**
	 * 删除本地临时文件
	 * @param file
	 */
	public static void delteTempFile(File file) {
		if (file != null) {
			File del = new File(file.toURI());
			del.delete();
		}
	}
}
