简述
每个项目从新建开始我们或多或少都会导入各种依赖库,如果项目中只有一个module的话,对于依赖库版本的管理很容易,但是多个module的话,稍加不注意,很容易导入多个版本的库甚至产生版本冲突,更新修改依赖库也需要多处操作,所以我们需要对依赖库版本进行统一管理。
传统apply from的方式(也是我以前项目中使用)
为了对模块进行统一管理,会在根目录新建一个config.gradle文件或者在根目录的build.gradle定义一些变量
ext {
    android = [
            compileSdkVersion   : 29,
            buildToolsVersion   : "30.0.2",
            applicationId       : "com.xionggouba.bearseller",
            minSdkVersion       : 19,
            targetSdkVersion    : 30,
            versionCode         : 27,
            versionName         : "3.9.1",
            defaultPublishConfig: 'release',
            publishNonDefault   : true,
            multiDexEnabled     : true,
            mapKey              : 'c7e1ee468aa1bf8a6739',
            pushKey             : '65aae199a0059eb1dbe7',
            pushChannel         : 'developer-default',
    ]
    appid = [
            app           : "com.xionggouba.bearseller",
            login         : "com.huitao.login",
            home          : "com.huitao.home",
            webview       : "com.huitao.webview",
            main          : "com.huitao.main",
            productManager: "com.huitao.productmanager",
            personal      : "com.huitao.personalcenter",
            map           : "com.huitao.map",
            bluetooth     : "com.huitao.bluetooth",
            push          : "com.huitao.push",
            markketing    : "con.huitao.marketing",
            printer       : "com.huitao.printer"
    ]
    versions = [
            "lifecycle_version": "2.2.0",
            "arch_version"     : "2.1.0",
            "retrofit_version" : "2.6.2",
            "dialog_version"   : "3.3.0",
            "glide_version"    : "4.9.0",
            "hilt"             : "2.28-alpha",
            "kotlin_version"   : "1.4.10",
            "fragment_version" : "1.2.5",
            "room_version"     : "2.2.6"
    ]
    architecture = [
            "viewmodel"          : "androidx.lifecycle:lifecycle-viewmodel-ktx:${versions['lifecycle_version']}",
            "livedata"           : "androidx.lifecycle:lifecycle-livedata-ktx:${versions['lifecycle_version']}",
            "lifecycleruntime"   : "androidx.lifecycle:lifecycle-runtime-ktx:${versions['lifecycle_version']}",
            "savedstate"         : "androidx.lifecycle:lifecycle-viewmodel-savedstate:${versions['lifecycle_version']}",
            // alternately - if using Java8, use the following instead of lifecycle-compiler
            "lifecyclecommon"    : "androidx.lifecycle:lifecycle-common-java8:${versions['lifecycle_version']}",
            // Saved state module for ViewModel
            "viewmodelsavedstate": "androidx.lifecycle:lifecycle-viewmodel-savedstate:${versions['lifecycle_version']}",
            "lifecycleextentions": "androidx.lifecycle:lifecycle-extensions:${versions['lifecycle_version']}",
            "retrofit2"          : "com.squareup.retrofit2:retrofit:${versions['retrofit_version']}",
            "gson"               : "com.squareup.retrofit2:converter-gson:${versions['retrofit_version']}",
            "persistentcookiejar": "com.github.franmontiel:PersistentCookieJar:v1.0.1",
            "glide"              : "com.github.bumptech.glide:glide:${versions['glide_version']}",
            "glidecompiler"      : "com.github.bumptech.glide:compiler:${versions['glide_version']}",
            "oss"                : "com.aliyun.dpa:oss-android-sdk:2.9.1",
            "luban"              : "top.zibin:Luban:1.1.8"
    ]
]
在工程的根目录build.gradle添加
apply from"config.gradle"
找一个东西就得靠搜索,逐一查找。
buildSrc方式
什么是buildSrc
当运行 Gradle 时会检查项目中是否存在一个名为 buildSrc 的目录。然后 Gradle 会自动编译并测试这段代码,并将其放入构建脚本的类路径中, 对于多项目构建,只能有一个 buildSrc 目录,该目录必须位于根项目目录中, buildSrc 是 Gradle 项目根目录下的一个目录,它可以包含我们的构建逻辑,与脚本插件相比,buildSrc 应该是首选,因为它更易于维护、重构和测试代码
小结
buildSrc在近几年时非常流行的,因为它共享 buildSrc 库工件的引用,全局只有一个地方可以修改它,支持自动补全(这个很爽),支持跳转。 但是他也有一个缺点,依赖更新将重新构建整个项目,这个不是很好。
Composing builds
什么是Composing builds
复合构建只是包含其他构建的构建. 在许多方面,复合构建类似于 Gradle 多项目构建,不同之处在于,它包括完整的 builds ,而不是包含单个 projects
- 组合通常独立开发的构建,例如,在应用程序使用的库中尝试错误修复时
- 将大型的多项目构建分解为更小,更孤立的块,可以根据需要独立或一起工作
小结
这种方式拥有buildSrc的优点,同时依赖更新不用重新构建整个项目。
Composing builds项目实战
在项目中新建一个model,用于管理配置信息
新建一个ConfigPlugin的类,不用具体的实现
class ConfigPlugin: Plugin{ override fun apply(p0: Project) { } companion object{ } }
编辑configPluginmodel中的build.gradle文件
我的文件大致内容如下
buildscript {
    repositories {
        jcenter()
    }
    dependencies {
        // 因为使用的 Kotlin 需要需要添加 Kotlin 插件
        classpath "org.jetbrains.kotlin:kotlin-gradle-plugin:1.6.10"
    }
}

apply plugin: 'kotlin'
apply plugin: 'java-gradle-plugin'

repositories {
    // 需要添加 jcenter 否则会提示找不到 gradlePlugin
    jcenter()
    google()
}

dependencies {
    implementation gradleApi()
    implementation "org.jetbrains.kotlin:kotlin-gradle-plugin:1.6.10"
}

compileKotlin {
    kotlinOptions {
        jvmTarget = "1.8"
    }
}
compileTestKotlin {
    kotlinOptions {
        jvmTarget = "1.8"
    }
}

gradlePlugin {
    plugins {
        version {
            // 在 app 模块需要通过 id 引用这个插件
            id = 'com.umeshop.configplugin'
            // 实现这个插件的类的路径
            implementationClass = 'com.umeshop.configplugin.ConfigPlugin'
        }
    }
}
修改根目录的settings.gradle文件
项目目录引入插件
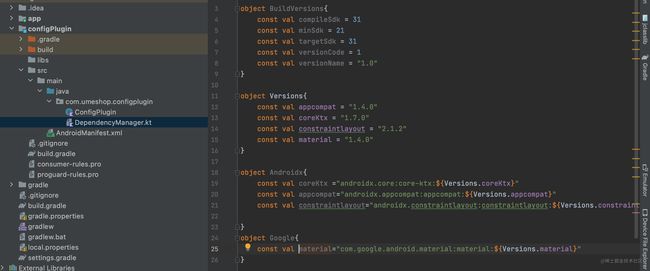
在configPluginmodel中定义一个DependencyManager文件来管理一些第三方的依赖
在使用目录导入
大致流程介绍完成
需要注意的地方
根目录的settings.gradle的配置
dependencyResolutionManagement {
    repositoriesMode.set(RepositoriesMode.FAIL_ON_PROJECT_REPOS)
    repositories {
        google()
        mavenCentral()
        jcenter() // Warning: this repository is going to shut down soon
    }
}
rootProject.name = "jetpackDemo"
include ':app'
有些版本是这样的,建议删除dependencyResolutionManagement的配置,在build.gradle中配置。大致是这样的
allprojects {
    repositories {
        google()
        mavenCentral()
        jcenter() // Warning: this repository is going to shut down soon
    }
}
还有一个就是依赖的修改
includeBuild("configPlugin")
是includeBuild标签,不是include
总结
到此这篇关于Android统一依赖管理的三种方式的文章就介绍到这了,更多相关Android统一依赖管理内容请搜索脚本之家以前的文章或继续浏览下面的相关文章希望大家以后多多支持脚本之家!


