OpenCV学习Histogram&equalizeHist&Lomography effect&Cartoonize effect实现
本小实验完成如下五个功能:
1:使用trackbar实现button功能(OpenCV不自带button,不用QT我只能用trackerbar来实现可视化操作了);
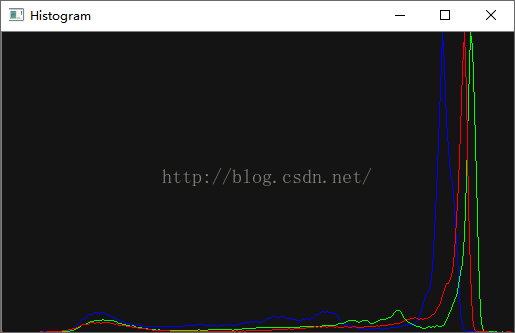
2:计算并绘制直方图;
3:Histogram equalization;
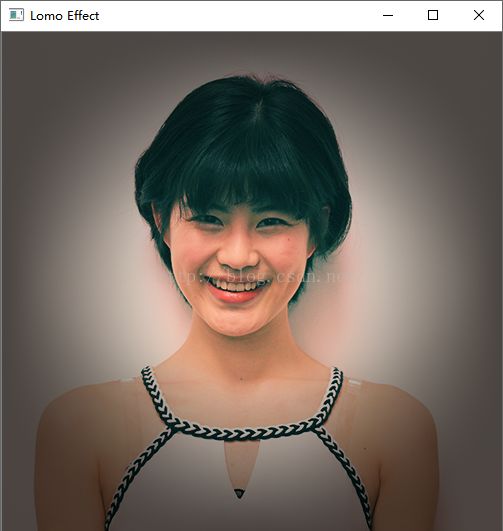
4:实现lomography效果;
5:实现cartoonize效果。
3中为了色调均衡化一幅彩色图像,我们可以对图像的HSV 或 YCrCb格式分别对各个通道进行均衡化,这里我们对图像YCrCb格式的Y通道进行均衡化。先split分离出YCrCb格式图像的不同通道的矩阵,再对Y通道进行equalizeHist均衡化,然后merge合并通道,最后把图像转换为RGB图像。
4中实现实现lomography效果分两步进行。先对red通道进行LUT操作实现曲线变换,变换公式如下:

该公式实现的效果是增强图像的对比度

接下来对图像增加暗晕(dark halo),最后multiply操作实现效果。
5中实现cartoonize效果,第一步检测出图像的边缘,当然先要进行降噪处理,检测到边缘后进行膨胀操作连接断续的边缘。最后实现目标效果边缘图像与彩色图像进行multiply操作实现效果。
具体见代码。
// OpenCV includes
#include "opencv2/core/utility.hpp"
#include "opencv2/imgproc.hpp"
#include "opencv2/highgui.hpp"

using namespace cv;
using namespace std;

Mat img;

void showHisto(int state, void* userData);
void equalize(int state, void* userData);
void lomo(int state, void* userData);
void cartoon(int state, void* userData);

// OpenCV command line parser functions
// Keys accecpted by command line parser
const char* keys =
{
	"{help h usage ? | | print this message}"
	"{@image | | Image to process}"
};

char* trackbar_name = "mode 1-4";
char* window_name = "Mode Table";
int modeL = 0;
int modeH = 4;

void switchMode(int pos, void*) {
	if (pos == 1)
	{
		showHisto(0, 0);
	}
	if (pos == 2)
	{
		equalize(0, 0);
	}
	if (pos == 3)
	{
		lomo(0, 0);
	}
	if (pos == 4)
	{
		cartoon(0, 0);
	}
}

int main(int argc, const char** argv)
{
	/*
	CommandLineParser parser(argc, argv, keys);
	parser.about("Chapter 4. PhotoTool v1.0.0");
	//If requires help show
	if (parser.has("help"))
	{
		parser.printMessage();
		return 0;
	}

	String imgFile = parser.get(0);
	// Check if params are correctly parsed in his variables
	if (!parser.check())
	{
		parser.printErrors();
		return 0;
	}
	*/

	// Load image to process
	img = imread("E:/VS2013/face/xuelian/jpg/1.jpg");
	if (!img.data)
	{
		return -1;
	}
	// Create window
	namedWindow(window_name);

	// Create UI buttons
	/*
	createButton("Show histogram", showHistoCallback, NULL, QT_PUSH_BUTTON, 0);
	createButton("Equalize histogram", equalizeCallback, NULL, QT_PUSH_BUTTON, 0);
	createButton("Lomography effect", lomoCallback, NULL, QT_PUSH_BUTTON, 0);
	createButton("Cartonize effect", cartoonCallback, NULL, QT_PUSH_BUTTON, 0);
	*/

	createTrackbar(trackbar_name, window_name, &modeL, modeH, switchMode);//使用trackbar实现button功能

	// Show image
	//imshow("Input", img);
	waitKey(0);
	return 0;
}

void showHisto(int state, void* userData)
{
	// 分割成3个单通道图像 ( B, G 和 R )
	vector bgr;
	split(img, bgr);

	//设定bin数目,划分的子区间个数
	int numbins = 256;

	//设定像素值范围 (前面已经提到,在 0 到 255之间 )
	float range[] = { 0, 255 };
	const float* histRange = { range };

	//创建储存直方图的矩阵
	Mat b_hist, g_hist, r_hist;

	// 计算直方图
	/*
	bgr[i]:输入数组(或数组集)
	1: 输入数组的个数 (这里我们使用了一个单通道图像,我们也可以输入数组集 )
	0: 需要统计的通道 (dim)索引 ,这里我们只是统计了灰度 (且每个数组都是单通道)所以只要写 0 就行了
	Mat(): 掩码( 0 表示忽略该像素), 如果未定义,则不使用掩码
	b_hist: 储存直方图的矩阵
	1: 直方图维数
    numbins: 每个维度的bin数目
	histRange: 每个维度的取值范围
	*/
	calcHist(&bgr[0], 1, 0, Mat(), b_hist, 1, &numbins, &histRange);
	calcHist(&bgr[1], 1, 0, Mat(), g_hist, 1, &numbins, &histRange);
	calcHist(&bgr[2], 1, 0, Mat(), r_hist, 1, &numbins, &histRange);
	// Draw the histogram
	// We go to draw lines for each channel
	int width = 512;
	int height = 300;
	int binStep = cvRound((float)width / (float)numbins);//一个double型的数进行四舍五入,并返回一个整型数

	// Create image with gray base
	Mat histImage(height, width, CV_8UC3, Scalar(20, 20, 20));

	// Normalize the histograms to height of image
	// 将直方图归一化到范围[0, histImage.rows]
	/*
	r_hist: 输入数组
	r_hist: 归一化后的输出数组(支持原地计算)
	0 及 histImage.rows: 这里,它们是归一化 r_hist 之后的取值极限
	NORM_MINMAX: 归一化方法 (例中指定的方法将数值缩放到以上指定范围)
	*/
	normalize(b_hist, b_hist, 0, height, NORM_MINMAX);
	normalize(g_hist, g_hist, 0, height, NORM_MINMAX);
	normalize(r_hist, r_hist, 0, height, NORM_MINMAX);

	for (int i = 1; i< numbins; i++)
	{
		//line( Mat img, Point start, Point end )
		line(histImage,
			Point(binStep*(i - 1), height - cvRound(b_hist.at(i - 1))),
			Point(binStep*(i), height - cvRound(b_hist.at(i))),
			Scalar(255, 0, 0));
		line(histImage,
			Point(binStep*(i - 1), height - cvRound(g_hist.at(i - 1))),
			Point(binStep*(i), height - cvRound(g_hist.at(i))),
			Scalar(0, 255, 0));
		line(histImage,
			Point(binStep*(i - 1), height - cvRound(r_hist.at(i - 1))),
			Point(binStep*(i), height - cvRound(r_hist.at(i))),
			Scalar(0, 0, 255));
	}
	imshow("Histogram", histImage);
}

void equalize(int state, void* userData)
{
	Mat result;
	// Convert BGR image to YCbCr
	Mat ycrcb;
	cvtColor(img, ycrcb, COLOR_BGR2YCrCb);
	// Split image into channels
	vector channels;
	split(ycrcb, channels);
	// Equalize the Y channel only
	equalizeHist(channels[0], channels[0]);
	// Merge the result channels
	merge(channels, ycrcb);
	// Convert color ycrcb to BGR
	cvtColor(ycrcb, result, COLOR_YCrCb2BGR);
	// Show image
	imshow("Equalized", result);
}

void lomo(int state, void* userData)
{
	Mat result;
	const double exponential_e = std::exp(1.0);
	// Create Lookup table for color curve effect
	Mat lut(1, 256, CV_8UC1);//建立一个256个元素的映射表
	for (int i = 0; i<256; i++)
	{
		float x = (float)i / 256.0;
		lut.at(i) = cvRound(256 * (1 / (1 + pow(exponential_e, -((x - 0.5) / 0.1)))));//pow(InputArray src, double p, OutputArray dst)
	}
	// Split the image channels and apply curve transform only to red channel
	vector bgr;
	split(img, bgr);
	LUT(bgr[2], lut, bgr[2]);
	// merge result
	merge(bgr, result);
	// Create image for halo dark
	Mat halo(img.rows, img.cols, CV_32FC3, Scalar(0.3, 0.3, 0.3));
	// Create circle
	circle(halo, Point(img.cols / 2, img.rows / 2), img.cols / 3, Scalar(1, 1, 1), -1);
	blur(halo, halo, Size(img.cols / 3, img.cols / 3));
	// Convert the result to float to allow multiply by 1 factor
	Mat resultf;
	result.convertTo(resultf, CV_32FC3);
	// Multiply our result with halo
	multiply(resultf, halo, resultf);
	// convert to 8 bits
	resultf.convertTo(result, CV_8UC3);
	// show result
	imshow("Lomo Effect", result);
}

void cartoon(int state, void* userData)
{
	/** EDGES **/
	// Apply median filter to remove possible noise
	Mat imgMedian;
	medianBlur(img, imgMedian, 7);
	// Detect edges with canny
	Mat imgCanny;
	Canny(imgMedian, imgCanny, 50, 150);
	// Dilate the edges使断续的边缘连接
	Mat kernel = getStructuringElement(MORPH_RECT, Size(2, 2));
	dilate(imgCanny, imgCanny, kernel);
	// Scale edges values to 1 and invert values
	imgCanny = imgCanny / 255;
	imgCanny = 1 - imgCanny;
	// Use float values to allow multiply between 0 and 1
	Mat imgCannyf;
	imgCanny.convertTo(imgCannyf, CV_32FC3);
	// Blur the edgest to do smooth effect平滑边缘
	blur(imgCannyf, imgCannyf, Size(5, 5));
	/** COLOR **/
	// Apply bilateral filter to homogenizes color
	Mat imgBF;
	bilateralFilter(img, imgBF, 9, 150.0, 150.0);
	// truncate colors
	Mat result = imgBF / 25;
	result = result * 25;
	/** MERGES COLOR + EDGES **/
	// Create a 3 channles for edges
	Mat imgCanny3c;
	Mat cannyChannels[] = { imgCannyf, imgCannyf, imgCannyf };
	merge(cannyChannels, 3, imgCanny3c);
	// Convert color result to float
	Mat resultf;
	result.convertTo(resultf, CV_32FC3);
	// Multiply color and edges matrices
	multiply(resultf, imgCanny3c, resultf);
	// convert to 8 bits color
	resultf.convertTo(result, CV_8UC3);
	// Show image
	imshow("cartoon Effect", result);
}