Windows11 WSL2 Ubuntu18.04环境中配置cuda及PyTorch
Windows11 WSL2 Ubuntu18.04环境中配置cuda及PyTorch
Windows11 WSL2 ubuntu开发环境使用分享
第一章 Windows11 WSL2 安装ubuntu18.04并运行ROS
第二章 Windows11 WSL2 Ubuntu18.04环境中配置cuda及PyTorch
场景
习惯了Windows11 wsl2的linux环境。今天记录一下在wsl2的ubuntu18.04中配置cuda和PyTorch的过程。为其他同学排雷踩坑。
文章目录
- Windows11 WSL2 Ubuntu18.04环境中配置cuda及PyTorch
- 场景
- 前言
- 一、WSL2下配置PyTorch的特殊点
- 二、配置步骤
-
- 1.检查显卡驱动
- 2.安装cuda
- 3.安装并配置conda环境
- 4.安装PyTorch
- 三、踩坑参考
前言
首先,如果是刚刚接触Windows11 WSL2和PyTorch的同学不建议采用此文章所述的Windows11 WSL2 +cuda PyTorch的开发环境。
如果你对Windows11 WSL2和PyTorch有一定的了解,那我们开始吧。
一、WSL2下配置PyTorch的特殊点
一般ubuntu系统下配置PyTorch有以下几步:
- 安装cuda,参考 NVIDIA CUDA Toolkit Downloads
- 安装cuDNN(最新版本可省略),参考 NVIDIA cuDNN
- 安装conda,参考 简书:ubuntu 18 安装conda
- 安装PyTorch,参考 PyTorch Get Started
WSL2的Ubuntu系统中配置PyTorch也是以上步骤,其中cuDNN可省去,另外在WSL2的Ubuntu系统中要十分注意驱动和各部分的版本兼容情况。以下是我配置正常的情况:
| module | version or parm |
|---|---|
| 显卡型号 | GTX 3050Ti |
| 驱动版本 | 512.15 |
| CUDA版本 | 11.6 |
| PyTorch版本 | 1.10.2(cuda11.3) |
时间:2022年04月21日
二、配置步骤
1.检查显卡驱动
默认已经在Windows11上启用了WSL2并安装了Ubuntu18.04。如果没有可以参考 Windows11使用wlsg安装ubuntu18.04并运行ROS。
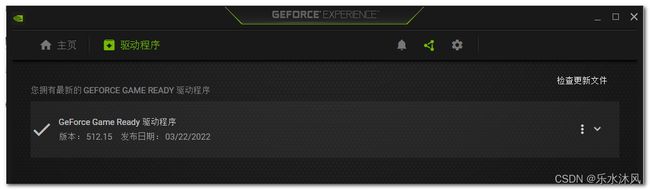
WSL2的驱动检查需要在windows系统中进行。打开GeForce Experience软件检查驱动程序的情况,需要更新到最新版。

下载并更新驱动,过程中可能需要重启GeForce Experience才能正常安装。更新后驱动如下:
2.安装cuda
打开 NVIDIA CUDA Toolkit Downloads,Select Target Platform中设置如下:
注意:其中Distribution选择WSL-Ubuntu。
根据以上设置生成Download Installer for Linux WSL-Ubuntu 2.0 x86_64的安装命令如下:
wget https://developer.download.nvidia.com/compute/cuda/repos/wsl-ubuntu/x86_64/cuda-wsl-ubuntu.pin
sudo mv cuda-wsl-ubuntu.pin /etc/apt/preferences.d/cuda-repository-pin-600
wget https://developer.download.nvidia.com/compute/cuda/11.6.2/local_installers/cuda-repo-wsl-ubuntu-11-6-local_11.6.2-1_amd64.deb
sudo dpkg -i cuda-repo-wsl-ubuntu-11-6-local_11.6.2-1_amd64.deb
sudo apt-key add /var/cuda-repo-wsl-ubuntu-11-6-local/7fa2af80.pub
sudo apt-get update
sudo apt-get -y install cuda
然后设置cuda环境变量。打开~/.bashrc,添加环境变量参数:
gedit ~/.bashrc
export PATH=/usr/local/cuda/bin:$PATH
export LD_LIBRARY_PATH=/usr/local/cuda/lib64:$LD_LIBRARY_PAT
source ~/.bashrc
验证
$ nvcc -V
$ nvcc -V
nvcc: NVIDIA (R) Cuda compiler driver
Copyright (c) 2005-2022 NVIDIA Corporation
Built on Tue_Mar__8_18:18:20_PST_2022
Cuda compilation tools, release 11.6, V11.6.124
Build cuda_11.6.r11.6/compiler.31057947_0
得到以上cuda信息证明安装完成。
此时也可以通过以下命令查看显卡、驱动、cuda的信息:
$ nvidia-smi
输出如下:
+-----------------------------------------------------------------------------+
| NVIDIA-SMI 510.60.02    Driver Version: 512.15       CUDA Version: 11.6     |
|-------------------------------+----------------------+----------------------+
| GPU  Name        Persistence-M| Bus-Id        Disp.A | Volatile Uncorr. ECC |
| Fan  Temp  Perf  Pwr:Usage/Cap|         Memory-Usage | GPU-Util  Compute M. |
|                               |                      |               MIG M. |
|===============================+======================+======================|
|   0  NVIDIA GeForce ...  On   | 00000000:01:00.0  On |                  N/A |
| N/A   41C    P5     6W /  N/A |    325MiB /  4096MiB |      0%      Default |
|                               |                      |                  N/A |
+-------------------------------+----------------------+----------------------+

+-----------------------------------------------------------------------------+
| Processes:                                                                  |
|  GPU   GI   CI        PID   Type   Process name                  GPU Memory |
|        ID   ID                                                   Usage      |
|=============================================================================|
|    0   N/A  N/A      4688      G   /Xwayland                       N/A      |
+-----------------------------------------------------------------------------+
3.安装并配置conda环境
安装
# 下载安装包
wget -c https://repo.anaconda.com/miniconda/Miniconda3-latest-Linux-x86_64.sh
chmod 777 Miniconda3-latest-Linux-x86_64.sh
# 安装conda
bash Miniconda3-latest-Linux-x86_64.sh
配置conda环境
$ conda create -n env_pytorch python=3.6
#
# To activate this environment, use
#
#     $ conda activate pytorch1.5
#
# To deactivate an active environment, use
#
#     $ conda deactivate

$ conda activate env_pytorch
(env_pytorch)$
4.安装PyTorch
打开PyTorch Get Started,选择PyTorch相关参数,具体如下:
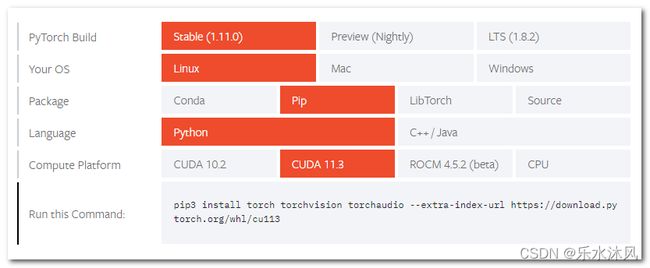
注意:
虽然我们的环境是conda,并且cuda版本为11.6。也要在Package部分选择Pip,在Compute Platform部分选择CUDA 11.3。
按照生成的命令进行安装:
pip3 install torch torchvision torchaudio --extra-index-url https://download.pytorch.org/whl/cu113
验证
(env_pytorch)$ python
Python 3.6.13 |Anaconda, Inc.| (default, Jun  4 2021, 14:25:59)
[GCC 7.5.0] on linux
Type "help", "copyright", "credits" or "license" for more information.
>>> import torch
>>> print(torch.cuda.is_available())
True # gpu被检测
>>> a=torch.Tensor([1,2])
>>> a=a.cuda()
>>> a
tensor([1., 2.], device='cuda:0') # 计算正常
>>>
到此,就完成了在Windows11 WSL2 Ubuntu18.04环境中配置cuda及PyTorch了,相信你已经迫不及待要开始自己的项目了。
三、踩坑参考
问题1
NVIDIA GeForce RTX XXX GPU with CUDA capability sm_86 is not compatible with the current PyTorch installation.
The current PyTorch install supports CUDA capabilities sm_37 sm_50 sm_60 sm_70.
提示显卡的计算能力sm_86与当前PyTorch版本不匹配,这里可能有两种情况:
- PyTorch的版本太低,需要卸载PyTorch后安装高版本。
- PyTorch的Compute Platform中cuda版本选择不正确,需要卸载PyTorch后选择合适的Compute Platform。
问题2
RuntimeError: CUDA out of memory. Tried to allocate 1.17 GiB (GPU 0; 4.00 GiB total capacity; 2.22 GiB already allocated; 0 bytes free; 3.21 GiB reserved in total by PyTorch) If reserved memory is >> allocated memory try setting max_split_size_mb to avoid fragmentation. See documentation for Memory Management and PYTORCH_CUDA_ALLOC_CONF
提示显存耗尽,基本思路就是清内存占用、减小batch_size、更换显卡。解决方法可参考 四种方法。
其他参考
查询显卡计算能力:NVIDIA Your GPU Compute Capability