在线超市系统-PythonGUI Tkinter 图片界面设计案例
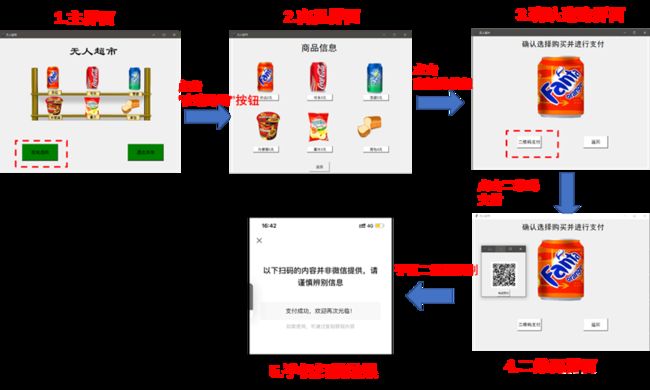
综合前面3篇Python GUI 设计教学文章,设计出了在线超市系统。该系统实现了在界面选择商品,然后确认商品,最后进行支付。
一、实现效果:

二、开发环境:
Windows10+python3.5.5+Vs Code(开发工具)
三、开发准备:
收集实验需要用到的图片,为了方便读者使用,在文章最后附上了图片和程序链接,不用客气。

四、实现过程:
注意:先从第 [7.主界面的程序] 设计看起,尤其关注主界面的功能按钮。从功能按钮的command参数去找对应的执行函数。
- 导入库函数。
没有安装PIL库的,需要在管理员命令提示符中安装PIL库,安装指令“pip install pillow”.由于PIL目前仅支持到Python2.7,所以Python3.x的兼容版本名为Pillow。
from tkinter import *  #需要安装tkinter库
from PIL import Image, ImageTk  #图像处理工具,需要安装Pillow库
- 设计“在线购物函数”按钮函数
首先在界面中利用place_forget()方法隐藏掉第一个框架组件main_frame,然后布局新的框架组件second_frame,其中,参数relwidth、relheight为1是为了让框架铺满整个窗口。需要注意商品按钮传递的几个参数.
def Online_Shopping():
    #隐藏主界面框架,显示商品界面框架second_frame
    main_frame.place_forget()
    second_frame = Frame(top)
    second_frame.place(relwidth=1,relheight= 1)

    Label(second_frame,text = "商品信息",font = ("黑体",30),width = 30,height = 2).place(x=90,y = 0)
    #加载第一层图片(芬达、可乐、雪碧)
    global photo1
    photo_open1 = Image.open("C:/Users/Administrator/Desktop/suppermarket/11.png")
    photo1 = photo_open1.resize((570 , 150))#图片尺寸
    photo1 = ImageTk.PhotoImage(photo1)
    Label(second_frame, image = photo1).place(x= 110,y =100 )
    #加载第二层图片(方便面、薯片、面包)
    global photo2
    photo_open2 = Image.open("C:/Users/Administrator/Desktop/suppermarket/22.png")
    photo2 = photo_open2.resize((570 , 150))#图片尺寸
    photo2 = ImageTk.PhotoImage(photo2)
    Label(second_frame, image = photo2).place(x= 110,y =320 )

    #商品对应按钮,传递的函数参数包括商品、second_frame框架组件、图片名称
    Button(second_frame,text = "芬达2元",bg = "white",font = ("黑体",12), width=13,
    command = lambda:Goods("芬达",second_frame,"芬达.png") ).place(x = 100,y = 250)  #芬达的按钮
    Button(second_frame,text = "可乐3元",bg = "white",font = ("黑体",12), width=13,
    command = lambda:Goods("可乐",second_frame,"可乐.png")).place(x = 340,y = 250)  #可乐的按钮
    Button(second_frame,text = "雪碧2元",bg = "white",font = ("黑体",12), width=13,
    command = lambda:Goods("雪碧",second_frame,"雪碧.png")).place(x = 590,y = 250)  #雪碧的按钮
    Button(second_frame,text = "方便面5元",bg = "white",font = ("黑体",12), width=13,
    command = lambda:Goods("方便面",second_frame,"方便面.png")).place(x = 100,y = 480)  #方便面的按钮
    Button(second_frame,text = "薯片3元",bg = "white",font = ("黑体",12), width=13,
    command = lambda:Goods("薯片",second_frame,"薯片.png")).place(x = 340,y = 480)  #薯片的按钮
    Button(second_frame,text = "面包4元",bg = "white",font = ("黑体",12), width=13,
    command = lambda:Goods("面包",second_frame,"面包.png")).place(x = 590,y = 480)  #面包的按钮
    Button(second_frame,text = "返回",font = ("黑体",12), width=10,height= 2,
    command=lambda:back(second_frame,main_frame)).place(x = 350,y = 550)  #返回按钮
- 返回按钮函数
a当前界面框架,b要返回的界面框架
def back(a,b):
    a.place_forget()  #隐藏a框架
    top.geometry("800x600")
    b.place(relwidth=1,relheight= 1)  #布局b框架
- 商品按钮函数
设计确认选购界面。同样先隐藏掉上一个界面的框架,在布局新的框架,在新的框架里面放置组件。
#商品按钮函数
def Goods(goods,second_frame,pic):
    print(goods)
    second_frame.place_forget()  #隐藏商品界面
    third_frame = Frame(top)  #布局新组件
    third_frame.place(relwidth=1,relheight= 1)
    #加载第三层图片,也就是选购的商品图片
    global photo3
    photo_open3 = Image.open("C:/Users/Administrator/Desktop/suppermarket/" + pic)  #打开图片
    photo3 = photo_open3.resize((250 , 300))#图片尺寸
    photo3 = ImageTk.PhotoImage(photo3)
    Label(third_frame, image = photo3).place(x= 270,y =80 )  #显示选购商品图片
    Label(third_frame,text = "确认选择购买并进行支付",font = ("黑体",25),
    width = 30,height = 2).place(x=150,y = 0)  #文字标签提示顾客进行确认
    Button(third_frame,text = "二维码支付",font = ("黑体",15), bg ="white" ,width=10,height= 2,
    command=Pay).place(x = 200,y = 450)  #刷脸支付按钮
    Button(third_frame,text = "返回",font = ("黑体",15), bg ="white" ,width=10,height= 2,
    command=lambda:back(third_frame,second_frame)).place(x = 500,y = 450)  #返回按钮
- 二维码支付按钮函数
设计一个新的窗口,窗口对象是root,在该窗口放置二维码图片。PS:该二维码是我随便生成的哈!该码不关联程序,只是简单的文字生成!!!
#二维码支付函数
def Pay():
    print("请支付")
    root = Toplevel()  #一个程序中只能存在一个根窗口,也就是说只能存在一个Tk(),其他的窗口只能以顶层窗口(Toplevel())的形式存在
    root.title("二维码支付")
    root.geometry("200x200") #窗口长宽
    #放置主界面图片
    global photo4
    photo_open4 = Image.open("C:/Users/Administrator/Desktop/suppermarket/1.png")  #打开图片
    photo4 = photo_open4.resize((120 , 120))  #限制图片尺寸
    photo4 = ImageTk.PhotoImage(photo4)  #显示图片
    Label(root, image = photo4).place(x= 40,y =40 )  #设置图片在界面的显示位置
    #“退出系统”按钮
    Button(root,text = "完成支付",command = root.destroy).place(x= 70,y = 170)  #设置按钮位置
    root.mainloop()  #进入消息循环
- 退出系统按钮函数
#退出系统
def quit():
    top.destroy()
- 主界面程序
设计无人超市系统主界面。窗口标题为“无人超市”,窗口的宽度和高度为“800x600”,创建主界面框架组件main_frame。
top = Tk()
top.title("无人超市") #窗口标题
top.geometry("800x600")#窗口长宽
#设置主界面的控件
main_frame = Frame(top)
main_frame.place(relwidth=1,relheight= 1)
#放置主界面图片
photo_open0 = Image.open("C:/Users/Administrator/Desktop/suppermarket/主界面.png")  #打开图片
photo0 = photo_open0.resize((570 , 250))  #限制图片尺寸
photo0 = ImageTk.PhotoImage(photo0)  #显示图片
Label(main_frame, image = photo0).place(x= 120,y =120 )  #设置图片在界面的显示位置
#主界面的大标题
Label(main_frame,text = "无人超市",font = ("隶书",40),width = 30,height = 2).place(x=10,y = 0)
#“在线购物”按钮
Button(main_frame,text = "在线选购",bg = "green",font = ("黑体",15),width = 15,height = 3,
command = Online_Shopping).place(x= 100,y = 470)  #设置按钮位置
#“退出系统”按钮
Button(main_frame,text = "退出系统",bg = "green",font = ("黑体",15),width = 15,height = 3,
command = quit).place(x= 570,y = 470)  #设置按钮位置
top.mainloop()  #进入消息循环
无人超市系统主界面的效果展示如下图:

PS:①可能会有疑问的是为什么图片需要设置成全局变量?Tkinter在不同框架中放不同的图片的时候会出现图片无法显示的情况,可参考之前写过一篇博客[https://blog.csdn.net/lyx4949/article/details/117672715]
②点我:图片及完整程序的链接
提取码:lyx4
③案例完善:关于支付方式还可以改成人脸识别的刷脸支付;可结合一些设备,例如机械臂等,实现从系统上选择商品后,让设备去抓取物品等。
④下来会继续更新一些综合案例,欢迎大家提更多的意见!


