ajax总结(三):ajax跨域访问接口方法汇总
ajax跨域访问接口方法和模板引擎的应用
一.学习跨域之前先要了解:
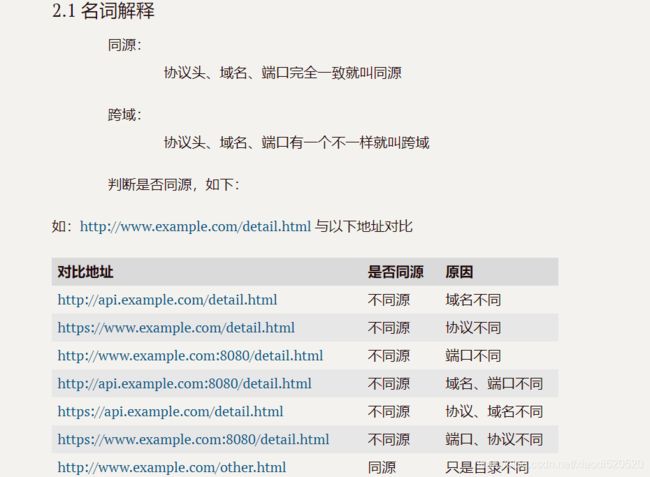
1.同源和跨域的概念
a.同源:协议头、域名、端口全部一样就叫同源;
b.跨域:只要协议头,域名,端口任意一个不一样就是跨域.
因为跨域的影响,导致浏览器出于安全角度考虑,不允许你用ajax(XMLHttpRequest)访问跨域的资源.
来一张图来说明 :
:
(如果使用了跨域,会报"No ‘Access-Control-Allow-Origin’ header is present on the requested"的错误)
二.解决办法:
1.跨域方案之一:JSONP方法
JSONP的优点是:它不像XMLHttpRequest对象实现的Ajax请求那样受到同源策略的限制;它的兼容性更好,在更加古老的浏览器中都 可以运行,不需要XMLHttpRequest或ActiveX的支持;并且在请求完毕后可以通过调用callback的方式回传结果。
JSONP的缺点则是:它只支持GET请求而不支持POST等其它类型的HTTP请求;它只支持跨域HTTP请求这种情况,不能解决不同域的两个页面之间如何进行JavaScript调用的问题。
具体介绍:
a.它是一套用script标签解决跨域问题,得到JSON数据的方案
b.用法:就是用script标签的src属性去访问跨域接口,然后在后面加一个参数叫callback,传入一个函数名字,当响应完成是它会自动调用这个函数,并把JSON数据当作参数传递给这个函数.
演示案例:
    <script>
    function test(obj){
        console.log(obj); //可以正常得到接口里的数据
    }
    </script>
    <script src="http://api.douban.com/v2/movie/top250?callback=test"></script>
c.怎么看能不能用JSONP?就是看文档,没文档就试一下行不行不就知道了嘛.
d.如何在事件里发JSONP?
解决方法:只要在事件里创建script标签,然后给它一个src属性,再加到页面中就可以了.
演示代码:
<body>
    <input type="text" id="qq">

    <input type="button" value="点我发请求" id="btn">
</body>
</html>
<script>
    function f1(obj){
        console.log(obj);
    }
     var qq = document.getElementById('qq');

     //如何在事件里发JSONP的请求
     document.getElementById('btn').onclick = function(){

        //我可以再这里面自己创建一个script标签
        var spt = document.createElement('script');
        spt.src = "http://api.douban.com/v2/movie/top250?callback=f1"
        console.log(spt);
        document.head.appendChild(spt);//注意是在head里面加script标签
     }
</script>
e.也可以用jQuery发jsonp请求,而且代码更加简洁.
$.get({
url:"http://api.douban.com/v2/movie/top250",
dataType:"jsonp",
success:function(obj){
console.log(obj)//成功拿到数据.
}

})
      $.ajax({
          type: 'GET',
          url:'http://api.douban.com/v2/movie/top250',
          dataType:'jsonp',
          jsonp:"callback",
          data: {
            q: "select * from json where url=\"http://v.juhe.cn/toutiao/index?type=shehui&key=989c40de0a1c5c3618f9469e8271f488\"",
            format: "json"
          },
          success: function(data) {
            console.log(data);
          },
          error: function(error) {
            console.log(error);
          }
        });
2.跨域方案二:CORS方法
a.原理:让服务器告诉浏览器,我这个接口所有网站都可以访问!
b.方法:在后台里加上一句话:header(‘Access-Control-Allow-Origin:*’);
演示案例
后端:

前端 :

3.跨域方案三:利用服务器当跳板去访问接口
原理:
跨域只是浏览器的限制,但是我自己的服务器可以去访问别人的接口,我们访问自己服务器,让自己的服务器去访问接口,然后返回的数据再返回给服务器.
后台核心代码,将结果echo输出就可以:
<?php
    $qq = $_GET['qq'];
    //去访问别人的接口
    //读取文件的内容
    //参数:文件的路径
    //其实,它本质上是发起一个请求,读取到响应体而已
    // $res = file_get_contents("1.txt");
 $res = file_get_contents('http://japi.juhe.cn/qqevaluate/qq?key=8d9160d4a96f2a6b5316de5b9d14d09d&qq='.$qq);
    echo $res;
三.模板引擎的使用(重要)
1.模板和引擎的意思
模板:先写好一套HTML结构,但是数据不要写死,而是挖几个坑,然后你给我什么数据,我就填充到坑里面去,就能生成不同的页面结构了.
引擎:就是实现上面模板功能的插件,就叫引擎.
2.模板引擎有很多个,我用的是art-template这个模板引擎,因为它小,功能又强大,关键是还有中文的文档.(官方网站:https://aui.github.io/art-template/zh-cn/docs/index.html#模板);
3.使用步骤:
共三步:
a.导入模板引擎
在html里写:
<script src="./js/template-web.js">script>
b.准备一个模板,注意点:
用script标签来准备,并且必须给type属性,而且type属性不能是text/javascript,再给一个id;
在标签里写你需要的HTML模板.
在html里写:
<script type="text/html" id="tp1">
	{{each list value}}
	<div class="item clearfix">
		<a href="#" class="title">
			<img src="{{value.img}}" alt="">
			<span>{{value.time}}</span>
		</a>
	</div>
	{{/each}}

script>
3.调用模板,并且给模板传递数据,它就能生成对应的HTML代码了
使用template调用
演示代码:
在js里写:
		xhr.onload = function () {
			// console.log(xhr.responseText);
			var obj=JSON.parse(xhr.responseText);
			console.log(obj);

			//调用模板
			var html=template('tp1',{list:obj.items});
			// console.log(html);
			items.innerHTML+=html;
		}
附什么值得买网站模板引擎的应用案例:
<html>

<head>
	<meta charset="UTF-8">
	<title>SMZDMtitle>
	<style>
		.items {
			display: flex;
			flex-wrap: wrap;
		}

		.item {
			/*float: left;*/
			width: 320px;
			/*height: 320px;*/
			border: 1px solid #0094ff;
			overflow: hidden;
			margin: 10px 20px;
		}

		.item .title {
			display: block;
			width: 100%;
			position: relative;
		}

		.title img {
			display: block;
			width: 100%;
		}

		.title span {
			position: absolute;
			right: 20px;
			bottom: 0px;
			width: 50px;
			text-align: center;
			background-color: lightgray;
			color: gray;
			font-size: 13px;
			border-radius: 5px 5px 0 0;
		}

		.content {
			padding: 10px 0;
		}

		.content a {
			text-decoration: none;
			color: black;
			font-family: "微软雅黑";
			font-size: 16px;
		}

		.content p {
			color: gray;
			font-size: 13px;
			font-family: "微软雅黑";
			margin-bottom: 0;
		}

		.f_l {
			float: left;
		}

		.f_r {
			float: right;
		}

		.clearfix::before,
		.clearfix::after {
			content: '';
			display: block;
			line-height: 0;
			height: 0;
			clear: both;
			visibility: hidden;
		}

		.clearfix {
			zoom: 1;
		}

		.info {
			line-height: 25px;
		}

		.info img {
			width: 20px;
			height: 20px;
			vertical-align: middle;
			margin-right: 10px;
		}

		.info a {
			color: gray;
			text-decoration: none;
			font-size: 12px;
			height: 20px;
			line-height: 20px;
			margin: 0 10px;
		}

		.getMore {
			width: 100px;
			height: 100px;
			border: none;
			text-align: center;
			background-color: hotpink;
			line-height: 100px;
			cursor: pointer;
			font-size: 20px;
			font-weight: 900;
		}

		.getSome {
			width: 100px;
			height: 100px;
			border: none;
			text-align: center;
			line-height: 100px;
			cursor: pointer;
			font-size: 20px;
			font-weight: 900;
			position: relative;
			background-color: #222222;
			color:#c0c0c0;
			z-index: 2;
		}
		.getSome img{
			position: absolute;
			top:0;
			left:0;
			width: 100%;
			height: 100%;
			opacity: .5;
		}

		.controls {
			display: flex;
		}
	style>
head>

<body>

	<div class="controls">
		<div class="getSome">
			加载更多
			<img src="./imgs/loading01.gif" alt="">
		div>
	div>


	<div class="items">


	div>

body>

html>

<script src="js/template-web.js">script>

<script type="text/html" id="tpl">

{{ each list value }}

	<div class="item clearfix">
			<a href="{{value.article_link}}" class="title">
					<img src="{{value.article_pic}}" alt="">
					<span>{{value.article_date}}</span>
			</a>
			<div class="content">
				<a href="#">{{value.article_title}}</a>
				<p>{{value.article_content}}</p>
			</div>
			<div class="info clearfix">
				<a href="#" class="f_l"><img src="{{value.icon}}" alt="">{{value.article_referrals}}</a>
				<a href="#" class="f_r">信息:1</a>
				<a href="#" class="f_r">❤:2</a>
				<a href="#" class="f_r">赞:3</a>
			</div>
	</div>

{{ /each }}

script>


<script>

	//获取容器
	var items = document.querySelector('.items');

	//获取更多的点击事件
	document.querySelector('.getSome').onclick = function(){

		//1. 创建请求对象
		var xhr = new XMLHttpRequest();

		//2. 设置请求行
		xhr.open('get','https://www.smzdm.com/homepage/json_more?timesort=154209876095&p=2');

		//3. 设置请求头,post才需要

		//4. 发送请求
		xhr.send();

		//5. 监听响应完成
		xhr.onload = function(){

			// console.log(xhr.responseText);
			// 转成JS数据
			var obj = JSON.parse(xhr.responseText);
			console.log(obj);

			//调用模板
			var html = template('tpl',{ list: obj.data});

			items.innerHTML += html;
		}
	};
script>
