文档扫描OCR识别
案例:@ Fu Xianjun. All Rights Reserved.
1.介绍
1.OpenCV是一个基于BSD许可(开源)发行的跨平台计算机视觉和机器学习软件库,可以运行在Linux、Windows、Android和Mac OS操作系统上。 [1] 它轻量级而且高效——由一系列 C 函数和少量 C++ 类构成,同时提供了Python、Ruby、MATLAB等语言的接口,实现了图像处理和计算机视觉方面的很多通用算法。
特点:
(1) 开放的C/C++源码
(2) 基于Intel处理器指令集开发的优化代码
(3) 统一的结构和功能定义
(4) 强大的图像和矩阵运算能力
(5) 方便灵活的用户接口
(6)同时支持MS-WINDOWS、Linux平台
作为一个基本的计算机视觉、图像处理和模式识别的开源项目,OPENCV可以直接应用于很多领域,作为第二次开发的理想工具。
2.OCR简介:OCR(optical character recognition)文字识别是指电子设备(例如扫描仪或数码相机)检查纸上打印的字符,然后用字符识别方法将形状翻译成计算机文字的过程;即,对文本资料进行扫描,然后对图像文件进行分析处理,获取文字及版面信息的过程。如何除错或利用辅助信息提高识别正确率,是OCR最重要的课题。衡量一个OCR系统性能好坏的主要指标有:拒识率、误识率、识别速度、用户界面的友好性,产品的稳定性,易用性及可行性等。
2.安装tesseract
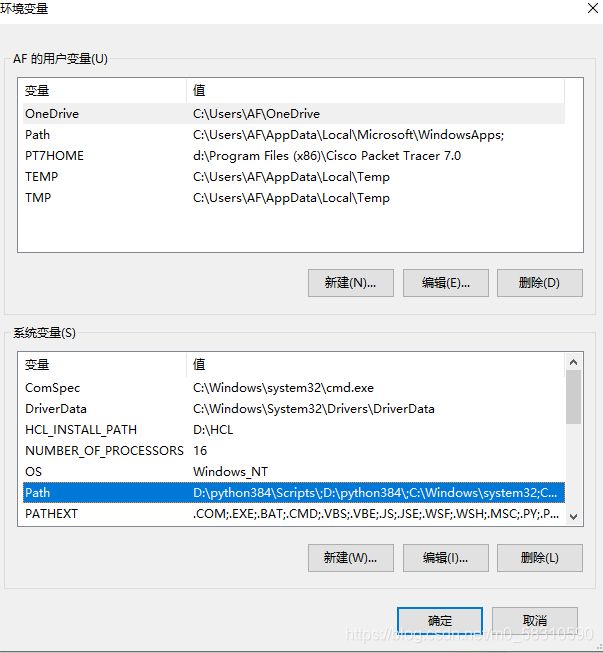
安装后添加环境变量
新建一个图片1.png 用于识别
最后测试
安装pip install pytesseract
3.(1)边缘检测
import cv2
import numpy as np

image = cv2.imread("1.jpg")
h,w = image.shape[:2]
ratio = 500/h
image = cv2.resize(image,(int(500*w/h),500))
gray = cv2.cvtColor(image, cv2.COLOR_BGR2GRAY)

edge = cv2.Canny(gray, 75, 200)

cv2.imshow("image",image)
cv2.imshow("edge",edge)
cv2.waitKey(0)
cv2.destroyAllWindows()
效果图:
3.(2)获得轮廓
import cv2
import numpy as np

image = cv2.imread("1.jpg")
h,w = image.shape[:2]
ratio = 500/h
image = cv2.resize(image,(int(500*w/h),500))#变化坐标
gray = cv2.cvtColor(image, cv2.COLOR_BGR2GRAY)
gray = cv2.GaussianBlur(gray,(5,5),0)
edge = cv2.Canny(gray, 75, 200)# 边缘检测
cnts,h = cv2.findContours(edge, cv2.RETR_LIST, cv2.CHAIN_APPROX_SIMPLE)
# cnts中可检测到许多个轮廓,取前5个最大面积的轮廓
cnts = sorted(cnts, key = cv2.contourArea, reverse = True)
for c in cnts:
    peri = cv2.arcLength(c,True)
    approx = cv2.approxPolyDP(c,0.02*peri,True)
    if len(approx)==4:
        screenCnt = approx
        break
cv2.drawContours(image,screenCnt,-1,(255,255,0), 10)
print(screenCnt)
cv2.imshow("image",image)
cv2.imshow("edge",edge)
cv2.waitKey(0)
cv2.destroyAllWindows()
3.(3)透视变换
透视变换函数 four_point_transform
import cv2
import numpy as np
import os
# 按顺序找到对应坐标0123分别是 左上,右上,右下,左下
	# 计算左上,右下
def order_point(pts):
    rect = np.zeros((4,2),dtype="float32")
    s = pts.sum(axis=1)
    rect[0]=pts[np.argmin(s)]
    rect[2]=pts[np.argmax(s)]
    d = np.diff(pts, axis=1)
    rect[1]=pts[np.argmin(d)]
    rect[3]=pts[np.argmax(d)]
    return rect
def four_point_transform(image, pts):#获取坐标点
    rect = order_point(pts)# (tl, tr, br, bl) = rect
    (tl,tr,br,bl) = rect
    widthA = np.sqrt(((br[0]-bl[0])**2)+((br[1]-bl[1])**2))
    widthB = np.sqrt(((tr[0]-tl[0])**2)+((tr[1]-tl[1])**2))
    maxWidth = max(int(widthA),int(widthB))
    heightA = np.sqrt(((tr[0]-br[0])**2)+((tr[1]-br[1])**2))
    heightB = np.sqrt(((bl[0]-tl[0])**2)+((bl[1]-tl[1])**2))
    maxHeight = max(int(heightA),int(heightB))
    dst = np.array([[0,0],[maxWidth-1,0],[maxWidth-1,maxHeight-1],[0,maxHeight-1]],dtype="float32")
    M = cv2.getPerspectiveTransform(rect,dst)
    warp = cv2.warpPerspective(image,M,(maxWidth,maxHeight))
    return warp


image = cv2.imread("1.jpg")
h,w = image.shape[:2]
ratio = 500/h
image = cv2.resize(image,(int(1000*w/h),500))#变化坐标
gray = cv2.cvtColor(image, cv2.COLOR_BGR2GRAY)
gray = cv2.GaussianBlur(gray,(5,5),0)
edge = cv2.Canny(gray, 75, 200)# 边缘检测
cnts,h = cv2.findContours(edge, cv2.RETR_LIST, cv2.CHAIN_APPROX_SIMPLE)
# cnts中可检测到许多个轮廓,取前5个最大面积的轮廓
cnts = sorted(cnts, key = cv2.contourArea, reverse = True)
for c in cnts:
    peri = cv2.arcLength(c,True)
    approx = cv2.approxPolyDP(c,0.02*peri,True)
    if len(approx)==4:
        screenCnt = approx
        break
cv2.drawContours(image,screenCnt,-1,(255,255,0), 10)
print(screenCnt)

warp = four_point_transform(image, screenCnt.reshape(4,2))
cv2.imwrite("123.jpg",warp)
cmd = "tesseract 123.jpg result"
os.system(cmd)
cv2.imshow("image",image)
cv2.imshow("edge",edge)
cv2.imshow("warp",warp)
cv2.waitKey(0)
cv2.destroyAllWindows()


