SharePoint 2010 配置 incoming email 步骤
Today we continue down our journey in setting up our SharePoint 2010 farm, with the focus on configuring incoming email for SharePoint 2010. When SharePoint 2007 was released, there was a lot of discussion and rumors around Exchange 2007 being the last version of Exchange to provide Public Folder support, and that SharePoint 2007 was going to be it’s alternative. Microsoft quickly changed its stance and continues to support Public folders in Exchange 2010. However, there still might be a number of compelling reasons why you would want to consider storing incoming email messages in SharePoint 2010 document libraries, instead of public folders. You can read more about the benefits of using email-enabled SharePoint libraries in one of my article’s here.
In today’s post, I will provide you with a comprehensive step by step guide in configuring your SharePoint 2010 server in conjunction with Exchange 2010, to provide successful delivery of incoming email directly to your SharePoint Web Applications.
The environment
This article builds on the SharePoint Farm setup that I have documented here. It consists of the following servers which would form a common basis in most large organizations.
- Windows 2008 R2 server running Active Directory Domain Services
- Windows 2008 R2 server running SQL 2008 R2
- Windows 2008 R2 server running SharePoint 2010 RTM
- Windows 2008 R2 server running Exchange 2010 RTM
- Windows 7 client running Office 2010 RTM
The SMTP service
SharePoint 2010 is reliant on the SMTP service which is a Windows 2008 feature and we must install this on our SharePoint 2010 front-end web server.
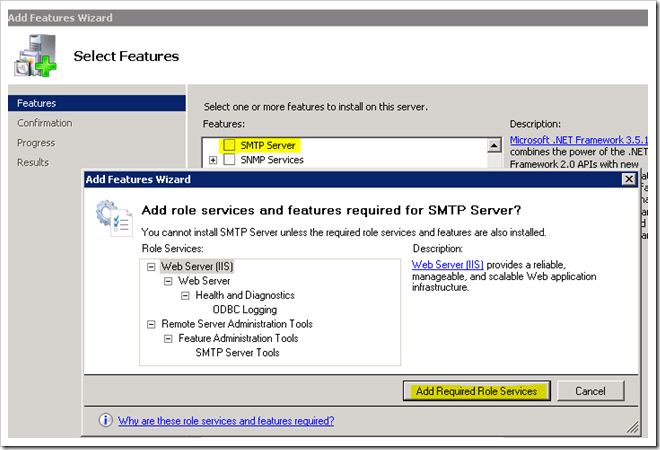
Navigate to your Start Menu / Administrative Tools / Server Manager. Click on the Features node and select Add Feature. Scroll down and select SMTP Server and click on Add Required Role Services.
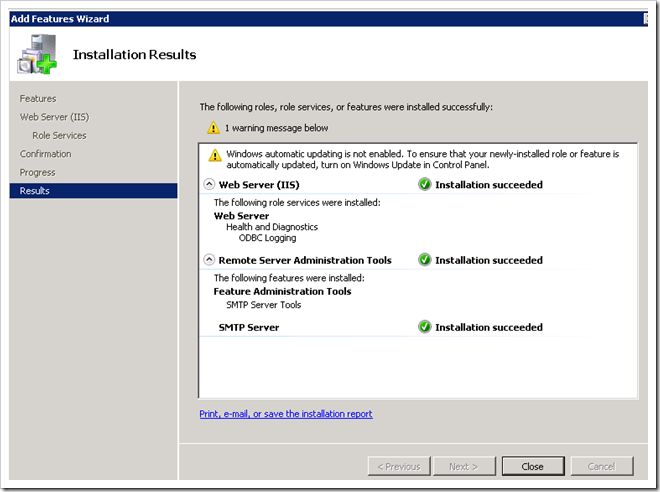
Click Next, Next and Install.
Click Close
We now need to install the II 6.0 Management Tools on our Windows 2008 R2 server in order to configure our SMTP service. If IIS 6.0 Manager is not already installed you must do so via, Start / Administrative Tools / Server Manager. Click on the Roles node and select Role / Add Role Services. Then select Management Tools and IIS 6 Management compatibility. Click Install.
We can now launch the IIS 6 Manager via Start / Administrative Tools.
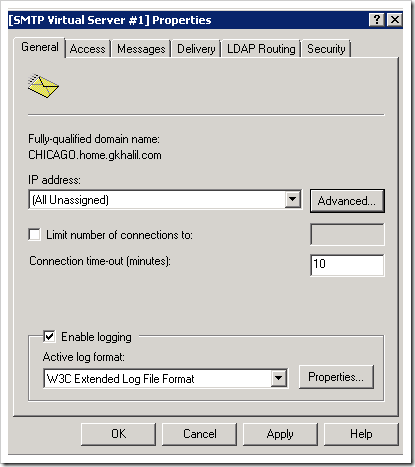
Right click on SMTP Virtual Server #1 and select properties.
Under the General tab, I have enabled logging and encourage doing so at the start in the event we need to do some troubleshooting. You can turn logging off after successful testing.
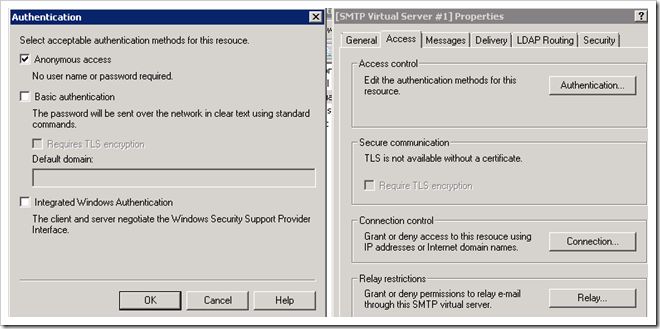
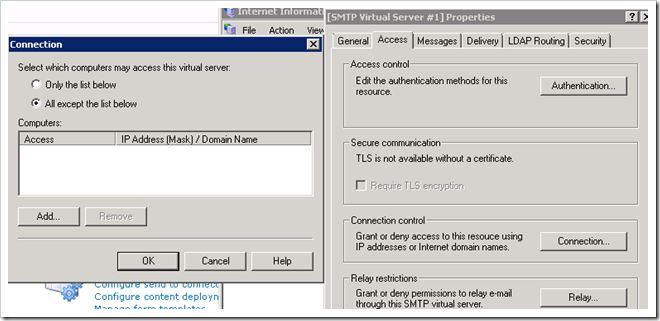
Click on the next tab, “Access”.
Click on “Authentication” and ensure that Anonymous access is selected.
Next, click on “Connection” and ensure “All except the list below” is selected.
Finally, click on “Relay”, and ensure that “Only the list below” is selected and that “Allow all computers which successfully authenticate to relay, regardless of the list above” is also checked.
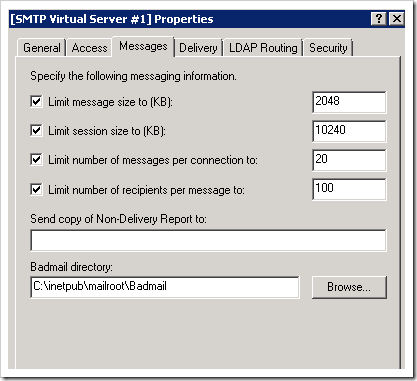
Now click on the Messages Tab and make any necessary adjustments that you see fit, such as potentially increasing the message size to allow for the delivery of larger emails with attachments into your SharePoint Libraries and Lists.
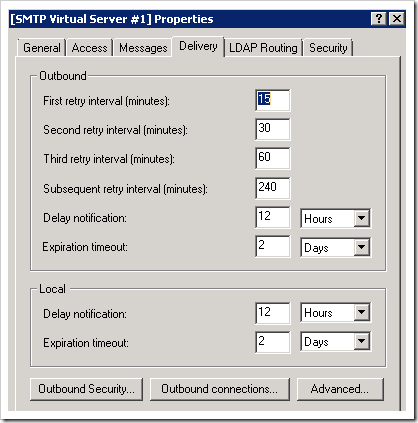
Next click on the Delivery Tab in which I normally leave all the defaults in place.
We can skip the LDAP routing tab as there are no settings required to be configured in this area.
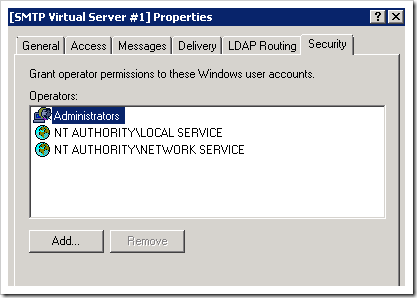
Lastly, the Security tab should list the default permissions as per the below. No changes are necessary in this area.
We next journey into the “Domains” are within IIS 6 Manager and a domain name should be listed, which by default is the fully qualified domain name of the machine.
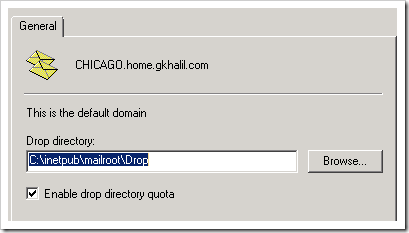
Right click on the Domain Name and select properties and take note of the Drop directory.
Finally, we now just need to confirm that our SMTP service is set to start automatically in the event the server is restarted. I can tell you now that the service is by default set to Manual.
Venture into Start / Administrative Tools / Services.
Scroll down your list of services and ensure that the Simple Mail Transfer Protocol (SMTP) is set to Start-up type, Automatic.
We have now completed the configuration of our SMTP service on our SharePoint Server.
Exchange 2007/2010 Connectors
Part two of the implementation of configuring incoming email in SharePoint is to configure our connectors in Microsoft Exchange. Now even though this is not a requirement, most organisations running SharePoint 2010 or 2007 will also be running a recent version of Microsoft Exchange, hopefully either 2007 or 2010. Exchange 2010 or 2007 will provide you with that extra layer of protection ensuring that all the necessary message hygiene has been performed via its inbuilt Anti Spam Agents on the Edge or Hub Transport Server in conjunction with some form of email antivirus such as Microsoft’s Forefront for Exchange, before the message is delivered to the SharePoint 2010 List or Library.
My instructions and screen captures below are from an Exchange 2010 server which are pretty much identical and applicable to Exchange 2007.
Let’s begin by launching the Exchange Management Console / Organization Configuration / Hub Transport.
Click on Send Connectors / Actions / New Send Connector.
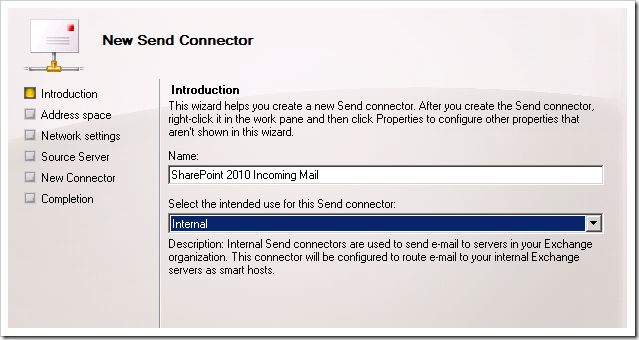
Type in a descriptive name for your Send Connector and then select Internal as the type.
Click Add and enter the Address space as the fully qualified domain name of the server where the SMTP service is installed (i.e. your SharePoint Server)
Click Next
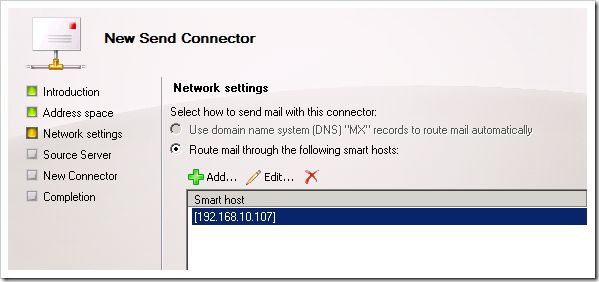
Enter the IP address of the server which also hosts the SMTP service.
Click Next
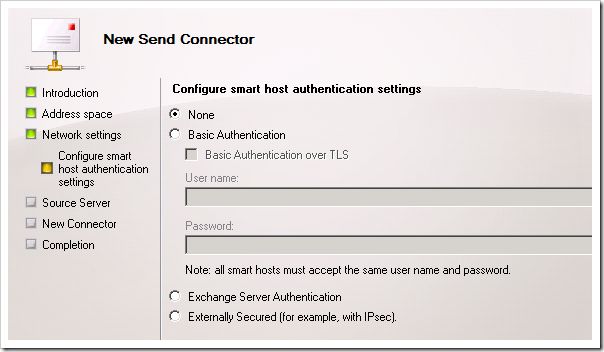
Select “None” as your smart host authentication settings
Click Next
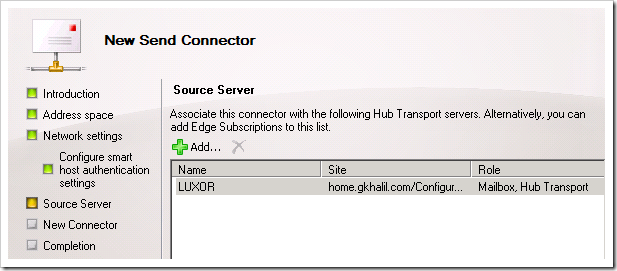
Ensure your Hub Transport Server has been added.
Click Next
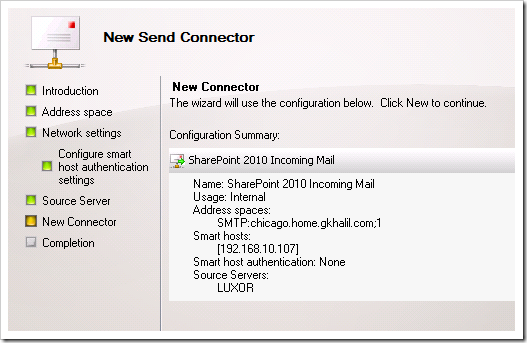
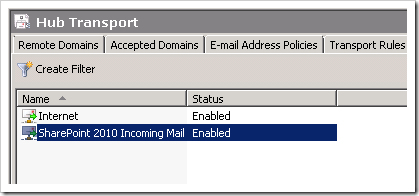
Click New and then click Finish
The end result will be that the Send connector will route email to the SMTP service sitting on our SharePoint Server.
The Directory Management Service
SharePoint 2010 allows you to leverage Active Directory Domain Services (AD DS) so that contacts that are created when you email enable document libraries or lists are stored in a designated Organizational Unit within your AD DS infrastructure. So why would you want to enable Directory Management Service? Purely for the fact that by storing these contacts in AD, you are allowing your users to locate email enabled libraries and lists easily from within their Outlook Address book.
Let’s begin by creating an Organizational Unit in Active Directory.
From your Active Directory server, click Start / Administrative Tools / Active Directory Users and Computers.
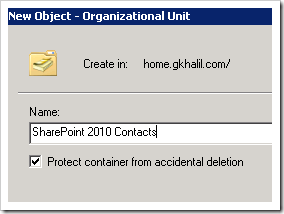
Right click on your domain object and select New / Organizational Unit
Type in a descriptive name
Click Ok.
The next step is imperative and very important that we get this right. I have seen on many occasions where incorrect permissions were applied and all sorts of problems were encountered when libraries or list were email enabled.
In summary, we need to provide our Central Administration Application pool identity account specific permissions to our recently created Organizational Unit to be used for creating and deleting contacts for our SharePoint 2010 libraries and lists when they are either email enabled or email disabled.
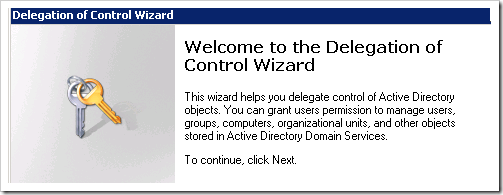
Right click on the recently created Organizational Unit and click on Delegate Control. This will invoke the Delegation of Control Wizard.
Click Next.
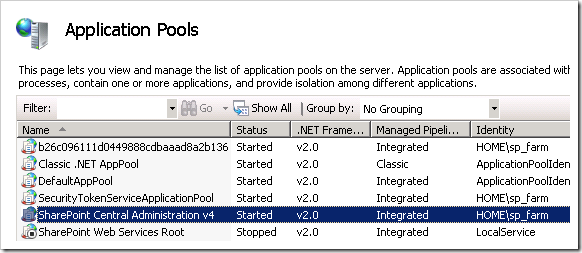
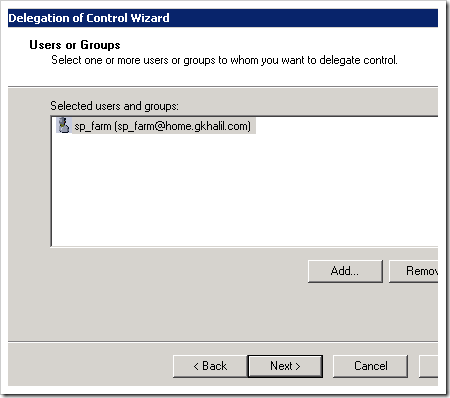
We will now add the Central Administration application pool account which you can confirm from IIS Manager as per the below screen capture.
Add the necessary Account.
Click Next.
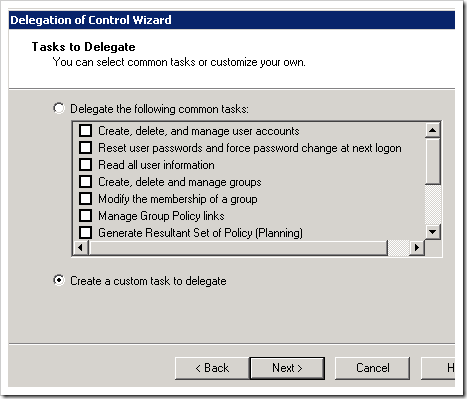
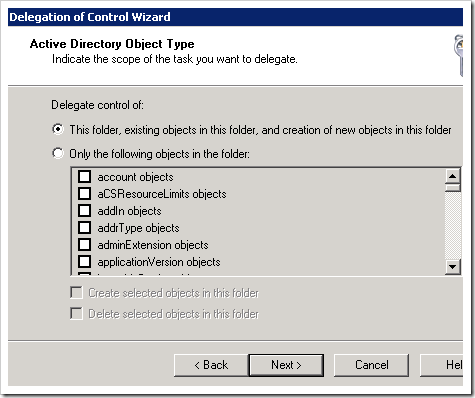
Click Create a custom task to delegate.
Click Next
Click “This folder, existing objects in this folder, and creation of new objects in this folder’.
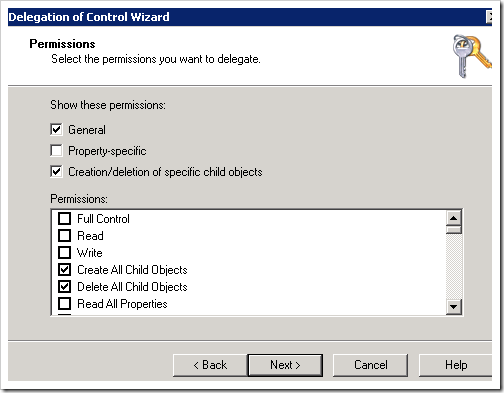
Click Next
Click on Create All Child Objects and Delete All Child Objects.
Click Finish.
Before we finish off our configuration of AD DS and the Directory Management Service we need to provide our Central Administration application pool account with Delete Subtree permissions.
We need to ensure that “Advanced Features” from within Active Directory Users and Computers (ADUC) is active before we venture into the security tab of our SharePoint organizational unit. If you do not enable Advanced Features, the security tab will not be visible.
From within ADUC, click on View and select Advanced Features.
Right click on our SharePoint 2010 Organizational Unit and select Properties.
Click on the Security Tab / Advanced /and Edit the CA Application Pool Identity Account.
Select Allow for “Delete Subtree”
Click on OK and Apply.
After assigning these permissions, you must run IISRESET on your SharePoint server.
Configuring Incoming e-mail settings in Central Administration
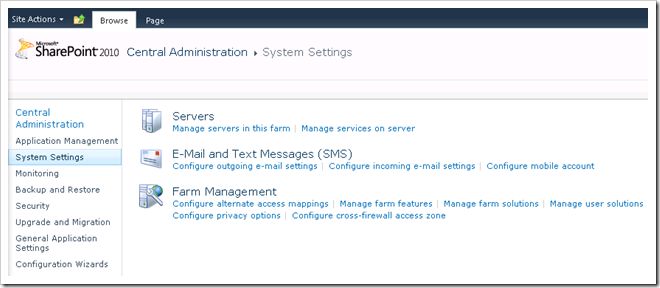
Navigate to Central Administration / System Settings / Configure incoming e-mail settings.
Select Yes to “Enable site on this server to receive e-mail”
Select “Automatic” for Setting mode.
Select “Yes” to use the SharePoint Directory Management Service to create distributions groups and contacts.
Enter your Active Directory container details, i.e. the Organizational Unit container that we created specifically for our SharePoint 2010 contacts.
Ensure that your SMTP server details are correct, this should be the fully qualified domain name of your SMTP service that was installed on your SharePoint Server.
Finally, ensure “Accept mail from all e-mail servers” is selected.
Click OK.
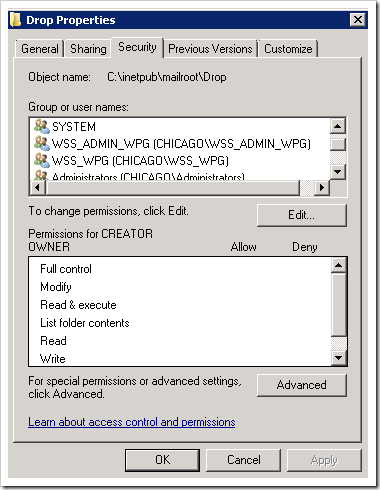
Please note that this process will configure the necessary permissions on the email drop folder listed in IIS 6 Manager. In summary, the following permissions are added;
WSS_Admin_WPG – Full Control and
WSS_WPG – Read & Execute / List folder Contents / Read
Ensure that these accounts are added successfully and on the rare occasion in which it isn’t, you will need to add them manually.
Testing the configuration
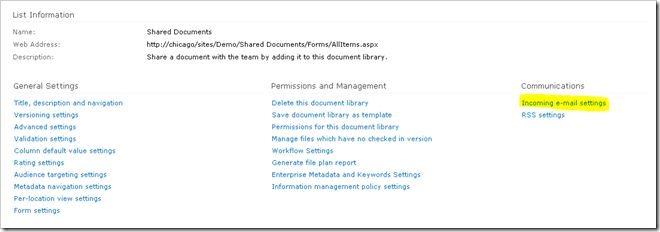
From within any document library or list, click on Library / Library Settings.
Click on Incoming e-mail settings.
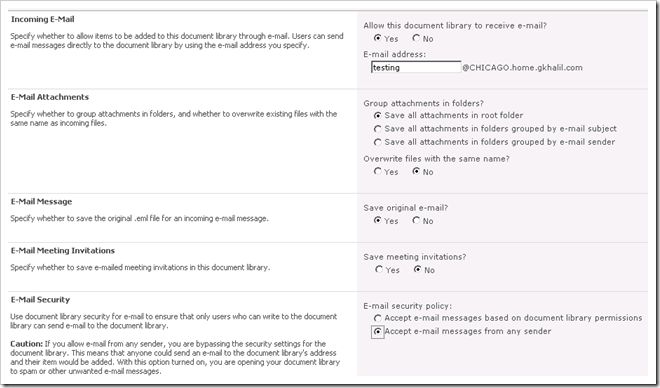
Select “Yes” to allow this document library to receive e-mail.
Select your email attachment options and ensure that Save original e-mail is set to Yes.
Lastly, ensure that you Accept e-mail messages from any sender is selected.
Click OK.
This is your first step to ensure that all of the above configuration is in place. If you do receive an error, it’s most likely going to be permissions related against your Organizational Unit, i.e. SharePoint may not have the privilege to add the contact in Active Directory.
Let’s navigate back to ADUC and confirm that our “testing” contact is created under the SharePoint 2010 Contacts Organizational Unit.
Let’s next navigate to our Exchange 2010 server and ensure it is also listed there with an SMTP address against it.
Launch your Microsoft Exchange Management console and navigate to Recipient Configuration / Mail contact.
Right click on the Contact and select Properties / E-Mail Addresses.
Ensure that both an internal and external routable email address is listed.
From your favorite email client, send a test email to the document libraries’ external SMTP address.
Navigate to your recently email enabled document library and hopefully after a couple of minutes (SharePoint Job timer service delay) you should have received your test email.
Well! That’s all that is to it, from start to finish. Apart from sending a test email, there are a couple of other scenarios that you should test to ensure complete seamless integration with the SharePoint 2010 Directory Management Service. Within the same document library, modify the email address to something different and ensure that this change also flows through to Active Directory. You should also try disabling incoming email from that same library and ensure that the contact is completely removed from Active Directory. If you pass all of these tests scenarios, then we are comfortable in knowing that the correct delegation was provided to our Central Administration Pool Account against our SharePoint Contacts Organizational Unit.
I hope you have found this step by step guide in configuring incoming email in SharePoint 2010 with Exchange useful, so stay tuned as we continue our journey in configuring our SharePoint 2010 Farm.
