三年经验的前端或多或少与 nginx 配置打过交道。
nginx 的重要性不言而喻。
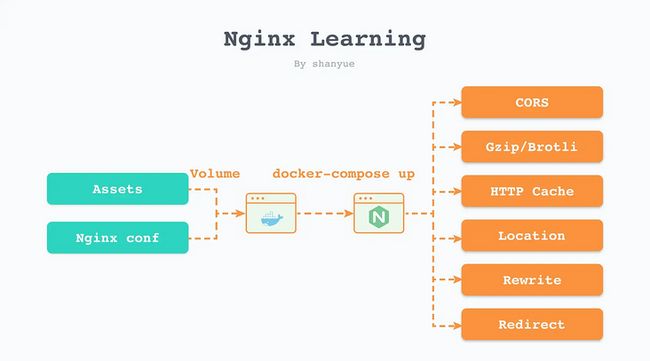
本篇文章以前端的视角,介绍下 nginx 的常见配置,并通过 docker 的方式学习 nginx,这保证所有示例配置都能正常运行。
我将本文所有关于 docker/nginx 的配置放置在 simple-deploy,可克隆下来通过 docker compose 快速运行。
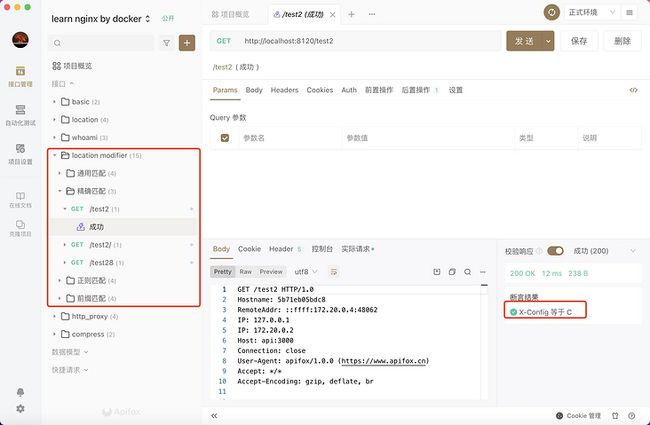
并将所有的接口示例维护在了 Learn Nginx By Docker 文档,并可通过 Apifox 打开并快速调试。
nginx 的配置文件
我们通过 nginx 镜像来了解 nginx 的配置文件都有哪些。
$ docker run -it --rm nginx:alpine sh

$ ls -lah /etc/nginx/
total 40K
drwxr-xr-x    3 root     root        4.0K Nov 13  2021 .
drwxr-xr-x    1 root     root        4.0K Jun 14 07:55 ..
drwxr-xr-x    2 root     root        4.0K Nov 13  2021 conf.d
-rw-r--r--    1 root     root        1.1K Nov  2  2021 fastcgi.conf
-rw-r--r--    1 root     root        1007 Nov  2  2021 fastcgi_params
-rw-r--r--    1 root     root        5.2K Nov  2  2021 mime.types
lrwxrwxrwx    1 root     root          22 Nov 13  2021 modules -> /usr/lib/nginx/modules
-rw-r--r--    1 root     root         648 Nov  2  2021 nginx.conf
-rw-r--r--    1 root     root         636 Nov  2  2021 scgi_params
-rw-r--r--    1 root     root         664 Nov  2  2021 uwsgi_params
在 nginx 中,其中比较重要的有以下几个文件,而它们都是有层层关联的:
/etc/nginx/nginx.conf/etc/nginx/conf.d/default.conf
/etc/nginx/nginx.conf
nginx 主配置文件,引用了 /etc/nginx/conf.d/ 目录下的所有配置文件。
user  nginx;
worker_processes  auto;

error_log  /var/log/nginx/error.log notice;
pid        /var/run/nginx.pid;


events {
    worker_connections  1024;
}


http {
    include       /etc/nginx/mime.types;
    default_type  application/octet-stream;

    log_format  main  '$remote_addr - $remote_user [$time_local] "$request" '
                      '$status $body_bytes_sent "$http_referer" '
                      '"$http_user_agent" "$http_x_forwarded_for"';

    access_log  /var/log/nginx/access.log  main;

    sendfile        on;
    #tcp_nopush     on;

    keepalive_timeout  65;

    #gzip  on;

    include /etc/nginx/conf.d/*.conf;
}
/etc/nginx/conf.d/default.conf
server {
    listen       80;
    server_name  localhost;

    #access_log  /var/log/nginx/host.access.log  main;

    location / {
        root   /usr/share/nginx/html;
        index  index.html index.htm;
    }

    #error_page  404              /404.html;

    # redirect server error pages to the static page /50x.html
    #
    error_page   500 502 503 504  /50x.html;
    location = /50x.html {
        root   /usr/share/nginx/html;
    }

    # proxy the PHP scripts to Apache listening on 127.0.0.1:80
    #
    #location ~ \.php$ {
    #    proxy_pass   http://127.0.0.1;
    #}

    # pass the PHP scripts to FastCGI server listening on 127.0.0.1:9000
    #
    #location ~ \.php$ {
    #    root           html;
    #    fastcgi_pass   127.0.0.1:9000;
    #    fastcgi_index  index.php;
    #    fastcgi_param  SCRIPT_FILENAME  /scripts$fastcgi_script_name;
    #    include        fastcgi_params;
    #}

    # deny access to .htaccess files, if Apache's document root
    # concurs with nginx's one
    #
    #location ~ /\.ht {
    #    deny  all;
    #}
}
/usr/share/nginx/html
默认的静态资源目录,也是 nginx 的欢迎页面。
Welcome to nginx!
Welcome to nginx!
If you see this page, the nginx web server is successfully installed and
working. Further configuration is required.
For online documentation and support please refer to
nginx.org.
Commercial support is available at
nginx.com.
Thank you for using nginx.
通过 docker 高效学习 nginx 配置
推荐一种高效学习 nginx 的方法: 在本地使用 nginx 镜像并挂载 nginx 配置启动容器。
通过以下 docker-compose 可秒级验证 nginx 配置,无疑是学习 nginx 的绝佳利器。
我将所有关于 nginx 的配置放置在 simple-deploy,并且每一份配置对应 docker-compose 中的一个 service 如以下 nginx、location、order1 就是 service。
version: "3"
services:
  # 关于 nginx 最常见配置的学习
  nginx:
    image: nginx:alpine
    ports:
      - 8080:80
    volumes:
      - ./nginx.conf:/etc/nginx/conf.d/default.conf
      - .:/usr/share/nginx/html
  # 关于 location 的学习
  location: ...
  # 关于 location 匹配顺序的学习
  order1: ...
每次修改配置时,需要重启容器,可根据服务名学习指定内容。
$ docker-compose up

# 学习 nginx 最基础的配置
$ docker-compose up nginx

# 学习关于 location 的配置
$ docker-compose up location
本篇文章所有的 nginx 配置均可以通过 docker 来进行学习,并附全部代码及配置。
root 与 index
root: 静态资源的根路径。见文档 https://nginx.org/en/docs/htt...index: 当请求路径以/结尾时,则自动寻找该路径下的 index 文件。见文档 https://nginx.org/en/docs/htt...
root 与 index 为前端部署的基础,在默认情况下 root 为 /usr/share/nginx/html,因此我们部署前端时,往往将构建后的静态资源目录挂载到该地址。
server {
    listen       80;
    server_name  localhost;

    root   /usr/share/nginx/html;
    index  index.html index.htm;
}
location
location 用以匹配路由,配置语法如下。
location [ = | ~ | ~* | ^~ ] uri { ... }其中 uri 前可提供以下修饰符
=精确匹配,优先级最高。^~前缀匹配,优先级其次。如果同样是前缀匹配,走最长路径。~正则匹配,优先级再次 (~* 只是不区分大小写,不单列)。如果同样是正则匹配,走第一个路径。/通用匹配,优先级再次。
为了验证所匹配的 location,我会在以下示例中添加一个自定义响应头 X-Config,可通过浏览器控制台网络面板验证其响应头。
add_header X-Config B;注意,我所有配置文件中的链接可直接点击,避免了在 compose 配置文件中寻找映射端口号的不方便。
location 修饰符验证
对于此四种修饰符可以在我的 nginx 下进行验证。
由于此处使用了 proxy_pass,因此需要 location2,api 两个服务一起启动,在 location2 服务中,可直接通过 service 名称作为 hostname 即 http://api:3000 访问 api 服务。
而 api 服务,为我自己写的一个 whoami 服务,用以打印出请求路径等信息,详见 shfshanyue/whoami。
$ docker-compose up location2 api以下是关于验证 location 的配置文件,详见 shfshanyue/simple-daploy:learn-nginxs
server {
    listen       80;
    server_name  localhost;

    root   /usr/share/nginx/html;
    index  index.html index.htm;

    # 通用匹配,所有 /xxx 任意路径都会匹配其中的规则
    location / {
        add_header X-Config A;
        try_files  $uri $uri.html $uri/index.html /index.html;
    }

    # http://localhost:8120/test1           ok
    # http://localhost:8120/test1/          ok
    # http://localhost:8120/test18          ok
    # http://localhost:8120/test28          not ok
    location /test1 {
        # 可通过查看响应头来判断是否成功返回
        add_header X-Config B;
        proxy_pass http://api:3000;
    }

    # http://localhost:8120/test2           ok
    # http://localhost:8120/test2/          not ok
    # http://localhost:8120/test28          not ok
    location = /test2 {
        add_header X-Config C;
        proxy_pass http://api:3000;
    }

    # http://localhost:8120/test3           ok
    # http://localhost:8120/test3/          ok
    # http://localhost:8120/test38          ok
    # http://localhost:8120/hellotest3      ok
    location ~ .*test3.* {
        add_header X-Config D;
        proxy_pass http://api:3000;
    }

    # http://localhost:8120/test4           ok
    # http://localhost:8120/test4/          ok
    # http://localhost:8120/test48          ok
    # http://localhost:8120/test28          not ok
    location ^~ /test4 {
        # 可通过查看响应头来判断是否成功返回
        add_header X-Config E;
        proxy_pass http://api:3000;
    }
}
location 优先级验证
在我配置文件中,以 order 打头来命名所有优先级验证的 nginx 配置,总共有四个配置文件,详见 docker-compose。
此处仅仅以 order1 为例进行验证,配置如下:
# 以下配置,访问以下链接,其 X-Config 为多少
#
# http://localhost:8210/shanyue,为 B,若都是前缀匹配,则找到最长匹配的 location

server {
    root   /usr/share/nginx/html;

    # 主要是为了 shanyue 该路径,因为没有后缀名,无法确认其 content-type,会自动下载
    # 因此这里采用 text/plain,则不会自动下载
    default_type text/plain;

    location ^~ /shan {
        add_header X-Config A;
    }

    location ^~ /shanyue {
        add_header X-Config B;
    }
}
启动服务:
$ docker-compose up order1curl 验证:
当然也可以通过浏览器控制台网络面板验证,由于此处只需要验证响应头,则我们通过 curl --head 只发送 head 请求即可。
# 查看其 X-Config 为 B
$ curl --head http://localhost:8210/shanyue
HTTP/1.1 200 OK
Server: nginx/1.21.4
Date: Fri, 03 Jun 2022 10:15:11 GMT
Content-Type: text/plain
Content-Length: 15
Last-Modified: Thu, 02 Jun 2022 12:44:23 GMT
Connection: keep-alive
ETag: "6298b0a7-f"
X-Config: B
Accept-Ranges: bytes
proxy_pass
proxy_pass 反向代理,也是 nginx 最重要的内容,这也是常用的解决跨域的问题。
当使用 proxy_pass 代理路径时,有两种情况
- 代理服务器地址不含 URI,则此时客户端请求路径与代理服务器路径相同。强烈建议这种方式
- 代理服务器地址含 URI,则此时客户端请求路径匹配 location,并将其 location 后的路径附在代理服务器地址后。
# 不含 URI
proxy_pass http://api:3000;

# 含 URI
proxy_pass http://api:3000/;
proxy_pass http://api:3000/api;
proxy_pass http://api:3000/api/;
再举一个例子:
- 访问 http://localhost:8300/api3/hello,与以下路径匹配成功
proxy_pass附有 URI- 匹配路径后多余的路径为
/hello,将其附在proxy_pass之后,得 http://api:3000/hello/hello
location /api3 {
    add_header X-Config C;

    # http://localhost:8300/api3/hello -> proxy:3000/hello/hello
    proxy_pass http://api:3000/hello;
}
有点拗口,在我们试验环境有多个示例,使用以下代码启动可反复测试:
$ docker-compose up proxy api由于 proxy_pass 所代理的服务为 whoami,可打印出真实请求路径,可根据此进行测试
server {
    listen       80;
    server_name  localhost;

    root   /usr/share/nginx/html;
    index  index.html index.htm;

    # 建议使用此种 proxy_pass 不加 URI 的写法,原样路径即可
    # http://localhost:8300/api1/hello -> proxy:3000/api1/hello
    location /api1 {
        # 可通过查看响应头来判断是否成功返回
        add_header X-Config A;
        proxy_pass http://api:3000;
    }

    # http://localhost:8300/api2/hello -> proxy:3000/hello
    location /api2/ {
        add_header X-Config B;
        proxy_pass http://api:3000/;
    }

    # http://localhost:8300/api3/hello -> proxy:3000/hello/hello
    location /api3 {
        add_header X-Config C;
        proxy_pass http://api:3000/hello;
    }

    # http://localhost:8300/api4/hello -> proxy:3000//hello
    location /api4 {
        add_header X-Config D;
        proxy_pass http://api:3000/;
    }
}
add_header
控制响应头。
由于很多特性都是通过响应头控制,因此基于此指令可做很多事情,比如:
- Cache
- CORS
- HSTS
- CSP
- ...
Cache
location /static {
    add_header Cache-Control max-age=31536000;
}
CORS
location /api {
    add_header Access-Control-Allow-Origin *;
}
HSTS
location / {
    listen 443 ssl;

    add_header Strict-Transport-Security max-age=7200;
}
CSP
location / {
    add_header Content-Security-Policy "default-src 'self';";
}
作业
- 初阶: 基于 docker 学习 nginx 配置,并可配置 index.html 强缓存 60s 时间
- 中阶: 如何使用 nginx 与 whoami 镜像,模拟 502/504
- 高阶: 基于 docker 学习 nginx 配置,并可配置 gzip/brotli
- 面试: brotli/gzip 有何区别

