【Spring源码解析】XmlBeanFactory文件资源加载(包含时序图)
1、前言
使用Spring的时候总会有疑惑,关于Spring是如何管理Spring bean。
网上也有大量资料混杂,在这里记录下自己最近看《Spring源码深度解析》后,自己脱离书本梳理的一些内容。
说到Spring就不得不说上古年代,Spring 刚如日中天的时候,使用的还是XML啊,后续优化才有的注解方式。
在这里也是从Spring Xml方式说起。
2、实例
先创建简单的maven项目。
- 添加maven依赖
这里使用的Spring版本是5.1.7,其实初期只需要Spring 几个核心包即可,为了后续方便,这里就一次性添加完成。
注意: 这里spring-test 和 Junit 的作用域是默认test,所以测试代码在test中 。
<properties>
    <maven.compiler.source>8maven.compiler.source>
    <maven.compiler.target>8maven.compiler.target>
    <spring-version>5.1.7.RELEASEspring-version>
properties>
<dependencies>

    <dependency>
        <groupId>org.slf4jgroupId>
        <artifactId>slf4j-apiartifactId>
    dependency>
    <dependency>
        <groupId>org.apache.logging.log4jgroupId>
        <artifactId>log4j-apiartifactId>
        <version>2.11.2version>
    dependency>
    <dependency>
        <groupId>org.apache.logging.log4jgroupId>
        <artifactId>log4j-coreartifactId>
        <version>2.11.2version>
    dependency>
    <dependency>
        <groupId>org.apache.logging.log4jgroupId>
        <artifactId>log4j-slf4j-implartifactId>
        <version>2.11.2version>
    dependency>


    <dependency>
        <groupId>org.springframeworkgroupId>
        <artifactId>spring-beansartifactId>
        <version>${spring-version}version>
    dependency>
    <dependency>
        <groupId>org.springframeworkgroupId>
        <artifactId>spring-contextartifactId>
        <version>${spring-version}version>
    dependency>
    <dependency>
        <groupId>org.springframeworkgroupId>
        <artifactId>spring-coreartifactId>
        <version>${spring-version}version>
    dependency>

    <dependency>
        <groupId>org.springframeworkgroupId>
        <artifactId>spring-testartifactId>
        <version>${spring-version}version>
        <scope>testscope>
        <exclusions>
            <exclusion>
                <groupId>junitgroupId>
                <artifactId>junitartifactId>
            exclusion>
        exclusions>
    dependency>
    <dependency>
        <groupId>org.junit.jupitergroupId>
        <artifactId>junit-jupiterartifactId>
        <version>5.7.2version>
    dependency>

    <dependency>
        <groupId>org.springframeworkgroupId>
        <artifactId>spring-aopartifactId>
        <version>${spring-version}version>
    dependency>
    <dependency>
        <groupId>org.springframeworkgroupId>
        <artifactId>spring-aspectsartifactId>
        <version>${spring-version}version>
    dependency>

    <dependency>
        <groupId>org.springframeworkgroupId>
        <artifactId>spring-aspectsartifactId>
        <version>${spring-version}version>
    dependency>
    <dependency>
        <groupId>org.aspectjgroupId>
        <artifactId>aspectjrtartifactId>
        <version>1.9.5version>
    dependency>
dependencies>
- Java Bean
public class User {
    private int sex;
    private String username;
    private int age;
    // 省略set/get
}
- 配置XML
这里简单解释下:
- xmlns:xsi="http://www.w3.org/2001/XMLSchema-instance 代表是XMLschema实例
- http://www.springframework.org/schema/beans 代表bean命名空间存放位置,可以直接访问。
- http://www.springframework.org/schema/beans/spring-beans-3.2.xsd 代表XSD xml 解析文件。
<beans xmlns="http://www.springframework.org/schema/beans"
       xmlns:xsi="http://www.w3.org/2001/XMLSchema-instance"
       xsi:schemaLocation="http://www.springframework.org/schema/beans
    http://www.springframework.org/schema/beans/spring-beans-3.2.xsd">

    <bean id="user" class="com.fans.entity.User"/>
beans>
- 测试代码
测试代码编写在项目src/test/java 下:
public class SpringTest {

    @Test
    void test(){
        BeanFactory beanFactory = new XmlBeanFactory(new ClassPathResource("user.xml"));
        User user = (User) beanFactory.getBean("user");
        System.out.println(user);
    }
}
测试结果: com.fans.entity.User@2f7c2f4f
- 代码结构
3、解析
注: 此处只解析资源加载的情况,后续会继续补充
从BeanFactory beanFactory = new XmlBeanFactory(new ClassPathResource(“user.xml”)); 这一句说起:
3.1、Resource
new ClassPathResouce(“user.xml”) 是对资源的加载。
在Java中,将不同来源的资源抽象成 URL ,通过注册不同的 handler ( URLStreamHandler )来处理不同来源的资源的读取逻辑,一般 handler 类型使用不同前缀(协议, Protocol )来识别,如"file:",“jar:”,"http:"等,然而 URL 没有默认定义相对Classpath或ServletContext 等资源的 handler ,虽然可以注册自己的 URLStreamHandler 解析 URL 前缀(协议 ), 比如classpath: ,然而这需要了解协议的实现机制,而URL也也没有提供基本URL方法,如检查当前资源是否存在、检查当前资源是否可读,因此 Spring 对其内部使用到的资源实现了自己的抽象结构: Resource 接口封装底层资源。
以上引用内容来自于书籍。我们可以知道demo测试代码中 new ClassPathResource(“user.xml”) 是对user.xml 中配置信息的资源加载,便于我们后续的解析内容。
查看源码:
- new ClassPathResouce(“user.xml”)
public ClassPathResource(String path) {
   this(path, (ClassLoader) null);
}

public ClassPathResource(String path, @Nullable ClassLoader classLoader) {
   Assert.notNull(path, "Path must not be null");
   String pathToUse = StringUtils.cleanPath(path);
   if (pathToUse.startsWith("/")) {
      pathToUse = pathToUse.substring(1);
   }
   this.path = pathToUse;
   this.classLoader = (classLoader != null ? classLoader : ClassUtils.getDefaultClassLoader());
}
这里主要是处理 “user.xml” 中的路径问题,StringUtils.cleanPath 、 pathToUse.substring 等。
3.2、 XmlBeanFactory
- new XmlBeanFactory(new ClassPathResource(“user.xml”))
public XmlBeanFactory(Resource resource) throws BeansException {
   this(resource, null);
}

public XmlBeanFactory(Resource resource, BeanFactory parentBeanFactory) throws BeansException {
   super(parentBeanFactory);
   this.reader.loadBeanDefinitions(resource);
}
XmlBeanFactory(Resource resource) 指向了 XmlBeanFactory(Resource resource, BeanFactory parentBeanFactory) 来进行解析,这里使用了构建器的方式创建对象。
- super(parentBeanFactory)
这里XmlBeanFactory指向了父类DefaultListableBeanFactory , 而 DefaultListableBeanFactory指向了父类AbstractAutowireCapableBeanFactory。
public AbstractAutowireCapableBeanFactory() {
   super();
   ignoreDependencyInterface(BeanNameAware.class);
   ignoreDependencyInterface(BeanFactoryAware.class);
   ignoreDependencyInterface(BeanClassLoaderAware.class);
}

public AbstractAutowireCapableBeanFactory(@Nullable BeanFactory parentBeanFactory) {
   this();
   setParentBeanFactory(parentBeanFactory);
}
这里 ignoreDependencyInterface(Class clazz) 的以上就是 在自动装配的时候对传入的class进行忽略。
super() 由 AbstractAutowireCapableBeanFactory 指向父类 AbstractBeanFactory。
setParentBeanFactory(parentBeanFactory) 也是在 AbstractBeanFactory 中实现,主要是对父BeanFactory 的加注入。
3.3、loadBeanDefinitions
this.reader.loadBeanDefinitions(resource) 这里才是对资源的处理情况,其中资源的解析和加载都是这一句进行完成的。这里不是XmlBeanFactory 自己完成的加载,而是使用自己的属性 XmlBeanDefinitionReader 完成, 点进去看下:
@Override
public int loadBeanDefinitions(Resource resource) throws BeanDefinitionStoreException {
   return loadBeanDefinitions(new EncodedResource(resource));
}

public int loadBeanDefinitions(EncodedResource encodedResource) throws BeanDefinitionStoreException {
   Assert.notNull(encodedResource, "EncodedResource must not be null");
   if (logger.isTraceEnabled()) {
      logger.trace("Loading XML bean definitions from " + encodedResource);
   }

   Set<EncodedResource> currentResources = this.resourcesCurrentlyBeingLoaded.get();

   if (!currentResources.add(encodedResource)) {
      throw new BeanDefinitionStoreException(
            "Detected cyclic loading of " + encodedResource + " - check your import definitions!");
   }

   try (InputStream inputStream = encodedResource.getResource().getInputStream()) {
      InputSource inputSource = new InputSource(inputStream);
      if (encodedResource.getEncoding() != null) {
         inputSource.setEncoding(encodedResource.getEncoding());
      }
      return doLoadBeanDefinitions(inputSource, encodedResource.getResource());
   }
   catch (IOException ex) {
      throw new BeanDefinitionStoreException(
            "IOException parsing XML document from " + encodedResource.getResource(), ex);
   }
   finally {
      currentResources.remove(encodedResource);
      if (currentResources.isEmpty()) {
         this.resourcesCurrentlyBeingLoaded.remove();
      }
   }
}
EncodedResource 是对资源进行编码处理,来满足下面输入流的编码。
encodedResource.getResource().getInputStream() 来获取资源的数据流。
new InputSource(inputStream) 然后封装获取资源流对象。
doLoadBeanDefinitions(inputSource, encodedResource.getResource()) 这里才是加载的实际内容所在。
- doLoadBeanDefinitions
protected int doLoadBeanDefinitions(InputSource inputSource, Resource resource)
      throws BeanDefinitionStoreException {

   try {
      Document doc = doLoadDocument(inputSource, resource);
      int count = registerBeanDefinitions(doc, resource);
      if (logger.isDebugEnabled()) {
         logger.debug("Loaded " + count + " bean definitions from " + resource);
      }
      return count;
   }
   catch (BeanDefinitionStoreException ex) {
        // catch 内容省略,都是对解析异常情况的处理,这里只关注主流程
   }
}
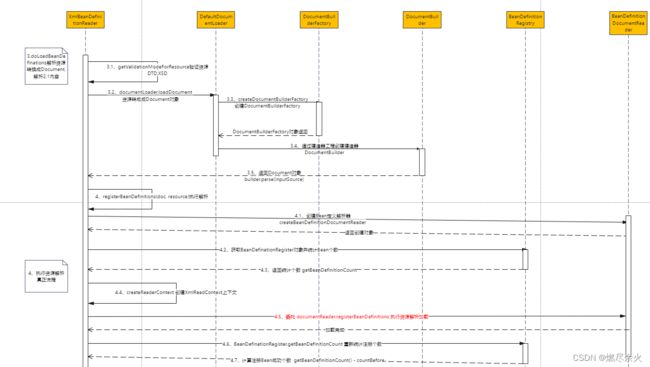
这里解析加载分为两步:
(1)解析转换成Document对象
Document doc = doLoadDocument(inputSource, resource);
(2)执行注册并统计注册bean数量
int count = registerBeanDefinitions(doc, resource);
- doLoadDocument
protected Document doLoadDocument(InputSource inputSource, Resource resource) throws Exception {
   return this.documentLoader.loadDocument(inputSource, getEntityResolver(), this.errorHandler,
         getValidationModeForResource(resource), isNamespaceAware());
}
转换对象之前其实先做了获取解析器和校验过程:
getEntityResolver() 获取解析器,这里是指项目提供寻找解析XML DTD文件的方式。
getValidationModeForResource 是用来判断XML 采用自定义,DTD还是XSD方式解析。
- loadDocument
loadDocument其实是通过 DocumentLoader的默认实现类DafaultDocument 来完成对XML文件转换Document 。
@Override
public Document loadDocument(InputSource inputSource, EntityResolver entityResolver,
      ErrorHandler errorHandler, int validationMode, boolean namespaceAware) throws Exception {

   DocumentBuilderFactory factory = createDocumentBuilderFactory(validationMode, namespaceAware);
   if (logger.isTraceEnabled()) {
      logger.trace("Using JAXP provider [" + factory.getClass().getName() + "]");
   }
   DocumentBuilder builder = createDocumentBuilder(factory, entityResolver, errorHandler);
   return builder.parse(inputSource);
}
这里createDocumentBuilderFactory主要作用是创建工厂类:
protected DocumentBuilderFactory createDocumentBuilderFactory(int validationMode, boolean namespaceAware)
      throws ParserConfigurationException {

   DocumentBuilderFactory factory = DocumentBuilderFactory.newInstance();
   factory.setNamespaceAware(namespaceAware);

   if (validationMode != XmlValidationModeDetector.VALIDATION_NONE) {
      factory.setValidating(true);
      if (validationMode == XmlValidationModeDetector.VALIDATION_XSD) {
         // Enforce namespace aware for XSD...
         factory.setNamespaceAware(true);
         try {
            factory.setAttribute(SCHEMA_LANGUAGE_ATTRIBUTE, XSD_SCHEMA_LANGUAGE);
         }
         catch (IllegalArgumentException ex) {
            ParserConfigurationException pcex = new ParserConfigurationException(
                  "Unable to validate using XSD: Your JAXP provider [" + factory +
                  "] does not support XML Schema. Are you running on Java 1.4 with Apache Crimson? " +
                  "Upgrade to Apache Xerces (or Java 1.5) for full XSD support.");
            pcex.initCause(ex);
            throw pcex;
         }
      }
   }

   return factory;
}
然后通过工厂类创建Builder,设置解析器,异常处理 :
protected DocumentBuilder createDocumentBuilder(DocumentBuilderFactory factory,
      @Nullable EntityResolver entityResolver, @Nullable ErrorHandler errorHandler)
      throws ParserConfigurationException {

   DocumentBuilder docBuilder = factory.newDocumentBuilder();
   if (entityResolver != null) {
      docBuilder.setEntityResolver(entityResolver);
   }
   if (errorHandler != null) {
      docBuilder.setErrorHandler(errorHandler);
   }
   return docBuilder;
}
上述两部是创建解析对象,真正解析是 通过parse方法,builder.parse(inputSource),在DocumentBuilder的实现类 DocumentBuilderImpl中,这里是通过DomParser来进行解析XML文件,DomParser不是我们讨论的重点,这里有兴趣可以深入了解。
public Document parse(InputSource is) throws SAXException, IOException {
    if (is == null) {
        throw new IllegalArgumentException(
            DOMMessageFormatter.formatMessage(DOMMessageFormatter.DOM_DOMAIN,
            "jaxp-null-input-source", null));
    }
    if (fSchemaValidator != null) {
        if (fSchemaValidationManager != null) {
            fSchemaValidationManager.reset();
            fUnparsedEntityHandler.reset();
        }
        resetSchemaValidator();
    }
    domParser.parse(is);
    Document doc = domParser.getDocument();
    domParser.dropDocumentReferences();
    return doc;
}
- registerBeanDefinitions
完成对Document 的解析后,就是对Document 的处理,现在做到的其实就是XML配置文件转换成Document ,下面才是继续做解析内容:
public int registerBeanDefinitions(Document doc, Resource resource) throws BeanDefinitionStoreException {
   BeanDefinitionDocumentReader documentReader = createBeanDefinitionDocumentReader();
   int countBefore = getRegistry().getBeanDefinitionCount();
   documentReader.registerBeanDefinitions(doc, createReaderContext(resource));
   return getRegistry().getBeanDefinitionCount() - countBefore;
}
- 先获取注册中心已注册的Bean数量统计
- 通过BeanDefinitionDocumentReader完成注册,这个是主要内容
- 计算注册bean数量
- registerBeanDefinitions
查看 BeanDefinitionDocumentReader 的默认实现类 DefaultBeanDefinitionDocumentReader :
@Override
public void registerBeanDefinitions(Document doc, XmlReaderContext readerContext) {
   this.readerContext = readerContext;
   doRegisterBeanDefinitions(doc.getDocumentElement());
}

protected void doRegisterBeanDefinitions(Element root) {
   // Any nested  elements will cause recursion in this method. In
   // order to propagate and preserve  default-* attributes correctly,
   // keep track of the current (parent) delegate, which may be null. Create
   // the new (child) delegate with a reference to the parent for fallback purposes,
   // then ultimately reset this.delegate back to its original (parent) reference.
   // this behavior emulates a stack of delegates without actually necessitating one.
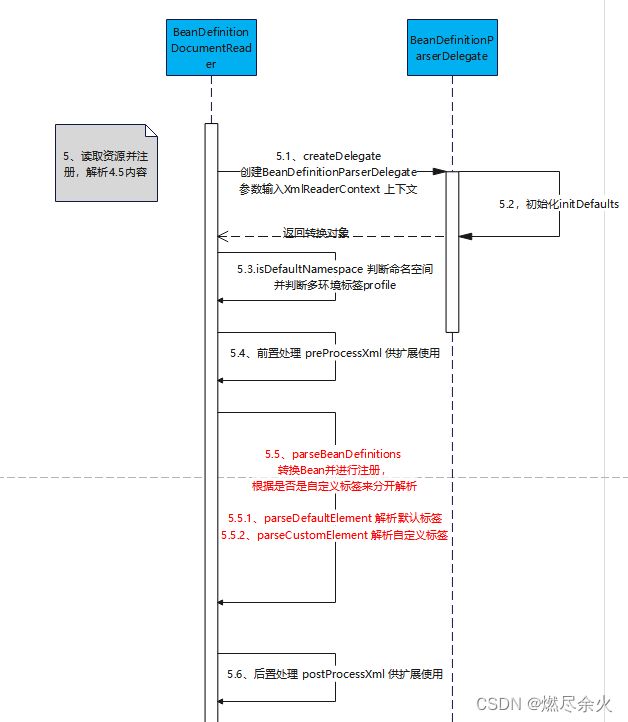
   BeanDefinitionParserDelegate parent = this.delegate;
   this.delegate = createDelegate(getReaderContext(), root, parent);

   if (this.delegate.isDefaultNamespace(root)) {
      String profileSpec = root.getAttribute(PROFILE_ATTRIBUTE);
      if (StringUtils.hasText(profileSpec)) {
         String[] specifiedProfiles = StringUtils.tokenizeToStringArray(
               profileSpec, BeanDefinitionParserDelegate.MULTI_VALUE_ATTRIBUTE_DELIMITERS);
         // We cannot use Profiles.of(...) since profile expressions are not supported
         // in XML config. See SPR-12458 for details.
         if (!getReaderContext().getEnvironment().acceptsProfiles(specifiedProfiles)) {
            if (logger.isDebugEnabled()) {
               logger.debug("Skipped XML bean definition file due to specified profiles [" + profileSpec +
                     "] not matching: " + getReaderContext().getResource());
            }
            return;
         }
      }
   }

   preProcessXml(root);
   parseBeanDefinitions(root, this.delegate);
   postProcessXml(root);

   this.delegate = parent;
}
通过 createDelegate 创建Bean的持有对象,然后通过 parseBeanDefinitions 最终完成对bean的解析和注册。所有标签的解析和注册都在其中,下篇具体讲解其中细节。
4、时序图
之前查看的时候,花了不少时间做了时序图(看不清的话可以点击放大):
5、总结
上面编写时候,也有一部分细节没有注意,不过主流程是完整的,如果想非常详细,还是推荐看下原书。
另外Spring内部实现是非常复杂的,我们在看的时候也是比较费劲,不过慢慢梳理总有收获。
加油,共勉!


