python爬虫从入门到实战笔记——第四章Scrapy框架
推荐阅读:
python爬虫从入门到实战笔记——第一章爬虫原理和数据爬取
python爬虫从入门到实战笔记——第二章非结构化数据和结构化数据的提取
python爬虫从入门到实战笔记——第三章动态HTML处理和机器图像识别
第四章Scrapy 框架
-
-
- 4.1 Scrapy的安装介绍
-
- Windows 安装方式
- Ubuntu 需要9.10或以上版本安装方式
- 4.2 入门案例
-
- 一. 新建项目(scrapy startproject)
- 二、明确目标(mySpider/items.py)
- 三、制作爬虫 (spiders/itcastSpider.py)
- 4.3 Scrapy Shell
-
- 启动Scrapy Shell
- Selectors选择器
- 4.4 Item Pipeline
-
- 编写item pipeline
- 完善之前的案例:
- 4.5 Spider
-
- 源码参考
- 主要属性和方法
- 案例:链家网自动翻页采集
- 思考
- 4.6 CrawlSpiders
-
- 源码参考
- rules
- LinkExtractors
- 爬取规则(Crawling rules)
- CrawlSpider 版本
- Logging
- 4.7 Request和Response
-
- Request
- Response
- 模拟登陆
- 知乎爬虫案例参考:
- 4.8 download middlewares
-
- 反反爬虫相关机制
- 通常防止爬虫被反主要有以下几个策略:
- 设置下载中间件(Downloader Middlewares)
- 使用案例:
- 4.9 Settings
-
- 内置设置参考手册
-
- `CONCURRENT_REQUESTS`
- `DEFAULT_REQUEST_HEADERS`
- `DOWNLOAD_DELAY`
- `ITEM_PIPELINES`
- `USER_AGENT`
- `PROXIES`: 代理设置
- `COOKIES_ENABLED = False`
-
- Scrapy是用纯Python实现一个为了爬取网站数据、提取结构性数据而编写的应用框架,用途非常广泛。
- 框架的力量,用户只需要定制开发几个模块就可以轻松的实现一个爬虫,用来抓取网页内容以及各种图片,非常之方便。
- Scrapy 使用了 Twisted
['twɪstɪd](其主要对手是Tornado)异步网络框架来处理网络通讯,可以加快我们的下载速度,不用自己去实现异步框架,并且包含了各种中间件接口,可以灵活的完成各种需求。
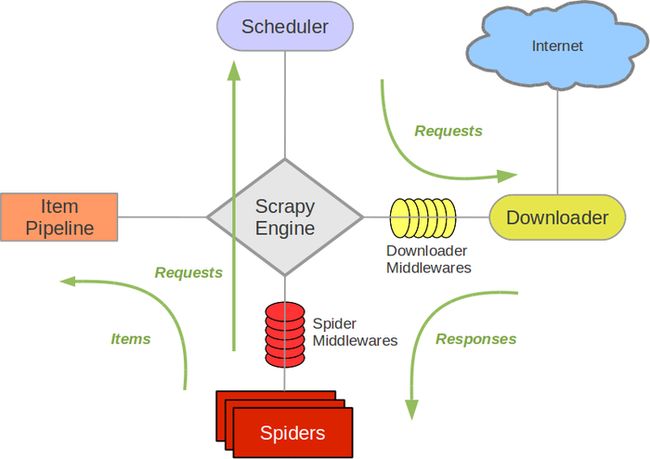
Scrapy架构图(绿线是数据流向):
Scrapy Engine(引擎): 负责Spider、ItemPipeline、Downloader、Scheduler中间的通讯,信号、数据传递等。Scheduler(调度器): 它负责接受引擎发送过来的Request请求,并按照一定的方式进行整理排列,入队,当引擎需要时,交还给引擎。Downloader(下载器):负责下载Scrapy Engine(引擎)发送的所有Requests请求,并将其获取到的Responses交还给Scrapy Engine(引擎),由引擎交给Spider来处理,Spider(爬虫):它负责处理所有Responses,从中分析提取数据,获取Item字段需要的数据,并将需要跟进的URL提交给引擎,再次进入Scheduler(调度器),Item Pipeline(管道):它负责处理Spider中获取到的Item,并进行进行后期处理(详细分析、过滤、存储等)的地方.Downloader Middlewares(下载中间件):你可以当作是一个可以自定义扩展下载功能的组件。Spider Middlewares(Spider中间件):你可以理解为是一个可以自定扩展和操作引擎和Spider中间通信的功能组件(比如进入Spider的Responses;和从Spider出去的Requests)
Scrapy的运作流程
代码写好,程序开始运行…
引擎:Hi!Spider, 你要处理哪一个网站?Spider:老大要我处理xxxx.com。引擎:你把第一个需要处理的URL给我吧。Spider:给你,第一个URL是xxxxxxx.com。引擎:Hi!调度器,我这有request请求你帮我排序入队一下。调度器:好的,正在处理你等一下。引擎:Hi!调度器,把你处理好的request请求给我。调度器:给你,这是我处理好的request引擎:Hi!下载器,你按照老大的下载中间件的设置帮我下载一下这个request请求下载器:好的!给你,这是下载好的东西。(如果失败:sorry,这个request下载失败了。然后引擎告诉调度器,这个request下载失败了,你记录一下,我们待会儿再下载)引擎:Hi!Spider,这是下载好的东西,并且已经按照老大的下载中间件处理过了,你自己处理一下(注意!这儿responses默认是交给def parse()这个函数处理的)Spider:(处理完毕数据之后对于需要跟进的URL),Hi!引擎,我这里有两个结果,这个是我需要跟进的URL,还有这个是我获取到的Item数据。引擎:Hi !管道我这儿有个item你帮我处理一下!调度器!这是需要跟进URL你帮我处理下。然后从第四步开始循环,直到获取完老大需要全部信息。管道``调度器:好的,现在就做!
注意!只有当调度器中不存在任何request了,整个程序才会停止,(也就是说,对于下载失败的URL,Scrapy也会重新下载。)
制作 Scrapy 爬虫 一共需要4步:
- 新建项目 (scrapy startproject xxx):新建一个新的爬虫项目
- 明确目标 (编写items.py):明确你想要抓取的目标
- 制作爬虫 (spiders/xxspider.py):制作爬虫开始爬取网页
- 存储内容 (pipelines.py):设计管道存储爬取内容
4.1 Scrapy的安装介绍
Scrapy框架官方网址:http://doc.scrapy.org/en/latest
Scrapy中文维护站点:http://scrapy-chs.readthedocs.io/zh_CN/latest/index.html
Windows 安装方式
- Python 2 / 3
- 升级pip版本:
pip install --upgrade pip - 通过pip 安装 Scrapy 框架
pip install Scrapy
Ubuntu 需要9.10或以上版本安装方式
- Python 2 / 3
- 安装非Python的依赖
sudo apt-get install python-dev python-pip libxml2-dev libxslt1-dev zlib1g-dev libffi-dev libssl-dev - 通过pip 安装 Scrapy 框架
sudo pip install scrapy
安装后,只要在命令终端输入 scrapy,提示类似以下结果,代表已经安装成功
具体Scrapy安装流程参考:http://doc.scrapy.org/en/latest/intro/install.html#intro-install-platform-notes 里面有各个平台的安装方法
4.2 入门案例
学习目标
- 创建一个Scrapy项目
- 定义提取的结构化数据(Item)
- 编写爬取网站的 Spider 并提取出结构化数据(Item)
- 编写 Item Pipelines 来存储提取到的Item(即结构化数据)
一. 新建项目(scrapy startproject)
- 在开始爬取之前,必须创建一个新的Scrapy项目。进入自定义的项目目录中,运行下列命令:
scrapy startproject mySpider
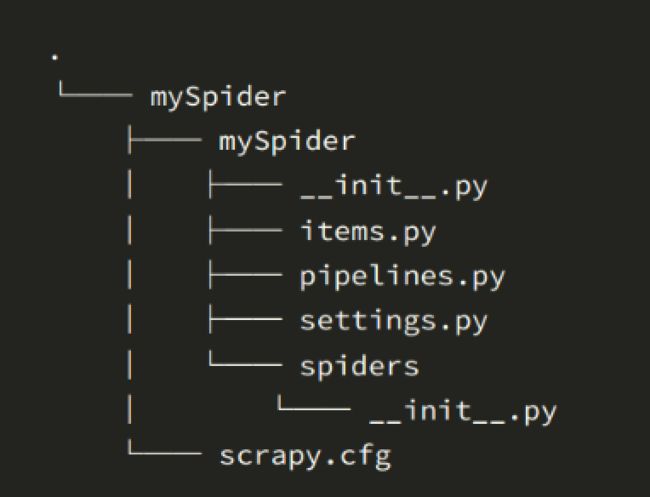
- 其中, mySpider 为项目名称,可以看到将会创建一个 mySpider 文件夹,目录结构大致如下:
下面来简单介绍一下各个主要文件的作用:
scrapy.cfg :项目的配置文件
mySpider/ :项目的Python模块,将会从这里引用代码
mySpider/items.py :项目的目标文件
mySpider/pipelines.py :项目的管道文件
mySpider/settings.py :项目的设置文件
mySpider/spiders/ :存储爬虫代码目录
二、明确目标(mySpider/items.py)
我们打算抓取:http://www.itcast.cn/channel/teacher.shtml 网站里的所有讲师的姓名、职称和个人信息。
- 打开mySpider目录下的items.py
- Item 定义结构化数据字段,用来保存爬取到的数据,有点像Python中的dict,但是提供了一些额外的保护减少错误。
- 可以通过创建一个 scrapy.Item 类, 并且定义类型为 scrapy.Field的类属性来定义一个Item。
- 接下来,创建一个ItcastItem 类,和构建item模型(model)。
import scrapy

class ItcastItem(scrapy.Item):
    name = scrapy.Field()
    title = scrapy.Field()
    info = scrapy.Field()
三、制作爬虫 (spiders/itcastSpider.py)
爬虫功能要分两步:
- 爬数据
- 在当前目录下输入命令,将在
mySpider/spider目录下创建一个名为itcast的爬虫,并指定爬取域的范围:
scrapy genspider itcast "itcast.cn"
- 打开 mySpider/spider目录里的 itcast.py,默认增加了下列代码:
import scrapy

class ItcastSpider(scrapy.Spider):
    name = "itcast"
    allowed_domains = ["itcast.cn"]
    start_urls = (
        'http://www.itcast.cn/',
    )

    def parse(self, response):
        pass
其实也可以由我们自行创建itcast.py并编写上面的代码,只不过使用命令可以免去编写固定代码的麻烦
要建立一个Spider, 你必须用scrapy.Spider类创建一个子类,并确定了三个强制的属性 和 一个方法。
name = "":这个爬虫的识别名称,必须是唯一的,在不同的爬虫必须定义不同的名字。allow_domains = []是搜索的域名范围,也就是爬虫的约束区域,规定爬虫只爬取这个域名下的网页,不存在的URL会被忽略。start_urls = ():爬取的URL元祖/列表。爬虫从这里开始抓取数据,所以,第一次下载的数据将会从这些urls开始。其他子URL将会从这些起始URL中继承性生成。parse(self, response):解析的方法,每个初始URL完成下载后将被调用,调用的时候传入从每一个URL传回的Response对象来作为唯一参数,主要作用如下:- 负责解析返回的网页数据(response.body),提取结构化数据(生成item)
- 生成需要下一页的URL请求。
将start_urls的值修改为需要爬取的第一个url
start_urls = ("http://www.itcast.cn/channel/teacher.shtml",)
修改parse()方法
def parse(self, response):
    with open("teacher.html", "w") as f:
        f.write(response.text)
然后运行一下看看,在mySpider目录下执行:
scrapy crawl itcast
是的,就是 itcast,看上面代码,它是 ItcastSpider 类的 name 属性,也就是使用 scrapy genspider命令的爬虫名。
一个Scrapy爬虫项目里,可以存在多个爬虫。各个爬虫在执行时,就是按照 name 属性来区分。
运行之后,如果打印的日志出现 [scrapy] INFO: Spider closed (finished),代表执行完成。 之后当前文件夹中就出现了一个 teacher.html 文件,里面就是我们刚刚要爬取的网页的全部源代码信息。
- 取数据
- 爬取整个网页完毕,接下来的就是的取过程了,首先观察页面源码:
<div class="li_txt">
    <h3>  xxx  h3>
    <h4> xxxxx h4>
    <p> xxxxxxxx p>
是不是一目了然?直接上XPath开始提取数据吧。
- 我们之前在mySpider/items.py 里定义了一个ItcastItem类。 这里引入进来
from mySpider.items import ItcastItem
- 然后将我们得到的数据封装到一个
ItcastItem对象中,可以保存每个老师的属性:
from mySpider.items import ItcastItem

def parse(self, response):
    #open("teacher.html","wb").write(response.body).close()
    # 存放老师信息的集合
    items = []

    for each in response.xpath("//div[@class='li_txt']"):
        # 将我们得到的数据封装到一个 `ItcastItem` 对象
        item = ItcastItem()
        #extract()方法返回的都是字符串
        name = each.xpath("h3/text()").extract()
        title = each.xpath("h4/text()").extract()
        info = each.xpath("p/text()").extract()

        #xpath返回的是包含一个元素的列表
        item['name'] = name[0]
        item['title'] = title[0]
        item['info'] = info[0]

        items.append(item)

    # 直接返回最后数据
    return items
- 我们暂时先不处理管道,后面会详细介绍。
3.保存数据
scrapy保存信息的最简单的方法主要有四种,-o 输出指定格式的文件,,命令如下:
# json格式,默认为Unicode编码
scrapy crawl itcast -o teachers.json

# json lines格式,默认为Unicode编码
scrapy crawl itcast -o teachers.jsonl

# csv 逗号表达式,可用Excel打开
scrapy crawl itcast -o teachers.csv

# xml格式
scrapy crawl itcast -o teachers.xml
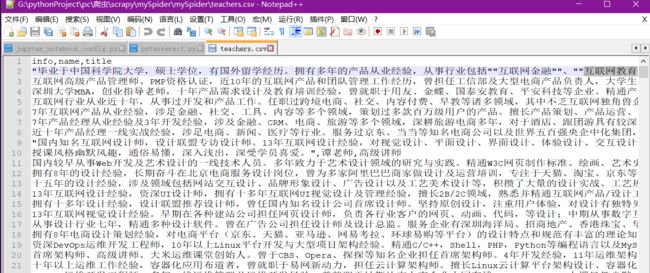
在命令行中输入我们想要保存的数据格式,这里比如说csv
运行完之后查看我们的teachers.csv
4.3 Scrapy Shell
Scrapy终端是一个交互终端,我们可以在未启动spider的情况下尝试及调试代码,也可以用来测试XPath或CSS表达式,查看他们的工作方式,方便我们爬取的网页中提取的数据。
如果安装了 IPython ,Scrapy终端将使用 IPython (替代标准Python终端)。 IPython 终端与其他相比更为强大,提供智能的自动补全,高亮输出,及其他特性。(推荐安装IPython)
启动Scrapy Shell
进入项目的根目录,执行下列命令来启动shell:
scrapy shell "http://www.itcast.cn/channel/teacher.shtml"
[外链图片转存失败,源站可能有防盗链机制,建议将图片保存下来直接上传(img-pSzFnD6E-1593267918014)(http://www.python88.cn/static/spider/images/scrapy_shell.png)]
Scrapy Shell根据下载的页面会自动创建一些方便使用的对象,例如 Response 对象,以及 Selector 对象 (对HTML及XML内容)。
- 当shell载入后,将得到一个包含response数据的本地 response 变量,输入
response.body将输出response的包体,输出response.headers可以看到response的包头。 - 输入
response.selector时, 将获取到一个response 初始化的类 Selector 的对象,此时可以通过使用response.selector.xpath()或response.selector.css()来对 response 进行查询。 - Scrapy也提供了一些快捷方式, 例如
response.xpath()或response.css()同样可以生效(如之前的案例)。
Selectors选择器
Scrapy Selectors 内置 XPath 和 CSS Selector 表达式机制
Selector有四个基本的方法,最常用的还是xpath:
- xpath(): 传入xpath表达式,返回该表达式所对应的所有节点的selector list列表
- extract(): 序列化该节点为字符串并返回list
- css(): 传入CSS表达式,返回该表达式所对应的所有节点的selector list列表,语法同 BeautifulSoup4
- re(): 根据传入的正则表达式对数据进行提取,返回字符串list列表
XPath表达式的例子及对应的含义:
/html/head/title: 选择<HTML>文档中 <head> 标签内的 <title> 元素
/html/head/title/text(): 选择上面提到的 <title> 元素的文字
//td: 选择所有的 <td> 元素
//div[@class="mine"]: 选择所有具有 class="mine" 属性的 div 元素
尝试Selector
我们用腾讯社招的网站http://hr.tencent.com/position.php?&start=0#a举例:
# 启动
scrapy shell "http://hr.tencent.com/position.php?&start=0#a"
# 返回 xpath选择器对象列表
response.xpath('//title')
[<Selector xpath='//title' data='职位搜索 | 社会招聘 | Tencent 腾讯招聘</title'</span><span class="token operator">></span><span class="token punctuation">]</span>
<span class="token comment"># 使用 extract()方法返回字符串列表</span>
response<span class="token punctuation">.</span>xpath<span class="token punctuation">(</span><span class="token string">'//title'</span><span class="token punctuation">)</span><span class="token punctuation">.</span>extract<span class="token punctuation">(</span><span class="token punctuation">)</span>
<span class="token punctuation">[</span><span class="token string">'<title>职位搜索 | 社会招聘 | Tencent 腾讯招聘 ']
# 打印列表第一个元素,没有则返回None
print response.xpath('//title').extract_first()
<title>职位搜索 | 社会招聘 | Tencent 腾讯招聘</title>
#contains的用法,or的用法,last()的含义
In [6]: response.xpath('//*[contains(@class,"odd") or contains(@class,"even")]/td[last()]/text()').extract()
Out[6]:
['2017-06-02',
'2017-06-02',
'2017-06-02',
'2017-06-02',
'2017-06-02',
'2017-06-02',
'2017-06-02',
'2017-06-02',
'2017-06-02',
'2017-06-02']
In [4]: response.xpath('//a[contains(@href,"position_detail.php?")]/text()').extract()
Out[4]:
['19407-移动游戏平台合作(上海)',
'19407-手游商业化与本地化策划(上海)',
'OMG236-腾讯视频平台高级产品经理(深圳)',
'OMG096-科技频道记者(北京)',
'18402-项目管理',
'IEG-招聘经理(深圳)',
'OMG097-视觉设计师(北京)',
'OMG097-策略产品经理/产品运营(北京)',
'OMG097-策略产品经理/产品运营(北京)',
'OMG097-数据产品经理(北京)']
In [5]: response.xpath('//*[contains(@class,"odd") or contains(@class,"even")]/td[last()-1]/text()').extract()
Out[5]: ['上海', '上海', '深圳', '北京', '深圳', '深圳', '北京', '北京', '北京', '北京']
以后做数据提取的时候,可以把现在Scrapy Shell中测试,测试通过后再应用到代码中。
当然Scrapy Shell作用不仅仅如此,但是不属于我们课程重点,不做详细介绍。
官方文档:http://scrapy-chs.readthedocs.io/zh_CN/latest/topics/shell.html
4.4 Item Pipeline
当Item在Spider中被收集之后,它将会被传递到Item Pipeline,这些Item Pipeline组件按定义的顺序处理Item。
每个Item Pipeline都是实现了简单方法的Python类,比如决定此Item是丢弃而存储。以下是item pipeline的一些典型应用:
- 验证爬取的数据(检查item包含某些字段,比如说name字段)
- 查重(并丢弃)
- 将爬取结果保存到文件或者数据库中
编写item pipeline
编写item pipeline很简单,item pipiline组件是一个独立的Python类,其中process_item()方法必须实现:
import something

class SomethingPipeline(object):
    def __init__(self):
        # 可选实现,做参数初始化等
        # doing something

    def process_item(self, item, spider):
        # item (Item 对象) – 被爬取的item
        # spider (Spider 对象) – 爬取该item的spider
        # 这个方法必须实现,每个item pipeline组件都需要调用该方法,
        # 这个方法必须返回一个 Item 对象,被丢弃的item将不会被之后的pipeline组件所处理。
        return item

    def open_spider(self, spider):
        # spider (Spider 对象) – 被开启的spider
        # 可选实现,当spider被开启时,这个方法被调用。

    def close_spider(self, spider):
        # spider (Spider 对象) – 被关闭的spider
        # 可选实现,当spider被关闭时,这个方法被调用
完善之前的案例:
item写入JSON文件
以下pipeline将所有(从所有’spider’中)爬取到的item,存储到一个独立地items.json 文件,每行包含一个序列化为’JSON’格式的’item’。
打开 pipelines.py 文件,写入下面代码:
# pipelines.py

import json

class ItcastJsonPipeline(object):

    def __init__(self):
        self.file = open('teacher.json', 'wb')

    def process_item(self, item, spider):
        content = json.dumps(dict(item), ensure_ascii=False) + "\n"
        self.file.write(content)
        return item

    def close_spider(self, spider):
        self.file.close()
启用一个Item Pipeline组件
为了启用Item Pipeline组件,必须将它的类添加到 settings.py文件ITEM_PIPELINES 配置,就像下面这个例子:
# Configure item pipelines
# See http://scrapy.readthedocs.org/en/latest/topics/item-pipeline.html
ITEM_PIPELINES = {
    #'mySpider.pipelines.SomePipeline': 300,
    "mySpider.pipelines.ItcastJsonPipeline":300
}
分配给每个类的整型值,确定了他们运行的顺序,item按数字从低到高的顺序,通过pipeline,通常将这些数字定义在0-1000范围内(0-1000随意设置,数值越低,组件的优先级越高)
重新启动爬虫
将parse()方法改为的如下代码
思考如果将代码改成下面形式,结果完全一样。请思考 yield 在这里的作用:
import scrapy
from mySpider.items import ItcastItem
class ItcastSpider(scrapy.Spider):
    name = 'itcast'
    allowed_domains = ['itcast.cn']
    start_urls = ['http://www.itcast.cn/channel/teacher.shtml']

    def parse(self, response):
        # open("teacher.html","wb").write(response.body).close()
        # 存放老师信息的集合
        items = []
        for each in response.xpath("//div[@class='li_txt']"):
            # 将我们得到的数据封装到一个 `ItcastItem` 对象
            item = ItcastItem()
            # extract()方法返回的都是字符串
            name = each.xpath("h3/text()").extract_first()
            title = each.xpath("h4/text()").extract_first()
            info = each.xpath("p/text()").extract_first()
            item['name'] = name
            item['title'] = title
            item['info'] = info
            # 将获取的数据交给pipelines
            yield item

        # 返回数据,不经过pipeline
        # return items
然后执行下面的命令:
scrapy crawl itcast
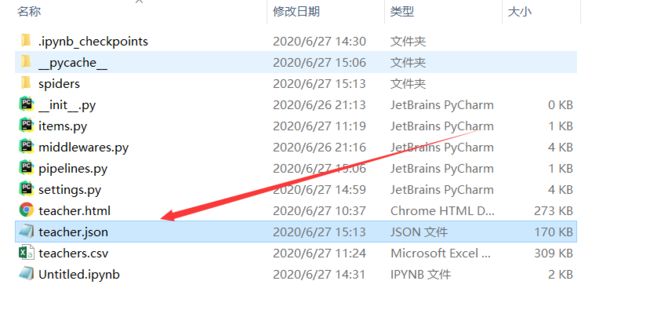
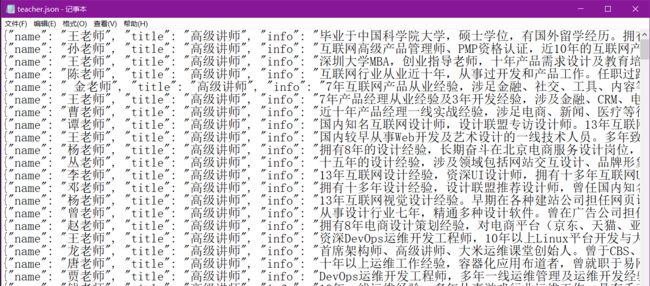
查看当前目录是否生成teacher.json
查看json数据的内容
4.5 Spider
Spider类定义了如何爬取某个(或某些)网站。包括了爬取的动作(例如:是否跟进链接)以及如何从网页的内容中提取结构化数据(爬取item)。 换句话说,Spider就是您定义爬取的动作及分析某个网页(或者是有些网页)的地方。
class scrapy.Spider是最基本的类,所有编写的爬虫必须继承这个类。
主要用到的函数及调用顺序为:
__init__() : 初始化爬虫名字和start_urls列表
start_requests() 调用make_requests_from url():生成Requests对象交给Scrapy下载并返回response
parse() : 解析response,并返回Item或Requests(需指定回调函数)。Item传给Item pipline持久化 , 而Requests交由Scrapy下载,并由指定的回调函数处理(默认parse()),一直进行循环,直到处理完所有的数据为止。
源码参考
#所有爬虫的基类,用户定义的爬虫必须从这个类继承
class Spider(object_ref):

    #定义spider名字的字符串(string)。spider的名字定义了Scrapy如何定位(并初始化)spider,所以其必须是唯一的。
    #name是spider最重要的属性,而且是必须的。
    #一般做法是以该网站(domain)(加或不加 后缀 )来命名spider。 例如,如果spider爬取 mywebsite.com ,该spider通常会被命名为 mywebsite
    name = None

    #初始化,提取爬虫名字,start_ruls
    def __init__(self, name=None, **kwargs):
        if name is not None:
            self.name = name
        # 如果爬虫没有名字,中断后续操作则报错
        elif not getattr(self, 'name', None):
            raise ValueError("%s must have a name" % type(self).__name__)

        # python 对象或类型通过内置成员__dict__来存储成员信息
        self.__dict__.update(kwargs)

        #URL列表。当没有指定的URL时,spider将从该列表中开始进行爬取。 因此,第一个被获取到的页面的URL将是该列表之一。 后续的URL将会从获取到的数据中提取。
        if not hasattr(self, 'start_urls'):
            self.start_urls = []

    # 打印Scrapy执行后的log信息
    def log(self, message, level=log.DEBUG, **kw):
        log.msg(message, spider=self, level=level, **kw)

    # 判断对象object的属性是否存在,不存在做断言处理
    def set_crawler(self, crawler):
        assert not hasattr(self, '_crawler'), "Spider already bounded to %s" % crawler
        self._crawler = crawler

    @property
    def crawler(self):
        assert hasattr(self, '_crawler'), "Spider not bounded to any crawler"
        return self._crawler

    @property
    def settings(self):
        return self.crawler.settings

    #该方法将读取start_urls内的地址,并为每一个地址生成一个Request对象,交给Scrapy下载并返回Response
    #该方法仅调用一次
    def start_requests(self):
        for url in self.start_urls:
            yield self.make_requests_from_url(url)

    #start_requests()中调用,实际生成Request的函数。
    #Request对象默认的回调函数为parse(),提交的方式为get
    def make_requests_from_url(self, url):
        return Request(url, dont_filter=True)

    #默认的Request对象回调函数,处理返回的response。
    #生成Item或者Request对象。用户必须实现这个类
    def parse(self, response):
        raise NotImplementedError

    @classmethod
    def handles_request(cls, request):
        return url_is_from_spider(request.url, cls)

    def __str__(self):
        return "<%s %r at 0x%0x>" % (type(self).__name__, self.name, id(self))

    __repr__ = __str__
主要属性和方法
-
name
定义spider名字的字符串。
例如,如果spider爬取 mywebsite.com ,该spider通常会被命名为 mywebsite
-
allowed_domains
包含了spider允许爬取的域名(domain)的列表,可选。
-
start_urls
初始URL元祖/列表。当没有制定特定的URL时,spider将从该列表中开始进行爬取。
-
start_requests(self)
该方法必须返回一个可迭代对象(iterable)。该对象包含了spider用于爬取(默认实现是使用 start_urls 的url)的第一个Request。
当spider启动爬取并且未指定start_urls时,该方法被调用。
-
parse(self, response)
当请求url返回网页没有指定回调函数时,默认的Request对象回调函数。用来处理网页返回的response,以及生成Item或者Request对象。
-
log(self, message[, level, component])
使用 scrapy.log.msg() 方法记录(log)message。 更多数据请参见 logging
案例:链家网自动翻页采集
- 创建一个新的爬虫:
scrapy genspider tencent "lianjia.com"
- 编写ershoufang.py
# -*- coding: utf-8 -*-
import scrapy
import copy
import math
import uuid


class ErshoufangSpider(scrapy.Spider):
    name = 'ershoufang'
    allowed_domains = ['lianjia.com']
    start_urls = ['https://www.lianjia.com/city/']

    # 提取所有城市的链接
    def parse(self, response):
        province_list = response.xpath("//div[@class='city_province']")
        for province in province_list:
            province_name = province.xpath("./div/text()").get()
            city_list = province.xpath("./ul/li/a")
            for city in city_list:
                item = {}
                city_name = city.xpath("./text()").get()
                city_url = city.xpath("./@href").get()
                # 链接分为两类:没有二手房的链接和有二手房的链接
                if "fang" in city_url:
                    continue
                # print(province_name, city_name, city_url)
                # 将所有城市的链接转化为二手房的链接
                city_esf_url = city_url + "ershoufang/co32/"
                item["province"] = province_name
                item["city"] = city_name
                yield scrapy.Request(url=city_esf_url, callback=self.parse_city, meta={"item": copy.deepcopy(item)})

    def parse_city(self, response):
        city_url = response.url
        info = response.meta.get("item")
        all_count = int(response.xpath("//h2[contains(@class, 'total')]/span/text()").get())
        max_page = 100 if all_count > 30 * 100 else math.floor(all_count/30)
        template_url_list = city_url.split("/")
        template_url_list[-2] = "pg{}co32"
        template_url = "/".join(template_url_list)
        for page in range(1, max_page + 1):
            per_page_url = template_url.format(page)
            yield scrapy.Request(url=per_page_url, callback=self.parse_per_page, meta={"item": copy.deepcopy(info)})

    def parse_per_page(self, response):
        info = response.meta.get("item")
        houses = response.xpath("//ul[@class='sellListContent']/li")
        for house in houses:
            house_url = house.xpath("./a/@href").get()
            info["url"] = house_url
            yield scrapy.Request(url=house_url, callback=self.parse_house_detail, meta={"item": copy.deepcopy(info)})

    def parse_house_detail(self, response):
        item = response.meta.get("item")
        # 描述
        try:
            item["desc"] = response.xpath("//h1[@class='main']/text()").get()
        except:
            item["desc"] = ""
        # 总价
        try:
            item["totalPrice"] = response.xpath("//span[@class='total']/text()").get()
        except:
            item["totalPrice"] = ""
        # 单价
        try:
            item["unitPrice"] = response.xpath("//span[@class='unitPriceValue']/text()").get()
        except:
            item["unitPrice"] = ""
        # 面积
        try:
            item["area"] = response.xpath("//div[@class='area']/div[@class='mainInfo']/text()").get()
        except:
            item["area"] = ""
        # 类型
        try:
            item["type"] = response.xpath("//div[@class='area']/div[@class='subInfo']/text()").get()
        except:
            item["type"] = ""
        # 朝向
        try:
            item["aspect"] = response.xpath("//div[@class='type']/div[@class='mainInfo']/text()").get()
        except:
            item["aspect"] = ""
        # 房间
        try:
            item["room"] = response.xpath("//div[@class='room']/div[@class='mainInfo']/text()").get()
        except:
            item["room"] = ""
        # 楼层
        try:
            item["floor"] = response.xpath("//div[@class='room']/div[@class='subInfo']/text()").get()
        except:
            item["floor"] = ""
        # 所在区
        try:
            item["region"] = response.xpath("//div[@class='areaName']/span[@class='info']/a[1]/text()").get()
        except:
            item["region"] = ""
        # 具体地址
        try:
            item["around"] = response.xpath("//div[@class='communityName']/a[contains(@class,'info')]/text()").get()
        except:
            item["around"] = ""
        address = item["province"] + item["city"] + item["region"] + item["around"]
        item["address"] = address
        item["_id"] = uuid.uuid1().hex
        item = copy.deepcopy(item)
        return item
- 编写pipeline.py文件
# -*- coding: utf-8 -*-

# Define your item pipelines here
#
# Don't forget to add your pipeline to the ITEM_PIPELINES setting
# See: https://docs.scrapy.org/en/latest/topics/item-pipeline.html
from scrapy.exceptions import DropItem
import pymongo
import pymysql

class SavePipeline:
    def __init__(self):
        self.client = pymongo.MongoClient(host="127.0.0.1", port=27017)
        self.database = self.client["spider"]
        self.col = self.database["LianjiaData"]

    def process_item(self, item, spider):
        try:
            self.col.insert_one(item)
        except Exception as e:
            spider.logger.warning(e)
        return item
- 在 setting.py 里设置ITEM_PIPELINES
# -*- coding: utf-8 -*-
BOT_NAME = 'lianjia'

SPIDER_MODULES = ['lianjia.spiders']
NEWSPIDER_MODULE = 'lianjia.spiders'


# Obey robots.txt rules
ROBOTSTXT_OBEY = True

# Configure maximum concurrent requests performed by Scrapy (default: 16)
CONCURRENT_REQUESTS = 2


DOWNLOADER_MIDDLEWARES = {
   'lianjia.middlewares.RandomUADownloaderMiddleware': 100,
}

ITEM_PIPELINES = {
   'lianjia.pipelines.SavePipeline': 1000,
}


LOG_FILE = "lianjia.log"

LOG_LEVEL = "WARNING"
- 执行爬虫:`scrapy crawl ershoufang
思考
请思考 parse()方法的工作机制:
1. 如果使用的yield,而不是return。parse函数将会被当做一个生成器使用。scrapy会逐一获取parse方法中生成的结果,并判断该结果是一个什么样的类型;
2. 如果是request则加入爬取队列,如果是item类型则使用pipeline处理,其他类型则返回错误信息。
3. scrapy取到第一部分的request不会立马就去发送这个request,只是把这个request放到队列里,然后接着从生成器里获取;
4. 取尽第一部分的request,然后再获取第二部分的item,取到item了,就会放到对应的pipeline里处理;
5. parse()方法作为回调函数(callback)赋值给了Request,指定parse()方法来处理这些请求 scrapy.Request(url, callback=self.parse)
6. Request对象经过调度,执行生成 scrapy.http.response()的响应对象,并送回给parse()方法,直到调度器中没有Request(递归的思路)
7. 取尽之后,parse()工作结束,引擎再根据队列和pipelines中的内容去执行相应的操作;
8. 程序在取得各个页面的items前,会先处理完之前所有的request队列里的请求,然后再提取items。
7. 这一切的一切,Scrapy引擎和调度器将负责到底。
常见bug
[scrapy.spidermiddlewares.offsite] DEBUG: Filtered offsite request to ‘hr.tencent.com’:
解决方式:
domain错误 修改domain为:hr.tencent.com
4.6 CrawlSpiders
通过下面的命令可以快速创建 CrawlSpider模板 的代码:
scrapy genspider -t crawl tencent tencent.com
上一个案例中,我们通过正则表达式,制作了新的url作为Request请求参数,现在我们可以换个花样…
class scrapy.spiders.CrawlSpider
它是Spider的派生类,Spider类的设计原则是只爬取start_url列表中的网页,而CrawlSpider类定义了一些规则(rule)来提供跟进link的方便的机制,从爬取的网页中获取link并继续爬取的工作更适合。
源码参考
class CrawlSpider(Spider):
    rules = ()
    def __init__(self, *a, **kw):
        super(CrawlSpider, self).__init__(*a, **kw)
        self._compile_rules()

    #首先调用parse()来处理start_urls中返回的response对象
    #parse()则将这些response对象传递给了_parse_response()函数处理,并设置回调函数为parse_start_url()
    #设置了跟进标志位True
    #parse将返回item和跟进了的Request对象
    def parse(self, response):
        return self._parse_response(response, self.parse_start_url, cb_kwargs={}, follow=True)

    #处理start_url中返回的response,需要重写
    def parse_start_url(self, response):
        return []

    def process_results(self, response, results):
        return results

    #从response中抽取符合任一用户定义'规则'的链接,并构造成Resquest对象返回
    def _requests_to_follow(self, response):
        if not isinstance(response, HtmlResponse):
            return
        seen = set()
        #抽取之内的所有链接,只要通过任意一个'规则',即表示合法
        for n, rule in enumerate(self._rules):
            links = [l for l in rule.link_extractor.extract_links(response) if l not in seen]
            #使用用户指定的process_links处理每个连接
            if links and rule.process_links:
                links = rule.process_links(links)
            #将链接加入seen集合,为每个链接生成Request对象,并设置回调函数为_repsonse_downloaded()
            for link in links:
                seen.add(link)
                #构造Request对象,并将Rule规则中定义的回调函数作为这个Request对象的回调函数
                r = Request(url=link.url, callback=self._response_downloaded)
                r.meta.update(rule=n, link_text=link.text)
                #对每个Request调用process_request()函数。该函数默认为indentify,即不做任何处理,直接返回该Request.
                yield rule.process_request(r)

    #处理通过rule提取出的连接,并返回item以及request
    def _response_downloaded(self, response):
        rule = self._rules[response.meta['rule']]
        return self._parse_response(response, rule.callback, rule.cb_kwargs, rule.follow)

    #解析response对象,会用callback解析处理他,并返回request或Item对象
    def _parse_response(self, response, callback, cb_kwargs, follow=True):
        #首先判断是否设置了回调函数。(该回调函数可能是rule中的解析函数,也可能是 parse_start_url函数)
        #如果设置了回调函数(parse_start_url()),那么首先用parse_start_url()处理response对象,
        #然后再交给process_results处理。返回cb_res的一个列表
        if callback:
            #如果是parse调用的,则会解析成Request对象
            #如果是rule callback,则会解析成Item
            cb_res = callback(response, **cb_kwargs) or ()
            cb_res = self.process_results(response, cb_res)
            for requests_or_item in iterate_spider_output(cb_res):
                yield requests_or_item

        #如果需要跟进,那么使用定义的Rule规则提取并返回这些Request对象
        if follow and self._follow_links:
            #返回每个Request对象
            for request_or_item in self._requests_to_follow(response):
                yield request_or_item

    def _compile_rules(self):
        def get_method(method):
            if callable(method):
                return method
            elif isinstance(method, basestring):
                return getattr(self, method, None)

        self._rules = [copy.copy(r) for r in self.rules]
        for rule in self._rules:
            rule.callback = get_method(rule.callback)
            rule.process_links = get_method(rule.process_links)
            rule.process_request = get_method(rule.process_request)

    def set_crawler(self, crawler):
        super(CrawlSpider, self).set_crawler(crawler)
        self._follow_links = crawler.settings.getbool('CRAWLSPIDER_FOLLOW_LINKS', True)
CrawlSpider继承于Spider类,除了继承过来的属性外(name、allow_domains),还提供了新的属性和方法:
rules
CrawlSpider使用rules来决定爬虫的爬取规则,并将匹配后的url请求提交给引擎。所以在正常情况下,CrawlSpider不需要单独手动返回请求了。
在rules中包含一个或多个Rule对象,每个Rule对爬取网站的动作定义了某种特定操作,比如提取当前相应内容里的特定链接,是否对提取的链接跟进爬取,对提交的请求设置回调函数等。
如果多个rule匹配了相同的链接,则根据规则在本集合中被定义的顺序,第一个会被使用。
class scrapy.spiders.Rule(
        link_extractor,
        callback = None,
        cb_kwargs = None,
        follow = None,
        process_links = None,
        process_request = None
)
-
link_extractor:是一个Link Extractor对象,用于定义需要提取的链接。 -
callback: 从link_extractor中每获取到链接时,参数所指定的值作为回调函数,该回调函数接受一个response作为其第一个参数。注意:当编写爬虫规则时,避免使用parse作为回调函数。由于CrawlSpider使用parse方法来实现其逻辑,如果覆盖了 parse方法,crawl spider将会运行失败。
-
follow:是一个布尔(boolean)值,指定了根据该规则从response提取的链接是否需要跟进。 如果callback为None,follow 默认设置为True ,否则默认为False。 -
process_links:指定该spider中哪个的函数将会被调用,从link_extractor中获取到链接列表时将会调用该函数。该方法主要用来过滤。 -
process_request:指定该spider中哪个的函数将会被调用, 该规则提取到每个request时都会调用该函数。 (用来过滤request)
LinkExtractors
class scrapy.linkextractors.LinkExtractor
Link Extractors 的目的很简单: 提取链接。
每个LinkExtractor有唯一的公共方法是 extract_links(),它接收一个 Response 对象,并返回一个 scrapy.link.Link 对象。
Link Extractors要实例化一次,并且 extract_links 方法会根据不同的 response 调用多次提取链接。
class scrapy.linkextractors.LinkExtractor(
    allow = (),
    deny = (),
    allow_domains = (),
    deny_domains = (),
    deny_extensions = None,
    restrict_xpaths = (),
    tags = ('a','area'),
    attrs = ('href'),
    canonicalize = True,
    unique = True,
    process_value = None
)
主要参数:
allow:满足括号中“正则表达式”的URL会被提取,如果为空,则全部匹配。deny:满足括号中“正则表达式”的URL一定不提取(优先级高于allow)。allow_domains:会被提取的链接的domains。deny_domains:一定不会被提取链接的domains。restrict_xpaths:使用xpath表达式,和allow共同作用过滤链接。
爬取规则(Crawling rules)
继续用腾讯招聘为例,给出配合rule使用CrawlSpider的例子:
-
首先运行
scrapy shell "http://hr.tencent.com/position.php?&start=0#a" -
导入LinkExtractor,创建LinkExtractor实例对象。:
 from scrapy.linkextractors import LinkExtractor

 page_lx = LinkExtractor(allow=('position.php?&start=\d+'))
allow : LinkExtractor对象最重要的参数之一,这是一个正则表达式,必须要匹配这个正则表达式(或正则表达式列表)的URL才会被提取,如果没有给出(或为空), 它会匹配所有的链接。
deny : 用法同allow,只不过与这个正则表达式匹配的URL不会被提取)。它的优先级高于 allow 的参数,如果没有给出(或None), 将不排除任何链接。
-
调用LinkExtractor实例的extract_links()方法查询匹配结果:
page_lx.extract_links(response) -
没有查到:
[] -
注意转义字符的问题,继续重新匹配:
 page_lx = LinkExtractor(allow=('position\.php\?&start=\d+'))
 # page_lx = LinkExtractor(allow = ('start=\d+'))

 page_lx.extract_links(response)
[外链图片转存失败,源站可能有防盗链机制,建议将图片保存下来直接上传(img-QbkRgTEY-1593267918020)(http://www.python88.cn/static/spider/images/tencent_rule.png)]
CrawlSpider 版本
那么,scrapy shell测试完成之后,修改以下代码
#提取匹配 'http://hr.tencent.com/position.php?&start=\d+'的链接
page_lx = LinkExtractor(allow = ('start=\d+'))

rules = [
    #提取匹配,并使用spider的parse方法进行分析;并跟进链接(没有callback意味着follow默认为True)
    Rule(page_lx, callback = 'parse', follow = True)
]
这么写对吗?
不对!千万记住 callback 千万不能写 parse,再次强调:由于CrawlSpider使用parse方法来实现其逻辑,如果覆盖了 parse方法,crawl spider将会运行失败。
import scrapy
from scrapy.linkextractors import LinkExtractor
from scrapy.spiders import CrawlSpider, Rule


class TecentSpider(CrawlSpider):
    name = 'tecent'
    allowed_domains = ['hr.tencent.com']
    start_urls = ['http://hr.tencent.com/position.php?&start=0']
    page_lx = LinkExtractor(allow=r'start=\d+')
    #position.php?&start=10#a
    rules = (
        Rule(page_lx, callback='parse_item', follow=True),
    )

    def parse_item(self, response):
        items = response.xpath('//*[contains(@class,"odd") or contains(@class,"even")]')
        for item in items:
            temp = dict(
                position=item.xpath("./td[1]/a/text()").extract()[0],
                detailLink="http://hr.tencent.com/" + item.xpath("./td[1]/a/@href").extract()[0],
                type=item.xpath('./td[2]/text()').extract()[0] if len(
                    item.xpath('./td[2]/text()').extract()) > 0 else None,
                need_num=item.xpath('./td[3]/text()').extract()[0],
                location=item.xpath('./td[4]/text()').extract()[0],
                publish_time=item.xpath('./td[5]/text()').extract()[0]
            )
            print(temp)
            yield temp

    # parse() 方法不需要重写
    # def parse(self, response):
    #     pass
运行: scrapy crawl tencent
Logging
Scrapy提供了log功能,可以通过 logging 模块使用。
可以修改配置文件settings.py,任意位置添加下面两行,效果会清爽很多。
LOG_FILE = "TencentSpider.log"
LOG_LEVEL = "INFO"
Log levels
- Scrapy提供5层logging级别:
- CRITICAL - 严重错误(critical)
- ERROR - 一般错误(regular errors)
- WARNING - 警告信息(warning messages)
- INFO - 一般信息(informational messages)
- DEBUG - 调试信息(debugging messages)
logging设置
通过在setting.py中进行以下设置可以被用来配置logging:
LOG_ENABLED默认: True,启用loggingLOG_ENCODING默认: ‘utf-8’,logging使用的编码LOG_FILE默认: None,在当前目录里创建logging输出文件的文件名LOG_LEVEL默认: ‘DEBUG’,log的最低级别LOG_STDOUT默认: False 如果为 True,进程所有的标准输出(及错误)将会被重定向到log中。例如,执行 print “hello” ,其将会在Scrapy log中显示。
4.7 Request和Response
Request
Request 部分源码:
# 部分代码
class Request(object_ref):

    def __init__(self, url, callback=None, method='GET', headers=None, body=None,
                 cookies=None, meta=None, encoding='utf-8', priority=0,
                 dont_filter=False, errback=None):

        self._encoding = encoding  # this one has to be set first
        self.method = str(method).upper()
        self._set_url(url)
        self._set_body(body)
        assert isinstance(priority, int), "Request priority not an integer: %r" % priority
        self.priority = priority

        assert callback or not errback, "Cannot use errback without a callback"
        self.callback = callback
        self.errback = errback

        self.cookies = cookies or {}
        self.headers = Headers(headers or {}, encoding=encoding)
        self.dont_filter = dont_filter

        self._meta = dict(meta) if meta else None

    @property
    def meta(self):
        if self._meta is None:
            self._meta = {}
        return self._meta
其中,比较常用的参数:
url: 就是需要请求,并进行下一步处理的url

callback: 指定该请求返回的Response,由那个函数来处理。

method: 请求一般不需要指定,默认GET方法,可设置为"GET", "POST", "PUT"等,且保证字符串大写

headers: 请求时,包含的头文件。一般不需要。内容一般如下:
        # 自己写过爬虫的肯定知道
        Host: media.readthedocs.org
        User-Agent: Mozilla/5.0 (Windows NT 6.2; WOW64; rv:33.0) Gecko/20100101 Firefox/33.0
        Accept: text/css,*/*;q=0.1
        Accept-Language: zh-cn,zh;q=0.8,en-us;q=0.5,en;q=0.3
        Accept-Encoding: gzip, deflate
        Referer: http://scrapy-chs.readthedocs.org/zh_CN/0.24/
        Cookie: _ga=GA1.2.1612165614.1415584110;
        Connection: keep-alive
        If-Modified-Since: Mon, 25 Aug 2014 21:59:35 GMT
        Cache-Control: max-age=0

meta: 比较常用,在不同的请求之间传递数据使用的。字典dict型

        request_with_cookies = Request(
            url="http://www.example.com",
            cookies={'currency': 'USD', 'country': 'UY'},
            meta={'dont_merge_cookies': True}
        )

encoding: 使用默认的 'utf-8' 就行。

dont_filter: 表明该请求不由调度器过滤。这是当你想使用多次执行相同的请求,忽略重复的过滤器。默认为False。

errback: 指定错误处理函数
Response
# 部分代码
class Response(object_ref):
    def __init__(self, url, status=200, headers=None, body='', flags=None, request=None):
        self.headers = Headers(headers or {})
        self.status = int(status)
        self._set_body(body)
        self._set_url(url)
        self.request = request
        self.flags = [] if flags is None else list(flags)

    @property
    def meta(self):
        try:
            return self.request.meta
        except AttributeError:
            raise AttributeError("Response.meta not available, this response " \
                "is not tied to any request")
大部分参数和上面的差不多:
status: 响应码
_set_body(body): 响应体
_set_url(url):响应url
self.request = request
发送POST请求
- 可以使用
yield scrapy.FormRequest(url, formdata, callback)方法发送POST请求。 - 如果希望程序执行一开始就发送POST请求,可以重写Spider类的
start_requests(self)方法,并且不再调用start_urls里的url。
class mySpider(scrapy.Spider):
    # start_urls = ["http://www.example.com/"]

    def start_requests(self):
        url = 'http://www.renren.com/PLogin.do'

        # FormRequest 是Scrapy发送POST请求的方法
        yield scrapy.FormRequest(
            url = url,
            formdata = {"email" : "[email protected]", "password" : "axxxxxxxe"},
            callback = self.parse_page
        )
    def parse_page(self, response):
        # do something
模拟登陆
使用FormRequest.from_response()方法模拟用户登录
通常网站通过 实现对某些表单字段(如数据或是登录界面中的认证令牌等)的预填充。
使用Scrapy抓取网页时,如果想要预填充或重写像用户名、用户密码这些表单字段, 可以使用 FormRequest.from_response() 方法实现。
下面是使用这种方法的爬虫例子:
import scrapy

class LoginSpider(scrapy.Spider):
    name = 'example.com'
    start_urls = ['http://www.example.com/users/login.php']

    def parse(self, response):
        return scrapy.FormRequest.from_response(
            response,
            formdata={'username': 'john', 'password': 'secret'},
            callback=self.after_login
        )

    def after_login(self, response):
        # check login succeed before going on
        if "authentication failed" in response.body:
            self.log("Login failed", level=log.ERROR)
            return

        # continue scraping with authenticated session...
知乎爬虫案例参考:
zhihuSpider.py爬虫代码
#!/usr/bin/env python
# -*- coding:utf-8 -*-
from scrapy.spiders import CrawlSpider, Rule
from scrapy.selector import Selector
from scrapy.linkextractors import LinkExtractor
from scrapy import Request, FormRequest
from zhihu.items import ZhihuItem

class ZhihuSipder(CrawlSpider) :
    name = "zhihu"
    allowed_domains = ["www.zhihu.com"]
    start_urls = [
        "http://www.zhihu.com"
    ]
    rules = (
        Rule(LinkExtractor(allow = ('/question/\d+#.*?', )), callback = 'parse_page', follow = True),
        Rule(LinkExtractor(allow = ('/question/\d+', )), callback = 'parse_page', follow = True),
    )

    headers = {
        "Accept": "*/*",
        "Accept-Language": "en-US,en;q=0.8,zh-TW;q=0.6,zh;q=0.4",
        "Connection": "keep-alive",
        "Content-Type":" application/x-www-form-urlencoded; charset=UTF-8",
        "User-Agent": "Mozilla/5.0 (Macintosh; Intel Mac OS X 10_11_5) AppleWebKit/537.36 (KHTML, like Gecko) Chrome/54.0.2125.111 Safari/537.36",
        "Referer": "http://www.zhihu.com/"
    }

    #重写了爬虫类的方法, 实现了自定义请求, 运行成功后会调用callback回调函数
    def start_requests(self):
        return [Request("https://www.zhihu.com/login", meta = {'cookiejar' : 1}, callback = self.post_login)]

    def post_login(self, response):
        print 'Preparing login'
        #下面这句话用于抓取请求网页后返回网页中的_xsrf字段的文字, 用于成功提交表单
        xsrf = response.xpath('//input[@name="_xsrf"]/@value').extract()[0]
        print xsrf
        #FormRequeset.from_response是Scrapy提供的一个函数, 用于post表单
        #登陆成功后, 会调用after_login回调函数
        return [FormRequest.from_response(response,   #"http://www.zhihu.com/login",
                            meta = {'cookiejar' : response.meta['cookiejar']},
                            headers = self.headers,  #注意此处的headers
                            formdata = {
                            '_xsrf': xsrf,
                            'email': '[email protected]',
                            'password': '123456'
                            },
                            callback = self.after_login,
                            dont_filter = True
                            )]

    def after_login(self, response) :
        for url in self.start_urls :
            yield self.make_requests_from_url(url)

    def parse_page(self, response):
        problem = Selector(response)
        item = ZhihuItem()
        item['url'] = response.url
        item['name'] = problem.xpath('//span[@class="name"]/text()').extract()
        print item['name']
        item['title'] = problem.xpath('//h2[@class="zm-item-title zm-editable-content"]/text()').extract()
        item['description'] = problem.xpath('//div[@class="zm-editable-content"]/text()').extract()
        item['answer']= problem.xpath('//div[@class=" zm-editable-content clearfix"]/text()').extract()
        return item
Item类设置
from scrapy.item import Item, Field

class ZhihuItem(Item):
    # define the fields for your item here like:
    # name = scrapy.Field()
    url = Field()  #保存抓取问题的url
    title = Field()  #抓取问题的标题
    description = Field()  #抓取问题的描述
    answer = Field()  #抓取问题的答案
    name = Field()  #个人用户的名称
setting.py 设置抓取间隔
BOT_NAME = 'zhihu'

SPIDER_MODULES = ['zhihu.spiders']
NEWSPIDER_MODULE = 'zhihu.spiders'
DOWNLOAD_DELAY = 0.25   #设置下载间隔为250ms
4.8 download middlewares
反反爬虫相关机制
Some websites implement certain measures to prevent bots from crawling them, with varying degrees of sophistication. Getting around those measures can be difficult and tricky, and may sometimes require special infrastructure. Please consider contacting commercial support if in doubt.
(有些些网站使用特定的不同程度的复杂性规则防止爬虫访问,绕过这些规则是困难和复杂的,有时可能需要特殊的基础设施,如果有疑问,请联系商业支持。)
来自于Scrapy官方文档描述:http://doc.scrapy.org/en/master/topics/practices.html#avoiding-getting-banned
通常防止爬虫被反主要有以下几个策略:
-
动态设置User-Agent(随机切换User-Agent,模拟不同用户的浏览器信息)
-
禁用Cookies(也就是不启用cookies middleware,不向Server发送cookies,有些网站通过cookie的使用发现爬虫行为)
- 可以通过
COOKIES_ENABLED控制 CookiesMiddleware 开启或关闭
- 可以通过
-
设置延迟下载(防止访问过于频繁,设置为 2秒 或更高)
-
Google Cache 和 Baidu Cache:如果可能的话,使用谷歌/百度等搜索引擎服务器页面缓存获取页面数据。
-
使用IP地址池:VPN和代理IP,现在大部分网站都是根据IP来ban的。
-
使用 Crawlera(专用于爬虫的代理组件),正确配置和设置下载中间件后,项目所有的request都是通过crawlera发出。
  DOWNLOADER_MIDDLEWARES = {
      'scrapy_crawlera.CrawleraMiddleware': 600
  }

  CRAWLERA_ENABLED = True
  CRAWLERA_USER = '注册/购买的UserKey'
  CRAWLERA_PASS = '注册/购买的Password'
设置下载中间件(Downloader Middlewares)
下载中间件是处于引擎(crawler.engine)和下载器(crawler.engine.download())之间的一层组件,可以有多个下载中间件被加载运行。
- 当引擎传递请求给下载器的过程中,下载中间件可以对请求进行处理 (例如增加http header信息,增加proxy信息等);
- 在下载器完成http请求,传递响应给引擎的过程中, 下载中间件可以对响应进行处理(例如进行gzip的解压等)
要激活下载器中间件组件,将其加入到 DOWNLOADER_MIDDLEWARES 设置中。 该设置是一个字典(dict),键为中间件类的路径,值为其中间件的顺序(order)。
这里是一个例子:
DOWNLOADER_MIDDLEWARES = {
    'mySpider.middlewares.MyDownloaderMiddleware': 543,
}
编写下载器中间件十分简单。每个中间件组件是一个定义了以下一个或多个方法的Python类:
class scrapy.contrib.downloadermiddleware.DownloaderMiddleware
process_request(self, request, spider)
- 当每个request通过下载中间件时,该方法被调用。
- process_request() 必须返回以下其中之一:一个 None 、一个 Response 对象、一个 Request 对象或 raise IgnoreRequest:
- 如果其返回 None ,Scrapy将继续处理该request,执行其他的中间件的相应方法,直到合适的下载器处理函数(download handler)被调用, 该request被执行(其response被下载)。
- 如果其返回 Response 对象,Scrapy将不会调用 任何 其他的 process_request() 或 process_exception() 方法,或相应地下载函数; 其将返回该response。 已安装的中间件的 process_response() 方法则会在每个response返回时被调用。
- 如果其返回 Request 对象,Scrapy则停止调用 process_request方法并重新调度返回的request。当新返回的request被执行后, 相应地中间件链将会根据下载的response被调用。
- 如果其raise一个 IgnoreRequest 异常,则安装的下载中间件的 process_exception() 方法会被调用。如果没有任何一个方法处理该异常, 则request的errback(Request.errback)方法会被调用。如果没有代码处理抛出的异常, 则该异常被忽略且不记录(不同于其他异常那样)。
- 参数:
request (Request 对象)– 处理的requestspider (Spider 对象)– 该request对应的spider
process_response(self, request, response, spider)
当下载器完成http请求,传递响应给引擎的时候调用
- process_request() 必须返回以下其中之一: 返回一个 Response 对象、 返回一个 Request 对象或raise一个 IgnoreRequest 异常。
- 如果其返回一个 Response (可以与传入的response相同,也可以是全新的对象), 该response会被在链中的其他中间件的 process_response() 方法处理。
- 如果其返回一个 Request 对象,则中间件链停止, 返回的request会被重新调度下载。处理类似于 process_request() 返回request所做的那样。
- 如果其抛出一个 IgnoreRequest 异常,则调用request的errback(Request.errback)。 如果没有代码处理抛出的异常,则该异常被忽略且不记录(不同于其他异常那样)。
- 参数:
request (Request 对象)– response所对应的requestresponse (Response 对象)– 被处理的responsespider (Spider 对象)– response所对应的spider
使用案例:
- 创建
middlewares.py文件。
Scrapy代理IP、Uesr-Agent的切换都是通过DOWNLOADER_MIDDLEWARES进行控制,我们在settings.py同级目录下创建middlewares.py文件,包装所有请求。
# middlewares.py

#!/usr/bin/env python
# -*- coding:utf-8 -*-

import random
import base64

from settings import USER_AGENTS
from settings import PROXIES

# 随机的User-Agent
class RandomUserAgent(object):
    def process_request(self, request, spider):
        useragent = random.choice(USER_AGENTS)

        request.headers.setdefault("User-Agent", useragent)

class RandomProxy(object):
    def process_request(self, request, spider):
        proxy = random.choice(PROXIES)

        if proxy['user_passwd'] is None:
            # 没有代理账户验证的代理使用方式
            request.meta['proxy'] = "http://" + proxy['ip_port']
        else:
            # 对账户密码进行base64编码转换
            base64_userpasswd = base64.b64encode(proxy['user_passwd'])
            # 对应到代理服务器的信令格式里
            request.headers['Proxy-Authorization'] = 'Basic ' + base64_userpasswd
            request.meta['proxy'] = "http://" + proxy['ip_port']
为什么HTTP代理要使用base64编码:
HTTP代理的原理很简单,就是通过HTTP协议与代理服务器建立连接,协议信令中包含要连接到的远程主机的IP和端口号,如果有需要身份验证的话还需要加上授权信息,服务器收到信令后首先进行身份验证,通过后便与远程主机建立连接,连接成功之后会返回给客户端200,表示验证通过,就这么简单,下面是具体的信令格式:
CONNECT 59.64.128.198:21 HTTP/1.1
Host: 59.64.128.198:21
Proxy-Authorization: Basic bGV2I1TU5OTIz
User-Agent: OpenFetion
其中
Proxy-Authorization是身份验证信息,Basic后面的字符串是用户名和密码组合后进行base64编码的结果,也就是对username:password进行base64编码。
HTTP/1.0 200 Connection established
OK,客户端收到收面的信令后表示成功建立连接,接下来要发送给远程主机的数据就可以发送给代理服务器了,代理服务器建立连接后会在根据IP地址和端口号对应的连接放入缓存,收到信令后再根据IP地址和端口号从缓存中找到对应的连接,将数据通过该连接转发出去。
- 修改settings.py配置USER_AGENTS和PROXIES
- 添加USER_AGENTS:
  USER_AGENTS = [
    "Mozilla/5.0 (compatible; MSIE 9.0; Windows NT 6.1; Win64; x64; Trident/5.0; .NET CLR 3.5.30729; .NET CLR 3.0.30729; .NET CLR 2.0.50727; Media Center PC 6.0)",
    "Mozilla/5.0 (compatible; MSIE 8.0; Windows NT 6.0; Trident/4.0; WOW64; Trident/4.0; SLCC2; .NET CLR 2.0.50727; .NET CLR 3.5.30729; .NET CLR 3.0.30729; .NET CLR 1.0.3705; .NET CLR 1.1.4322)",
    "Mozilla/4.0 (compatible; MSIE 7.0b; Windows NT 5.2; .NET CLR 1.1.4322; .NET CLR 2.0.50727; InfoPath.2; .NET CLR 3.0.04506.30)",
    "Mozilla/5.0 (Windows; U; Windows NT 5.1; zh-CN) AppleWebKit/523.15 (KHTML, like Gecko, Safari/419.3) Arora/0.3 (Change: 287 c9dfb30)",
    "Mozilla/5.0 (X11; U; Linux; en-US) AppleWebKit/527+ (KHTML, like Gecko, Safari/419.3) Arora/0.6",
    "Mozilla/5.0 (Windows; U; Windows NT 5.1; en-US; rv:1.8.1.2pre) Gecko/20070215 K-Ninja/2.1.1",
    "Mozilla/5.0 (Windows; U; Windows NT 5.1; zh-CN; rv:1.9) Gecko/20080705 Firefox/3.0 Kapiko/3.0",
    "Mozilla/5.0 (X11; Linux i686; U;) Gecko/20070322 Kazehakase/0.4.5"
    ]
-
添加代理IP设置PROXIES:
免费代理IP可以网上搜索,或者付费购买一批可用的私密代理IP:
PROXIES = [
    {'ip_port': '111.8.60.9:8123', 'user_passwd': 'user1:pass1'},
    {'ip_port': '101.71.27.120:80', 'user_passwd': 'user2:pass2'},
    {'ip_port': '122.96.59.104:80', 'user_passwd': 'user3:pass3'},
    {'ip_port': '122.224.249.122:8088', 'user_passwd': 'user4:pass4'},
]
- 除非特殊需要,禁用cookies,防止某些网站根据Cookie来封锁爬虫。
COOKIES_ENABLED = False
- 设置下载延迟
DOWNLOAD_DELAY = 3
- 最后设置setting.py里的DOWNLOADER_MIDDLEWARES,添加自己编写的下载中间件类。
DOWNLOADER_MIDDLEWARES = {
    #'mySpider.middlewares.MyCustomDownloaderMiddleware': 543,
    'mySpider.middlewares.RandomUserAgent': 1,
    'mySpider.middlewares.ProxyMiddleware': 100
}
4.9 Settings
Scrapy设置(settings)提供了定制Scrapy组件的方法。可以控制包括核心(core),插件(extension),pipeline及spider组件。比如 设置Json Pipeliine、LOG_LEVEL等。
参考文档:http://scrapy-chs.readthedocs.io/zh_CN/1.0/topics/settings.html#topics-settings-ref
内置设置参考手册
-
BOT_NAME- 默认: ‘scrapybot’
- 当您使用 startproject 命令创建项目时其也被自动赋值。
-
CONCURRENT_ITEMS- 默认: 100
- Item Processor(即 Item Pipeline) 同时处理(每个response的)item的最大值。
-
CONCURRENT_REQUESTS- 默认: 16
- Scrapy downloader 并发请求(concurrent requests)的最大值。
-
DEFAULT_REQUEST_HEADERS-
默认: 如下
{
'Accept': 'text/html,application/xhtml+xml,application/xml;q=0.9,*/*;q=0.8',
'Accept-Language': 'en',
}
Scrapy HTTP Request使用的默认header。
-
-
DEPTH_LIMIT- 默认: 0
- 爬取网站最大允许的深度(depth)值。如果为0,则没有限制。
-
DOWNLOAD_DELAY- 默认: 0
- 下载器在下载同一个网站下一个页面前需要等待的时间。该选项可以用来限制爬取速度, 减轻服务器压力。同时也支持小数:
DOWNLOAD_DELAY = 0.25 # 250 ms of delay- 默认情况下,Scrapy在两个请求间不等待一个固定的值, 而是使用0.5到1.5之间的一个随机值 * DOWNLOAD_DELAY 的结果作为等待间隔。
-
DOWNLOAD_TIMEOUT- 默认: 180
- 下载器超时时间(单位: 秒)。
-
ITEM_PIPELINES-
默认: {}
-
保存项目中启用的pipeline及其顺序的字典。该字典默认为空,值(value)任意,不过值(value)习惯设置在0-1000范围内,值越小优先级越高。
ITEM_PIPELINES = {
'mySpider.pipelines.SomethingPipeline': 300,
'mySpider.pipelines.ItcastJsonPipeline': 800,
}
-
-
LOG_ENABLED- 默认: True
- 是否启用logging。
-
LOG_ENCODING- 默认: ‘utf-8’
- logging使用的编码。
-
LOG_LEVEL- 默认: ‘DEBUG’
- log的最低级别。可选的级别有: CRITICAL、 ERROR、WARNING、INFO、DEBUG 。
-
USER_AGENT- 默认: “Scrapy/VERSION (+http://scrapy.org)”
- 爬取的默认User-Agent,除非被覆盖。
-
PROXIES: 代理设置-
示例:
PROXIES = [
  {'ip_port': '111.11.228.75:80', 'password': ''},
  {'ip_port': '120.198.243.22:80', 'password': ''},
  {'ip_port': '111.8.60.9:8123', 'password': ''},
  {'ip_port': '101.71.27.120:80', 'password': ''},
  {'ip_port': '122.96.59.104:80', 'password': ''},
  {'ip_port': '122.224.249.122:8088', 'password':''},
]
-
-
COOKIES_ENABLED = False- 禁用Cookies
