学习的背景 (为啥 要写 一个 Babel 插件呢?)
- es6 是如何转换为 es5 的?
- 什么是 AST 语法树呢,怎样对一个AST树 的节点 进行增删改查呢?
- 为啥 之前 jsx需要 手动导入 react ,现在不需要了?
- 国际化内容 需要写 t 函数的 地方太多 ,懒得写了。(业务方面)
- 任何你可以想到的骚操作。
1. babel 常用包的介绍 (写插件必备知识)
代码 转 语法树的 官网:https://astexplorer.net/
1. Babylon 是Babel 的解析器,代码转为AST 语法树
npm init -y进行项目的初始化 搭建- Babylon 是 Babel 的解析器,是 将 代码 转换为 AST 语法树的 工具,现在来安装它
npm install --save babylon(PS:新版本 的babel 改名为 @babel/parser,仅仅是名字的更改,下面部分包的名字也有所更改但是API 的用法大致不变) - 新增
babylon-demo.mjs(注意是mjs 结尾的,方便使用ESmodule语法),写入 如下内容。调用 babylon.parse生成 ast 语法树
import * as babylon from "babylon";

const code = `function square(n) {
  return n * n;
}`;

const ast = babylon.parse(code);
console.log(ast);
// Node {
//   type: "File",
//   start: 0,
//   end: 38,
//   loc: SourceLocation {...},
//   program: Node {...},
//   comments: [],
//   tokens: [...]
// }
2. Babel-traverse 来操作 AST 语法树
npm install --save babel-traverse安装 依赖。- 利用 语法树 将 code 中的 n 替换为 x。(别急 下一步 就是 根据新的 语法树 生成代码)
import * as babylon from "babylon";
import traverse from "babel-traverse";

const code = `function square(n) {
  return n * n;
}`;

const ast = babylon.parse(code);
// 对 抽象语法树 一层层的 遍历
traverse.default(ast, {
  // 树 的节点 会 作为 参数 传入 enter 函数
  enter(path) {
    // 如果当前节点 是 Identifier 并且 name 是 n。就替换为 x
    if (
      path.node.type === "Identifier" &&
      path.node.name === "n"
    ) {
      path.node.name = "x";
    }
  }
});
3. babel-generator根据修改的语法树 生成代码 和源码映射(source map)
- 安装 依赖
npm install --save babel-generator - 将AST 语法树 生成代码
import * as babylon from "babylon";
import traverse from "babel-traverse";
import generate from "babel-generator";

// 原始代码
const code = `function square(n) {
  return n * n;
}`;
// ast 是对象 属于引用型
const ast = babylon.parse(code);

// 对 抽象语法树 一层层的 遍历
traverse.default(ast, {
  // 树 的节点 会 作为 参数 传入 enter 函数
  enter(path) {
    // 如果当前节点 是 Identifier 并且 name 是 n。就替换为 x
    // 因为 ast 是对象,所以 此处做的变更会 直接影响到 ast
    if (
      path.node.type === "Identifier" &&
      path.node.name === "n"
    ) {
      path.node.name = "x";
    }
  },
});
// 对节点操作过以后的代码
const targetCode = generate.default(ast).code

console.log('targetCode', targetCode)
// targetCode function square(x) {
//   return x * x;
// }
4. 发现对节点的判断 需要写的代码很多,抽离出公共的包来进行节点的判断。babel-types(AST节点里的 Lodash 式工具库)
- 安装:
npm install --save babel-types - 优化上面代码的 AST 节点的if 判断。
import * as babylon from "babylon";
import traverse from "babel-traverse";
import generate from "babel-generator";
// 注意 node_modules 模块里 导出的是 default
import {default as t} from "babel-types";

// 原始代码
const code = `function square(n) {
  return n * n;
}`;
// ast 是对象 属于引用型
const ast = babylon.parse(code);

// 对 抽象语法树 一层层的 遍历
traverse.default(ast, {
  // 树 的节点 会 作为 参数 传入 enter 函数
  enter(path) {
    // 如果当前节点 是 Identifier 并且 name 是 n。就替换为 x
    // 因为 ast 是对象,所以 此处做的变更会 直接影响到 ast
    // if (
    //   path.node.type === "Identifier" &&
    //   path.node.name === "n"
    // ) {
    //   path.node.name = "x";
    // }
    if (t.isIdentifier(path.node, {name: "n"})) {
      path.node.name = "x"
    }
  },
});
// 对节点操作过以后的代码
const targetCode = generate.default(ast).code

console.log('targetCode', targetCode)
// targetCode function square(x) {
//   return x * x;
// }
5. 通过AST 来生成CODE 可读性 太差。使用babel-template来实现占位符的来生成代码。
- 安装依赖:
npm install --save babel-template - 当前的需求是:我不想手动导入 文件 a 依赖。即:const a = require("a");这句话 我不想写。
- 首先构建 ast 的模板:判断哪些是变量,哪些是 语法。
// 构建模板
const buildRequire = template(`
  const IMPORT_NAME = require(SOURCE);
`);- 使用 变量 进行 填充
// 创建ast
const astImport = buildRequire({
  IMPORT_NAME: t.identifier("a"),
  SOURCE: t.stringLiteral("a")
});- 分析 何时塞入 这段 ast 。使用 https://astexplorer.net/ 分析 得知。代码和 图片如下
import * as babylon from "babylon";
import traverse from "babel-traverse";
import generate from "babel-generator";
import {default as template} from "babel-template";
// 注意 node_modules 模块里 导出的是 default
import {default as t} from "babel-types";

// 构建模板
const buildRequire = template(`
  const IMPORT_NAME = require(SOURCE);
`);
// 创建ast
const astImport = buildRequire({
  IMPORT_NAME: t.identifier("a"),
  SOURCE: t.stringLiteral("a")
});

// 原始代码
const code = `
function square(n) {
  return n * n;
}`;
// ast 是对象 属于引用型
const ast = babylon.parse(code);

// 对 抽象语法树 一层层的 遍历
traverse.default(ast, {
  // 树 的节点 会 作为 参数 传入 enter 函数
  enter(path) {
    // 如果当前节点 是 Identifier 并且 name 是 n。就替换为 x
    // 因为 ast 是对象,所以 此处做的变更会 直接影响到 ast
    // if (
    //   path.node.type === "Identifier" &&
    //   path.node.name === "n"
    // ) {
    //   path.node.name = "x";
    // }
    if (t.isIdentifier(path.node, {name: "n"})) {
      path.node.name = "x"
    }
    // 在程序的开头 塞进去 我的 ast
    if (t.isProgram(path.node)) {
      console.log('塞入我写的 ast')
      path.node.body.unshift(astImport)
    }
  },
});
// 对节点操作过以后的代码
const targetCode = generate.default(ast).code

console.log('targetCode', targetCode)
// 塞入我写的 ast
// targetCode const a = require("a");

// function square(x) {
//   return x * x;
// }
2. 开始 撸 Babel 的插件
1. 开始撸插件代码 之前 必须要有一个 方便调试的 babel 的环境
- 安装 babel 核心包 @babel/core (文档:https://www.babeljs.cn/docs/u...)。
npm install --save-dev @babel/core - 新建 demo 代码
index.js
// index.js
let bad = true;
const square = n => n * n;
新建插件
plugin2.js// plugin.js module.exports = function({ types: babelTypes }) { return { name: "deadly-simple-plugin-example", visitor: { Identifier(path, state) { if (path.node.name === 'bad') { path.node.name = 'good'; } } } }; };- 新建
core-demo.js使用 babel-core 来编译 代码
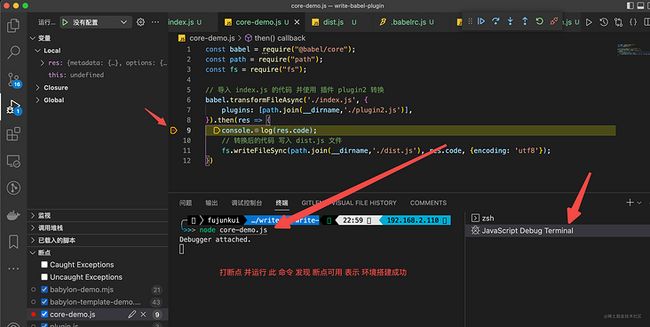
const babel = require("@babel/core"); const path = require("path"); const fs = require("fs"); // 导入 index.js 的代码 并使用 插件 plugin2 转换 babel.transformFileAsync('./index.js', { plugins: [path.join(__dirname,'./plugin2.js')], }).then(res => { console.log(res.code); // 转换后的代码 写入 dist.js 文件 fs.writeFileSync(path.join(__dirname,'./dist.js'), res.code, {encoding: 'utf8'}); })- 测试 断点是否生效(方便后期调试)
- 新建
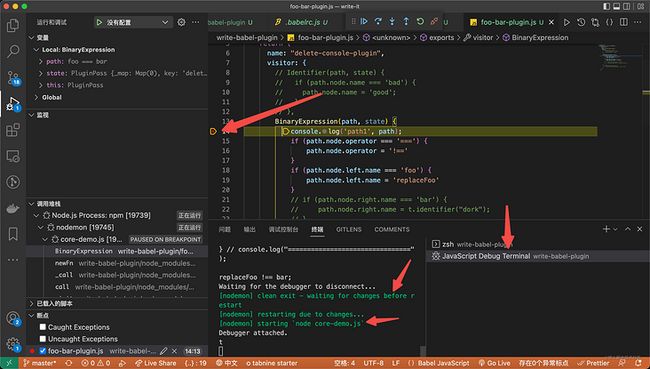
2. 使用 nodemon 包优化环境,提高调试的效率 (nodemon + debug 提高效率)
- 安装依赖:
npm i nodemon - 配置package.json 的 script 命令为:(监听文件变更时候忽略dist.js ,因为 dist的变更会引起 脚本的重新执行,脚本的重新执行又 产生新的 dist.js)
"babylon": "nodemon core-demo.js --ignore dist.js"- 开启debug 终端,运行
npm run babylon即可看到文件变更 会自动走到断点里
3. 开始进行 babel 插件的实战
本文并未详细介绍所有的 babel path 节点的相关 api,详细的 关于 path 节点的相关文档 请见 官方推荐文档(中文 有点老旧) 或者 根据官方原版 英文文档 翻译的 中文文档(已经向 官方 提了PR 但是暂未合并),推荐的 是 先看 此文档,发现其中 部分 api 不熟悉 的时候 再去查 api 文档,印象深刻。
1. babel 插件的API规范
- Babel 插件 本质上是一个函数,该函数 接受 babel 作为参数,通过 会 使用
babel参数里的types函数
export default function(babel) {
  // plugin contents
}
// or
export default function({types}) {
  // plugin contents
}- 返回的 是一个 对象。对象的
visitor属性是这个插件的主要访问者。visitor的 每个函数中 都会接受 2 个 参数:path和state
export default function({ types: t }) {
  return {
    visitor: {
      // 此处的函数 名 是从 ast 里 取的
      Identifier(path, state) {},
      ASTNodeTypeHere(path, state) {}
    }
  };
};
2. 来个 demo 实现 ast 层面的 代码替换
目的: 将 foo === bar; 转为 replaceFoo !== myBar;
- 首先 通过 https://astexplorer.net/ 来分析 ast 结构。
{
  type: "BinaryExpression",
  operator: "===",
  left: {
    type: "Identifier",
    name: "foo"
  },
  right: {
    type: "Identifier",
    name: "bar"
  }
}- 从
BinaryExpression添加 访问者 进行 ast 节点处理,可以 看到 当operator为 === 的时候 需要进行处理。代码如下
// plugin.js
module.exports = function({types}) {
    console.log('t')
    return {
      visitor: {
        BinaryExpression(path, state) {
            console.log('path1', path);
            // 不是 !== 语法的 直接返回
            if (path.node.operator !== '===') {
                return;
            }
        },
      }
    };
  };
进行 ast 节点的 更改,因为 ast 是一个对象,可以 对 path 字段 直接更改其属性值即可。 比如 将 left 和 right 节点 的name 进行修改。
// plugin.js
module.exports = function({types}) {
    console.log('t')
    return {
      visitor: {
        BinaryExpression(path, state) {
            console.log('path1', path);
            if (path.node.operator !== '===') {
                return;
            }
            if (path.node.operator === '===') {
                path.node.operator = '!=='
            }
            if (path.node.left.name === 'foo') {
                path.node.left.name = 'replaceFoo'
            }
            if (path.node.right.name === 'bar') {
                path.node.right.name = 'myBar';
            }
        },
      }
    };
  };
从 index.js 经过 上述 babel 插件处理以后得出 dist.js 内容为:
// index.js
foo === bar
a = 123

// babel 插件处理后
replaceFoo !== myBar;
a = 123;
3. 上一小节 掌握了ast 节点 基础的 修改 和 访问,加深一下 ast 节点的操作
1. 获取 ast 节点的 属性值:path.node.property
BinaryExpression(path) {
  path.node.left;
  path.node.right;
  path.node.operator;
}
2. 获取 该属性 内部的 path (节点信息): path.get(xxx)
BinaryExpression(path) {
  path.get('left'); // 返回的是一个 path 性的
}
Program(path) {
  path.get('body.0');
}
3. 检查节点的类型, 通过babel 参数自带的 types 函数进行检查。
- 简单判断节点的类型
// plugin.js
module.exports = function({types: t}) {
    console.log('t')
    return {
      visitor: {
        BinaryExpression(path, state) {
            console.log('path1', path.get('left'));
            if (path.node.operator !== '===') {
                return;
            }
            if (path.node.operator === '===') {
                path.node.operator = '!=='
            }
              // 等同于 path.node.left.type === "Identifier"
            if (t.isIdentifier(path.node.left)) {
                path.node.left.name = 'replaceFoo'
            }
        },
      }
    };
  };
- 判断节点的类型,外加 浅层属性的校验
BinaryExpression(path) {
  if (t.isIdentifier(path.node.left, { name: "n" })) {
    // ...
  }
}
功能上等同于:
BinaryExpression(path) {
  if (
    path.node.left != null &&
    path.node.left.type === "Identifier" &&
    path.node.left.name === "n"
  ) {
    // ...
  }
}
4. 再来一道关于ast 操作节点的题小试身手(关键还是学会看ast 语法树和 尝试一些ast 节点相关的api)
当前程序代码为:
function square(n) {
    return n * n;
}

const a = 2;
console.log(square(a));
目标程序代码是:
function newSquare(n, left) {
  return left ** n;
}

const a = 2;
console.log(newSquare(a, 222));
整体操作ast 语法树的分析逻辑:(结尾会放完整代码)
- 将
square函数命名 进行 更名,改为newSquare - 将
newSquare(因为square参数 节点的 ast 名称 已经改为了newSquare)的入参增加 一个left参数 - 将
n * n进行 替换,换成left ** n; - 在调用
square处 进行修改,首先将函数名 改为newSquare,然后在,对该函数的入参增加 一个222
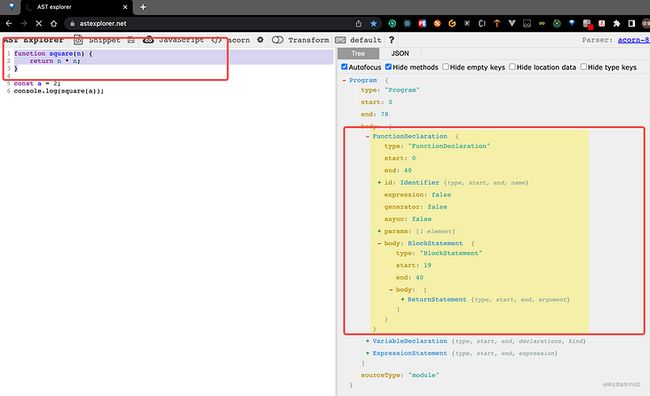
1. 首先分析 原代码的 ast 语法树
可以看到当前程序 代码 被解析为 3 段ast 语法树 节点
2. 接下来分析 函数定义 的这个节点
鼠标滑选 1-3 行,发现右侧 自动展开了。
3. 进行第一步:将 square函数命名 进行 更名,改为 newSquare
由图看出,如何确定 当前的节点是 square 函数的命名 节点呢?(1 分钟 思考一下)。
- 节点的类型首先是:Identifier 类型,并且 当前节点 的
name字段是 square - 节点的 父级 节点的 类型 是 FunctionDeclaration 的。
伪代码如下:
    // 新建 变量,记录 新函数的函数名
    const newName = 'newSquare';
    // 获取当前 函数的 父级。查找最接近的父函数或程序:
        const parentFunc = path.getFunctionParent();
        if (parentFunc) {
          // 当前父节点 是 square函数 并且当前的节点的key是 id(此处是为了确认 square 的函数命名节点)。
          // 然后对此函数进行重命名 从 square 改为 newName
          if (
            parentFunc.node.id.name === "square" &&
            path.key === "id"
          ) {
            console.log("对 square 进行重命名:", newName);
            path.node.name = newName;
          }
        }
4. 接下来 将 newSquare的入参增加 一个 left参数。
- 当前节点 的 类型 是
Identifier类型,并且是 在 名为params的 列表里 (列表,就意味着 可以 进行 增删改查了) - 当前节点的 父级 节点类型 是 FunctionDeclaration 的,并且 父级节点下的 id 的 name 属性 已经变更为了
newSquare
伪代码如下:
          // 当前父节点 是 square函数 并且当前的节点的listKey是 params(此处是为了排除 square 的函数命名节点)。
          // 此处是在重命名后才会走的 逻辑 所以 该节点 父级的 名称判断用的是 newName 而不是 square
          if (
            parentFunc.type === "FunctionDeclaration" &&
            parentFunc.node.id.name === newName &&
            path.listKey === "params"
          ) {
            console.log("新增函数参数 left");
            path.container.push(t.identifier("left"));
          }
5. 将 n * n 进行 替换,换成 left ** n;
- 发现 如果单纯的 去 操作 Identifier类型的 n 情况有些多,并且 当前情况 还要 判断 操作符(operator) 是不是
*,换个思路,去操作 BinaryExpression 类型的数据 在 BinaryExpression类型 中,仅仅 需要 判断 当前
operator的 属性 是不是 我们需要的*伪代码如下:
      BinaryExpression(path, state) {
        if (path.node.operator !== "*") return;
        console.log("BinaryExpression");
        // 替换一个节点
        path.replaceWith(
          // t.binaryExpression("**", path.node.left, t.NumericLiteral(2))
          t.binaryExpression("**", t.identifier("left"), t.identifier("n"))
        );
      },
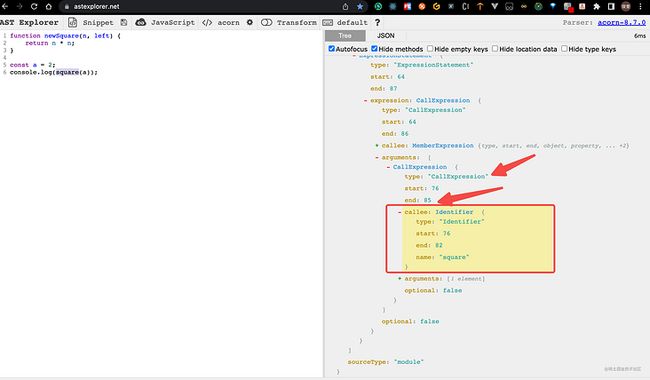
6. 最后一步:在调用 square处 进行修改,首先将函数名 改为 newSquare,然后在,对该函数的入参增加 一个 222
- 目标 是将 name 字段的
square字段 改为newSquare。
方法一:其 父级节点 是一个 CallExpression,直接在其 父级节点 操作 它。
伪代码 如下:
      CallExpression(path, state) {
        console.log("CallExpression");
        // 当前被调用函数的 名称 是 square
        if (path.node.callee.name === 'square') {
          console.log("在 CallExpression 中,更改 被调用 函数 square 的名字 为", newName);
          path.node.callee.name  = newName;
        }
      },
方法二:通过 节点 Identifier 进行操作
- 判断当前 节点的属性是
callee表示是被调用的,并且 当前 节点的 名字 为square
伪代码如下:
        // 判断是不是 square 的函数调用
        if (path.key === 'callee' && path.isIdentifier({name: 'square'})) {
          console.log("对square函数调用进行重命名", newName);
          path.node.name = newName;
        }
7. 总结 以及 全部代码
到现在,你会发现其实 对ast 语法树的操作,主要还是 操作一个 ast 语法树的对象,只要 对 ast 语法树 对象 进行 符合 ast 语法树 相关规则的 属性的 更改,babel 就会 自动 处理 ast 语法树对象 并生成 新的 代码。
核心代码
// square-plugin.js
// 新建 变量,记录 新函数的函数名
const newName = 'newSquare';

module.exports = function ({ types: t }) {
  return {
    visitor: {
      Identifier(path, state) {
        console.log("走进 Identifier");
        if (path.parentPath && path.listKey === 'arguments') {
          console.log("增加参数");
          path.container.push(t.NumericLiteral(222));
          return;
        }

        // 获取当前 函数的 父级。查找最接近的父函数或程序:
        const parentFunc = path.getFunctionParent();
        if (parentFunc) {
          // 当前父节点 是 square函数 并且当前的节点的listKey是 params(此处是为了排除 square 的函数命名节点)。
          // 此处是在重命名后才会走的 逻辑 所以 该节点 父级的 名称判断用的是 newName 而不是 square
          if (
            parentFunc.type === "FunctionDeclaration" &&
            parentFunc.node.id.name === newName &&
            path.listKey === "params"
          ) {
            console.log("新增函数参数 left");
            path.container.push(t.identifier("left"));
          }
          // 当前父节点 是 square函数 并且当前的节点的key是 id(此处是为了确认 square 的函数命名节点)。
          // 然后对此函数进行重命名 从 square 改为 newName
          if (
            parentFunc.node.id.name === "square" &&
            path.key === "id"
          ) {
            console.log("对 square 进行重命名:", newName);
            path.node.name = newName;
          }
        }
        // 方法二: 判断是不是 square 的函数调用
        // if (path.key === 'callee' && path.isIdentifier({name: 'square'})) {
        //   console.log("对square函数调用进行重命名", newName);
        //   path.node.name = newName;
        // }
      },
      BinaryExpression(path, state) {
        if (path.node.operator !== "*") return;
        console.log("BinaryExpression");
        // 替换一个节点
        path.replaceWith(
          // t.binaryExpression("**", path.node.left, t.NumericLiteral(2))
          t.binaryExpression("**", t.identifier("left"), t.identifier("n"))
        );
      },
      CallExpression(path, state) {
        console.log("CallExpression");
        // 方法1: 当前被调用函数的 名称 是 square
        if (path.node.callee.name === 'square') {
          console.log("在 CallExpression 中,更改 被调用 函数 square 的名字 为", newName);
          path.node.callee.name  = newName;
        }
      },
      FunctionDeclaration(path, state) {
        console.log("FunctionDeclaration");
        // const params = path.get('params');
        // const params = path.get('params');
        // params.push(t.identifier('left'));
        // console.log('FunctionDeclaration end', path);
        // path.params = params;
        // path.params.push(t.identifier('right'));
      },
    },
  };
};


