【Python】| PyGUI
好久没写Python了,写个脚本练练手,用Tkinter写了个GUI界面,然后打包成一个可移植的exe文件
该exe目前就实现两个小功能
- 一键数据爬取
- 一键数据分析
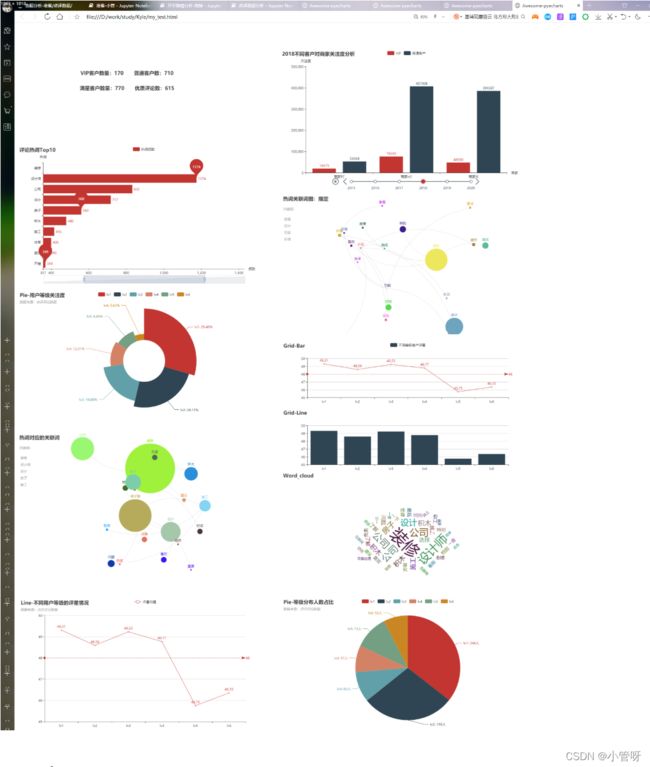
实现:利用任务计划程序每天调用爬虫,将数据爬取存到Sqlserver中,利用SSIS实现ETL数据清洗,调用exe实现Report呈现
GUI Code
# -- coding: utf-8 --

from tkinter import *
import hashlib
import time
from PIL import Image, ImageTk
import tkinter.messagebox
import webbrowser

LOG_LINE_NUM = 0

class MY_GUI():
    def __init__(self,init_window_name):
        self.init_window_name = init_window_name


    #设置窗口
    def set_init_window(self):
        font9 = "-family {Microsoft YaHei UI} -size 18 -weight normal " \
                "-slant roman -underline 0 -overstrike 0"

        self.init_window_name.title("KyleChearTool_v1.2")           #窗口名
        #self.init_window_name.geometry('320x160+10+10')                         #290 160为窗口大小,+10 +10 定义窗口弹出时的默认展示位置
        # self.init_window_name.geometry('1068x681+10+10')
        #self.init_window_name["bg"] = "pink"                                    #窗口背景色,其他背景色见:blog.csdn.net/chl0000/article/details/7657887
        #self.init_window_name.attributes("-alpha",0.9)                          #虚化,值越小虚化程度越高

        self.init_window_name.configure(background="#d9d9d9")
        self.init_window_name.configure(highlightbackground="#d9d9d9")
        self.init_window_name.configure(highlightcolor="black")

        #标签
        # 去掉Label(top)中的top
        # Label1 = Label(top)
        self.Label1 = Label()
        self.Label1.place(relx=0.47, rely=0.15, height=28, width=300)
        self.Label1.configure(activebackground="#f9f9f9", activeforeground="black", background="#d9d9d9",
                         disabledforeground="#a3a3a3", font=font9, foreground="#000000", highlightbackground="#d9d9d9",
                         highlightcolor="black", text='''智能可视化展示平台''')

        self.init_data_label = Label(self.init_window_name, text="输入路径:")
        self.init_data_label.place(relx=0.40, rely=0.40, height=25, width=71)
        self.init_data_label.configure(activebackground="#f9f9f9", activeforeground="black", background="#d9d9d9",
                         disabledforeground="#a3a3a3", foreground="#000000", highlightbackground="#d9d9d9",
                         highlightcolor="black", justify=RIGHT)


        self.Label3 = Label(self.init_window_name, text="输出结果")
        self.Label3.place(relx=0.40, rely=0.50, height=25, width=71)
        self.Label3.configure(activebackground="#f9f9f9", activeforeground="black", background="#d9d9d9",
                         disabledforeground="#a3a3a3", foreground="#000000", highlightbackground="#d9d9d9",
                         highlightcolor="black", justify=RIGHT, text='''输入文件:''')


        # self.log_label = Label(self.init_window_name, text="日志")
        # self.log_label.place(relx=0.40, rely=0.60, height=25, width=71)

        # #文本框
        self.init_data_Text = Text(self.init_window_name, width=67, height=35)  #路径录入框
        self.init_data_Text.place(relx=0.45, rely=0.40, height=25, relwidth=0.2)


        self.Input_data_Text = Text(self.init_window_name, width=70, height=49)  #文件选择展示
        self.Input_data_Text.place(relx=0.45, rely=0.50, height=25, relwidth=0.2)


        # self.log_data_Text = Text(self.init_window_name, width=66, height=9)  # 日志框
        # self.log_data_Text.place(relx=0.45, rely=0.75, height=350, relwidth=0.2)
        # #提交按钮
        self.str_trans_to_md5_button = Button(self.init_window_name, text="数据分析展示", bg="lightblue", width=10,command=self.str_trans)  # 调用内部方法  加()为直接调用
        self.str_trans_to_md5_button.place(relx=0.62, rely=0.79, height=28, width=79)

        # #提交按钮
        self.str_trans_to_md5_button = Button(self.init_window_name, text="一键数据爬取", bg="lightblue", width=10,
                                              command=self.str_trans)  # 调用内部方法  加()为直接调用
        self.str_trans_to_md5_button.place(relx=0.45, rely=0.79, height=28, width=79)

    # #功能函数
    def str_trans(self):#gbk
        src = self.init_data_Text.get(1.0,END).strip().replace("\n","").encode('utf-8')+self.Input_data_Text.get(1.0,END).strip().replace("\n","").encode('gbk')
        print("src =",src)
        if src!=b'':
            webbrowser.open(src)
            self.write_log_to_Text("INFO:打开成功!"+self.get_current_time())
        else:
            webbrowser.open("D:\\work\\study\\Kyle\\my_test.html")

    #
    #获取当前时间
    def get_current_time(self):
        current_time = time.strftime('%Y-%m-%d %H:%M:%S',time.localtime(time.time()))
        return current_time

    #
    # #日志动态打印
    def write_log_to_Text(self,logmsg):
        global LOG_LINE_NUM
        current_time = self.get_current_time()
        logmsg_in = str(current_time) +" " + str(logmsg) + "\n"      #换行
        if LOG_LINE_NUM <= 7:
            self.log_data_Text.insert(END, logmsg_in)
            LOG_LINE_NUM = LOG_LINE_NUM + 1
        else:
            self.log_data_Text.delete(1.0,2.0)
            self.log_data_Text.insert(END, logmsg_in)


def gui_start():
    init_window = Tk()              #实例化出一个父窗口
    ZMJ_PORTAL = MY_GUI(init_window)

    # 背景图
    image_file = Image.open("D:\\work\\study\\Kyle\\壁纸.jpg")
    photo = ImageTk.PhotoImage(image_file)
    fwagui = tkinter.Frame(init_window, padx=2, pady=2)
    fwagui.grid(row=0, column=0)
    tkinter.Label(fwagui, image=photo).grid(row=0, column=0, rowspan=3, columnspan=3)


    # 设置根窗口默认属性
    ZMJ_PORTAL.set_init_window()

    # 父窗口进入事件循环,可以理解为保持窗口运行,否则界面不展示
    init_window.mainloop()

gui_start()
打包
- 使用PyInstaller
#创建虚拟环境--减小Size
conda create -n Kyle python=3.6

#激活虚拟环境
conda activate Kyle

#查看当前存在的虚拟环境
conda env list

#切换到打包路径下
CD D:\work\study\Kyle

#安装相应第三方库
pip install -i https://pypi.mirrors.ustc.edu.cn/simple/ pyspider

#Pyinstaller打包
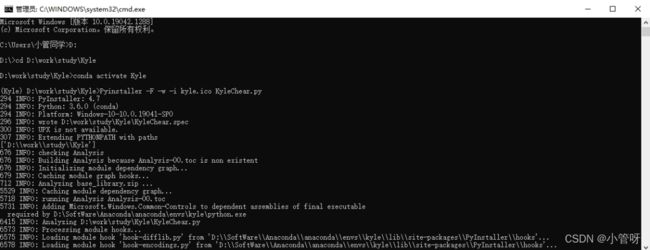
Pyinstaller -F -w -i kyle.ico KyleChear.py

#关闭当前虚拟环境
conda deactivate

#删除虚拟环境
conda env remove -n Kyle
小Tips
安装相应第三方库国内镜像源:

清华:https://pypi.tuna.tsinghua.edu.cn/simple

阿里云:http://mirrors.aliyun.com/pypi/simple/

中国科技大学 https://pypi.mirrors.ustc.edu.cn/simple/

华中理工大学:http://pypi.hustunique.com/

山东理工大学:http://pypi.sdutlinux.org/

豆瓣:http://pypi.douban.com/simple/
Pyinstaller打包

建议参考:https://blog.csdn.net/wuShiJingZuo/article/details/115291276

Pyinstaller -F -w -i kyle.ico KyleChear.py

其中kyle.ico为图标文件

-F 表示生成单个可执行文件

-w 表示去掉控制台窗口,这在GUI界面时非常有用。

-i 表示可执行文件的图标
利用Pyinstaller打包报错
--------------------------------------------------------------------------------
File "c:\programdata\anaconda3\envs\v1\lib\site-packages\PyInstaller\hooks\hook-distutils.py", l
    hiddenimports = [sysconfig._get_sysconfigdata_name()]
TypeError: _get_sysconfigdata_name() missing 1 required positional argument: 'check_exists'
--------------------------------------------------------------------------------

解决方案:
转到python交互式shell,做
$ python
>> import sysconfig
>> print(sysconfig.__file__)
这应该为您提供文件所在的位置sysconfig。然后你需要去那个文件并编辑源代码,

修改了check_exists= True

源文件修改后

def _get_sysconfigdata_name(check_exists= True):

    res = os.environ.get('_PYTHON_SYSCONFIGDATA_NAME', None)
    if res and check_exists:
        try:
            loader = importlib.util.find_spec(res)
        except:
            res = None
    if res:
        return res
    return '_sysconfigdata_{abi}_{platform}_{multiarch}'.format(
            abi=sys.abiflags,
            platform=sys.platform,
            multiarch=getattr(sys.implementation, '_multiarch', ''))
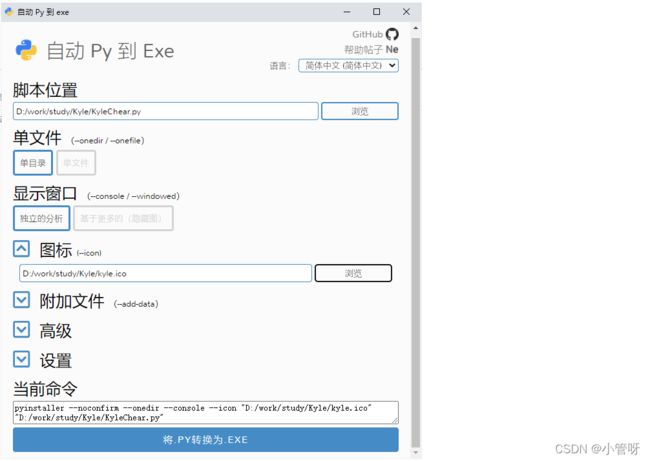
- 打包使用auto-py-to-exe
打包操作相对于PyInstaller,我更乐意使用auto-py-to-exe


