学习【瑞吉外卖⑪】SpringBoot单体项目_项目优化
- 若文章内容或图片失效,请留言反馈。部分素材来自网络,若不小心影响到您的利益,请联系博主删除。
- 本人写这篇博客旨在制作学习笔记,巩固知识。同时方便个人在线阅览,回顾知识。
- 这篇博客中主要对应【瑞吉外卖项目】视频中的内容,略有增删。
文章目录
- 前言
- 0.总目录链接
- 1.缓存优化
-
- 1.1.问题说明
- 1.2.环境搭建
- 1.3.缓存短信验证码
-
- 1.3.1.实现思路
- 1.3.2.代码改造
- 1.3.3.Redis 图形化界面
- 1.3.4.代码再改造
- 1.4.缓存菜品数据
-
- 1.4.1.实现思路
- 1.4.2.代码改造
- 1.5.Spring Cache
-
- 1.5.1.Spring Cache 介绍
- 1.5.2.Spring Cache 常用注解
- 1.5.3.具体项目
- 1.5.4.Spring Cache 注解参数
- 1.5.5.使用 Redis 作为缓存产品
- 1.6.缓存套餐数据
-
- 1.6.1.实现思路
- 1.6.2.代码改造
- 2.读写分离
-
- 2.1.MySQL 主从复制
-
- 2.1.1.介绍
- 2.1.2.前置条件
- 2.1.3.配置主库 Master
- 2.1.4.配置从库 Slave
- 2.2.读写分离案例
-
- 2.2.1.背景
- 2.2.2.Sharding-JDBC
- 2.2.3.项目准备
- 2.2.4.配置文件中的操作
- 2.3.项目实现读写分离
- 3.Nginx
-
- 3.1.Nginx 概述
-
- 3.1.1.Nginx介绍
- 3.1.2.Nginx 下载和安装
- 3.1.3.Nginx 目录结构
- 3.2.Nignx 命令
-
- 3.2.1.查看版本
- 3.2.2.检查配置文件正确性
- 3.2.3.启动和停止
- 3.2.4.重新加载配置文件
- 3.3.Nginx 配置环境变量
- 3.4.Nginx 配置文件结构
- 3.5.Nginx 具体应用
-
- 3.5.1.部署静态资源
- 3.5.2.反向代理
- 3.5.3.负载均衡
- 4.前后端分离开发简单介绍
-
- 4.1.问题分析
- 4.2.介绍
- 4.3.开发流程
- 4.4.前端技术栈
- 5.Yapi
- 6.Swagger
-
- 6.1.介绍
- 6.2.操作步骤
- 6.3.常用注解
- 7.项目部署
-
- 7.1.部署架构
- 7.2.部署环境说明
- 7.3.部署前端项目
- 7.4.部署后端项目
前言
【瑞吉外卖】项目课程:项目优化
- 该课程在某站视频下的简介
- 《瑞吉外卖》项目课程以当前热门的外卖点餐为业务基础,业务真实、实用、广泛。
- 基于流行的 Spring Boot、MyBatis Plus 等技术框架进行开发,带领学习者体验真实项目开发流程、需求分析过程、代码实现过程。
- 学完本课程可以锻炼需求分析能力、编码能力、bug 调试能力,增长开发经验。
- 黑马瑞吉外卖实战项目的相关链接
- 在线观看:https://www.bilibili.com/video/BV13a411q753
- 百度网盘链接:https://pan.baidu.com/s/1bxEy2bHiCYQtouifUppsTA
- 提取码:1234
- 阿里云盘链接:https://www.aliyundrive.com/s/DS2XMVojBjH
官方所给的资料链接中是没有视频中出现的 PPT 的,本博客的主要内容就是摘抄自其视频中出现的 PPT 内容。
- 缓存优化对应的视频是:P155~P169
- 读写分离对应的视频是:P170~P176
- Nginx 对应的视频是:P177~P182
- 前后端分离开发对应的视频:P183~P190
0.总目录链接
- 【瑞吉外卖】Java 项目总目录:https://blog.csdn.net/yanzhaohanwei/article/details/125236345
1.缓存优化
1.1.问题说明
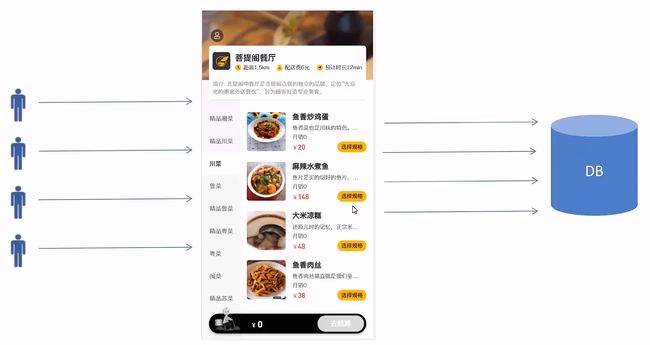
用户数量多,系统访问量大。
频繁服务数据库,系统性能下降,用户体验差。
1.2.环境搭建
- 使用 git 来管理代码
- maven 坐标
- 配置文件:application.yml
- 配置类:RedisConfig.java
- 使用 git 来管理代码
首先得将相关代码推送到 Gitee 上(无需像视频那样先创建仓库再推送上去)。
之后在本地上创建一个新的分支并推送到码云社区,来专门开发优化缓存的代码。
比如我设置的 Branch 就是 v1.1,当开发完毕,功能测试无误时,可以将 v1.1 与 master 这俩分支合并。
- maven 坐标
pom.xml
<dependency>
	<groupId>org.springframework.bootgroupId>
	<artifactId>spring-boot-starter-data-redisartifactId>
dependency>
- 配置文件:application.yml
resources 目录 下的 application.yml 文件
server:
  port: 8080
spring:
  application:
    # 应用的名称
    name: reggie_take_out
  datasource:
    druid:
      driver-class-name: com.mysql.cj.jdbc.Driver
      url: jdbc:mysql://localhost:3306/reggie?serverTimezone=Asia/Shanghai&useUnicode=true&characterEncoding=utf-8&zeroDateTimeBehavior=convertToNull&useSSL=false&allowPublicKeyRetrieval=true
      username: root
      password: root # 请填写你的数据库的密码
  redis:
  	# 使用本地 redis 服务就用本地的 Ip 地址;使用Linux 上的 edis 服务就用 Linux 上的 Ip 地址
    host: 172.168.2.94 # 请填写你自己的 Ip 地址
    port: 6379
    password: 123456 # 填写你自己设置的 redis 的密码;没设置密码请注释该行
    database: 0
  cache:
    redis:
      time-to-live: 1800000 # 设置缓存数据的过期时间

mybatis-plus:
  configuration:
    # 在映射实体或者属性时,将数据库中表名和字段名中的下划线去掉,按照驼峰命名法映射
    map-underscore-to-camel-case: true
    log-impl: org.apache.ibatis.logging.stdout.StdOutImpl
  global-config:
    db-config:
      id-type: ASSIGN_ID

reggie:
  path: D:\D_File\D_Pictures\IdeaProjectsPictures\ReggieTakeout\ # 请填写你自己所存储的图片的位置
- 配置类:RedisConfig.java
com/itheima/reggie/config/RedisConfig.java
package com.itheima.reggie.config;

import org.springframework.cache.annotation.CachingConfigurerSupport;
import org.springframework.context.annotation.Bean;
import org.springframework.context.annotation.Configuration;
import org.springframework.data.redis.connection.RedisConnectionFactory;
import org.springframework.data.redis.core.RedisTemplate;
import org.springframework.data.redis.serializer.StringRedisSerializer;

@Configuration
public class RedisConfig extends CachingConfigurerSupport {
    @Bean
    public RedisTemplate<Object, Object> redisTemplate(RedisConnectionFactory connectionFactory) {
        RedisTemplate<Object, Object> redisTemplate = new RedisTemplate<>();
        //默认的 Key 序列化器为:JdkSerializationRedisSerializer
        redisTemplate.setKeySerializer(new StringRedisSerializer());
        redisTemplate.setConnectionFactory(connectionFactory);
        return redisTemplate;
    }
}
1.3.缓存短信验证码
前面我们已经实现了移动端手机验证码登录,随机生成的验证码我们是保存在 HttpSession 中的。
现在需要改造为将验证码缓存在 Redis 中。
1.3.1.实现思路
- 在服务端 UserController 中注入 RedisTemplate 对象,用于操作 Redis
- 在服务端 UserController 的 sendMsg 方法中,将随机生成的验证码缓存到 Redis 中,并设置有效期为 5 分钟
- 在服务端 UserController 的 login 方法中,从 Redis 中获取缓存的验证码,如果登录成功则删除 Redis 中的验证码
1.3.2.代码改造
- 接下来的代码改造,都发生在
com/itheima/reggie/controller/UserController.java中
在服务端 UserController 中注入 RedisTemplate 对象,用于操作 Redis
@Autowired
private RedisTemplate redisTemplate;
在服务端 UserController 的 sendMsg 方法中,将随机生成的验证码缓存到 Redis 中,并设置有效期为 5 分钟
//需要将生成的验证码保存到 Session
//session.setAttribute(phone, code);// 注释掉此行代码

//将生成的验证码缓存到 redis 中,且设置有效期是 5 分钟
redisTemplate.opsForValue().set(phone, code, 5, TimeUnit.MINUTES);
在服务端 UserController 的 login 方法中,从 Redis 中获取缓存的验证码
//从 Session 中获取保存的验证码
//Object codeInSession = session.getAttribute(phone);// 注释掉此行代码

//从 redis 中获取缓存的验证码
Object codeInSession = redisTemplate.opsForValue().get(phone);
在服务端 UserController 的 login 方法中,若登录成功则删除 Redis 中的验证码
//如果用户登录成功,删除 Redis 中缓存的验证码
redisTemplate.delete(phone);

return R.success(user);
1.3.3.Redis 图形化界面
GitHub 上的大神编写了 Redis 的图形化桌面客户端。
地址:https://github.com/uglide/RedisDesktopManager
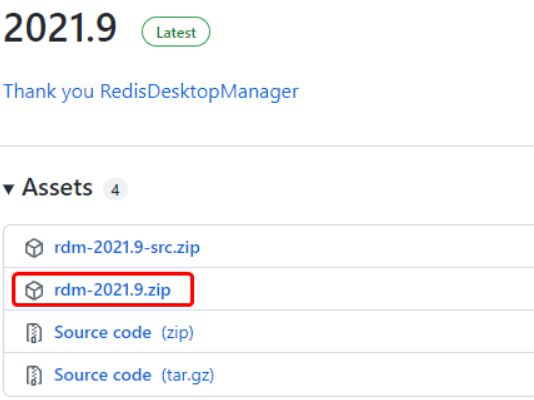
不过该仓库提供的是 RedisDesktopManager 的源码,并未提供 windows 安装包。
在下面这个仓库可以找到安装包:https://github.com/lework/RedisDesktopManager-Windows/releases
安装过程并没有什么细讲之处,按提示操作即可完成安装。
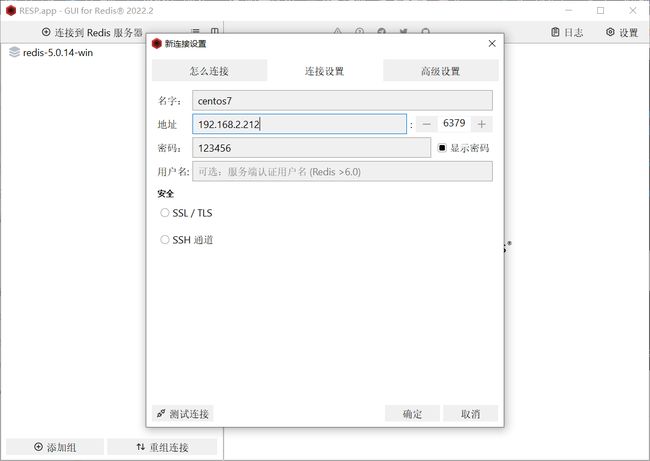
直接点击 “连接到 Redis 服务器”,就会弹出下方的界面。
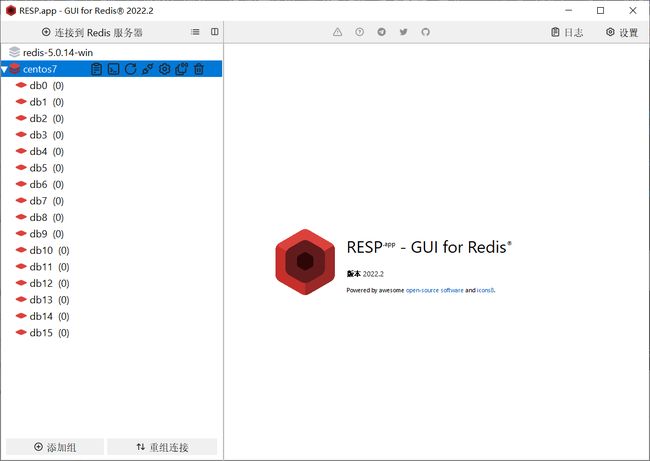
连接成功。
之后经过测试,发现功能并无问题。
1.3.4.代码再改造
经过测试,发现Redis 存储的 value 是 xAC\xED\x001x05tlx00\x048713,idea 工具控制台显示的值是 8713。
原因是我们并没有对其的 value 值做处理,我们只处理了 key 值,所以 key 的字符串显示没有问题。
虽然功能无大碍,但强迫症看着着实难受。
有两种解决办法可以处理这个问题
一种是使用 StringRedisTemplate,然后让它来替换之前写的 RedisTemplate 即可。
(实际上只有这种办法可行,因为验证码是独立的,是不会影响到后续操作的)
com/itheima/reggie/controller/UserController.java
@Autowired
private StringRedisTemplate stringRedisTemplate;
另一种则是直接在配置类中添加处理 value 的代码即可。
com/itheima/reggie/config/RedisConfig.java
redisTemplate.setValueSerializer(new StringRedisSerializer());
但是,后续的开发中,统一处理 value 的反序列化,会报错:java.util.ArrayList cannot be cast to java.lang.String。
而验证码登录这里的功能是独立的,所以实际上我们只有上面的一种选择,使用 StringRedisTemplate。
1.4.缓存菜品数据
前面我们已经实现了移动端菜品查看功能,对应的服务端方法为 DishController 的 list 方法。
此方法会根据前端提交的查询条件进行数据库查询操作。
在高并发的情况下,频繁查询数据库会导致系统性能下降,服务端响应时间增长。
现在需要对此方法进行缓存优化,提高系统的性能。
1.4.1.实现思路
- 改造 DishController 的 list 方法,先从 Redis 中获取菜品数据。
- 如果有则直接返回,无需查询数据库;
- 如果没有则查询数据库,并将查询到的菜品数据放入Redis。
- 改造 DishController 的 save 和 update 方法,加入清理缓存的逻辑
- 注意事项
- 在使用缓存过程中,要注意保证数据库中的数据和缓存中的数据一致。
- 如果数据库中的数据发生变化,需要及时清理缓存数据。
1.4.2.代码改造
- 接下来的代码改造,都发生在
com/itheima/reggie/controller/DishController.java中
改造 DishController 的 list 方法
@GetMapping("/list")
public R<List<DishDto>> list(Dish dish) {
	/***********************************************************************************/
    List<DishDto> dishDtoList = null;

    //动态构造 key
    String key = "dish_" + dish.getCategoryId() + "_" + dish.getStatus();// dish_1397844391040167938_1

    //先从 redis 中获取缓存数据
    dishDtoList = (List<DishDto>) redisTemplate.opsForValue().get(key);

    if (dishDtoList != null) {
        //如果存在,直接返回,无需查询数据库
        return R.success(dishDtoList);
    }
    /***********************************************************************************/

	//构造查询条件
    LambdaQueryWrapper<Dish> queryWrapper = new LambdaQueryWrapper<>();

	... ...

	/***********************************************************************************/
	//如果不存在,需要查询数据库,将查询到的菜品数据缓存到 redis
    redisTemplate.opsForValue().set(key, dishDtoList, 60, TimeUnit.MINUTES);
    /***********************************************************************************/

	return R.success(dishDtoList);
}
改造 DishController 的 save 方法
//第一种方式:清除[所有]的菜品的缓存数据
Set keys = redisTemplate.keys("dish_*");
redisTemplate.delete(keys);

//第二种方式:精准清理某个分类下面的菜品缓存数据
//String key = "dish_" + dishDto.getCategoryId() + "_1";
//redisTemplate.delete(key);
改造 DishController 的 update 方法
//第一种方式:清除[所有]的菜品的缓存数据
Set keys = redisTemplate.keys("dish_*");
redisTemplate.delete(keys);

//第二种方式:精准清理某个分类下面的菜品缓存数据
//String key = "dish_" + dishDto.getCategoryId() + "_1";
//redisTemplate.delete(key);
需要注意的是,如果之前做了对 value 值的反序列化处理(在配置类修改的那种方式)
idea 的控制台会报错:java.util.ArrayList cannot be cast to java.lang.String。
1.5.Spring Cache
1.5.1.Spring Cache 介绍
Spring Cache 是一个框架,实现了基于注解的缓存功能,只需要简单地加一个注解,就能实现缓存功能。
Spring Cache 提供了一层抽象,底层可以切换不同的cache实现。
具体就是通过 CacheManager 接口来统一不同的缓存技术。
CacheManager 是 Spring 提供的各种缓存技术抽象接口。
针对不同的缓存技术需要实现不同的 CacheManager
| CacheManager | 描述 |
|---|---|
| EhCacheCacheManager | 使用 EhCache 作为缓存技术 |
| GuavaCacheManager | 使用 Google 的 GuavaCache 作为缓存技术 |
| RedisCacheManager | 使用 Redis 作为缓存技术 |
1.5.2.Spring Cache 常用注解
| 注解 | 说明 |
|---|---|
| @EnableCaching | 开启缓存注解功能 |
| @Cacheable | 在方法执行前 spring 先查看缓存中是否有数据,如果有数据,则直接返回缓存数据;若没有数据,调用方法并将方法返回值放到缓存中 |
| @CachePut | 将方法的返回值放到缓存中 |
| @CacheEvict | 将一条或多条数据从缓存中删除 |
在 spring boot 项目中,使用缓存技术只需在项目中导入相关缓存技术的依赖包,并在启动类上使用 @EnableCaching 开启缓存支持即可。
例如,使用 Redis 作为缓存技术,只需要导入 Spring data Redis 的 maven 坐标即可。
1.5.3.具体项目
- 直接在资料中就可以找到该项目,导入 idea 即可使用。
- 资料链接:https://pan.baidu.com/s/1bxEy2bHiCYQtouifUppsTA
- 提取码:1234
- 此处给的是完整代码,1.5 之后的功能都可以理解为是在对代码的补充介绍。
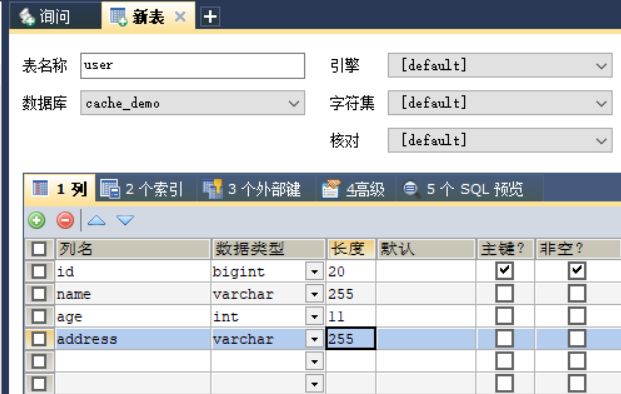
- 数据库为 cache_demo,数据表为 user。
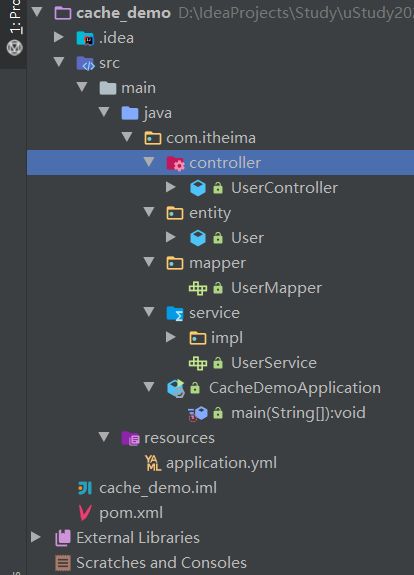
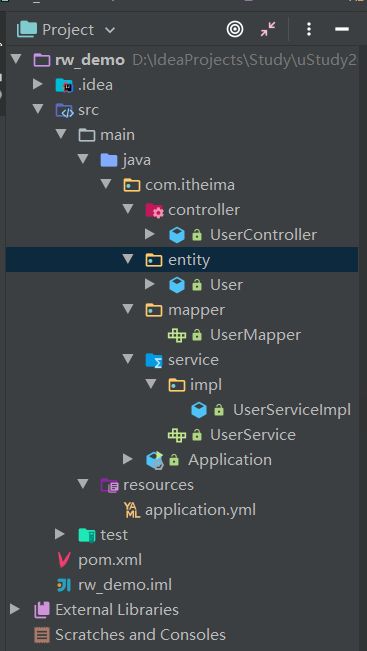
- 项目结构图
- pom.xml
导入的 spring-boot-starter-web 包,其中包含了 spring-webmvc 包
spring-webmvc 包中有 spring-context 包,spring-context 包有 spring cache 的基础的 api 的包
<project xmlns="http://maven.apache.org/POM/4.0.0"
         xmlns:xsi="http://www.w3.org/2001/XMLSchema-instance"
         xsi:schemaLocation="http://maven.apache.org/POM/4.0.0
         http://maven.apache.org/xsd/maven-4.0.0.xsd">

    <modelVersion>4.0.0modelVersion>
    <parent>
        <groupId>org.springframework.bootgroupId>
        <artifactId>spring-boot-starter-parentartifactId>
        <version>2.4.5version>
        <relativePath/>
    parent>

    <groupId>com.itheimagroupId>
    <artifactId>cache_demoartifactId>
    <version>1.0-SNAPSHOTversion>
    <properties>
        <java.version>1.8java.version>
    properties>

    <dependencies>

        <dependency>
            <groupId>org.springframework.bootgroupId>
            <artifactId>spring-boot-starter-webartifactId>
            <scope>compilescope>
        dependency>

        <dependency>
            <groupId>org.projectlombokgroupId>
            <artifactId>lombokartifactId>
            <version>1.18.20version>
        dependency>

        <dependency>
            <groupId>com.alibabagroupId>
            <artifactId>fastjsonartifactId>
            <version>1.2.76version>
        dependency>

        <dependency>
            <groupId>commons-langgroupId>
            <artifactId>commons-langartifactId>
            <version>2.6version>
        dependency>

        <dependency>
            <groupId>org.springframework.bootgroupId>
            <artifactId>spring-boot-starter-cacheartifactId>
        dependency>

        <dependency>
            <groupId>org.springframework.bootgroupId>
            <artifactId>spring-boot-starter-data-redisartifactId>
        dependency>

        <dependency>
            <groupId>mysqlgroupId>
            <artifactId>mysql-connector-javaartifactId>
            <scope>runtimescope>
        dependency>

        <dependency>
            <groupId>com.baomidougroupId>
            <artifactId>mybatis-plus-boot-starterartifactId>
            <version>3.4.2version>
        dependency>

        <dependency>
            <groupId>com.alibabagroupId>
            <artifactId>druid-spring-boot-starterartifactId>
            <version>1.1.23version>
        dependency>

    dependencies>

    <build>
        <plugins>
            <plugin>
                <groupId>org.springframework.bootgroupId>
                <artifactId>spring-boot-maven-pluginartifactId>
                <version>2.4.5version>
            plugin>
        plugins>
    build>

project>
resources目录下的 application.yml
server:
  port: 8080
spring:
  application:
    # 应用的名称,可选
    name: cache_demo
  datasource:
    druid:
      driver-class-name: com.mysql.cj.jdbc.Driver
      url: jdbc:mysql://localhost:3306/cache_demo?serverTimezone=Asia/Shanghai&useUnicode=true&characterEncoding=utf-8&zeroDateTimeBehavior=convertToNull&useSSL=false&allowPublicKeyRetrieval=true
      username: root
      password: root
  redis:
    host: 172.17.2.94
    port: 6379
    password: root@123456
    database: 0
  cache:
    redis:
      time-to-live: 1800000 #设置缓存过期时间,可选
mybatis-plus:
  configuration:
    # 在映射实体或者属性时,将数据库中表名和字段名中的下划线去掉,按照驼峰命名法映射
    map-underscore-to-camel-case: true
    log-impl: org.apache.ibatis.logging.stdout.StdOutImpl
  global-config:
    db-config:
      id-type: ASSIGN_ID
- 启动类:CacheDemoApplication
com/itheima/CacheDemoApplication.java
package com.itheima;

import lombok.extern.slf4j.Slf4j;
import org.springframework.boot.SpringApplication;
import org.springframework.boot.autoconfigure.SpringBootApplication;
import org.springframework.cache.annotation.EnableCaching;

@Slf4j
@SpringBootApplication
@EnableCaching
public class CacheDemoApplication {
    public static void main(String[] args) {
        SpringApplication.run(CacheDemoApplication.class, args);
        log.info("项目启动成功...");
    }
}
- 实体类:User
com/itheima/entity/User.java
package com.itheima.entity;

import lombok.Data;

import java.io.Serializable;

@Data
public class User implements Serializable {
    private static final long serialVersionUID = 1L;

    private Long id;

    private String name;

    private int age;

    private String address;
}
- mapper 接口:UserMapper
com/itheima/mapper/UserMapper.java
package com.itheima.mapper;

import com.baomidou.mybatisplus.core.mapper.BaseMapper;
import com.itheima.entity.User;
import org.apache.ibatis.annotations.Mapper;

@Mapper
public interface UserMapper extends BaseMapper<User>{}
- service 接口:UserService
com/itheima/service/UserService.java
package com.itheima.service;

import com.baomidou.mybatisplus.extension.service.IService;
import com.itheima.entity.User;

public interface UserService extends IService<User> {}
- service 实现类:UserServiceImpl
com/itheima/service/impl/UserServiceImpl.java
package com.itheima.service.impl;

import com.baomidou.mybatisplus.extension.service.impl.ServiceImpl;
import com.itheima.entity.User;
import com.itheima.mapper.UserMapper;
import com.itheima.service.UserService;
import org.springframework.stereotype.Service;

@Service
public class UserServiceImpl extends ServiceImpl<UserMapper,User> implements UserService {}
- 控制类:UserController.java
com/itheima/controller/UserController.java
package com.itheima.controller;

import com.baomidou.mybatisplus.core.conditions.query.LambdaQueryWrapper;
import com.itheima.entity.User;
import com.itheima.service.UserService;
import lombok.extern.slf4j.Slf4j;
import org.springframework.beans.factory.annotation.Autowired;
import org.springframework.cache.CacheManager;
import org.springframework.cache.annotation.CacheEvict;
import org.springframework.cache.annotation.CachePut;
import org.springframework.cache.annotation.Cacheable;
import org.springframework.web.bind.annotation.*;

import java.util.ArrayList;
import java.util.List;

@RestController
@RequestMapping("/user")
@Slf4j
public class UserController {

    @Autowired
    private CacheManager cacheManager;

    @Autowired
    private UserService userService;

    /**
     * CachePut:将方法返回值放入缓存
     * value:缓存的名称,每个缓存名称下面可以有多个 key
     * key:缓存的 key
     */
    @CachePut(value = "userCache", key = "#user.id")
    @PostMapping
    public User save(User user) {
        userService.save(user);
        return user;
    }

    /**
     * CacheEvict:清理指定缓存
     * value:缓存的名称,每个缓存名称下面可以有多个 key
     * key:缓存的 key
     */
    @CacheEvict(value = "userCache", key = "#p0")
    //@CacheEvict(value = "userCache",key = "#root.args[0]")
    //@CacheEvict(value = "userCache",key = "#id")
    @DeleteMapping("/{id}")
    public void delete(@PathVariable Long id) {
        userService.removeById(id);
    }

    //@CacheEvict(value = "userCache",key = "#p0.id")
    //@CacheEvict(value = "userCache",key = "#user.id")
    //@CacheEvict(value = "userCache",key = "#root.args[0].id")
    @CacheEvict(value = "userCache", key = "#result.id")
    @PutMapping
    public User update(User user) {
        userService.updateById(user);
        return user;
    }

    /**
     * Cacheable:在方法执行前 spring 先查看缓存中是否有数据
     * * 如果有数据,则直接返回缓存数据;
     * * 若没有数据,调用方法并将方法返回值放到缓存中
     * value:缓存的名称,每个缓存名称下面可以有多个 key
     * key:缓存的 key
     * condition:条件,满足条件时才缓存数据
     * unless:满足条件则不缓存
     */
    @Cacheable(value = "userCache", key = "#id", unless = "#result == null")
    @GetMapping("/{id}")
    public User getById(@PathVariable Long id) {
        User user = userService.getById(id);
        return user;
    }

    @Cacheable(value = "userCache", key = "#user.id + '_' + #user.name")
    @GetMapping("/list")
    public List<User> list(User user) {
        LambdaQueryWrapper<User> queryWrapper = new LambdaQueryWrapper<>();
        queryWrapper.eq(user.getId() != null, User::getId, user.getId());
        queryWrapper.eq(user.getName() != null, User::getName, user.getName());
        List<User> list = userService.list(queryWrapper);
        return list;
    }
}
1.5.4.Spring Cache 注解参数
- 具体的代码实现都已经在贴在上面了。
- 更多详情还请诸位自行阅读源码
- CachePut 注解
- CachePut:将方法返回值放入缓存
- value:缓存的名称,每个缓存名称下面可以有多个 key
- key:缓存的 key
- 例:
@CachePut(value = "userCache", key = "#result.id")
- CachePut:将方法返回值放入缓存
- CacheEvict 注解
- CacheEvict:清理指定缓存
- value:缓存的名称,每个缓存名称下面可以有多个 key
- key:缓存的 key
- 例 1:
@CacheEvict(value = "userCache", key = "#p0") - 例 1:
@CacheEvict(value = "userCache",key = "#root.args[0]") - 例 1:
@CacheEvict(value = "userCache",key = "#id") - 例 2:
@CacheEvict(value = "userCache",key = "#p0.id") - 例 2:
@CacheEvict(value = "userCache",key = "#root.args[0].id") - 例 2:
@CacheEvict(value = "userCache",key = "#user.id") - 例 2:
@CacheEvict(value = "userCache", key = "#result.id")
- CacheEvict:清理指定缓存
- Cacheable 注解
- Cacheable:在方法执行前 spring 先查看缓存中是否有数据
- 如果有数据,则直接返回缓存数据
- 若没有数据,调用方法并将方法返回值放到缓存中
- value:缓存的名称,每个缓存名称下面可以有多个 key
- key:缓存的 key
- condition:条件,满足条件时才缓存数据
- unless:满足条件则不
- 例 1:
@Cacheable(value = "userCache", key = "#id", unless = "#result == null") - 例 2:
@Cacheable(value = "userCache", key = "#user.id + '_' + #user.name")
- Cacheable:在方法执行前 spring 先查看缓存中是否有数据
1.5.5.使用 Redis 作为缓存产品
在 Spring Boot 项目中使用 Spring Cache 的操作步骤(使用 redis 缓存技术)
- 导入 maven 坐标:spring-boot-starter-data-redis、spring-boot-starter-cache
<dependency>
    <groupId>org.springframework.bootgroupId>
    <artifactId>spring-boot-starter-cacheartifactId>
dependency>

<dependency>
    <groupId>org.springframework.bootgroupId>
    <artifactId>spring-boot-starter-data-redisartifactId>
dependency>
- 配置 application.yml
spring:
  redis:
    host: 172.17.2.94
    port: 6379
    password: root@123456
    database: 0
	cache:
		redis:
            time-to-live: 1800000 # 设置缓存有效期
-
在启动类
com/itheima/CacheDemoApplication.java上加入 @EnableCaching 注解,开启缓存注解功能 -
在 Controller
com/itheima/controller/UserController.java的方法上加入 @Cacheable、@CacheEvict 等注解,进行缓存操作
1.6.缓存套餐数据
前面我们已经实现了移动端套餐查看功能,对应的服务端方法为 SetmealController 的 list 方法。
此方法会根据前端提交的查询条件进行数据库查询操作。
在高并发的情况下,频繁查询数据库会导致系统性能下降,服务端响应时间增长。
现在需要对此方法进行缓存优化,提高系统的性能。
1.6.1.实现思路
- 导入 Spring Cache 和 Redis 相关 maven 坐标
- 在 application.yml 中配置缓存数据的过期时间
- 在启动类上加入 @EnableCaching 注解,开启缓存注解功能
- 在 SetmealController 的 list 方法上加入 @Cacheable 注解
- 在 SetmealController 的 save 和 delete 方法上加入 CacheEvict 注解
1.6.2.代码改造
- 导入 Spring Cache 和 Redis 相关 maven 坐标
<dependency>
    <groupId>org.springframework.bootgroupId>
    <artifactId>spring-boot-starter-data-redisartifactId>
dependency>

<dependency>
    <groupId>org.springframework.bootgroupId>
    <artifactId>spring-boot-starter-cacheartifactId>
dependency>
- 在 application.yml 中配置缓存数据的过期时间
spring:
	application: <1 key>
	datasource: <1 key>
	redis: <3 keys>
	cache:
		redis:
			time-to-live: 1800000 # 设置缓存有效期
- 在启动类上加入 @EnableCaching 注解,开启缓存注解功能
com/itheima/reggie/ReggieApplication.java
@EnableCaching // 开启 Spring Cache 注解方式的缓存功能
- 在 SetmealController 的 list 方法上加入 @Cacheable 注解
@Cacheable(value = "setmealCache", key = "#setmeal.categoryId + '_' + #setmeal.status")
- 在 SetmealController 的 save 和 delete 方法上加入 CacheEvict 注解
@CacheEvict(value = "setmealCache", allEntries = true)
- 需要注意的地方是封装类 R 需要实现 Serializable 接口(序列化),注解才能生效。
即 public class R
否则会报错:DefaultSerializer requires a Serializable payload but received an object of type ...
2.读写分离
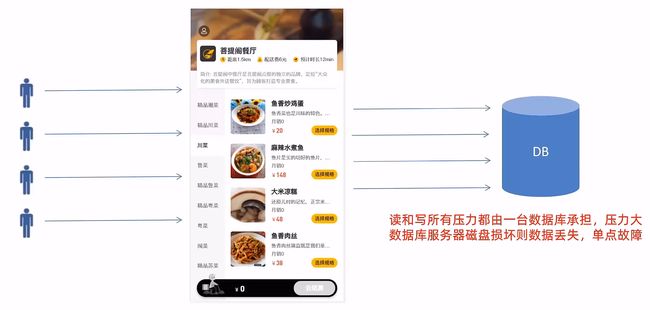
问题:读和写所有压力都由一台数据库承担,压力大。数据库服务器磁盘损坏则数据丢失,单点故障。
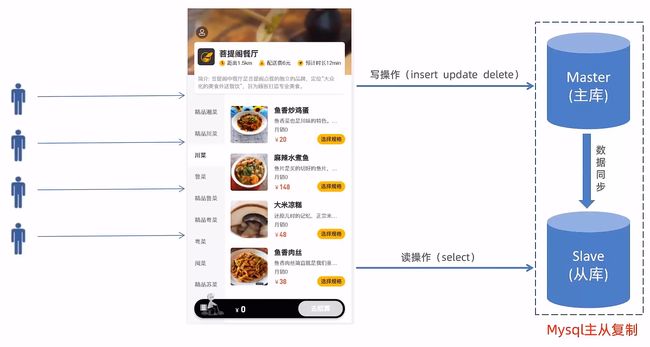
解决办法:读写分离
2.1.MySQL 主从复制
2.1.1.介绍
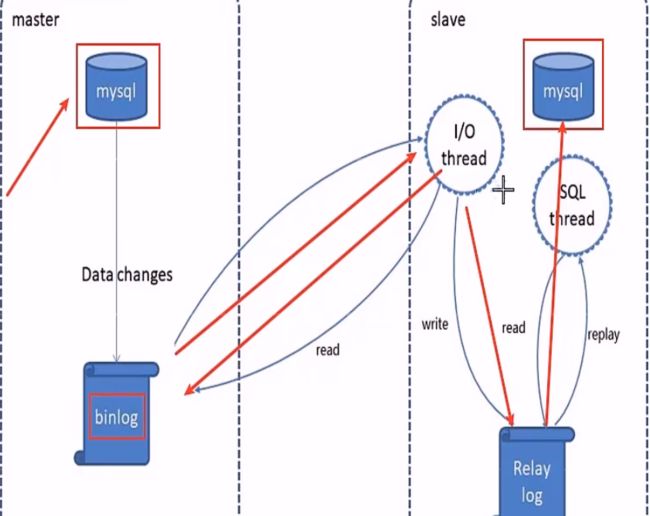
MysSQL 主从复制是一个异步的复制过程,底层是基于 MySQL 数据库自带的二进制日志功能。
就是一台或多台 AysQL 数据库(slave,即从库)从另一台 MySQL 数据库(master,即主库)进行日志的复制,
然后再解析日志并应用到自身,最终实现从库的数据和主库的数据保持一致。
MySQL 主从复制是 MySQL 数据库自带功能,无需借助第三方工具。
- MySQL 复制过程分成三步
- master 将改变记录到二进制日志(binary log)
- slave 将 master 的 binary log 拷贝到它的中继日志(relay log)
- slave 重做中继日志中的事件,将改变应用到自己的数据库中
一般来说,主库只有一个,但从库可以有很多个。
2.1.2.前置条件
提前准备好两台服务器,分别按照 MySQL 并启动服务成功。
在实际生产中两台数据库工具版本要保持一致。
可以使用 select version() from dual; 或 status; 来查看 MySQL 的版本。
- 主库 master:192.168.2.13
- 从库 slave:192.168.2.14
2.1.3.配置主库 Master
第一步:修改 MySQL 数据库的配置文件:vim /etc/my.cnf
[mysqld]
log-bin=mysql-bin #[必须]启用二级制日志
server-id=13 #[必须]服务器唯一id
第二步:重启 MySQL 服务
systemctl restart mysqld
第三步:登录 MySQL 数据库,执行下面的 SQL 语句
GRANT REPLICATION SLAVE ON *.* to 'xiaoming'@'%' identified by 'Root@123456';
- 上面的 SQL 语句的作用是创建一个用户 xiaoming,密码为 Root@123456 。
- 并且给 xiaoming 用户授予 REPLICATION SLAVE 权限。
- 常用于建立复制时所需要用到的用户权限。
- 也就是 slave 必须被 master 授权具有该权限的用户,才能通过该用户复制。
第四步:登录 MySQL 数据库,执行下面的 SQL 语句,记录下结果中的 File 和 Position 的值
show master status;
- 上面 SQL 的作用是查看 Master 的状态,执行完此 SQL 语句后,请不要再执行任何操作,以免影响到主库。
2.1.4.配置从库 Slave
第一步:修改 MySQL 数据库的配置文件:vim /etc/my.cnf
[mysqld]
server-id=14 #[必须]服务器唯一id
第二步:重启 MySQL 服务
systemctl restart mysqld
第三步:登录 MySQL 数据库,执行下面的 SQL 语句
change master to
	master_host='192.168.2.13',
	master_user='xiaoming',
	master_password='Root@123456',
	master_log_file='mysql-bin.000003',
	master_log_pos=441;
start slave;
如果忘记执行第二步的话,就会报下面这样的错误。这个坑我就踩上去了。
ERROR 1794 (HY000): Slave is not configured or failed to initialize properly.

You must at least set --server-id to enable either a master or a slave.

Additional error messages can be found in the MySQL error log.
第四步:登录 MySQL 数据库,执行下面的 SQL 语句,查看从数据库的状态。
show slave status;
最终显示的数据很多,建议复制数据至其他软件打开,方便观看。
当我们看到这两列下的数据都是 Yes 时,说明数据库的主从配置已经完成。
当然也可以使用以下命令来查看
show slave status\G;
出现的问题和解决办法
如果你是直接复制虚拟机的话,你的从库的数据是 Slave_IO_Running: No。
解决办法参考博客:《MySQL 修改 UUID》
这个时候只需要修改 uuid 即可(因为直接复制的虚拟机中的 mysql 的 uuid 是相同的)
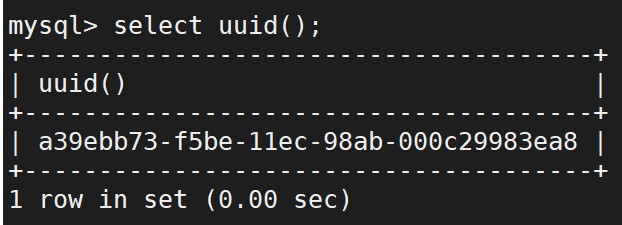
首先利用 uuid 函数生成新的 uuid(找到后请复制该 uuid)
select uuid();
再查看配置文件目录(这个目录是我设置的,不一定与诸位的目录相同)
show variables like 'datadir';
通过查找到的 dataidir(该目录下有 auto.cnf 文件)来修改 uuid
vi /var/lib/mysql/auto.cnf
修改 auto.cnf 中的 server-uuid 即可。
server-uuid=a39ebb73-f5be-11ec-98ab-000c29983ea8
之后重启服务就没有问题了。
systemtcl restart mysqld
2.2.读写分离案例
2.2.1.背景
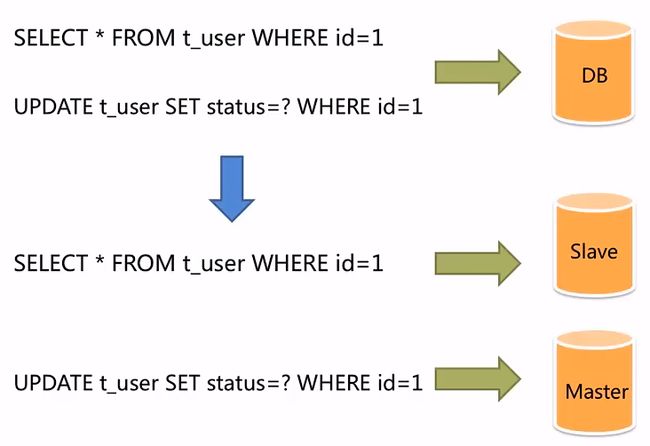
面对日益增加的系统访问量,数据库的吞吐量面临着巨大瓶颈。
对于同一时刻有大量并发读操作和较少写操作类型的应用系统来说,将数据库拆分为主库和从库。
主库负责处理事务性的增删改操作。
从库负责处理查询操作,能够有效的避免由数据更新导致的行锁,使得整个系统的查询性能得到极大的改善。
2.2.2.Sharding-JDBC
介绍
Sharding-JDBC 定位为轻量级 Java 框架,在 Java 的 JDBC 层提供的额外服务。
它使用客户端直连数据库,以 jar 包形式提供服务,无需额外部署和依赖。
其可理解为增强版的 JDBC 驱动,且完全兼容 JDBC 和各种 ORM 框架。
使用 Sharding-JDBC 可以在程序中轻松的实现数据库读写分离。
其适用于任何基于JDBC 的 ORM 框架。如:JPA、Hibernate、Mybatis、Spring JDBC Template 或直接使用 JDBC。
支持任何第三方的数据库连接池,如:DBCP、C3PO、BoneCP、 Druid、HikariCP 等。
支持任意实现 JDBC 规范的数据库。
目前支持 MySQL、Oracle、SQLServer、PostgreSQL 以及任何遵循 SQL92 标准的数据库。
<dependency>
    <groupId>org.apache.shardingspheregroupId>
    <artifactId>sharding-jdbc-spring-boot-starterartifactId>
    <version>4.0.0-RC1version>
dependency>
2.2.3.项目准备
- 直接在资料中就可以找到该项目,导入 idea 即可使用。
- 资料链接:https://pan.baidu.com/s/1bxEy2bHiCYQtouifUppsTA
- 提取码:1234
- 数据准备
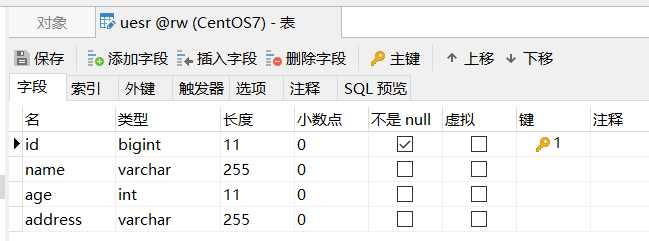
创建数据库:rw(字符集为 utf8mb4)
在此数据库中创建 user 表
项目结构
pom.xml
<project xmlns="http://maven.apache.org/POM/4.0.0"
         xmlns:xsi="http://www.w3.org/2001/XMLSchema-instance"
         xsi:schemaLocation="http://maven.apache.org/POM/4.0.0
          http://maven.apache.org/xsd/maven-4.0.0.xsd">

    <modelVersion>4.0.0modelVersion>

    <parent>
        <groupId>org.springframework.bootgroupId>
        <artifactId>spring-boot-starter-parentartifactId>
        <version>2.4.5version>
        <relativePath/>
    parent>

    <groupId>com.itheimagroupId>
    <artifactId>rw_demoartifactId>
    <version>1.0-SNAPSHOTversion>

    <properties>
        <java.version>1.8java.version>
    properties>

    <dependencies>
        <dependency>
            <groupId>org.apache.shardingspheregroupId>
            <artifactId>sharding-jdbc-spring-boot-starterartifactId>
            <version>4.0.0-RC1version>
        dependency>
        <dependency>
            <groupId>org.springframework.bootgroupId>
            <artifactId>spring-boot-starter-webartifactId>
            <scope>compilescope>
        dependency>
        <dependency>
            <groupId>org.projectlombokgroupId>
            <artifactId>lombokartifactId>
            <version>1.18.20version>
        dependency>
        <dependency>
            <groupId>com.alibabagroupId>
            <artifactId>fastjsonartifactId>
            <version>1.2.76version>
        dependency>
        <dependency>
            <groupId>commons-langgroupId>
            <artifactId>commons-langartifactId>
            <version>2.6version>
        dependency>
        <dependency>
            <groupId>mysqlgroupId>
            <artifactId>mysql-connector-javaartifactId>
            <scope>runtimescope>
        dependency>
        <dependency>
            <groupId>com.baomidougroupId>
            <artifactId>mybatis-plus-boot-starterartifactId>
            <version>3.4.2version>
        dependency>
        <dependency>
            <groupId>com.alibabagroupId>
            <artifactId>druid-spring-boot-starterartifactId>
            <version>1.1.23version>
        dependency>
    dependencies>

    <build>
        <plugins>
            <plugin>
                <groupId>org.springframework.bootgroupId>
                <artifactId>spring-boot-maven-pluginartifactId>
                <version>2.4.5version>
            plugin>
        plugins>
    build>

project>
resources 目录下的 applciation.yml
server:
  port: 8080
mybatis-plus:
  configuration:
    #在映射实体或者属性时,将数据库中表名和字段名中的下划线去掉,按照驼峰命名法映射
    map-underscore-to-camel-case: true
    log-impl: org.apache.ibatis.logging.stdout.StdOutImpl
  global-config:
    db-config:
      id-type: ASSIGN_ID
启动类:Application.java
com/itheima/Application.java
package com.itheima;

import lombok.extern.slf4j.Slf4j;
import org.springframework.boot.SpringApplication;
import org.springframework.boot.autoconfigure.SpringBootApplication;

@Slf4j
@SpringBootApplication
public class Application {
    public static void main(String[] args) {
        SpringApplication.run(Application.class, args);
        log.info("项目启动成功...");
    }
}
实体类:User.java
com/itheima/entity/User.java
package com.itheima.entity;

import lombok.Data;
import java.io.Serializable;

@Data
public class User implements Serializable {

    private static final long serialVersionUID = 1L;

    private Long id;

    private String name;

    private int age;

    private String address;

}
mapper 接口:UserMapper.java
com/itheima/mapper/UserMapper.java
package com.itheima.mapper;

import com.baomidou.mybatisplus.core.mapper.BaseMapper;
import com.itheima.entity.User;
import org.apache.ibatis.annotations.Mapper;

@Mapper
public interface UserMapper extends BaseMapper<User>{ }
Service 接口:UserService
com/itheima/service/UserService.java
package com.itheima.service;

import com.baomidou.mybatisplus.extension.service.IService;
import com.itheima.entity.User;

public interface UserService extends IService<User> {}
Service 接口实现类:UserServiceImpl.java
com/itheima/service/impl/UserServiceImpl.java
package com.itheima.service.impl;

import com.baomidou.mybatisplus.extension.service.impl.ServiceImpl;
import com.itheima.entity.User;
import com.itheima.mapper.UserMapper;
import com.itheima.service.UserService;
import org.springframework.stereotype.Service;

@Service
public class UserServiceImpl extends ServiceImpl<UserMapper,User> implements UserService {}
控制类:UserController.java
com/itheima/controller/UserController.java
package com.itheima.controller;

import com.baomidou.mybatisplus.core.conditions.query.LambdaQueryWrapper;
import com.itheima.entity.User;
import com.itheima.service.UserService;
import lombok.extern.slf4j.Slf4j;
import org.springframework.beans.factory.annotation.Autowired;
import org.springframework.web.bind.annotation.*;
import javax.sql.DataSource;
import java.util.List;

@RestController
@RequestMapping("/user")
@Slf4j
public class UserController {

    @Autowired
    private DataSource dataSource;

    @Autowired
    private UserService userService;

    @PostMapping
    public User save(User user){
        userService.save(user);
        return user;
    }

    @DeleteMapping("/{id}")
    public void delete(@PathVariable Long id){
        userService.removeById(id);
    }

    @PutMapping
    public User update(User user){
        userService.updateById(user);
        return user;
    }

    @GetMapping("/{id}")
    public User getById(@PathVariable Long id){
        User user = userService.getById(id);
        return user;
    }

    @GetMapping("/list")
    public List<User> list(User user){
        LambdaQueryWrapper<User> queryWrapper = new LambdaQueryWrapper<>();
        queryWrapper.eq(user.getId() != null,User::getId,user.getId());
        queryWrapper.eq(user.getName() != null,User::getName,user.getName());
        List<User> list = userService.list(queryWrapper);
        return list;
    }
}
2.2.4.配置文件中的操作
- 在配置文件中设置读写分离规则
resources 目录下的 application.yml
server:
  port: 8080
mybatis-plus:
  configuration:
    # 在映射实体或者属性时,将数据库中表名和字段名中的下划线去掉,按照驼峰命名法映射
    map-underscore-to-camel-case: true
    log-impl: org.apache.ibatis.logging.stdout.StdOutImpl
  global-config:
    db-config:
      id-type: ASSIGN_ID
spring:
  shardingsphere:
    datasource:
      names:
        master,slave
      # 主数据源
      master:
        type: com.alibaba.druid.pool.DruidDataSource
        driver-class-name: com.mysql.cj.jdbc.Driver
        url: jdbc:mysql://192.168.2.13:3306/rw?characterEncoding=utf-8
        username: root
        password: root
      # 从数据源
      slave:
        type: com.alibaba.druid.pool.DruidDataSource
        driver-class-name: com.mysql.cj.jdbc.Driver
        url: jdbc:mysql://192.168.2.14:3306/rw?characterEncoding=utf-8
        username: root
        password: root
    masterslave:
      # 读写分离配置
      load-balance-algorithm-type: round_robin # 轮询
      # 最终的数据源名称
      name: dataSource
      # 主库数据源名称
      master-data-source-name: master
      # 从库数据源名称列表,多个逗号分隔
      slave-data-source-names: slave
    props:
      sql:
        show: true #开启 SQL 显示,默认 false
- 在配置文件中配置 [允许 bean 定义覆盖] 配置项
resources 目录下的 application.yml
spring:
  main:
    allow-bean-definition-overriding: true
2.3.项目实现读写分离
环境准备(主从复制)
直接使用我们前面在虚拟机中搭建的主从复制的数据库环境即可。
在主库中创建瑞吉外卖项目的业务数据库reggie并导入相关表结构和数据。
代码构造
在项目中加入 Sharding-JDBC 实现读写分离步骤
- 导入 maven 坐标
- 在配置文件中配置读写分离规则
- 在配置文件中配置允许 bean 定义覆盖 配置项
pom.xml
<dependency>
    <groupId>org.apache.shardingspheregroupId>
    <artifactId>sharding-jdbc-spring-boot-starterartifactId>
    <version>4.0.0-RC1version>
dependency>
由于内容几乎与 2.2.4 无异,故这里不再赘述。
3.Nginx
3.1.Nginx 概述
3.1.1.Nginx介绍
Nginx 是一款轻量级的web服务器/反向代理服务器及电子邮件(IMAP / POP3)代理服务器。
其特点是占有内存少,并发能力强。
Nginx 的并发能力在同类型的网页服务器中表现较好。
中国大陆使用 Nginx 的网站有:百度、京东、新浪、网易、腾讯、淘宝等。
Nginx 是由伊戈尔·赛索耶夫为俄罗斯访问量第二的 Rambler.ru 站点(俄文: Paw6nep)开发的。
第一个公开版本 0.1.e 发布于 2004 年 10 月 4 日。
- 官网:https://nginx.org/
3.1.2.Nginx 下载和安装
可以到 Nginx 官方网站下载 Nginx 的安装包。
地址为:https://nginx.org/en/download.html
安装过程
- 安装依赖包
yum -y install gcc pcre-devel zlib-devel openssl openssl-devel - 下载 Nginx 安装包
wget https://nginx.org/download/nginx-1.16.1.tar.gz(需要先yum install wget) - 解压
tar -zxvf nginx-1.16.1.tar.gz cd nginx-1.16.1./configure --prefix=/usr/local/nginxmake && make install
3.1.3.Nginx 目录结构
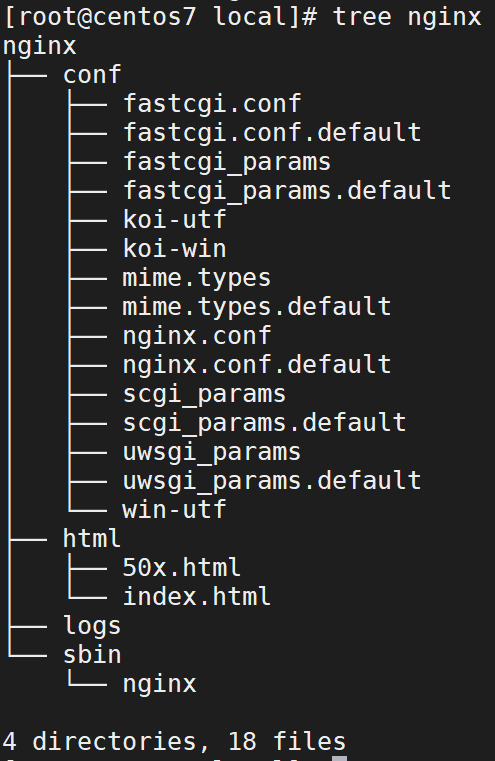
可以使用命令下载 tree:yum install tree
之后就可以直接查看树型目录了
- 重点目录/文件
conf/nginx.conf:nginx 配置文件html:存放静态文件(html、css、JS 等)logs:日志目录,存放日志文件sbin/nginx:二进制文件,用于启动、停止 Nginx 服务
3.2.Nignx 命令
3.2.1.查看版本
在 sbin 目录下输入:./nginx -v
3.2.2.检查配置文件正确性
在启动 Nginx 服务之前,可以先检查一下 conf/nginx.conf 文件配置的是否有错误
在 sbin 目录下执行命令:./nginx -t
3.2.3.启动和停止
启动 Nginx 服务:在 sbin 目录下输入命令./nginx
停止 Nginx 服务:在 sbin 目录下输入命令./nginx -s stop
启动服务成功后,查看 Nginx 进程:ps -ef | grep nginx
当然,我们也可以使用绝对路径的写法的命令来启动服务:/usr/local/nginx/sbin/nginx
- 当 nginx 服务启动时。默认情况下,其会有两个教程:master 和 worker
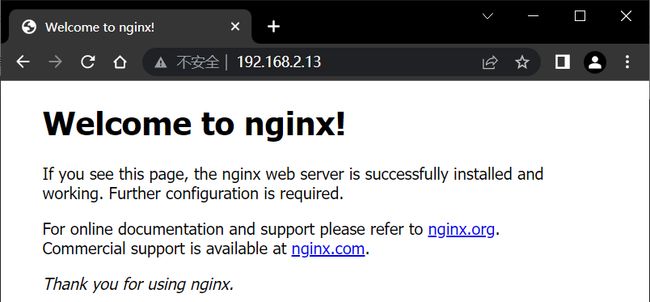
- 当我们成功启动 nginx 时,输入自己虚拟机的 IP 地址,可以访问到其默认的首页面
- 首页面的位置:
/nignix的下载位置/html/index.html。
- 首页面的位置:
- 当然,此时你得关掉防火墙(
systemctl stop firewalld)才可以通过 windows 来访问。
此外,当 nginx 成功启动之后,其目录结果发生了变化,会出现一些临时目录。
空的 logs 目录会生成三个文件:access.log、error.log、nginx.pid
nginx.pid 只有在 nginx 服务开启时才会出现,其记录的是当前 nginx 服务的进程号。
3.2.4.重新加载配置文件
当修改 Nginx 配置文件后,需要重新加载才可以生效。
可以使用命令来重新加载配置文件:./nginx -s reload
或者使用绝对路径的方式来加载:/usr/local/nginx/sbin/nginx -s reload
例:我们可以通过修改配置文件来达到修改运行的进程数目的目的
首先使用命令:vim /usr/local/nginx/conf/nginx.conf
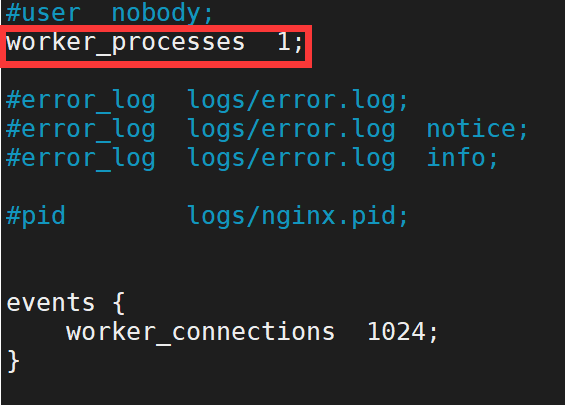
打开文件后,找到 worker_processes 1; 这一行,表明只开启一个 worker 进程。
保存后使用命令(/usr/local/nginx/sbin/nginx -s reload)重载配置文件。
此时再次查看进程 id 的情况:ps -ef | grep nginx
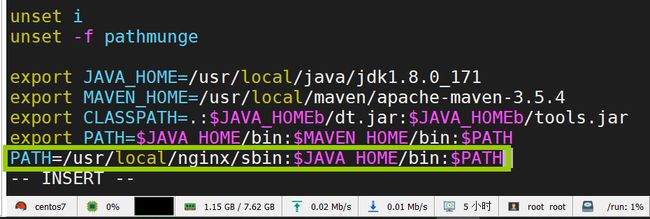
3.3.Nginx 配置环境变量
通过以上的命令操作,发现使用执行命令的过程过于繁琐。
故这里为简化操作,将 nginx 的二进制文件 /sbin/nginx 的路径配置到系统的环境变量中。
使用命令:vim /etc/profile,再追加其路径即可。
多个路径配置时,可以使用 : 来隔开。
最后使用命令:source /etc/profile 来加载文件,使其生效即可。
此时在任意路径下就可以直接使用 nginx 命令了。
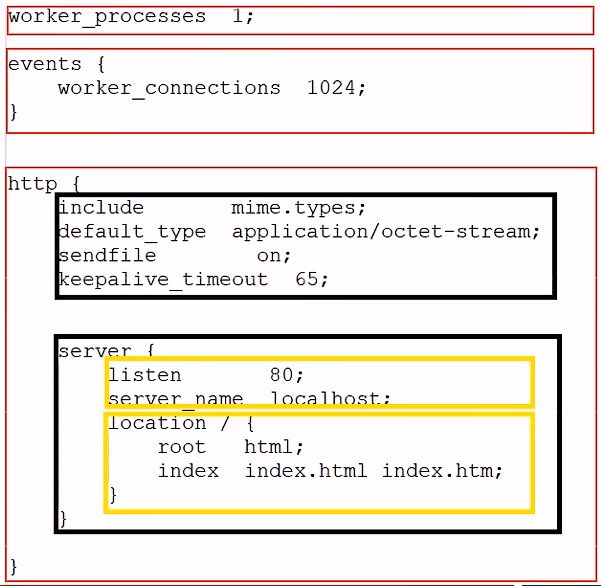
3.4.Nginx 配置文件结构
- 全局块、EVENTS 块、 HTTP 块
整体结构介绍
-
全局块:和 Nginx 运行相关的全局配置
-
events 块:和网络连接相关的配置
-
http 块:代理、缓存、日志记录、虚拟主机配置
- http 全局块
- Server 块
- Server 全局块
- location 块
-
注意:http 块中可以配置多个 Server 块,每个 Server 块中可以配置多个 location 块。
下面的这张图是 nginx.conf 的部分内容。
3.5.Nginx 具体应用
3.5.1.部署静态资源
Nginx 可以作为静态 web 服务器来部署静态资源。
静态资源指在服务端真实存在并且能够直接展示的一些文件。
比如常见的 html 页面、css 文件、js 文件、图片、视频等资源。
相对于 Tomcat,Nginx 处理静态资源的能力更加高效。
在生产环境下,一般都会将静态资源部署到 Nginx 中。
将静态资源部署到 Nginx ,只需要将文件复制到 Nginx 安装目录下的 html 目录中即可。
nginx.conf 中的部分内容
server {
    listen       80;					# 监听端口
    server_name  localhost;				# 服务器名称
    ... ...
    location / {						# 匹配客户端请求 url
        root   html;					# 指定静态资源根目录
        index  index.html index.htm;	# 指定默认首页
    }
    ... ...
}
其中 server 可以配置多个。
3.5.2.反向代理
- 正向代理
是一个位于客户端和原始服务器(origin server)之间的服务器,
为了从原始服务器取得内容,客户端向代理发送一个请求并指定目标(原始服务器),
然后代理向原始服务器转交请求并将获得的内容返回给客户端。
正向代理的典型用途是为在防火墙内的局域网客户端提供访问 Internet 的途径。
正向代理一般是在客户端设置代理服务器,通过代理服务器转发请求,最终访问到目标服务器。
吐槽:这个网址居然要打码,图片才不算违规。有点离谱。
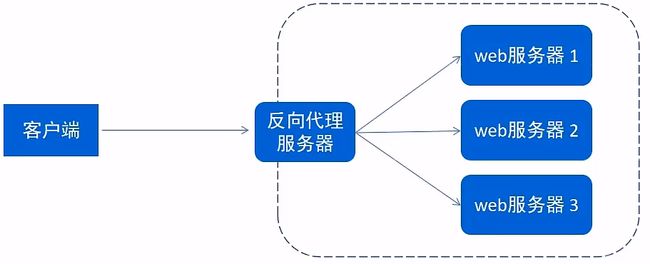
- 反向代理
反向代理服务器位于用户与目标服务器之间。
但是对于用户而言,反向代理服务器就相当于目标服务器,
即用户直接访问反向代理服务器就可以获得目标服务器的资源,
反向代理服务器负责将请求转发给目标服务器。
用户不需要知道目标服务器的地址,也无须在用户端作任何设定。
- 配置反向代理
server {
  listen       82;
  server_name  localhost;

  location / {
          proxy_pass http://192.168.188.101:8080; # 反向代理配置,将请求转发到指定服务
  }
}
3.5.3.负载均衡
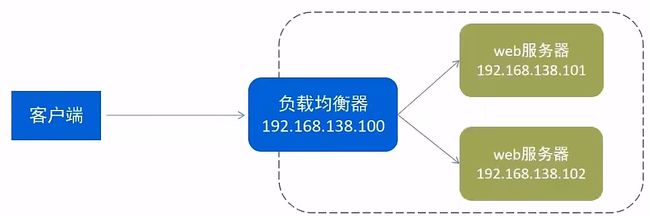
早期的网站流量和业务功能都比较简单,单台服务器就可以满足基本需求。
但是随着互联网的发展,业务流量越来越大并且业务逻辑也越来越复杂,
单台服务器的性能及单点故障问题就凸显出来了,
因此需要多台服务器组成应用集群,进行性能的水平扩展以及避免单点故障出现。
- 应用集群:将同一应用部署到多台机器上,组成应用集群,接收负载均衡器分发的请求,进行业务处理并返回响应数据。
- 负载均衡器:将用户请求根据对应的负载均衡算法分发到应用集群中的一台服务器进行处理。
配置负载均衡
upstream targetserver{    # upstream 指令可以定义一组服务器
  server 192.168.188.101:8080 weight=10;
  server 192.168.188.101:8081 weight=5;
}

server {
  listen  			8080;
  server_name     	localhost;
  location / {
          proxy_pass http://targetserver;
  }
}
负载均衡策略
| 名称 | 说明 |
|---|---|
| 轮询 | 默认方式 |
| weight | 权重方式 |
| ip_hash | 依据 ip 分配方式 |
| least_conn | 依据最少连接方式 |
| url_hash | 依据 url 分配方式 |
| fair | 依据响应时间方式 |
4.前后端分离开发简单介绍
4.1.问题分析
- 开发人员同时负责前端和后端代码开发,分工不明确
- 开发效率低
- 前后端代码混合在一个工程中,不便于管理
- 对开发人员要求高,人员招聘困难
4.2.介绍
前后端分离开发
就是在项目开发过程中,对于前端代码的开发由专门的前端开发人员负责,后端代码则由后端开发人员负责。
这样可以做到分工明确、各司其职,提高开发效率,前后端代码并行开发,可以加快项目开发进度。
目前,前后端分离开发方式已经被越来越多的公司所采用,成为当前项目开发的主流开发方式。
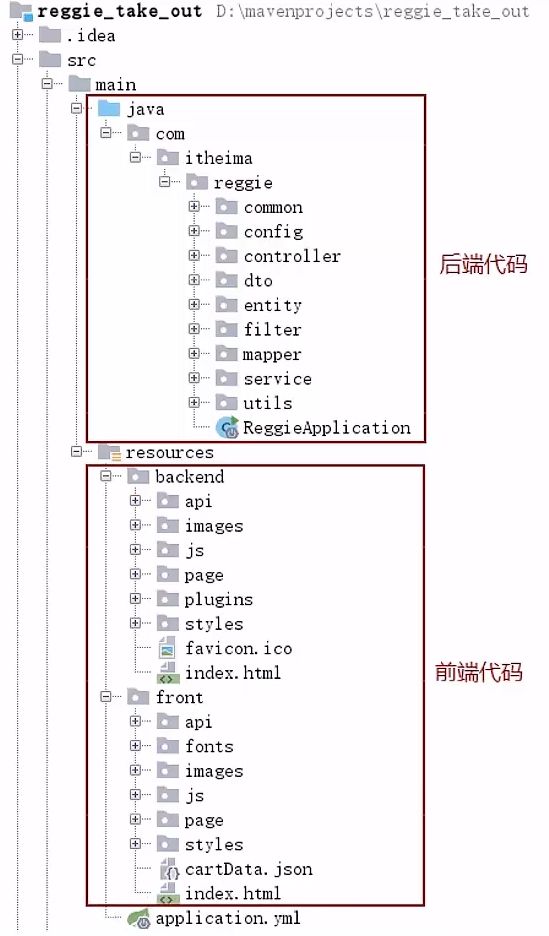
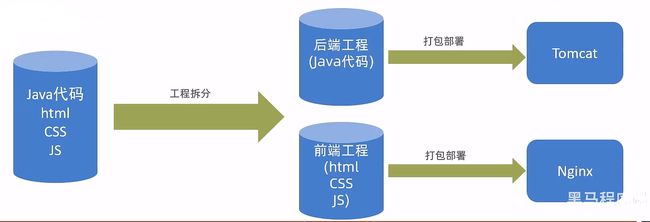
前后端分离开发后,从工程结构上也会发生变化。
即前后端代码不再混合在同一个 maven 工程中,而是分为前端工程和后端工程。
4.3.开发流程
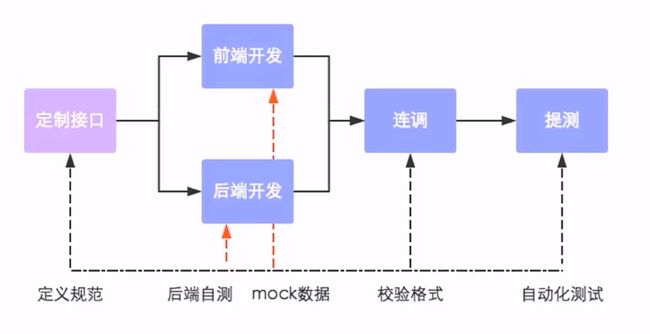
前后端分离开发后,面临一个问题,就是前端开发人员和后端开发人员如何进行配合来共同开发一个项目?
可以按照如下流程进行:
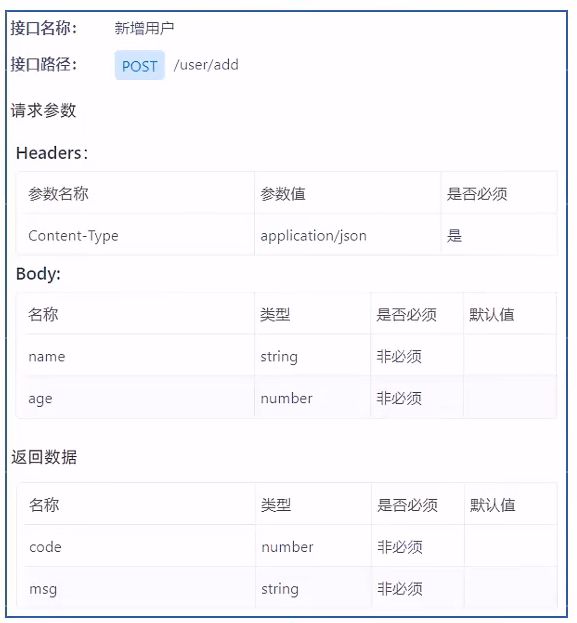
接口(API接口)就是一个 http 的请求地址,
主要就是去定义:请求路径、请求方式、请求参数、响应数据等内容。
例
4.4.前端技术栈
- 开发工具:Visual Studio Code、HBuilder
- 技术框架:nodejs、VUE、ElementUI、mock、webpack
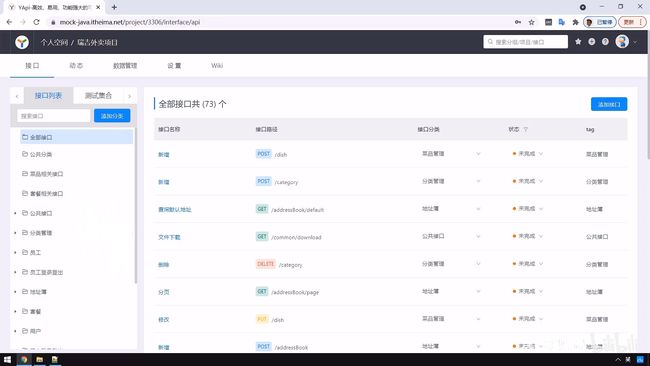
5.Yapi
介绍
YApi 是高效、易用、功能强大的 api 管理平台,旨在为开发、产品、测试人员提供更优雅的接口管理服务。
可以帮助开发者轻松创建、发布、维护 API。
YApi 还为用户提供了优秀的交互体验,开发人员只需利用平台提供的接口数据写入工具以及简单的点击操作就可以实现接口的管理。
YApi 让接口开发更简单高效,让接口的管理更具可读性、可维护性,让团队协作更合理。
源码地址:https://github.com/YMFE/yapi
网络链接:http://yapi.dapengjiaoyu.com/
使用文档:https://hellosean1025.github.io/yapi/
要使用 YApi,需要进行相关的部署,这里不做说明。一般来说这不是后端开发人员的活儿。
使用 YApi 可以执行这些操作:添加项目、添加分类、添加接口、编辑接口、查看接口
6.Swagger
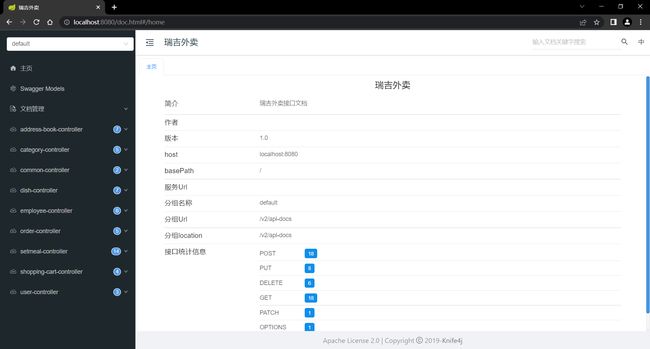
6.1.介绍
使用 Swagger,你只需要按照它的规范去定义接口及接口相关的信息,
再通过 Swagger 衍生出来的一系列项目和工具,就可以做到生成各种格式的接口文档,以及在线接口调试页面等等。
官网:https://swagger.io/
knife4j 是为 Java MVC 框架集成 Swagger 生成 Api 文档的增强解决方案。
<dependency>
    <groupId>com.github.xiaoymingroupId>
    <artifactId>knife4j-spring-boot-starterartifactId>
    <version>3.0.2version>
dependency>
6.2.操作步骤
- 导入 knife4j 的 maven 坐标
- 导入 knife4j 相关配置类
- 设置静态资源,否则接口文档页面无法访问
- 在 LoginCheckFilter 中设置不需要处理的请求路径
- 访问
http://localhost:8080/doc.html页面查看文档
- 导入 knife4j 的 maven 坐标
<dependency>
    <groupId>com.github.xiaoymingroupId>
    <artifactId>knife4j-spring-boot-starterartifactId>
    <version>3.0.2version>
dependency>
- 导入 knife4j 相关配置类
src/main/java/com/itheima/reggie/config/WebMvcConfig.java
添加注解
@EnableSwagger2
@EnableKnife4j
添加方法
@Bean
public Docket createRestApi() {
    //文档类型
    return new Docket(DocumentationType.SWAGGER_2)
            .apiInfo(apiInfo())
            .select()
            .apis(RequestHandlerSelectors.basePackage("com.itheima.reggie.controller"))
            .paths(PathSelectors.any())
            .build();
}

private ApiInfo apiInfo() {
    return new ApiInfoBuilder()
            .title("瑞吉外卖")
            .version("1.0")
            .description("瑞吉外卖接口文档")
            .build();
}
- 设置静态资源,否则接口文档页面无法访问
src/main/java/com/itheima/reggie/config/WebMvcConfig.java
/**
 * 设置静态资源映射
 *
 * @param registry
 */
@Override
protected void addResourceHandlers(ResourceHandlerRegistry registry) {
    log.info("......开始进行静态资源的映射......");
    /*************************************************************************************************************/
    registry.addResourceHandler("doc.html").addResourceLocations("classpath:/META-INF/resources/");
    registry.addResourceHandler("/webjars/**").addResourceLocations("classpath:/META-INF/resources/webjars/");
    /*************************************************************************************************************/
    registry.addResourceHandler("/backend/**").addResourceLocations("classpath:/backend/");
    registry.addResourceHandler("/front/**").addResourceLocations("classpath:/front/");
}
- 在 LoginCheckFilter 中设置不需要处理的请求路径
src/main/java/com/itheima/reggie/filter/LoginCheckFilter.java
//定义不需要处理的请求路径
String[] urls = new String[]{
        "/employee/login",
        "/employee/logout",
        "/backend/**",
        "/front/**",
        "/common/**",
        "/user/sendMsg",
        "/user/login",
        /*********************/
        "/doc.html",
        "/webjars/**",
        "/swagger-resources",
        "/v2/api-docs"
        /*********************/
};
- 访问
http://localhost:8080/doc.html页面查看文档
完成以上五步操作进入页面后,便可以查看接口文档,使用接口文档了。
6.3.常用注解
使用常用注解的目的是为了更好的描述接口文档,增强接口文档的可读性。
| 注解 | 说明 |
|---|---|
| @Api | 用在请求的类上,例如 Controller,表示对类的说明 |
| @ApiModel | 用在类上,通常是实体类,表示一个返回响应数据的信息 |
| @ApiModelProperty | 用在属性上,描述响应类的属性 |
| @ApiOperation | 用在请求的方法上,说明方法的用途、作用 |
| @ApilmplicitParams | 用在请求的方法上,表示一组参数说明 |
| @ApilmplicitParam | 用在 @ApilmplicitParams 注解中,指定一个请求参数的各个方面 |
7.项目部署
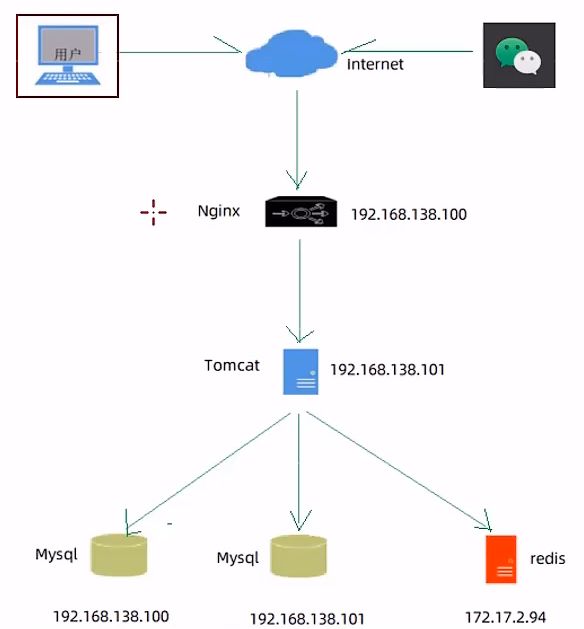
7.1.部署架构
7.2.部署环境说明
服务器
- 192.168.138.100(服务器 A)
- Nginx:部署前端项目、配置反向代理
- MySQL:主从复制结构中的主库
- 将 Redis 放在这里也没有问题,我就是这么干的
- 192.168.138.101(服务器 B)
- jdk:运行 Java 项目
- git:版本控制工具
- maven:项目构建工具
- jar:Spring Boot 项目打成 jar 包基于内置 Tomcat 运行
- MySQL:主从复制结构中的从库
- 172.17.2.94(服务器)
- Redis:缓存中间件
7.3.部署前端项目
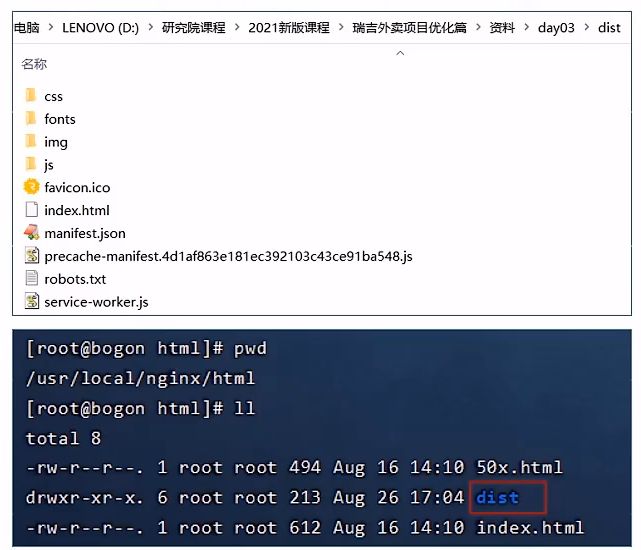
- 第一步:在服务器 A 中安装 Nginx,将课程资料中的 dist 目录上传到 Nginx 的 html 目录下
- 第二步:修改 Nginx 配置文件 nginx.conf
server{
  listen 		80;
  server_name 	localhost;

  location /{
    root html/dist;
    index index.html;
  }

  # 反向代理配置
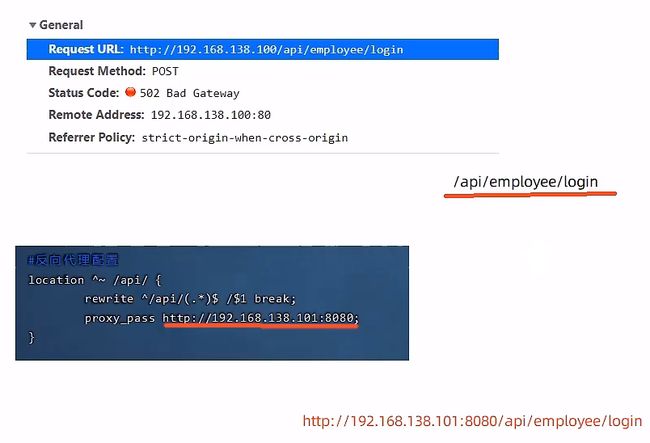
  location ^~ /api/{
          rewrite ^/api/(.*)$ /$1 break;
          proxy_pass http://192.168.138.101:8080;
  }

  error_page 500 502 503 504 /50x.html;
  location = /50x.html{
      root html;
  }
}
- 补充:结合前端的页面数据来分析反向代理配置中的操作
7.4.部署后端项目
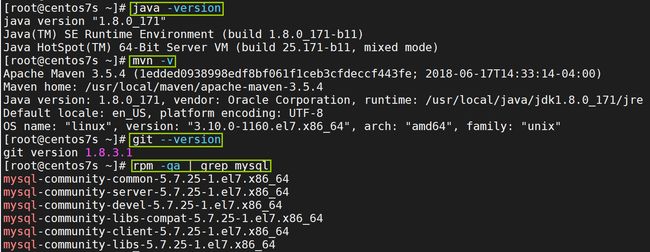
- 第一步∶在服务器 B 中安装 jdk、git、maven、MySQL,使用
git clone命令将git远程仓库的代码克隆下来。
我们也可以使用相关命令来查看相关软件是否安装。比如忘了哪个软件没下。
我这里是克隆项目的一个分支。
- 第二步:将资料中提供的 reggieStart.sh 文件上传到服务器 B
通过 chmod 777 reggieStart.sh 命令设置执行权限
同时根据实际情况来更改 .sh文件:vim reggieStart.sh。
对于需要加载图片的位置需要自己手动导入 Linux,并更改相关配置文件的路径。
- 第三步:执行 reggieStart.sh 脚本文件,自动部署项目:
./reggieStart.sh。
最终大概就是这么一个情况。
至此,视频对应课程的内容全部完结。
基本功能补全完毕,但优化功能只是优化了一部分。
只优化了部分功能,主要是我懒得再补全视频中未优化的部分了,就这么凑合着吧 。
相关代码的地址:https://gitee.com/yan-zhao-han-wei/reggie_takeout
