tsn-pytorch代码解读
代码解读
- 说明
- 一、项目结构
- 二、训练部分
-
- 2.1 模型导入(models.py解析)
-
- 2.1.1 __init__函数
- 2.1.2 _prepare_base_model函数
- 2.1.3 _prepare_base_model函数
- 附1 多gpu与断点恢复设置
- 2.2 数据导入(dataset.py解析)
-
- 2.2.1 __ init __函数
- 2.2.2 _parse_list函数
- 2.2.3 _sample_indices函数(稀疏和全局采样的实现)
- 2.2.4 __getitem__函数
- 2.2.5 _get_test_indices函数
- 2.3 准备和训练
-
- 2.3.1 Loss、optim与超参数
- 2.3.2 训练
- 2.4 main.py中的其他重要函数
-
- 2.4.1 train函数
- 2.4.2 accuracy函数
- 2.4.3 adjust_learning_rate函数
- 2.4.4 save_checkpoint函数
- 2.4.5 validate函数
- 2.5 main.py的自定义AverageMeter类
- 2.6 训练数据流
- 三、重读论文部分内容
- 四、一个问题
说明
本文中介绍解析的代码均为原始代码,地址:https://github.com/yjxiong/tsn-pytorch。
在TSN实验配置中,部分代码有所更改,不做对比。
一、项目结构
tsn-pytorch项目中主要的文件即其作用如下所示
下面对训练部分的代码进行详细的介绍。
二、训练部分
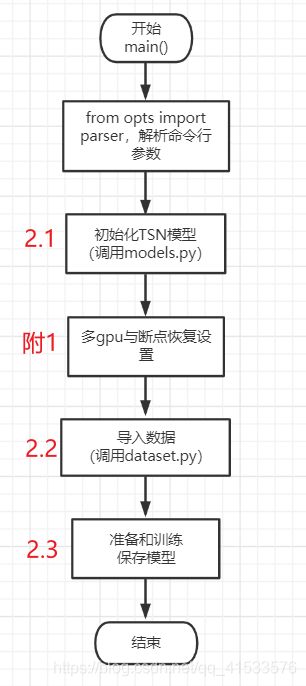
在前一篇博文TSN实验配置中,TSN训练是从main.py进入的,而main.py文件主方法为main(),所以我们从main()开始,其主体功能如下图,下面按顺序解释主函数及其调用的代码。
2.1 模型导入(models.py解析)
# 初始化模型
model = TSN(num_class, args.num_segments, args.modality,
                base_model=args.arch,
                consensus_type=args.consensus_type, dropout=args.dropout, partial_bn=not args.no_partialbn)

    crop_size = model.crop_size
    scale_size = model.scale_size
    input_mean = model.input_mean
    input_std = model.input_std
    policies = model.get_optim_policies()
    train_augmentation = model.get_augmentation()
从第一行代码,进入models.py查看关于模型的相关内容。
首先models.py结构如下:
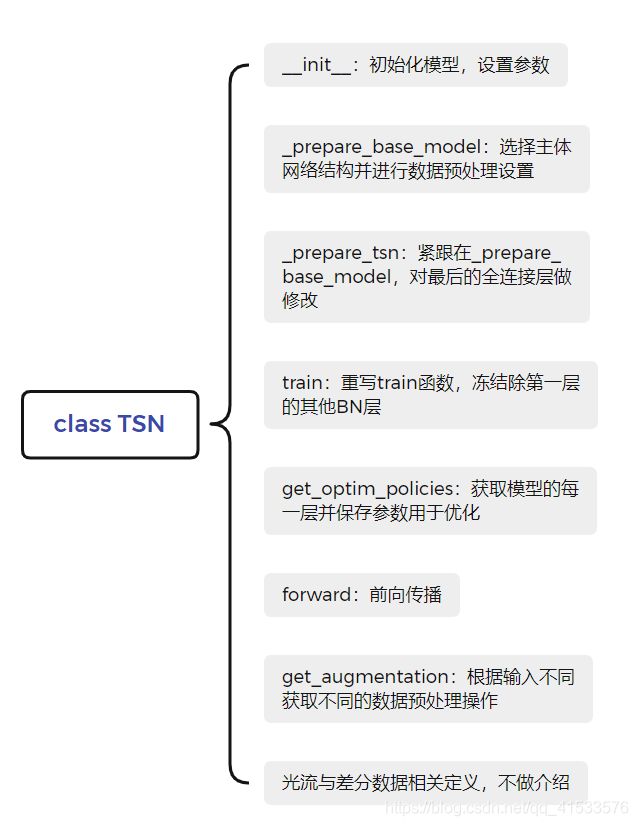
对其中几个函数进行解释。
2.1.1 __init__函数
    def __init__(self, num_class, num_segments, modality,
                 base_model='resnet101', new_length=None,
                 consensus_type='avg', before_softmax=True,
                 dropout=0.8,
                 crop_num=1, partial_bn=True):
        super(TSN, self).__init__()
        self.modality = modality
        self.num_segments = num_segments
        self.reshape = True
        self.before_softmax = before_softmax
        self.dropout = dropout
        self.crop_num = crop_num
        self.consensus_type = consensus_type
        if not before_softmax and consensus_type != 'avg':
            raise ValueError("Only avg consensus can be used after Softmax")

        if new_length is None:
            self.new_length = 1 if modality == "RGB" else 5
        else:
            self.new_length = new_length
		# 打印网络不贴出
        self._prepare_base_model(base_model)

        feature_dim = self._prepare_tsn(num_class)

        if self.modality == 'Flow':
            print("Converting the ImageNet model to a flow init model")
            self.base_model = self._construct_flow_model(self.base_model)
            print("Done. Flow model ready...")
        elif self.modality == 'RGBDiff':
            print("Converting the ImageNet model to RGB+Diff init model")
            self.base_model = self._construct_diff_model(self.base_model)
            print("Done. RGBDiff model ready.")

        self.consensus = ConsensusModule(consensus_type)

        if not self.before_softmax:
            self.softmax = nn.Softmax()

        self._enable_pbn = partial_bn
        if partial_bn:
            self.partialBN(True)
参数解释:
- num_class:分类的类别数
- num_segments:一个video分多少段,对应论文中的K
- modality:输入模态,如RGB,差分RGB,光流等
- base_model:基础的结构,默认resnet101
- new_length:视频提帧起点,RGB为1,光流为5
- consensus_type:选择聚合函数,默认为avg(平均池化)
- before_softmax:是否在softmax前融合,默认为True
- dropout:设置丢弃层概率
- partial_bn:是否部分BN,默认为True
这部分代码主要就是对模型的初始设置,对传入的参数进行保存和修改,在这之后调用_prepare_base_model方法导入模型并使用_prepare_tsn修改网络部分结构。
2.1.2 _prepare_base_model函数
对不同基础网络结构进行数据预处理设置,因为我们在实验时使用的是resnet101,这里仅对该部分解释
    def _prepare_base_model(self, base_model):

        if 'resnet' in base_model or 'vgg' in base_model:
            self.base_model = getattr(torchvision.models, base_model)(True)
            self.base_model.last_layer_name = 'fc'
            self.input_size = 224
            self.input_mean = [0.485, 0.456, 0.406]
            self.input_std = [0.229, 0.224, 0.225]

            if self.modality == 'Flow':
                self.input_mean = [0.5]
                self.input_std = [np.mean(self.input_std)]
            elif self.modality == 'RGBDiff':
                self.input_mean = [0.485, 0.456, 0.406] + [0] * 3 * self.new_length
                self.input_std = self.input_std + [np.mean(self.input_std) * 2] * 3 * self.new_length
主要是使用getattr模块:getattr(torchvision.models, base_model)()根据base_model的不同指定值来导入不同的网络,对不同基础模型设定不同的输入尺寸、均值和方差,这些后面进行数据处理时使用,此外对光流输入和RGB差分,需要进行不同的设置。
2.1.3 _prepare_base_model函数
调整feature_dim,feature_dim是网络最后一层的输入feature map的channel数,后面若有dropout层,那么添加一个dropout层后连一个全连接层,否则就直接连一个全连接层,全连接层的输入为feature_dim,输出为数据集的类别num_class。
    def _prepare_tsn(self, num_class):
        feature_dim = getattr(self.base_model, self.base_model.last_layer_name).in_features
        if self.dropout == 0:
            setattr(self.base_model, self.base_model.last_layer_name, nn.Linear(feature_dim, num_class))
            self.new_fc = None
        else:
            setattr(self.base_model, self.base_model.last_layer_name, nn.Dropout(p=self.dropout))
            self.new_fc = nn.Linear(feature_dim, num_class)

        std = 0.001
        if self.new_fc is None:
            normal(getattr(self.base_model, self.base_model.last_layer_name).weight, 0, std)
            constant(getattr(self.base_model, self.base_model.last_layer_name).bias, 0)
        else:
            normal(self.new_fc.weight, 0, std)
            constant(self.new_fc.bias, 0)
        return feature_dim
此部分用到了两个函数
- setattr(self.base_model, self.base_model.last_layer_name, nn.Dropout(p=self.dropout)):setattr是torch.nn.Module类的一个方法,用来为输入的某个属性赋值,一般可以用来修改网络结构,输入包含3个值,分别是基础网络,要赋值的属性名,要赋的值。
最后对全连接层的参数weight做一个0均值且指定标准差(std=0.001)的初始化操作,bias初始化为0 - getattr(self.base_model, self.base_model.last_layer_name):getattr是获得属性值,一般可以用来获取网络结构相关的信息,输入包含2个值,分别是基础网络和要获取值的属性名。
在调用本方法之后,初始化函数需要对非单一RGB输入(光流和差分数据)做修改,主要差别在第一个卷积层,因为该层的输入channel依据不同的输入类型而变化,分别通过_construct_flow_model和_construct_diff_model实现,由于只对单一RGB输入进行了实验,所以这部分不做详细介绍。
附1 多gpu与断点恢复设置
接下来回到main.py的main(),在模型初始化之后,对多gpu与断点恢复进行了设置
model = torch.nn.DataParallel(model, device_ids=args.gpus).cuda()

    if args.resume:
        if os.path.isfile(args.resume):
            print(("=> loading checkpoint '{}'".format(args.resume)))
            checkpoint = torch.load(args.resume)
            args.start_epoch = checkpoint['epoch']
            best_prec1 = checkpoint['best_prec1']
            model.load_state_dict(checkpoint['state_dict'])
            print(("=> loaded checkpoint '{}' (epoch {})"
                  .format(args.evaluate, checkpoint['epoch'])))
        else:
            print(("=> no checkpoint found at '{}'".format(args.resume)))

    cudnn.benchmark = True
使用torch.nn.DataParallel方法设置多GPU训练,而args.resume主要是用来设置是否从断点处继续训练,比如原来训练模型训到一半停止了,希望继续从保存的最新epoch开始训练,因此args.resume要么是默认的None,要么就是保存的模型文件(.pth)的路径。
其中checkpoint = torch.load(args.resume)是用来导入已训练好的模型,model.load_state_dict方法是完成导入模型的参数初始化model这个网络的过程,这也是torch.nn.Module类中的重要方法之一。
2.2 数据导入(dataset.py解析)
继续沿着main.py的main()阅读,下面是进行数据的导入,通过自定义的TSNDataSet类导入数据
    if args.modality != 'RGBDiff':
        normalize = GroupNormalize(input_mean, input_std)
    else:
        normalize = IdentityTransform()

    if args.modality == 'RGB':
        data_length = 1
    elif args.modality in ['Flow', 'RGBDiff']:
        data_length = 5

    train_loader = torch.utils.data.DataLoader(
        TSNDataSet("", args.train_list, num_segments=args.num_segments,
                   new_length=data_length,
                   modality=args.modality,
                   image_tmpl="img_{:05d}.jpg" if args.modality in ["RGB", "RGBDiff"] else args.flow_prefix+"{}_{:05d}.jpg",
                   transform=torchvision.transforms.Compose([
                       train_augmentation,
                       Stack(roll=args.arch == 'BNInception'),
                       ToTorchFormatTensor(div=args.arch != 'BNInception'),
                       normalize,
                   ])),
        batch_size=args.batch_size, shuffle=True,
        num_workers=args.workers, pin_memory=True)

    val_loader = torch.utils.data.DataLoader(
        TSNDataSet("", args.val_list, num_segments=args.num_segments,
                   new_length=data_length,
                   modality=args.modality,
                   image_tmpl="img_{:05d}.jpg" if args.modality in ["RGB", "RGBDiff"] else args.flow_prefix+"{}_{:05d}.jpg",
                   random_shift=False,
                   transform=torchvision.transforms.Compose([
                       GroupScale(int(scale_size)),
                       GroupCenterCrop(crop_size),
                       Stack(roll=args.arch == 'BNInception'),
                       ToTorchFormatTensor(div=args.arch != 'BNInception'),
                       normalize,
                   ])),
        batch_size=args.batch_size, shuffle=False,
        num_workers=args.workers, pin_memory=True)
TSNDataSet继承了pytorch中原生的Dataset类,最终返回torch.utils.data.Dataset类型,通过重写__init__和__getitem__方法自定义数据类型来读取数据。返回的Dataset类要经过torch.utils.data.DataLoader进一步封装成可迭代对象,这些与之前的CNN操作都类似,最终使用前面解析获得的batch size等参数将数据封装成一个可直接获取批大小数据量的类迭代器形式。
在获取数据时,需要特别关注的TSNDataSet这个自定义类,这是在dataset.py中定义的,结构如下图所示
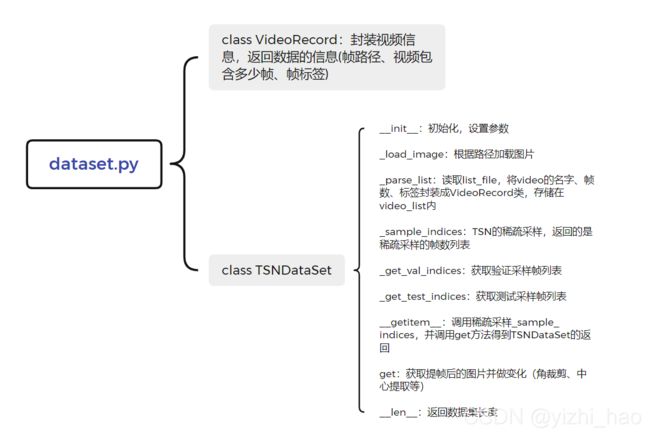
对TSNDataSet几个函数详解:
2.2.1 __ init __函数
    def __init__(self, root_path, list_file,
                 num_segments=3, new_length=1, modality='RGB',
                 image_tmpl='img_{:05d}.jpg', transform=None,
                 force_grayscale=False, random_shift=True, test_mode=False):

        self.root_path = root_path
        self.list_file = list_file
        self.num_segments = num_segments
        self.new_length = new_length
        self.modality = modality
        self.image_tmpl = image_tmpl
        self.transform = transform
        self.random_shift = random_shift
        self.test_mode = test_mode

        if self.modality == 'RGBDiff':
            self.new_length += 1# Diff needs one more image to calculate diff

        self._parse_list()
主要是要明白参数列表,重复的不再做介绍
- root_path:项目根目录
- list_file:训练/测试的列表文件(.txt)地址
- image_tmpl:图片名
- transform:数据变换操作
- random_shift:稀疏采样时是否增加一个随机数
- test_mode:是否为测试模式
2.2.2 _parse_list函数
    def _parse_list(self):
        self.video_list = [VideoRecord(x.strip().split(' ')) for x in open(self.list_file)]
self.list_file是训练或测试的列表文件(.txt文件),里面包含三列内容,用空格键分隔,第一列是video名,第二列是video的帧数,第三列是video的标签,分别将这三个信息提取出来封装为VideoRecord对象存储在video_list中。
2.2.3 _sample_indices函数(稀疏和全局采样的实现)
    def _sample_indices(self, record):
        """
        :param record: VideoRecord
        :return: list
        """
        average_duration = (record.num_frames - self.new_length + 1) // self.num_segments
        if average_duration > 0:
            offsets = np.multiply(list(range(self.num_segments)), average_duration) + randint(average_duration, size=self.num_segments)
        elif record.num_frames > self.num_segments:
            offsets = np.sort(randint(record.num_frames - self.new_length + 1, size=self.num_segments))
        else:
            offsets = np.zeros((self.num_segments,))
        return offsets + 1
对视频进行稀疏采样,采样方式如下:
- 定义平均持续时间average_duration(以下简称ad),即每一个视频分段 S K S_K SK的持续时间,若分段为3,则一个视频分为3段,每段之间的间隔为ad帧,ad计算方式如下
a d = n u m _ f r a m e s − n e w _ l e n g t h + 1 n u m _ s e g m e n t s ad=\frac{num\_frames-new\_length+1}{num\_segments} ad=num_segmentsnum_frames−new_length+1
其中num_frames 为视频帧数,num_segments为视频分段数,对应论文中应为 S K S_K SK,RGB的new_length=1 - 每个接下来就是计算从 S K S_K SK中抽取的片段 T K T_K TK采样的帧序号,从论文中可知, T K T_K TK是从 ( S 1 , S 2 , … , S k ) (S_1,S_2,…,S_k) (S1,S2,…,Sk)中对应的视频片段 S k S_k Sk中随机采样出来的结果,是一个片段(snippet),对于单一RGB输入来说,每个snippet包含一帧图像,又根据步骤1中的ad,每个 T k T_k Tk之间相隔至少ad帧,随机采样计算方式如下:
用offset列表保存帧序列,offset由两个向量相加而成,分别是np.multiply(list(range(self.num_segments)), average_duration)与randint(average_duration, size=self.num_segments),前一个为列表[0,1,…num_segments-1]与ad的对应乘积,当分段数为3时,可取0、1、2,则乘积为[0, ad, 2*ad],后一个为3位向量,向量每个元素取值为0~ad-1,二者相加后再加1即为最终采样的帧序号。这种方式保证了抽取的3个 T K T_K TK分别落在不同的 S K S_K SK上,而采样数num_segments是预设的,这样就达到论文所说的稀疏采样和全局采样的目的。
对于if和elif语句,是为了处理一些特殊的情况,如视频帧数小于段数等,这里不做阐述。
2.2.4 __getitem__函数
    def __getitem__(self, index):
        record = self.video_list[index]

        if not self.test_mode:
            segment_indices = self._sample_indices(record) if self.random_shift else self._get_val_indices(record)
        else:
            segment_indices = self._get_test_indices(record)

        return self.get(record, segment_indices)
此函数为真正的数据读取操作,record = self.video_list[index]得到的record就是一帧图像的信息,index是随机的,和前面数据读取中的shuffle参数对应。
训练时self.test_mode是False,故执行if语句,而self.random_shift默认是True,所以最终执行的是2.2.3的采样函数。
测试时self.test_mode为True,实际执行的是_get_test_indices函数。
2.2.5 _get_test_indices函数
def _get_test_indices(self, record):
        tick = (record.num_frames - self.new_length + 1) / float(self.num_segments)
        offsets = np.array([int(tick / 2.0 + tick * x) for x in range(self.num_segments)])
        return offsets + 1
本方法在模型测试的时候调用。
将输入video按照相等帧数距离分成self.num_segments份,最终返回的offsets就是长度为self.num_segments的numpy array,表示从输入video中取哪些帧作为模型的输入。
2.3 准备和训练
回到main.py的main(),接下来开始准备训练和训练。
2.3.1 Loss、optim与超参数
定义损失函数,优化器和设置一些超参数,从代码中可以看到,这里使用的是交叉熵损失函数,优化器使用SGD方式。
    if args.loss_type == 'nll':
        criterion = torch.nn.CrossEntropyLoss().cuda()
    else:
        raise ValueError("Unknown loss type")

    for group in policies:
        print(('group: {} has {} params, lr_mult: {}, decay_mult: {}'.format(
            group['name'], len(group['params']), group['lr_mult'], group['decay_mult'])))

    optimizer = torch.optim.SGD(policies,
                                args.lr,
                                momentum=args.momentum,
                                weight_decay=args.weight_decay)
2.3.2 训练
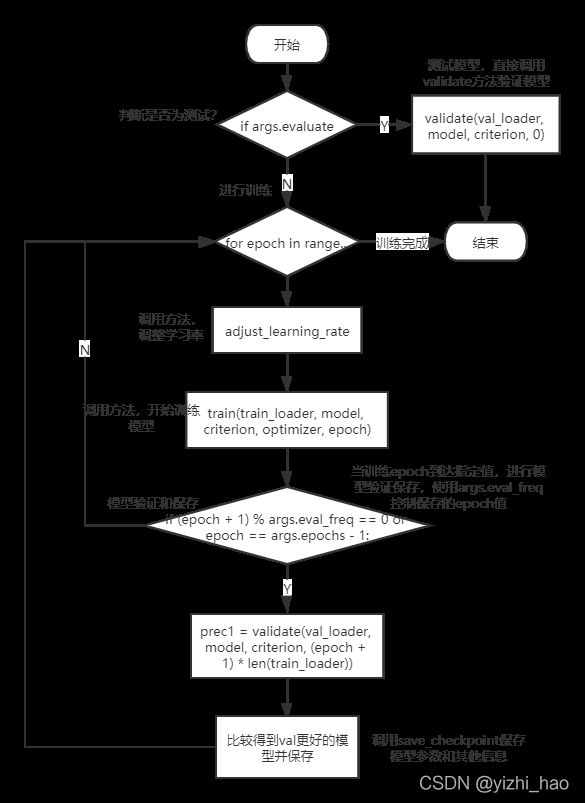
根据args.evaluate参数判断当前是训练模式还是测试模式,此处代码先列出代码的流程,其中涉及具体函数的内容将在2.4小节展开。
    if args.evaluate:
        validate(val_loader, model, criterion, 0)
        return

    for epoch in range(args.start_epoch, args.epochs):
        adjust_learning_rate(optimizer, epoch, args.lr_steps)

        # train for one epoch
        train(train_loader, model, criterion, optimizer, epoch)

        # evaluate on validation set
        if (epoch + 1) % args.eval_freq == 0 or epoch == args.epochs - 1:
            prec1 = validate(val_loader, model, criterion, (epoch + 1) * len(train_loader))

            # remember best prec@1 and save checkpoint
            is_best = prec1 > best_prec1
            best_prec1 = max(prec1, best_prec1)
            save_checkpoint({
                'epoch': epoch + 1,
                'arch': args.arch,
                'state_dict': model.state_dict(),
                'best_prec1': best_prec1,
            }, is_best)
代码流程如下图:
这个过程中有几个非常重要的函数,下面一一进行详解。
2.4 main.py中的其他重要函数
2.4.1 train函数
train函数是整个训练部分的入口
def train(train_loader, model, criterion, optimizer, epoch):
    batch_time = AverageMeter()
    data_time = AverageMeter()
    losses = AverageMeter()
    top1 = AverageMeter()
    top5 = AverageMeter()

    if args.no_partialbn:
        model.module.partialBN(False)
    else:
        model.module.partialBN(True)

    # switch to train mode
    model.train()

    end = time.time()
    for i, (input, target) in enumerate(train_loader):
        # measure data loading time
        data_time.update(time.time() - end)

        target = target.cuda()
        input_var = torch.autograd.Variable(input)
        target_var = torch.autograd.Variable(target)

        # compute output
        output = model(input_var)
        loss = criterion(output, target_var)

        # measure accuracy and record loss
        prec1, prec5 = accuracy(output.data, target, topk=(1,5))
        losses.update(loss.data[0], input.size(0))
        top1.update(prec1[0], input.size(0))
        top5.update(prec5[0], input.size(0))


        # compute gradient and do SGD step
        optimizer.zero_grad()

        loss.backward()

        if args.clip_gradient is not None:
            total_norm = clip_grad_norm(model.parameters(), args.clip_gradient)
            if total_norm > args.clip_gradient:
                print("clipping gradient: {} with coef {}".format(total_norm, args.clip_gradient / total_norm))

        optimizer.step()

        # measure elapsed time
        batch_time.update(time.time() - end)
        end = time.time()

 		# 输出部分代码不再贴出
train函数借助AverageMeter类实例来管理更新变量,关于AverageMeter类在后面解释,这里仅关注train函数的流程。
注意这样一行代码
prec1, prec5 = accuracy(output.data, target, topk=(1,5))
通过accuracy函数计算topK(1,5)的准确率,下面对这个函数解析。
2.4.2 accuracy函数
def accuracy(output, target, topk=(1,)):
    """Computes the precision@k for the specified values of k"""
    maxk = max(topk)
    batch_size = target.size(0)

    _, pred = output.topk(maxk, 1, True, True)
    pred = pred.t()
    correct = pred.eq(target.view(1, -1).expand_as(pred))

    res = []
    for k in topk:
        correct_k = correct[:k].view(-1).float().sum(0)
        res.append(correct_k.mul_(100.0 / batch_size))
    return res
accuracy为准确率计算函数,输入output是模型预测的结果,尺寸为batch size*num class;target是真实标签,长度为batch size。
- batch_size = target.size(0)是读取batch size值
- _, pred = output.topk(maxk, 1, True, True)这里调用了PyTorch中Tensor的topk方法
TopK方法参数解释:- 参数1:maxk表示要计算的是top maxk的结果;
- 参数2:1表示dim,即按行计算(dim=1)
- 参数3:完整的是largest=True,表示返回的是top maxk个最大值
- 参数4:四个参数True,完整的是sorted=True,表示返回排序的结果
- target.view(1, -1).expand_as(pred)先将target的尺寸规范到1*batch size,然后将维度扩充为pred相同的维度,也就是maxk*batch size,例如5*batch size,然后调用eq方法计算两个Tensor矩阵相同元素情况,得到的correct是同等维度的ByteTensor矩阵,1值表示相等,0值表示不等
- correct_k = correct[:k].view(-1).float().sum(0)通过k值来决定是计算top k的准确率,sum(0)表示按照dim 0维度计算和,最后都添加到res列表中并返回
2.4.3 adjust_learning_rate函数
学习率调整函数
def adjust_learning_rate(optimizer, epoch, lr_steps):
    """Sets the learning rate to the initial LR decayed by 10 every 30 epochs"""
    decay = 0.1 ** (sum(epoch >= np.array(lr_steps)))
    lr = args.lr * decay
    decay = args.weight_decay
    for param_group in optimizer.param_groups:
        param_group['lr'] = lr * param_group['lr_mult']
        param_group['weight_decay'] = decay * param_group['decay_mult']
lr_steps是一个列表,里面的值表示到达多少个epoch的时候要改变学习率,在adjust_learning_rate函数中,修改学习率时是默认修改成当前的0.1倍。
2.4.4 save_checkpoint函数
主要功能是保存表现最好的一个模型及其参数。
def save_checkpoint(state, is_best, filename='checkpoint.pth.tar'):
    filename = '_'.join((args.snapshot_pref, args.modality.lower(), filename))
    torch.save(state, filename)
    if is_best:
        best_name = '_'.join((args.snapshot_pref, args.modality.lower(), 'model_best.pth.tar'))
        shutil.copyfile(filename, best_name)
其主要工作是生成模型路径,用torch.save()方法保存模型。
关于torch.save()的用法可参考:
利用torch.save()保存/读取模型等相关参数
2.4.5 validate函数
验证函数validate和训练函数train类似,主要有几个不同点。
- model.eval()将模型设置为evaluate mode
- 没有optimizer.zero_grad()、loss.backward()、optimizer.step()等损失回传或梯度更新操作。
def validate(val_loader, model, criterion, iter, logger=None):
    batch_time = AverageMeter()
    losses = AverageMeter()
    top1 = AverageMeter()
    top5 = AverageMeter()

    # switch to evaluate mode
    model.eval()

    end = time.time()
    for i, (input, target) in enumerate(val_loader):
        target = target.cuda()
        input_var = torch.autograd.Variable(input, volatile=True)
        target_var = torch.autograd.Variable(target, volatile=True)

        # compute output
        output = model(input_var)
        loss = criterion(output, target_var)

        # measure accuracy and record loss
        prec1, prec5 = accuracy(output.data, target, topk=(1,5))

        losses.update(loss.data[0], input.size(0))
        top1.update(prec1[0], input.size(0))
        top5.update(prec5[0], input.size(0))

        # measure elapsed time
        batch_time.update(time.time() - end)
        end = time.time()

        # 打印代码不再贴出

    return top1.avg
2.5 main.py的自定义AverageMeter类
在train和validate函数中均使用了AverageMeter对象来管理变量更新,如
batch_time = AverageMeter()
    data_time = AverageMeter()
    losses = AverageMeter()
    top1 = AverageMeter()
    top5 = AverageMeter()
它的定义如下:
class AverageMeter(object):
    """Computes and stores the average and current value"""
    def __init__(self):
        self.reset()

    def reset(self):
        self.val = 0
        self.avg = 0
        self.sum = 0
        self.count = 0

    def update(self, val, n=1):
        self.val = val
        self.sum += val * n
        self.count += n
        self.avg = self.sum / self.count
初始化调用重置方法reset,当调用该类对象的update方法的时候就会进行变量更新,当要读取某个变量的时候,可以通过对象.属性的方式来读取,比如在train函数中的top1.val读取top1准确率。
2.6 训练数据流
至此,我们从main.py的main()入手,按照执行和调用顺序对tsn-pytorch训练的大部分代码做了解释,下面结合实验过程给出训练部分的数据流。

三、重读论文部分内容
通过阅读和解析代码,现在回顾TSN论文中的网络架构和主体公式
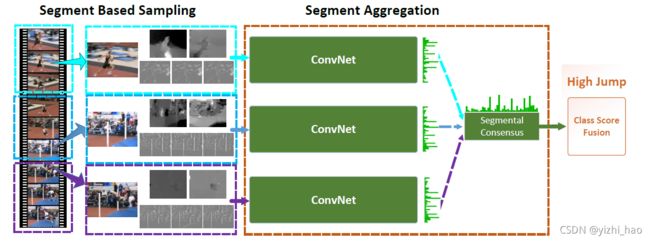

对应本文2.2.3小节(_sample_indices函数(稀疏和全局采样的实现))。
K=3,将视频分为3段,即 S 1 , S 2 , S 3 S_1,S_2,S_3 S1,S2,S3,再对每一段随机采样一个片段,在RGB中,一个片段包含一帧图像,采样方式同样在2.2.3小节,共有3个片段 T 1 , T 2 , T 3 T_1,T_2,T_3 T1,T2,T3,然后将每一个片段都输入到卷积网络中,将输出的三个结果进行分段聚合最终得到视频级别的分类结果。
四、一个问题
有关聚合函数的内容,我在代码中并没有找到很多的信息,在项目models.py定义TSN类别的初始化函数中,仅有这样的一句代码
self.consensus = ConsensusModule(consensus_type)
跟踪代码,可找到tsn-pytorch/ops/basic_ops.py中对于该模块的定义如下
class SegmentConsensus(torch.autograd.Function):

    def __init__(self, consensus_type, dim=1):
        self.consensus_type = consensus_type
        self.dim = dim
        self.shape = None

    def forward(self, input_tensor):
        self.shape = input_tensor.size()
        if self.consensus_type == 'avg':
            output = input_tensor.mean(dim=self.dim, keepdim=True)
        elif self.consensus_type == 'identity':
            output = input_tensor
        else:
            output = None

        return output

    def backward(self, grad_output):
        if self.consensus_type == 'avg':
            grad_in = grad_output.expand(self.shape) / float(self.shape[self.dim])
        elif self.consensus_type == 'identity':
            grad_in = grad_output
        else:
            grad_in = None

        return grad_in

class ConsensusModule(torch.nn.Module):

    def __init__(self, consensus_type, dim=1):
        super(ConsensusModule, self).__init__()
        self.consensus_type = consensus_type if consensus_type != 'rnn' else 'identity'
        self.dim = dim

    def forward(self, input):
        return SegmentConsensus(self.consensus_type, self.dim)(input)
这部分我仅能看出平均池化一个聚合类型,对于论文中提到的其他类型,希望随着后续学习的深入再做研究。
