一个JavaScript Title、alt提示(Tips)源码解读
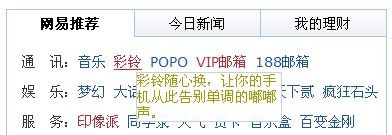
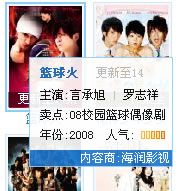
我们知道给某些HTML标签加上title属性后,这个标签对象在浏览的时候,鼠标移上去就会有一个小提示框出来,并显示title定义的内容。而对于图片标签img也有一个alt属性可以起到类似的作用。但很显然这种提示框太单调了,为此有人用JavaScript实现了漂亮的提示框效果,这种效果常用在WEB游戏中,其中下图的网易邮箱与迅雷影视页面就用到这种效果,虽然彼此实现效果有些差异,但整体实现思路是不变的。为了方便大家了解实现的细节,以方便定制自己想要的效果,我上网找了一段不错的源码,并对其进行了详细的注释,希望对大家有帮助。
含注释代码:
/*
**********************************************
一个JavaScript Title、alt提示(Tips)源码解读
代码注释:唐国辉
作者博客:http://webflash.cnblogs.com
********************************************** */
// 定义getElementById快捷方式
function $(obj)
{
if ( typeof (obj) == ' object ' )
{
return obj;
}
else
{
return document.getElementById(obj);
}
}
// 定义document.write快捷方式,代替复杂的DOM操作
function $P(str)
{
document.write(str);
}
// 脚本错误屏蔽
window.onerror = function ()
{
return true ;
};
/*
定义变量:
pltsPop(提示内容文字,来自对象的alt或title属性,不包含HTML)
toolTip(提示内容DOM对象,即后面定义的content变量)
pltsPoptop(上方提示标题DOM对象)
pltsPopbot(下方提示标题DOM对象)
topLeft(左上角提示标题DOM对象)
botLeft(左下方提示标题DOM对象)
topRight(右上角提示标题DOM对象)
botRight(右下方提示标题DOM对象)
*/
var pltsPop,toolTip,pltsPoptop,pltsPopbot,topLeft,botLeft,topRight,botRight;
// 设置提示窗口相对提示对象的位置偏移量
var pltsoffsetX = 10 ;
var pltsoffsetY = 15 ;
var pltsTitle = "" ;
// 创建一个绝对定位的隐藏图层
$P( ' <div id=\"pltsTipLayer\" style="display:none; position:absolute; z-index:10001"></div> ' );
// 把刚创建的层对象赋值给一个变量,此语句一定要出现在层创建之后
var pltsTipLayer = $( ' pltsTipLayer ' );
// 定义鼠标移到对象上时处理函数,主要提取alt或title属性值,并初始化提示框HTML及样式
function PltsMouseOver(ev)
{
// 兼容不同浏览器的事件和对象获取
var Event = window.event || ev;
var o = Event.srcElement || Event.target;
// 如果对象alt属性存在并且不等于空,就把它的值存到dypop属性,并清空当前alt内容
if (o.alt != null && o.alt != "" )
{
o.dypop = o.alt;
o.alt = "" ;
}
// 如上,对具有title属性的对象作同样的判断和处理,清空title属性值是让对象默认的提示效果失效
if (o.title != null && o.title != "" )
{
o.dypop = o.title;
o.title = "" ;
}
pltsPop = o.dypop;
if (pltsPop != null && pltsPop != "" && typeof (pltsPop) != " undefined " )
{
// 把上面创建的提示层显示出来,暂时移到左边很远,虽然显示但用户看不到
pltsTipLayer.style.left =- 1000 ;
pltsTipLayer.style.display = '' ;
/*
格式化提示信息,把其中的\n换成<br/>,比如像下面这样定义title值,显示出来会是作者和性别各一行,因为Tom 和Sex之间有\n:
<div title="Author:Tom
Sex:male">Article title </div>
*/
var Msg = pltsPop.replace( / \n / g, " <br/> " );
Msg = Msg.replace( / \0x13 / g, " <br/> " );
// 定义正则表达式检查提示内容是否含有类似这样的内容“{提示标题}”,而且{}和 {{}是排除在处的,如果没有就默认用“简介”作为提示标题
var re = / \{(.[^\{]*)\} / ig;
if ( ! re.test(Msg))
{
pltsTitle = " <label style=\ " color:# 000 \ " >简介</label> " ;
}
else
{
re = / \{(.[^\{]*)\}(.*) / ig;
// 提取{}中的内容
pltsTitle = Msg.replace(re, " $1 " ) + " " ;
// 把{内容},包括{}在内的内容替换为空,得到最终提示正文的内容
re = / \{(.[^\{]*)\} / ig;
Msg = Msg.replace(re, "" );
}
// 定义提示框内容Html与Style,并把获得的相关内容放到对应变量中
var content = " <dl id=\ " toolTip\ " style=\ " - moz - opacity: 0.85 ;opacity: 0.85 ;FILTER:alpha(opacity = 85 );padding:2px;background:#fff;\ " ><dd id=\ " pltsPoptop\ " class=\ " toolTipTitle\ " style=\ " line - height:20px;\ " ><p id=\ " topLeft\ " class=\ " left\ " ><b><label style=\ " color:#ffffff\ " >↖</label> " + pltsTitle + " </b></p><p id=\ " topRight\ " class=\ " right\ " style=\ " display:none\ " ><b> " + pltsTitle + " <label style=\ " color:#ffffff\ " >↗</label ></b></p></dd><dd class=\ " toolTipMsg\ " > " + Msg + " </dd><dd id=\ " pltsPopbot\ " style=\ " display:none\ " class=\ " toolTipTitle\ " ><p id=\ " botLeft\ " class=\ " left\ " ><b><label style=\ " color:#ffffff\ " >↙</label > " + pltsTitle + " </b></p><p id=\ " botRight\ " class=\ " right\ " style=\ " display:none\ " ><b> " + pltsTitle + " <label style=\ " color:#ffffff\ " >↘</label></b></p></dd></dl> " ;
pltsTipLayer.innerHTML = content;
toolTip = $( " toolTip " );
pltsPoptop = $( " pltsPoptop " );
pltsPopbot = $( " pltsPopbot " );
topLeft = $( " topLeft " );
botLeft = $( " botLeft " );
topRight = $( " topRight " );
botRight = $( " botRight " );
// 设置提示框宽度,它的大小是提示框自身大小和浏览器可见窗口大小一半两者中的最小值,即在浏览器窗口小过提示框本身宽度后,会自动调整提示框大小到一个新的宽度
toolTip.style.width = Math.min(pltsTipLayer.clientWidth,document.documentElement.clientWidth / 2.2)+"px";
}
else
{
pltsTipLayer.innerHTML = '' ;
pltsTipLayer.style.display = ' none ' ;
}
}
// 定义鼠标在对象上移动时处理函数,每移动一像素触发一次事件
function PltsMouseMove(ev)
{
if (pltsTipLayer.innerHTML == '' )
return true ;
var Event = window.event || ev;
// 获取光标当前X、Y坐标
var MouseX = Event.clientX;
var MouseY = Event.clientY;
// 获取提示框宽高度
var popHeight = pltsTipLayer.clientHeight;
var popWidth = pltsTipLayer.clientWidth;
// 如果当前光标Y坐标+提示框Y轴偏移量+提示框高度>当前窗口可见高度,一般处理窗口中下方要提示的对象,比如页脚有一个链接需要提示时就会是这种情况,此时考虑使用下方标题
if (MouseY + pltsoffsetY + popHeight > document.documentElement.clientHeight)
{
// 提示框显示在要提示对象上方时需要一个额外值popTopAdjust作为提示框最终定位的依据
popTopAdjust =- popHeight - pltsoffsetY * 1.5 ;
pltsPoptop.style.display = " none " ;
pltsPopbot.style.display = "" ;
}
else
{
popTopAdjust = 0 ;
pltsPoptop.style.display = "" ;
pltsPopbot.style.display = " none " ;
}
// 判断使用左标题还是右标题
if (MouseX + pltsoffsetX + popWidth > document.documentElement.clientWidth)
{
popLeftAdjust =- popWidth - pltsoffsetX * 2 ;
topLeft.style.display = " none " ;
botLeft.style.display = " none " ;
// 下面两个标题都显示,其实最终看到的只有一个位置上的标题,因为topRight是pltsPoptop的子元素,如果 pltsPoptop不显示,topRight显示也是看不到的,botLeft同理
topRight.style.display = "" ;
botRight.style.display = "" ;
}
else
{
popLeftAdjust = 0 ;
topLeft.style.display = "" ;
botLeft.style.display = "" ;
topRight.style.display = " none " ;
botRight.style.display = " none " ;
}
// 把综合处理得到的提示框最终位置值设置到对象,其中scrollTop是网页被卷去的高度,因为style.top是相对整个文档的而不是浏览器窗口,所以要算上滚动隐藏的高度,scrollLeft同理
pltsTipLayer.style.left = MouseX + pltsoffsetX + document.documentElement.scrollLeft + popLeftAdjust + " px " ;
pltsTipLayer.style.top = MouseY + pltsoffsetY + document.documentElement.scrollTop + popTopAdjust + " px " ;
return true ;
}
// 定义事件绑定函数
function PltsInit()
{
document.onmouseover = PltsMouseOver;
document.onmousemove = PltsMouseMove;
}
// 调用事件绑定函数
PltsInit();
一个JavaScript Title、alt提示(Tips)源码解读
代码注释:唐国辉
作者博客:http://webflash.cnblogs.com
********************************************** */
// 定义getElementById快捷方式
function $(obj)
{
if ( typeof (obj) == ' object ' )
{
return obj;
}
else
{
return document.getElementById(obj);
}
}
// 定义document.write快捷方式,代替复杂的DOM操作
function $P(str)
{
document.write(str);
}
// 脚本错误屏蔽
window.onerror = function ()
{
return true ;
};
/*
定义变量:
pltsPop(提示内容文字,来自对象的alt或title属性,不包含HTML)
toolTip(提示内容DOM对象,即后面定义的content变量)
pltsPoptop(上方提示标题DOM对象)
pltsPopbot(下方提示标题DOM对象)
topLeft(左上角提示标题DOM对象)
botLeft(左下方提示标题DOM对象)
topRight(右上角提示标题DOM对象)
botRight(右下方提示标题DOM对象)
*/
var pltsPop,toolTip,pltsPoptop,pltsPopbot,topLeft,botLeft,topRight,botRight;
// 设置提示窗口相对提示对象的位置偏移量
var pltsoffsetX = 10 ;
var pltsoffsetY = 15 ;
var pltsTitle = "" ;
// 创建一个绝对定位的隐藏图层
$P( ' <div id=\"pltsTipLayer\" style="display:none; position:absolute; z-index:10001"></div> ' );
// 把刚创建的层对象赋值给一个变量,此语句一定要出现在层创建之后
var pltsTipLayer = $( ' pltsTipLayer ' );
// 定义鼠标移到对象上时处理函数,主要提取alt或title属性值,并初始化提示框HTML及样式
function PltsMouseOver(ev)
{
// 兼容不同浏览器的事件和对象获取
var Event = window.event || ev;
var o = Event.srcElement || Event.target;
// 如果对象alt属性存在并且不等于空,就把它的值存到dypop属性,并清空当前alt内容
if (o.alt != null && o.alt != "" )
{
o.dypop = o.alt;
o.alt = "" ;
}
// 如上,对具有title属性的对象作同样的判断和处理,清空title属性值是让对象默认的提示效果失效
if (o.title != null && o.title != "" )
{
o.dypop = o.title;
o.title = "" ;
}
pltsPop = o.dypop;
if (pltsPop != null && pltsPop != "" && typeof (pltsPop) != " undefined " )
{
// 把上面创建的提示层显示出来,暂时移到左边很远,虽然显示但用户看不到
pltsTipLayer.style.left =- 1000 ;
pltsTipLayer.style.display = '' ;
/*
格式化提示信息,把其中的\n换成<br/>,比如像下面这样定义title值,显示出来会是作者和性别各一行,因为Tom 和Sex之间有\n:
<div title="Author:Tom
Sex:male">Article title
</div>*/
var Msg = pltsPop.replace( / \n / g, " <br/> " );
Msg = Msg.replace( / \0x13 / g, " <br/> " );
// 定义正则表达式检查提示内容是否含有类似这样的内容“{提示标题}”,而且{}和 {{}是排除在处的,如果没有就默认用“简介”作为提示标题
var re = / \{(.[^\{]*)\} / ig;
if ( ! re.test(Msg))
{
pltsTitle = " <label style=\ " color:# 000 \ " >简介</label> " ;
}
else
{
re = / \{(.[^\{]*)\}(.*) / ig;
// 提取{}中的内容
pltsTitle = Msg.replace(re, " $1 " ) + " " ;
// 把{内容},包括{}在内的内容替换为空,得到最终提示正文的内容
re = / \{(.[^\{]*)\} / ig;
Msg = Msg.replace(re, "" );
}
// 定义提示框内容Html与Style,并把获得的相关内容放到对应变量中
var content = " <dl id=\ " toolTip\ " style=\ " - moz - opacity: 0.85 ;opacity: 0.85 ;FILTER:alpha(opacity = 85 );padding:2px;background:#fff;\ " ><dd id=\ " pltsPoptop\ " class=\ " toolTipTitle\ " style=\ " line - height:20px;\ " ><p id=\ " topLeft\ " class=\ " left\ " ><b><label style=\ " color:#ffffff\ " >↖</label> " + pltsTitle + " </b></p><p id=\ " topRight\ " class=\ " right\ " style=\ " display:none\ " ><b> " + pltsTitle + " <label style=\ " color:#ffffff\ " >↗</label ></b></p></dd><dd class=\ " toolTipMsg\ " > " + Msg + " </dd><dd id=\ " pltsPopbot\ " style=\ " display:none\ " class=\ " toolTipTitle\ " ><p id=\ " botLeft\ " class=\ " left\ " ><b><label style=\ " color:#ffffff\ " >↙</label > " + pltsTitle + " </b></p><p id=\ " botRight\ " class=\ " right\ " style=\ " display:none\ " ><b> " + pltsTitle + " <label style=\ " color:#ffffff\ " >↘</label></b></p></dd></dl> " ;
pltsTipLayer.innerHTML = content;
toolTip = $( " toolTip " );
pltsPoptop = $( " pltsPoptop " );
pltsPopbot = $( " pltsPopbot " );
topLeft = $( " topLeft " );
botLeft = $( " botLeft " );
topRight = $( " topRight " );
botRight = $( " botRight " );
// 设置提示框宽度,它的大小是提示框自身大小和浏览器可见窗口大小一半两者中的最小值,即在浏览器窗口小过提示框本身宽度后,会自动调整提示框大小到一个新的宽度
toolTip.style.width = Math.min(pltsTipLayer.clientWidth,document.documentElement.clientWidth / 2.2)+"px";
}
else
{
pltsTipLayer.innerHTML = '' ;
pltsTipLayer.style.display = ' none ' ;
}
}
// 定义鼠标在对象上移动时处理函数,每移动一像素触发一次事件
function PltsMouseMove(ev)
{
if (pltsTipLayer.innerHTML == '' )
return true ;
var Event = window.event || ev;
// 获取光标当前X、Y坐标
var MouseX = Event.clientX;
var MouseY = Event.clientY;
// 获取提示框宽高度
var popHeight = pltsTipLayer.clientHeight;
var popWidth = pltsTipLayer.clientWidth;
// 如果当前光标Y坐标+提示框Y轴偏移量+提示框高度>当前窗口可见高度,一般处理窗口中下方要提示的对象,比如页脚有一个链接需要提示时就会是这种情况,此时考虑使用下方标题
if (MouseY + pltsoffsetY + popHeight > document.documentElement.clientHeight)
{
// 提示框显示在要提示对象上方时需要一个额外值popTopAdjust作为提示框最终定位的依据
popTopAdjust =- popHeight - pltsoffsetY * 1.5 ;
pltsPoptop.style.display = " none " ;
pltsPopbot.style.display = "" ;
}
else
{
popTopAdjust = 0 ;
pltsPoptop.style.display = "" ;
pltsPopbot.style.display = " none " ;
}
// 判断使用左标题还是右标题
if (MouseX + pltsoffsetX + popWidth > document.documentElement.clientWidth)
{
popLeftAdjust =- popWidth - pltsoffsetX * 2 ;
topLeft.style.display = " none " ;
botLeft.style.display = " none " ;
// 下面两个标题都显示,其实最终看到的只有一个位置上的标题,因为topRight是pltsPoptop的子元素,如果 pltsPoptop不显示,topRight显示也是看不到的,botLeft同理
topRight.style.display = "" ;
botRight.style.display = "" ;
}
else
{
popLeftAdjust = 0 ;
topLeft.style.display = "" ;
botLeft.style.display = "" ;
topRight.style.display = " none " ;
botRight.style.display = " none " ;
}
// 把综合处理得到的提示框最终位置值设置到对象,其中scrollTop是网页被卷去的高度,因为style.top是相对整个文档的而不是浏览器窗口,所以要算上滚动隐藏的高度,scrollLeft同理
pltsTipLayer.style.left = MouseX + pltsoffsetX + document.documentElement.scrollLeft + popLeftAdjust + " px " ;
pltsTipLayer.style.top = MouseY + pltsoffsetY + document.documentElement.scrollTop + popTopAdjust + " px " ;
return true ;
}
// 定义事件绑定函数
function PltsInit()
{
document.onmouseover = PltsMouseOver;
document.onmousemove = PltsMouseMove;
}
// 调用事件绑定函数
PltsInit();
调用方法:把上面的代码存到一个外部独立的JS文件中,然后在网页页面中包含这个JS文件,最后给需要提示的对象加上title属性,图片可以加alt属性就可以了。举例:<a href="#" title="{完整标题}完整标题文字">缩写标题</a> 或 <img src="#" alt="图片提示" />
相关链接:
1、http://www.cnblogs.com/czh-liyu/archive/2007/12/30/1021146.html
2、http://boxover.swazz.org
3、http://blog.csdn.net/lanmao100/archive/2008/10/31/3191767.aspx