【TypeScript】深入学习TypeScript类(上)
TypeScript学习:TypeScript从入门到精通
蓝桥杯国赛真题解析:蓝桥杯Web国赛真题解析
蓝桥省赛真题解析:蓝桥杯Web省赛真题解析
个人简介:即将大三的学生,热爱前端,热爱生活
你的一键三连是我更新的最大动力❤️!
文章目录
- 前言
- 1、类成员
-
- 类属性
- readonly
- 构造器
- 方法
- Getters/Setters
- 索引签名
- 2、类继承
-
- implements子句
- extends子句
- 重写方法
- 初始化顺序
- 继承内置类型
- 3、成员的可见性
-
- public
- protected
- private
- 参数属性
- 注意事项
- 4、静态成员
-
- 特殊静态名称
- 没有静态类
- 5、静态块
- 结语
前言
最近博主一直在创作
TypeScript的内容,所有的TypeScript文章都在我的TypeScript从入门到精通专栏里,每一篇文章都是精心打磨的优质好文,并且非常的全面和细致,期待你的订阅❤️
本篇文章将深入去讲解TypeScript中的class类(由于内容较多,将其分为上下两篇),这也许会是你看过的最全面最细致的TypeScript教程,点赞关注收藏不迷路!
1、类成员
类属性
在一个类上声明字段,创建一个公共的可写属性:
class Point {
    x: number;
    y: number;
}
const pt = new Point();
pt.x = 0;
pt.y = 0;
表示在类Point上声明了类型为number的两个属性,这时编译器可能会报错:
这由tsconfig.json下的strictPropertyInitialization字段控制:
strictPropertyInitialization控制类字段是否需要在构造函数中初始化- 将其设为
false可关闭该报错,但这是不提倡的
我们应该在声明属性时明确对其设置初始化器,这些初始化器将在类被实例化时自动运行:
class Point {
    x: number = 0;
    y: number = 0;
}
const pt = new Point();
// Prints 0, 0
console.log(`${pt.x}, ${pt.y}`);
或:
class Point {
    x: number;
    y: number;
    constructor() {
        this.x = 0;
        this.y = 0;
    }
}
const pt = new Point();
// Prints 0, 0
console.log(`${pt.x}, ${pt.y}`);
类中的类型注解是可选的,如果不指定,将会是一个隐含的any类型,但TypeScript会根据其初始化值来推断其类型:
如果你打算通过构造函数以外的方式来初始化一个字段,为了避免报错,你可以使用以下方法:
- 确定的赋值断言操作符
! - 使用可选属性
? - 明确添加未定义属性(与可选属性原理相同)
class Point {
    // 没有初始化,但没报错
    x!: number; // 赋值断言!
    y?: number; // 可选属性?
    z: number | undefined; // 添加未定义类型
}
const pt = new Point();
console.log(pt.x, pt.y, pt.z); // undefined undefined undefined
pt.x = 1;
pt.y = 2;
pt.z = 3;
console.log(pt.x, pt.y, pt.z); // 1 2 3
readonly
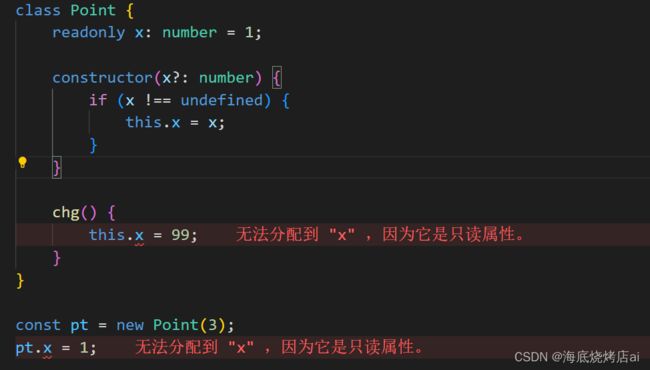
readonly修饰符,修饰只读属性,可以防止在构造函数之外对字段进行赋值:

设置readonly的属性只能在初始化表达式或constructor中进行修改赋值,连类中的方法(如chg)都不行
构造器
类中的构造函数constructor与函数相似,可以添加带有类型注释的参数,默认值和重载:
class Point {
    x: number;
    y: number;
    // 带类型注释和默认值的正常签名
    constructor(x: number = 1, y: number = 2) {
        this.x = x;
        this.y = y;
    }
}
class Point {
    x: number;
    y: number;
    // 重载
    constructor(x: number);
    constructor(x: number, y: number);
    constructor(x: number = 1, y: number = 2) {
        this.x = x;
        this.y = y;
    }
}
类的构造函数签名和函数签名之间只有一些区别:
- 构造函数不能有类型参数(泛型参数)
- 构造函数不能有返回类型注释——返回的总是类的实例类型
Super调用
就像在JavaScript中一样,如果你有一个基类,在使用任何 this.成员之前,你需要在构造器主体中调用super():
class Base {
    k = 4;
}
class Derived extends Base {
    constructor() {
        super();
        console.log(this.k);
    }
}
方法
类上的函数属性称为方法,可以使用与函数和构造函数相同的所有类型注释:
class Point {
    x = 10;
    y = 10;
    scale(n: number): void {
        this.x *= n;
        this.y *= n;
    }
}
除了标准的类型注解,TypeScript并没有为方法添加其他新的东西。
注意: 在一个方法体中,仍然必须通过this访问字段和其他方法。方法体中的非限定名称将总是指代包围范围内的东西:
let x: number = 0;
class Point {
    x = 10;
    scale(n: number): void {
        x *= n; // 这是在修改第一行的x变量,不是类属性
    }
}
Getters/Setters
使用Getters/Setters的规范写法:
class Point {
    _x = 0;
    get x() {
        console.log("get");
        return this._x;
    }
    set x(value: number) {
        console.log("set");
        this._x = value;
    }
}
let a = new Point();
// 调用了set
a.x = 8; // set
// 调用了get
console.log(a.x); // get 8
这里的命名规范:
- 以
_开头定义用于get/set的属性(与普通属性进行区别):_x - 用
get和set前缀分别定义get/set函数,函数名相同都为x,表示这俩是属于_x的get/set函数 - 在访问和修改时直接
.x触发get/set,而不是._x - 这样一来在使用时就像使用普通属性一样,如上
a.x = 8和console.log(a.x)
TypeScript对访问器有一些特殊的推理规则:
从TypeScript 4.3开始,可以有不同类型的访问器用于获取和设置:
class Thing {
    _size = 0;
    get size(): number {
        return this._size;
    }

    set size(value: string | number | boolean) { // 可以有不同类型的
        let num = Number(value);
        // 不允许NaN、Infinity等
        if (!Number.isFinite(num)) {
            this._size = 0;
            return;
        }
        this._size = num;
    }
}
索引签名
类也可以像其它对象类型一样使用索引签名,它们的索引签名的作用相同:
class MyClass {
    [s: string]: boolean | ((s: string) => boolean);
    check(s: string) {
        return this[s] as boolean;
    }
}
因为索引签名类型需要同时捕获方法的类型(这就是为什么上面的索引类型要|((s: string) => boolean),其目的就是要兼容check方法),所以要有用地使用这些类型并不容易
一般来说,最好将索引数据存储在另一个地方,而不是在类实例本身
2、类继承
implements子句
implements 子句可以使类实现一个接口(使类的类型服从该接口),那么使用它就可以检查一个类是否满足了一个特定的接口:
interface Animal {
    ping(): void;
}

class Dog implements Animal {
    ping(): void {
        console.log("旺!");
    }
}

// 报错:
// 类“Cat”错误实现接口“Animal”:
// 类型 "Cat" 中缺少属性 "ping",但类型 "Animal" 中需要该属性。
class Cat implements Animal {
    pong(): void {
        console.log("喵!");
    }
}
类也可以实现多个接口,例如 class C implements A, B
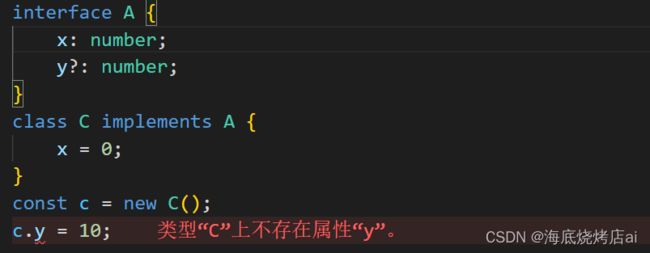
注意: implements 子句只是检查类的类型是否符合特定接口,它根本不会改变类的类型或其方法,如:一个类实现一个带有可选属性的接口并不能创建该属性:
extends子句
类可以从基类中扩展出来(称为派生类),派生类拥有其基类的所有属性和方法,也可以定义额外的成员:
class Animal {
    move() {
        console.log("move");
    }
}
class Dog extends Animal {
    woof() {
        console.log("woof");
    }
}
const d = new Dog();
// 基类的类方法
d.move();
// 派生类自己的类方法
d.woof();
注意:
在【TypeScript】深入学习TypeScript对象类型扩展类型部分中我们说到接口可以使用extends从多个类型中扩展:extends User, Age
而类使用extends只能扩展一个类:
重写方法
派生类可以覆盖基类的字段或属性,并且可以使用super. 语法来访问基类方法:
class Base {
    greet() {
        console.log("Hello, world!");
    }
}
class Derived extends Base {
	// 在Derived中重写greet方法
    greet(name?: string) {
        if (name === undefined) {
            // 调用基类的greet方法
            super.greet();
        } else {
            console.log(`Hello, ${name.toUpperCase()}`);
        }
    }
}
const d = new Derived();
d.greet(); // "Hello, world!"
d.greet("reader"); // "Hello, READER"
通过基类引用来引用派生类实例是合法的,并且是非常常见的:
// 通过基类引用来引用派生类实例
// b的类型引用的是基类Base,但其可以引用Base的派生类实例
const b: Base = new Derived();
// 没问题
b.greet();
TypeScript强制要求派生类总是其基类的一个子类型,如果违法约定就会报错:

上面报错是因为“(name: string) => void”不是类型“() => void”的子类型,而先前使用的“(name?: string) => void”才是“() => void”子类型
这里是不是有人感觉我说反了,会感觉() => void是(name?: string) => void的子类型才对吧,那么我就来验证一下我的说法:
type A = () => void;
type B = (name?: string) => void;
type C = B extends A ? number : string;
const num: C = 1;
这里可以看到num是number类型,则type C=number,则B extends A成立,所以A是B的基类,B是从A扩展来的,则称B是A的子类型,这就印证了上面的结论
其实这里子类型的"子"并不是说它是谁的一部分,而是说它是继承了谁
例如上面的类型A和B,如果单从范围上讲,B肯定是包含A的,但就因为B是在A的基础上扩展开来的,是继承的A,所以无论B范围比A大多少,它仍然是A的子类型
这就好像我们人类生了孩子,无论孩子的能力,眼光比父母大多少,他任然是父母的子类一样
初始化顺序
类初始化的顺序是:
- 基类的字段被初始化
- 基类构造函数运行
- 派生类的字段被初始化
- 派生类构造函数运行
class Base {
    name = "base";
    constructor() {
        console.log(this.name);
    }
}
class Derived extends Base {
    name = "derived";
}
// 打印 "base", 而不是 "derived"
const d = new Derived();
继承内置类型
注意:如果你不打算继承
Array、Error、Map等内置类型,或者你的编译目标明确设置为ES6/ES2015或以上,你可以跳过这一部分。
在ES6/ES2015中,返回对象的构造函数隐含地替代了任何调用super(...) 的this 的值。生成的构造函数代码有必要捕获super(...) 的任何潜在返回值并将其替换为this
因此,子类化Error 、Array 等可能不再像预期那样工作。这是由于Error 、Array 等的构造函数使用ES6的new.target 来调整原型链;然而,在ES5中调用构造函数时,没有办法确保new.target 的值。默认情况下,其他低级编译器(ES5以下)通常具有相同的限制。
看下面的一个子类:
class MsgError extends Error {
    constructor(m: string) {
        super(m);
    }
    sayHello() {
        // this.message为基类Error上的属性
        return "hello " + this.message;
    }
}

const msgError = new MsgError("hello");

console.log(msgError.sayHello());
上述代码,在编程成ES6及以上版本的JS后,能够正常运行,但当我们修改tsconfig.json的target为ES5时,使其编译成ES5版本的,你可能会发现:
-
方法在构造这些子类所返回的对象上可能是未定义的,所以调用
sayHello会导致错误。 -
instanceof将在子类的实例和它们的实例之间被打破,所以new MsgError("hello") instanceof MsgError)将返回false:console.log(new MsgError("hello") instanceof MsgError); // false
官方建议,可以在任何super(...) 调用后立即手动调整原型:
class MsgError extends Error {
    constructor(m: string) {
        super(m);
        // 明确地设置原型。
		// 将this上的原型设置为MsgError的原型
        Object.setPrototypeOf(this, MsgError.prototype);
    }
    sayHello() {
        // this.message为基类Error上的属性
        return "hello " + this.message;
    }
}
const msgError = new MsgError("hello");
console.log(msgError.sayHello()); // hello hello
console.log(new MsgError("hello") instanceof MsgError); // true
MsgError 的任何子类也必须手动设置原型。对于不支持Object.setPrototypeOf 的运行时,可以使用__proto__ 来代替:
class MsgError extends Error {
    // 先声明一下__proto__,其类型就是当前类
    // 不然调用this.__proto__时会报:类型“MsgError”上不存在属性“__proto__”
    __proto__: MsgError;
    constructor(m: string) {
        super(m);
        // 明确地设置原型。
        this.__proto__ = MsgError.prototype;
    }
    sayHello() {
        // this.message为基类Error上的属性
        return "hello " + this.message;
    }
}
const msgError = new MsgError("hello");
console.log(msgError.sayHello()); // hello hello
console.log(new MsgError("hello") instanceof MsgError); // true
不幸的是,这些变通方法在Internet Explorer 10 和更早的版本上不起作用。我们可以手动将原型中的方法复制到实例本身(例如MsgError.prototype 到this ),但是原型链本身不能被修复。
3、成员的可见性
可以使用TypeScript来控制某些方法或属性对类外的代码是否可见
public
public定义公共属性,是类成员的默认可见性,可以在任何地方被访问:
class Greeter {
    public greet() {
        console.log("hi!");
    }
}
const g = new Greeter();
g.greet();
因为public 已经是默认的可见性修饰符,所以一般不需要在类成员上写它,但为了风格/可读性的原因,可能会选择这样做
protected
protected定义受保护成员,仅对声明它们的类和其子类可见:
class Greeter {
    protected name = "Ailjx";
    greet() {
        console.log(this.name);
    }
}
class Child extends Greeter {
    childGreet() {
        console.log(this.name);
    }
}
const g = new Greeter();
const c = new Child();
g.greet(); // Ailjx
c.childGreet(); // Ailjx

// ❌❌报错:属性“name”受保护,只能在类“Greeter”及其子类中访问。
console.log(g.name); // 无权访问
-
暴露受保护的成员
派生类需要遵循它们的基类契约,但可以选择公开具有更多能力的基类的子类型,这包括将受保护的成员变成公开:class Base { protected m = 10; } class Derived extends Base { // 基类的受保持属性m被修改为公开的了 // 没有修饰符,所以默认为公共public m = 15; } const d = new Derived(); console.log(d.m); // OK
private
private 定义私有属性,比protected 还要严格,它仅允许在当前类中访问
class Base {
    private name = "Ailjx";
    greet() {
        // 只能在当前类访问
        console.log(this.name);
    }
}
class Child extends Base {
    childGreet() {
        // 不能在子类中访问
        // ❌❌报错:属性“name”为私有属性,只能在类“Base”中访问
        console.log(this.name);
    }
}
const b = new Base();
// 不能在类外访问
// ❌❌报错:属性“name”为私有属性,只能在类“Base”中访问。
console.log(b.name); // 无权访问
private 允许在类型检查时使用括号符号进行访问:
console.log(b["name"]); // "Ailjx"
因为私有private成员对派生类是不可见的,所以派生类不能像使用protected一样增加其可见性
-
跨实例访问
TypeScript中同一个类的不同实例之间可以相互访问对方的私有属性:class A { private x = 0; constructor(x: number) { this.x = x; } public sameAs(other: A) { // 可以访问 return other.x === this.x; } } const a1 = new A(1); const a2 = new A(10); const is = a1.sameAs(a2); console.log(is); // false
参数属性
TypeScript提供了特殊的语法,可以将构造函数参数变成具有相同名称和值的类属性,这些被称为参数属性,通过在构造函数参数前加上可见性修饰符 public 、private 、protected 或readonly 中的一个来创建,由此产生的字段会得到这些修饰符:
class A {
    // c为私有的可选属性
    constructor(public a: number, protected b: number, private c?: number) {}
}
const a = new A(1, 2, 3);
console.log(a.a); // 1
注意事项
像TypeScript类型系统的其他方面一样, private 和protected 只在类型检查中被强制执行,这意味着在JavaScript的运行时结构,如in 或简单的属性查询,仍然可以访问一个私有或保护的成员:
class MySafe {
    private secretKey = 12345;
}

const s = new MySafe();
// 报错:属性“secretKey”为私有属性,只能在类“MySafe”中访问。
console.log(s.secretKey);
上方TS代码虽然会报错,但当我们运行其编译后的JS文件时会发现其正常的打印出了12345
这意味着 private 和protected 只起到了报错提示作用,并不会真正限制编译后的JS文件,即这些字段是软性私有的,不能严格执行私有特性
与TypeScript的 private 不同,JavaScript的private 字段(#)在编译后仍然是private 的,并且不提供前面提到的像括号符号访问那样的转义窗口,使其成为硬private :
class Dog {
    #barkAmount = 0;
    constructor() {
        console.log(this.#barkAmount); // 0
    }
}
const dog = new Dog();
// TS报错:类型“Dog”上不存在属性“barkAmount”,编译后的JS运行时打印undefined
console.log(dog.barkAmount);

// TS报错:属性 "#barkAmount" 在类 "Dog" 外部不可访问,因为它具有专用标识符。
// 编译后的JS也直接报错
console.log(dog.#barkAmount);
上述代码在编译到ES2021或更低版本时,TypeScript将使用WeakMaps来代替 # :
"use strict";
var __classPrivateFieldGet = (this && this.__classPrivateFieldGet) || function (receiver, state, kind, f) {
    if (kind === "a" && !f) throw new TypeError("Private accessor was defined without a getter");
    if (typeof state === "function" ? receiver !== state || !f : !state.has(receiver)) throw new TypeError("Cannot read private member from an object whose class did not declare it");
    return kind === "m" ? f : kind === "a" ? f.call(receiver) : f ? f.value : state.get(receiver);
};
var _Dog_barkAmount;
class Dog {
    constructor() {
        _Dog_barkAmount.set(this, 0);
        console.log(__classPrivateFieldGet(this, _Dog_barkAmount, "f")); // 0
    }
}
_Dog_barkAmount = new WeakMap();
const dog = new Dog();
// TS报错:类型“Dog”上不存在属性“barkAmount”,编译后的JS运行时打印undefined
console.log(dog.barkAmount);
// TS报错:属性 "#barkAmount" 在类 "Dog" 外部不可访问,因为它具有专用标识符。
// 编译后的JS也直接报错
console.log(dog.);
如果你需要保护你的类中的值免受恶意行为的影响,你应该使用提供硬运行时隐私的机制,如闭包、
WeakMaps或私有字段。请注意,这些在运行时增加的隐私检查可能会影响性能。
4、静态成员
类可以有静态成员,这些成员并不与类的特定实例相关联,它们可以通过类的构造函数对象本身来访问:
class MyClass {
    static x = 0;
    static printX() {
        console.log(MyClass.x);
        // 等同于console.log(this.x);
    }
}
// 静态成员不需要new
console.log(MyClass.x); // 0
MyClass.printX(); // 0
静态成员也可以使用相同的public 、protected 和private 可见性修饰符:
class MyClass {
    private static x = 0;
    static printX() {
    	// ok
        console.log(MyClass.x);
        // 等同于console.log(this.x);
    }
}
// 静态成员不需要new
// ❌❌TS报错:属性“x”为私有属性,只能在类“MyClass”中访问
console.log(MyClass.x);

// ok
MyClass.printX(); // 0
静态成员也会被继承:
class Base {
    static BaseName = "Ailjx";
}

class Derived extends Base {
	// 基类的静态成员BaseName被继承了
    static myName = this.BaseName;
}

console.log(Derived.myName, Derived.BaseName); // Ailjx Ailjx
特殊静态名称
一般来说,从函数原型覆盖属性是不安全的/不可能的,因为类本身就是可以用new 调用的函数,所以某些静态名称不能使用,像name 、length 和call 这样的函数属性,定义为静态成员是无效的:

没有静态类
TypeScript(和JavaScript)没有像C#和Java那样有一个叫做静态类的结构,这些结构体的存在,只是因为这些语言强制所有的数据和函数都在一个类里面
因为这个限制在TypeScript中不存在,所以不需要它们,一个只有一个实例的类,在JavaScript/TypeScript中通常只是表示为一个普通的对象
例如,我们不需要TypeScript中的 "静态类 "语法,因为一个普通的对象(甚至是顶级函数)也可以完成这个工作:
// 不需要 "static" class
class MyStaticClass {
    static doSomething() {}
}
// 首选 (备选 1)
function doSomething() {}
// 首选 (备选 2)
const MyHelperObject = {
    dosomething() {},
};
5、静态块
static静态块允许你写一串有自己作用域的语句,可以访问包含类中的私有字段,这意味着我们可以用写语句的所有能力来写初始化代码,不泄露变量,并能完全访问我们类的内部结构:
class Foo {
    static #count = 0;
    get count() {
        return Foo.#count;
    }
    static {
        try {
            Foo.#count += 100;
            console.log("初始化成功!");
        } catch {
            console.log("初始化错误!");
        }
    }
}
const a = new Foo(); // 初始化成功
console.log(a.count); // 100
结语
至此,TypeScript类的上篇就结束了,关注博主下篇更精彩!
博主的TypeScript从入门到精通专栏正在慢慢的补充之中,赶快关注订阅,与博主一起进步吧!期待你的三连支持。
参考资料:TypeScript官网
如果本篇文章对你有所帮助,还请客官一件四连!❤️


