基于SpringCloud Alibaba的微服务项目基础骨架
本文从本人博客搬运,原文格式更加美观,可以移步原文阅读:基于SpringCloud Alibaba的微服务项目基础骨架
背景
目前项目开发最流行的架构是前后端分离,后端采用微服务形式。假设我们要开发一个全新的项目,如果从0开始搭建微服务,那么势必会花费很多时间。市面上也有很多开源项目可以帮助我们快速搭建自己的新项目,我也参考和使用过很多类似的开源项目,但是用过来发现一些问题:
- 功能太多太杂,不够精简
- 如果有一些个性化需求,原项目不能满足需要二次开发,那么有一定学习成本
- 项目的结构、编码规范不一定优雅(我有一定的强迫症)。比如一个新增数据的接口,从Controller接收前端参数到最终保存到数据库全程使用一个Entity对象
因此,我自己写了一套微服务项目的骨架,特点如下:
- 功能精简。封装了文件上传、短信、Excel等常用功能,并且没有强制引入,需要这些功能的微服务按需引入即可
- 不重复造轮子。封装功能的时候尽量利用现有比较好的开源项目
- 代码设计、规范上尽量更贴近实际项目(根据个人开发经验,这块会仁者见仁,有人可能会觉得我写的规范有问题,这个可以有自己意见或一起讨论,毕竟我的开发经验也尚浅)
骨架项目采用的主要技术框架如下:
- SpringBoot
- Spring Cloud、Spring Cloud Alibaba
- MyBatis-Plus
- Hutool
- knife4j
- EasyExcel
- mica工具集
- pig
项目地址如下,欢迎star和讨论:
- gitee:https://gitee.com/coder-baobao/micro-service-base.git
- github:https://github.com/baobao555/micro-service-base.git
此项目只是一个微服务基本骨架示例,可能会有很多地方的封装、规范不成熟或者不适用与大家的具体项目环境。所以如果觉得项目中哪些地方封装的不好或者用的技术框架不合适,大家都可以克隆后自行直接修改为自己觉得合适的,这样灵活度最高
项目结构介绍
父工程micro-service-base,作为依赖版本锁定。具体的子模块如下:
service-common:包含具体微服务可能用到的各种基础功能模块的封装goods-micro-service:商品微服务,作为微服务的示例模块(没有实际业务含义),演示如何引用通用模块、以及具体代码的规范order-micro-service:订单微服务,作为微服务的示例模块(没有实际业务含义),演示如何引用通用模块、以及具体代码的规范micro-service-gateway:微服务网关示例模块micro-service-doc:微服务聚合文档模块,用于聚合各个微服务的swagger接口文档
1.service-common
该模块非SpringBoot项目,不可启动。包含具体微服务可能用到的各种基础功能模块的封装,目前包含如下子模块:
common-base:包含所有微服务都需要的基础配置的封装common-file:包含文件上传功能的封装common-sms:包含短信发送功能的封装
1.1 common-base
包含所有微服务都需要的基础配置的封装,分为如下包:
domain:包含基础数据库实体Entity、分页VO、Controller接口统一返回对象exception:包含全局异常处理类、自定义业务异常mybatis:MyBatis-Plus配置,主要配置了分页插件、自动填充swagger:Swagger接口文档配置validate:包含校验快速失败模式配置以及自定义校验注解(身份证、手机号等)
1.2 common-file
包含文件上传功能的封装,目前有以下模块:
file-aliyun:阿里云OSSfile-minio:minio
1.3 common-sms
包含短信发送功能的封装,目前有以下模块:
sms-aliyun:阿里云短信服务
2.goods-micro-service
商品微服务,作为微服务的示例模块(没有实际业务含义),演示如何引用通用模块、以及具体代码的规范。具体包含以下模块:
goods-service:包含domain、mapper、service、controller和主启动类goods-api:feign远程调用接口和DTOgoods-common:包含枚举等通用内容
2.1 goods-service
可运行的SpringBoot项目,微服务主要接口实现,几点规范如下:
- 对于domain的划分如下:
dto:前端调用controller添加、更新接口时传递数据的封装对象,区分添加数据和更新数据的前端提交数据的dto,因为添加和更新的字段很可能不一样entity:与数据库表字段一一对应的实体类,不可被其他类继承query:前端调用controller查询接口时传递的条件参数封装对象vo:查询接口返回给前端的视图对象。区分多端,app和backend分别代表app端和后台管理端,因为不通端的视图对象返回字段很可能不同。如果还有其他端,可以按需再扩展。对于后台管理端来说,一般页面上会先呈现列表数据,点击列表中某一条数据进入详情页面,列表和详情需要展示的字段很可能不同,所以区分了ListVO和DetailVO,另外一般情况下详情展示的字段比列表数据要多,所以DetailVO继承自ListVO
- Controller区分多端,app代表app端,backend代表后台管理端,因为不同端需要的接口不同,返回的数据也不同,这样做也能方便前端区分接口。如果还有其他端,可以按需扩展
- Service也和Controller一样区分多端,不同的是每个
entity会有与之对应的一个基础Service(位于service.base包下),完成一些基本的查询功能,返回的必须是与数据库表字段一一对应的entity,然后不同端的Service去注入各个表的基础Service来完成具体的业务功能。这样做即区分了不同端的Service,也可以有效避免不同业务Service之间出现循环依赖的情况 - 前端提交参数的基本校验用hibernate-validator的注解。额外自定义校验在service层中,如果自定义校验失败用
Assert断言来抛出异常
2.2 goods-api
包含了该微服务自身可以被其他微服务调用的feign接口、返回数据DTO的定义,这样其他微服务如果想要通过feign远程调用该微服务的接口,只需要引入该模块即可,体现高内聚。其中feign接口的具体实现在goods-service模块中的controller包下,专门定义一个controller实现feign接口
2.3 goods-common
包含了枚举类型定义等通用内容,供goods-service和goods-api模块引用。因为枚举的定义微服务自身和远程调用api返回的DTO中可能都需要,所以单独抽取出来,方便复用
3.order-micro-service
订单微服务,作为微服务的示例模块(没有实际业务含义),演示如何引用通用模块、以及具体代码的规范。基本内容与goods-micro-service相似,只是增加了对goods-micro-service远程feign接口的调用演示
4.micro-service-gateway
可运行的SpringBoot项目,微服务网关示例,动态路由到每个微服务
5.micro-service-doc
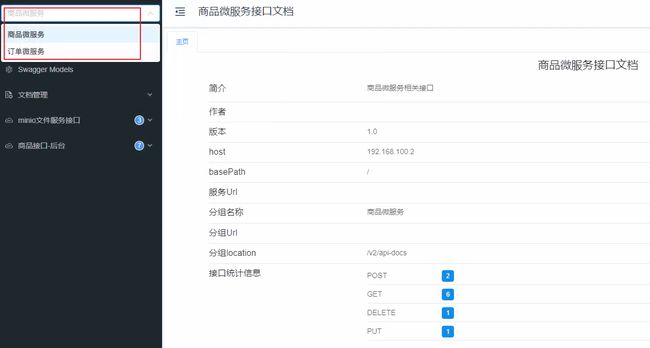
可运行的SpringBoot项目,knife4j微服务聚合文档,启动后访问可以得到一个以不同分组形式展示各个微服务接口文档的页面
使用方式
将项目克隆下来以后,使用的步骤如下:
-
创建数据库
goods和order,然后将mysql和redis连接地址配置好,这样就可以直接运行微服务示例模块goods-micro-service和order-micro-service -
参考微服务示例模块
goods-micro-service和order-micro-service,创建自己的微服务模块,配置好数据库的连接地址,开发接口注意:
-
自己的微服务模块至少要引入
common-base依赖,里面包含了微服务所需的基本依赖。其他文件、短信的依赖按需引入即可 -
common-base包含我认为微服务标配的一些依赖,如果你的微服务确实不需要某些依赖,可以在引入common-base的同时排除掉指定依赖,比如不需要nacos配置中心,排除的代码如下:<dependency> <groupId>com.baobaogroupId> <artifactId>common-baseartifactId> <version>${project.parent.version}version> <exclusions> <exclusion> <artifactId>spring-cloud-starter-alibaba-nacos-configartifactId> <groupId>com.alibaba.cloudgroupId> exclusion> exclusions> dependency> -
日志配置可以参考示例模块下的
resources/logback-spring.xml,对开发、测试、生产环境的日志做了不同配置
-
-
修改
micro-service-gateway配置,将自己的微服务加入网关路由 -
修改
micro-service-doc配置,将自己的微服务加入接口文档
下面分别介绍各个功能的具体使用
1.Redis缓存使用
借助了mica对RedisTemplate的封装,其依赖在common-base中
<dependency>
    <groupId>net.dreamlugroupId>
    <artifactId>mica-redisartifactId>
dependency>
mica-redis自动帮我们配置了redis的json序列化,并且包含以下增强功能:
-
对redis cache增强,支持
@Cacheable注解指定超时功能,使用方式为用#号分隔cachename和超时,支持 ms(毫秒),s(秒默认),m(分),h(小时),d(天)等单位// 缓存user,指定超时时间为5分钟 @Cacheable(value = "user#5m", key = "#id") public String selectById(Serializable id) { log.info("selectById"); return "selectById:" + id; } -
对
RedisTemplate进行了封装,简化使用。只需要注入MicaRedisCache,即可使用其提供的各种封装方法:@Autowired private MicaRedisCache redisCache; @Override public String findById(Serializable id) { // 从缓存中获取user:id,如果存在直接返回,如果不存在,利用userMapper从数据库获取,并存入缓存,再返回 return redisCache.get("user:" + id, () -> userMapper.selectById(id)); }
mica-redis的具体使用文档可以参考:mica-redis 使用文档 | 如梦技术 (dreamlu.net)
2.Excel导入导出
借助了pig对于easyexcel的封装,其依赖在common-base中
<dependency>
    <groupId>com.pig4cloud.excelgroupId>
    <artifactId>excel-spring-boot-starterartifactId>
dependency>
对导入导出的实体类添加好easyexcel的相关注解后(可参考EasyExcel · 语雀 (yuque.com)):
-
导出:只需要在相应Controller方法中标注
@ResponseExcel即可将返回数据导出为excel@ResponseExcel(name = "商品信息") // 将返回的List导出,表格名称为商品信息 @GetMapping("export") @ApiOperation("导出商品") public List<GoodsExcelVO> export(GoodsQuery query) { return goodsService.export(query); } -
导入:只需要在相应Controller方法中接收导入数据的参数前标注
@RequestExcel@PostMapping("import") @ApiOperation("导入商品") @Idempotent(expireTime = 5) public Result<List<ErrorMessage>> importGoods(@RequestExcel List<GoodsExcelVO> excelVOList, BindingResult bindingResult) { // 获取hibernate-validator基本校验的错误信息 List<ErrorMessage> basicErrorMessageList = (List<ErrorMessage>) bindingResult.getTarget(); if (CollUtil.isNotEmpty(excelVOList)) { // 执行数据导入,并获取自定义校验的错误信息 List<ErrorMessage> customErrorMessageList = goodsService.importGoods(excelVOList); // 合并基本校验和自定义校验的错误信息 basicErrorMessageList.addAll(customErrorMessageList); } // 返回错误信息 return Result.success(basicErrorMessageList); }
具体使用方式可参考:Excel 导入导出功能使用 · 语雀 (yuque.com)
3.防止重复提交
借助了pig封装的注解,其依赖在common-base中
<dependency>
    <groupId>com.pig4cloud.plugingroupId>
    <artifactId>idempotent-spring-boot-starterartifactId>
dependency>
在需要防止重复提交的Controller接口方法上(一般是新增和修改接口)添加@Idempotent注解,指定超时时间即可
@PostMapping
@ApiOperation("添加商品")
@Idempotent(expireTime = 5)  // 5秒内不能重复提交
public Result<Void> add(@RequestBody @Valid GoodsAddDTO to) {
    goodsService.add(to);
    return Result.success();
}
具体使用方法可参考:Redisson 实现业务接口幂等 · 语雀 (yuque.com)
4.短信服务
目前只实现了阿里云短信功能的封装,需要时引入如下依赖:
<dependency>
    <groupId>com.baobaogroupId>
    <artifactId>sms-aliyunartifactId>
    <version>${project.parent.version}version>
dependency>
然后在yaml中添加accessKey和secretKey
alibaba:
  cloud:
    access-key: ...
    secret-key: ...
在需要发送短信的地方注入AliyunSmsService即可,其提供了2个方法:
public void sendSms(String signName, String templateCode, String phoneNumber, String param):给单个号码发送短信public void sendSms(String signName, String templateCode, List:给多个号码批量发送短信phoneNumbers, String param)
5.文件服务
5.1 阿里云OSS
引入如下依赖:
<dependency>
    <groupId>com.baobaogroupId>
    <artifactId>file-aliyunartifactId>
    <version>${project.parent.version}version>
dependency>
在yaml中加入相关配置
alibaba:
  cloud:
    access-key: aaa
    secret-key: bbb
    oss:
      endpoint: ccc
      bucket: ddd
      policyExpire: 5    # 文件上传预签名信息的超时时间(单位:秒)
      tempUrlExpire: 10  # 文件访问临时url的超时时间(单位:秒)
在需要用到文件服务的地方注入AliyunOssService,调用对应方法即可,这里以一个Controller作为示例
@RestController
@RequestMapping("aliOss")
@Validated
@Api(tags = "阿里云对象存储服务接口")
@RequiredArgsConstructor
public class AliyunOssController {
    private final AliyunOssService aliyunOssService;

    @ApiOperation("获取文件上传预签名信息")
    @ApiImplicitParams({
            @ApiImplicitParam(name = "dir", value = "上传到哪个子目录", paramType = "query")
    })
    @GetMapping("policy")
    public Result<AliyunOssPolicy> getPolicy(String dir) {
        return Result.success(aliyunOssService.getPolicy(dir));
    }

    @ApiOperation("获取文件访问固定url(需要将bucket权限设置为公共)")
    @ApiImplicitParams({@ApiImplicitParam(name = "path", value = "文件在bucket中的相对路径", dataType = "string", paramType = "query", required = true)})
    @GetMapping("fixedUrl")
    public Result<String> getFixedUrl(@NotBlank(message = "文件路径不能为空") String path) {
        return Result.success("操作成功", aliyunOssService.getFixAccessUrl(path));
    }

    @ApiOperation("获取文件访问临时url")
    @ApiImplicitParams({@ApiImplicitParam(name = "path", value = "文件在bucket中的相对路径", dataType = "string", paramType = "query", required = true)})
    @GetMapping("tempUrl")
    public Result<String> getTempUrl(@NotBlank(message = "文件路径不能为空") String path) {
        return Result.success("操作成功", aliyunOssService.getTempAccessUrl(path));
    }
}
关于AliyunOssService中具体方法封装的含义可以参考教程:https://baobao555.tech/archives/52
5.2 MinIO
引入如下依赖:
<dependency>
    <groupId>com.baobaogroupId>
    <artifactId>file-minioartifactId>
    <version>${project.parent.version}version>
dependency>
在yaml中加入相关配置
minio:
  accessKey: admin
  secretKey: 12345678
  endpoint: http://192.168.109.153:9000
  bucket: test
  tempUrlExpire: 60  # 文件访问临时url的超时时间(单位:秒)
  directUploadExpire: 600  # 文件上传预签名信息的超时时间(单位:秒)
在需要用到文件服务的地方注入MinioService,调用对应方法即可,这里以一个Controller作为示例
@RestController
@RequestMapping("minio")
@Validated
@Api(tags = "minio文件服务接口")
@Slf4j
@RequiredArgsConstructor
public class MinioController {
    private final MinioService minioService;

    @ApiOperation("获取文件上传预签名信息")
    @ApiImplicitParams({
            @ApiImplicitParam(name = "fileName", value = "原始文件名", paramType = "query", required = true),
            @ApiImplicitParam(name = "dir", value = "上传到哪个子目录", paramType = "query")
    })
    @GetMapping("preSignedInfo")
    public Result<Map<String, String>> getPresignedInfo(String dir, @NotBlank(message = "文件名不能为空") String fileName) {
        try {
            return Result.success(minioService.getUploadPresignedInfo(dir, fileName));
        } catch (Exception e) {
            log.error("获取文件上传预签名信息失败", e);
            throw new BusinessException("获取文件上传预签名信息失败");
        }
    }

    @ApiOperation("获取文件访问固定url(需要将bucket权限设置为公共)")
    @ApiImplicitParams({@ApiImplicitParam(name = "path", value = "文件在bucket中的相对路径", dataType = "string", paramType = "query", required = true)})
    @GetMapping("fixedUrl")
    public Result<String> getFixedUrl(@NotBlank(message = "文件路径不能为空") String path) {
        return Result.success("操作成功", minioService.getFixAccessUrl(path));
    }

    @ApiOperation("获取文件访问临时url")
    @ApiImplicitParams({@ApiImplicitParam(name = "path", value = "文件在bucket中的相对路径", dataType = "string", paramType = "query", required = true)})
    @GetMapping("tempUrl")
    public Result<String> getTempUrl(@NotBlank(message = "文件路径不能为空") String path) {
        try {
            return Result.success("操作成功", minioService.getTempAccessUrl(path));
        } catch (Exception e) {
            log.error("获取文件访问临时url失败", e);
            throw new BusinessException("获取文件访问临时url失败");
        }
    }
}
关于MinioService中具体方法封装的含义可以参考教程:https://baobao555.tech/archives/55
6.接口文档
添加自己的微服务模块后,在micro-service-doc模块的yaml配置中添加新的微服务接口文档配置即可,参考示例如下
server:
  port: 9010

knife4j:
  enableAggregation: true
  nacos:
    enable: true  # 开启Nacos模式
    serviceUrl: http://localhost:8848/nacos # Nacos注册中心地址
    routes:
      - name: 商品微服务  # 微服务在聚合文档中的名称
        serviceName: GOODS-SERVICE  # 微服务在Nacos注册中心的名称
        location: /v2/api-docs # 微服务文档资源路径
        servicePath: /gateway/goods # 给每个接口添加路径前缀,作用是拼接出经过nginx和gateway处理前的实际接口url
      - name: 订单微服务
        serviceName: ORDER-SERVICE
        location: /v2/api-docs
        servicePath: /gateway/order
这样启动micro-service-doc后会以分组形式展示各个微服务的接口文档
具体使用方式可以参考教程:https://baobao555.tech/archives/50
后续计划
- 增加基础用户认证、权限控制模块
- 整合分布式定时任务
- 整合微信登录
- 整合支付宝、微信支付
- 添加前端演示页面
因工作比较忙,更新会比较龟速,不好意思哈哈
