SpringBoot框架入门(三)
SpringBoot框架入门(三)
一、API文档构建工具-Swagger2
1.环境整合配置
(1)pom.xml 依赖添加
<!--    swagger2-->
    <dependency>
      <groupId>io.springfox</groupId>
      <artifactId>springfox-swagger2</artifactId>
      <version>2.9.2</version>
    </dependency> <dependency>
      <groupId>io.springfox</groupId>
      <artifactId>springfox-swagger-ui</artifactId>
      <version>2.9.2</version>
    </dependency>
(2)配置类添加
@Configuration
@EnableSwagger2
public class Swagger2 {
    @Bean
    public Docket createRestApi() {
        return new Docket(DocumentationType.SWAGGER_2)
                .apiInfo(apiInfo())
                .select()
                .apis(RequestHandlerSelectors.basePackage("com.xxxx.springboot.controller"))
                .paths(PathSelectors.any())
                .build();
    }
    private ApiInfo apiInfo() {
        return new ApiInfoBuilder()
                .title("⽤户管理接⼝API⽂档")
                .version("1.0")
                .build();
    }
}
2.Swagger2 常用注解说明
(1)@Api
@Api:⽤在请求的类上,说明该类的作⽤
 tags="说明该类的作⽤"
@Api(tags="APP⽤户注册Controller")
@ApiOperation
@ApiOperation:"⽤在请求的⽅法上,说明⽅法的作⽤"
 value="说明⽅法的作⽤"
 notes="⽅法的备注说明"
@ApiOperation(value = "根据用户名查询用户对象",notes = "用户名不能为空")
@ApiImplicitParams
@ApiImplicitParams:⽤在请求的⽅法上,包含⼀组参数说明
 @ApiImplicitParam:⽤在 @ApiImplicitParams 注解中,指定⼀个请求参数的配置信息
 name:参数名
 value:参数的汉字说明、解释
 required:参数是否必须传
 paramType:参数放在哪个地⽅
 · header --> 请求参数的获取:@RequestHeader
 · query --> 请求参数的获取:@RequestParam
 · path(⽤于restful接⼝)--> 请求参数的获取:@PathVariable
 · body(不常⽤)
 · form(不常⽤)
 dataType:参数类型,默认String,其它值dataType="Integer"
 defaultValue:参数的默认值
@ApiImplicitParam(name = "userName",value = "用户名称",required = true,paramType = "path")
@ApiResponses
@ApiResponses:⽤于请求的⽅法上,表示⼀组响应
 @ApiResponse:⽤在@ApiResponses中,⼀般⽤于表达⼀个错误的响应信息
 code:数字,例如400
 message:信息,例如"请求参数没填好"
 response:抛出异常的类
@ApiResponse(code = 404 ,message = "路径不正确或访问资源未找到")
@ApiModel
@ApiModel:⽤于响应类上,表示⼀个返回响应数据的信息
 (这种⼀般⽤在post创建的时候,使⽤@RequestBody这样的场景,
 请求参数⽆法使⽤@ApiImplicitParam注解进⾏描述的时候)
 @ApiModelProperty:⽤在属性上,描述响应类的属性
@ApiModelProperty(value = "响应状态码" ,example = "200")
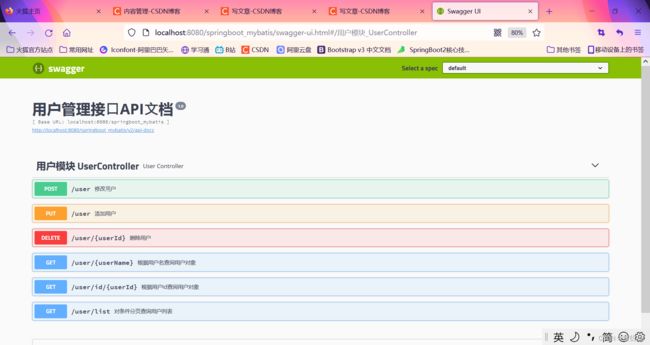
测试:http://localhost:8080/springboot_mybatis/swagger-ui.html
 3.用户模块注解配置
(1)Controller 使用注解
@GetMapping("user/{userName}")
@ApiOperation(value = "根据⽤户名查询⽤户记录")
@ApiImplicitParam(name = "userName",value = "查询参数",required = true,paramType =
"path")
public User queryUserByUserName(@PathVariable String userName){
	 return userService.queryUserByUserName(userName);
}
@ApiOperation(value = "根据⽤户id查询⽤户记录")
@ApiImplicitParam(name = "userId",value = "查询参数",required = true,paramType =
"path")
@GetMapping("user/id/{userId}")
public User queryUserByUserId(@PathVariable Integer userId, HttpServletRequest
request){
	 return userService.queryUserByUserId(userId);
}
@GetMapping("user/list")
@ApiOperation(value = "多条件查询⽤户列表记录")
public PageInfo<User> list(UserQuery userQuery){
	 return userService.queryUserByParams(userQuery);
}
@PutMapping("user")
@ApiOperation(value = "⽤户添加")
@ApiImplicitParam(name = "user",value = "⽤户实体类",dataType = "User")
public ResultInfo saveUser(@RequestBody User user){
 ResultInfo resultInfo=new ResultInfo();
	 try {
	 userService.saveUser(user);
	 } catch (ParamsException e) {
	 e.printStackTrace();
	 resultInfo.setCode(e.getCode());
	 resultInfo.setMsg(e.getMsg());
	  (Exception e) {
	 e.printStackTrace();
	 resultInfo.setCode(300);
	 resultInfo.setMsg("记录添加失败!");
	 }
	 return resultInfo;
}
@PostMapping("user")
@ApiOperation(value = "⽤户更新")
@ApiImplicitParam(name = "user",value = "⽤户实体类",dataType = "User")
public ResultInfo updateUser(@RequestBody User user){
 ResultInfo resultInfo=new ResultInfo();
	 try {
	 userService.updateUser(user);
	 } catch (ParamsException e) {
	 e.printStackTrace();
	 resultInfo.setCode(e.getCode());
	 resultInfo.setMsg(e.getMsg());
	 }catch (Exception e) {
	 e.printStackTrace();
	 resultInfo.setCode(300);
	 resultInfo.setMsg("记录更新失败!");
 	}
 	return resultInfo;
}
@PutMapping("user/{userId}")
@ApiOperation(value = "根据⽤户id删除⽤户记录")
@ApiImplicitParam(name = "userId",value = "查询参数",required = true,paramType =
"path")
public ResultInfo deleteUser(@PathVariable Integer userId){
 ResultInfo resultInfo=new ResultInfo();
	 try {
	 userService.deleteUser(userId);
	 } catch (ParamsException e) {
	 e.printStackTrace();
	 resultInfo.setCode(e.getCode());
	 resultInfo.setMsg(e.getMsg());
	 }catch (Exception e) {
	 e.printStackTrace();
	 resultInfo.setCode(300);
	 resultInfo.setMsg("记录删除失败!");
	 }
	 return resultInfo;
 }
(2)JavaBean 使用注解
User
@ApiModel(description = "响应结果-⽤户信息")
public class User {
	 @ApiModelProperty(value = "⽤户id",example = "0")
	 private Integer id;
	 @ApiModelProperty(value = "⽤户名")
	 private String userName;
	 @ApiModelProperty(value = "⽤户密码")
	 private String userPwd;
	 /*
	 省略get|set
	 */
}
UserQuery
@ApiModel(description = "⽤户模块条件查询类")
public class UserQuery {
	 @ApiModelProperty(value = "分⻚⻚码",example = "1")
	 private Integer pageNum = 1;
	 @ApiModelProperty(value = "每⻚⼤⼩",example = "10")
	 private Integer pageSize = 10;
	 @ApiModelProperty(value = "⽤户名")
	 private String userName;
	 /*
	 省略get|set
	 */
 }
ResultInfo
@ApiModel(description = "响应结果 - Model信息")
public class ResultInfo {
	 @ApiModelProperty(value = "响应状态码",example = "200")
	 private Integer code=200;
	 @ApiModelProperty(value = "响应消息结果")
	 private String msg = "success";
	 @ApiModelProperty(value = "响应具体结果信息")
	 private Object result;
	 /*
	 省略get|set
	 */
}
二、SpringBoot 应用热部署
1.什么是热部署?
热部署,就是在应用正在运行的时候升级软件(增加业务/修改bug),却不需要重新启动应用。大家都知道在项目开发过程中,常常会改动页面数据或者修改数据结构,为了显示改动效果,往往需要重启应⽤查看改变效果,其实就是重新编译生成了新的 Class 文件,这个文件里记录着和代码等对应的各种信息,然后 Class 文件将被虚拟机的 ClassLoader 加载。
而热部署正是利用了这个特点,它监听到如果有 Class 文件改动了,就会创建⼀个新的 ClaassLoader 进行加载该文件,经过⼀系列的过程,最终将结果呈现在我们眼前,Spring Boot 通过配置 DevTools 工具来达到热部署效果。
在原理上是使用了两个 ClassLoader,⼀个 ClassLoader 加载那些不会改变的类(第三方 Jar 包),另⼀个ClassLoader 加载会更改的类,称为 restart ClassLoader,这样在有代码更改的时候,原来的 restart ClassLoader被丢弃,重新创建⼀个 restart ClassLoader,由于需要加载的类相⽐较少,所以实现了较快的重启时间。
2.热部署环境配置与测试
(1)配置 DevTools 环境
修改 Pom文件,添加 DevTools 依赖
<!-- DevTools 的坐标 -->
<dependency>
 <groupId>org.springframework.boot</groupId>
 <artifactId>spring-boot-devtools</artifactId>
 <!--当前这个项⽬被继承之后,这个不向下传递-->
 <optional>true</optional>
</dependency>
<plugin>
 <groupId>org.springframework.boot</groupId>
 <artifactId>spring-boot-maven-plugin</artifactId>
 <configuration>
 <fork>true</fork><!-- 如果没有该配置,热部署的devtools不⽣效 -->
 </configuration>
</plugin>
(2)全局配置文件配置
spring:
	 ## 热部署配置
   devtools:
    restart:
     enabled: true
    # 设置重启的⽬录,添加⽬录的⽂件需要restart
     additional-paths: src/main/java
    # 解决项⽬⾃动重新编译后接⼝报404的问题
     poll-interval: 3000
     quiet-period: 1000
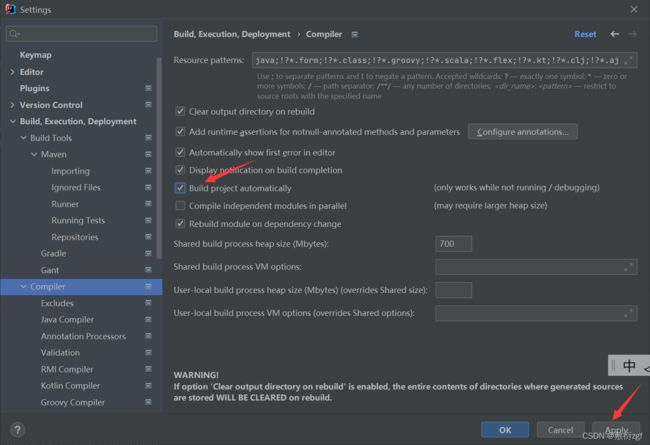
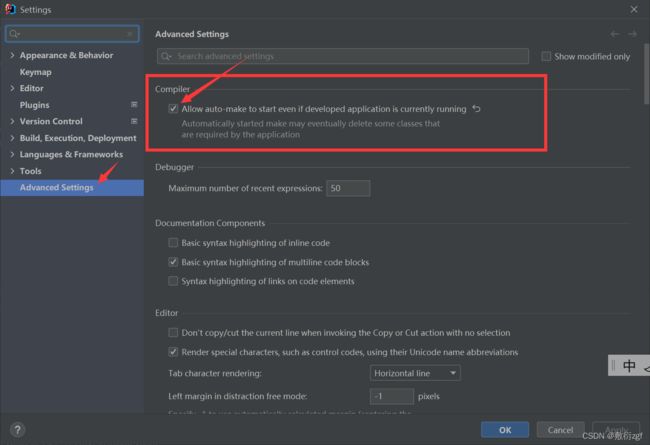
(3) IDEA 配置 ctrl + shift + alt + /,选择Registry,勾上 Compiler autoMake allow when app running
 测试: ctrl+Fn+F9 键重新编译,浏览器访问
三、SpringBoot 单元测试
1.pom.xml 测试依赖添加
<dependency>
 <groupId>org.springframework.boot</groupId>
 <artifactId>spring-boot-starter-test</artifactId>
</dependency>
2.Service业务方法测试
package com.zgf.springboot.service;
@RunWith(SpringRunner.class)
@SpringBootTest(classes = {Starter.class})
public class TestUserService {
    private Logger logger = (Logger) LoggerFactory.getLogger(TestUserService.class);
    @Resource
    private UserService userService;
    @Before
    public void before(){
        logger.info("单元测试前");
    }
    @Test
    public void test01(){
        User user = userService.queryUserById(1);
        logger.info("用户记录:{}",user.toString());
    }
    @After
    public void After(){
        logger.info("单元测试后");
    }
}
package com.zgf.springboot.controller;
@RunWith(SpringRunner.class)
@SpringBootTest(classes = {Starter.class})
@AutoConfigureMockMvc
public class TestUserController {
    //使用日志
    private Logger log = LoggerFactory.getLogger(TestUserController.class);
    @Autowired
    private MockMvc mockMvc;
    @Test
    public void apitest01() throws Exception {
        //响应请求
        MockHttpServletRequestBuilder request = MockMvcRequestBuilders.get("/user/list")
                .contentType("text/html");//设置请求Accect头信息
        //发送请求,得到请求结果
        ResultActions perform = mockMvc.perform(request);
        //校验请求结果
        perform.andExpect(MockMvcResultMatchers.status().isOk());
        //获取执行完成后返回的结果
        MvcResult mvcResult = perform.andReturn();
        //得到执行后响应
        MockHttpServletResponse response = mvcResult.getResponse();
        //打印结果
        log.info("用户状态:{}",response.getStatus());
        log.info("用户信息:{}",response.getContentAsString());
    }
}
 四、分布式缓存Ehcache整合
1.Spring Cache 相关注解说明
(1)@CacheConfig
用于标注在类上,可以存放该类中所有缓存的公有属性,比如设置缓存的名字。
@CacheConfig(cacheNames = "users")
public interface UserService {。。。}
(2) @Cacheable
应用到读取数据的方法上,即可缓存的方法,如查找方法,先从缓存中读取,如果没有再调用相应方法获取数据,然后把数据添加到缓存中。
该注解主要有下⾯⼏个参数:
-
value、cacheNames:两个等同的参数( cacheNames 为 Spring 4 新增,作为 value 的别名),用于指定缓存存储的集合名。
-
key:缓存对象存储在Map集合中的 key 值,非必需,缺省按照函数的所有参数组合作为 key 值,若自己配置需使用 SpEL 表达式,比如:@Cacheable
(key = “#p0”):使用函数第⼀个参数作为缓存的key 值。 -
condition:缓存对象的条件,非必需,也需使用SpEL表达式,只有满⾜表达式条件的内容才会被缓存,比如:@Cacheable(key = “#p0”, condition = “#p0.length() < 3”),表示只有当第⼀个参数的长度小于3的时候才会被缓存。
-
unless:另外⼀个缓存条件参数,非必需,需使用 SpEL 表达式。它不同于 condition 参数的地⽅在于它的判断时机,该条件是在函数被调⽤之后才做判断的,所以它可以通过对 result 进⾏判断。
-
keyGenerator:用于指定 key ⽣成器,非必需。若需要指定⼀个⾃定义的 key ⽣成器,我们需要去实现org.springframework.cache.interceptor.KeyGenerator 接⼝,并使用该参数来指定。需要注意的是:该参数与 key 是互斥的。
-
cacheManager:用于指定使⽤哪个缓存管理器,⾮必需。只有当有多个时才需要使用。
-
cacheResolver:用于指定使用那个缓存解析器,非必需。需通过org.springframework.cache.interceptor.CacheResolver 接口来实现自己的缓存解析器,并用该参数指定。
(3) @CachePut
应用到写数据的方法上,如新增/修改方法,调用方法时会自动把相应的数据放⼊缓存.
@CachePut(value = "user", key = "#user.id")
public User save(User user) {
 users.add(user);
 return user;
}
(4) @CacheEvict
应⽤到移除数据的方法上,如删除⽅法,调用方法时会从缓存中移除相应的数据。
@CacheEvict(value = "user", key = "#id")
void delete(final Integer id);
- allEntries:非必需,默认为 false。当为 true 时,会移除所有数据.
- beforeInvocation:非必需,默认为 false,会在调用方法之后移除数据。当为 true 时,会在调用方法之前移除数据。
(5) @Caching
@Caching(
 put = {
 @CachePut(value = "user", key = "#user.id"),
 @CachePut(value = "user", key = "#user.username"),
 @CachePut(value = "user", key = "#user.age")
 }
}
2.环境配置
(1)pom.xml 依赖添加
<!-- Ehcache -->
    <dependency>
      <groupId>org.springframework.boot</groupId>
      <artifactId>spring-boot-starter-cache</artifactId>
    </dependency>
    <dependency>
      <groupId>net.sf.ehcache</groupId>
      <artifactId>ehcache</artifactId>
    </dependency>
(2) ehcahe.xml 文件添加
<ehcache name="mycache">
    <!--
    如果不使⽤磁盘存储,只需要将diskStore注释掉即可;
    如果使⽤,需要在ehcache.xml⽂件中的ehcahce元素下的定义⼀个diskStore元素并指定其path属性。
    -->
    <diskStore path="D:\Java\cache"/>
    <!--
    name:缓存名称。
    maxElementsInMemory:缓存最⼤数⽬
    maxElementsOnDisk:硬盘最⼤缓存个数。
    eternal:对象是否永久有效,⼀但设置了,timeout将不起作⽤。
    overflowToDisk:是否保存到磁盘,当系统宕机时
    timeToIdleSeconds:设置对象在失效前的允许闲置时间(单位:秒)。
    仅当eternal=false对象不是永久有效时使⽤,可选属性,默认值是0,表示可闲置时间⽆穷⼤。
    timeToLiveSeconds:设置对象在失效前允许存活时间(单位:秒)。
    最⼤时间介于创建时间和失效时间之间。
    仅当eternal=false对象不是永久有效时使⽤,默认是0,也就是对象存活时间⽆穷⼤。
    diskPersistent:是否缓存虚拟机重启数据
    Whether the disk store persists between restarts of the Virtual Machine.
    The default value is false.
    diskSpoolBufferSizeMB:这个参数设置DiskStore(磁盘缓存)的缓存区⼤⼩。
    默认是30MB。每个Cache都应该有⾃⼰的⼀个缓冲区。
    diskExpiryThreadIntervalSeconds:磁盘失效线程运⾏时间间隔,默认是120秒。
    memoryStoreEvictionPolicy:当达到maxElementsInMemory限制时,会根据指定的策略去清理内
   存
    默认策略是LRU(最近最少使⽤)。你可以设置为FIFO(先进先出)或是LFU(较少使⽤)。
    clearOnFlush:内存数量最⼤时是否清除。
    memoryStoreEvictionPolicy:
    可选策略有:
    LRU(最近最少使⽤,默认策略)
    Less Frequently Used,就是例⼦中使⽤的策略,就是⼀直以来最少被使⽤的。
    FIFO(先进先出)
    first in first out,这个是⼤家最熟的,先进先出。
    LFU(最少访问次数)
    Least Recently Used,最近最少使⽤的。
    缓存的元素有⼀个时间戳,当缓存容量满了,⽽⼜需要腾出地⽅来缓存新的元素的时候,
    那么现有缓存元素中时间戳离当前时间最远的元素将被清出缓存。
    -->
    <defaultCache
            maxElementsInMemory="10000"
            eternal="false"
            timeToIdleSeconds="120"
            timeToLiveSeconds="120"
            maxElementsOnDisk="10000000"
            diskExpiryThreadIntervalSeconds="120"
            memoryStoreEvictionPolicy="LRU">
    </defaultCache>
    <cache
            name="users"
            eternal="false"
            maxElementsInMemory="100"
            overflowToDisk="false"
            diskPersistent="false"
            timeToIdleSeconds="0"
            timeToLiveSeconds="300"
            memoryStoreEvictionPolicy="LRU"/>
</ehcache>
(3)application.yml 缓存配置
## Ehcache 缓存配置
    cache:
      ehcache:
        config: classpath:ehcache.xml
(4)启动缓存
在 Starter 启动入口类中,添加 @EnableCaching 注解,启动缓存
(5)JavaBean 对象实现序列化
JavaBean 实现Serializable接口
(6)测试
 五、定时调度集成-Quartz
1.环境整合配置
<!--    Quartz-->
    <dependency>
      <groupId>org.springframework.boot</groupId>
      <artifactId>spring-boot-starter-quartz</artifactId>
    </dependency>
2.源代码添加
job
package com.zgf.springboot.jobs;
import org.quartz.Job;
import org.quartz.JobExecutionContext;
import org.quartz.JobExecutionException;
import org.quartz.TriggerKey;
import org.slf4j.Logger;
import org.slf4j.LoggerFactory;
import java.text.SimpleDateFormat;
import java.util.Date;
public class MyFirstJob implements Job {
    private Logger log = LoggerFactory.getLogger(MyFirstJob.class);
    @Override
    public void execute(JobExecutionContext context) throws JobExecutionException {
        SimpleDateFormat sdf = new SimpleDateFormat("yyyy-MM-dd HH:mm:ss");
        TriggerKey triggerKey = context.getTrigger().getKey();
        log.info("触发器:"+triggerKey.getName()+"所属分组:"+triggerKey.getGroup()+"------"+sdf.format(new Date())+"-->"+"Hello Spring Boot Quuartz...");
    }
}
QuartzConfig
package com.zgf.springboot.config;
@Configuration
public class QuartzConfig {
    @Bean
    public JobDetail jobDetail1(){
        return JobBuilder.newJob(MyFirstJob.class).storeDurably().build();
    }
    @Bean
    public Trigger trigger1(){
        SimpleScheduleBuilder scheduleBuilder =SimpleScheduleBuilder.simpleSchedule()
                //每一秒执行一次
                .withIntervalInSeconds(1)
                //永久重复,一直执行下去
                .repeatForever();
        return TriggerBuilder.newTrigger()
                .withIdentity("trigger1","group1")
                .withSchedule(scheduleBuilder)
                .forJob(jobDetail1())
                .build();
    }
    @Bean
    public Trigger trigger2(){
        return TriggerBuilder.newTrigger()
                .withIdentity("trigger2","group1")
                .withSchedule(CronScheduleBuilder.cronSchedule("0/5 * * * * ? *"))
                .forJob(jobDetail1())
                .build();
    }
}

六、全局异常与事务控制
1.Spring Boot 事务支持
@Transactional(propagation = Propagation.REQUIRED)
2.Spring Boot 全局异常处理
(1)@ControllerAdvice
该注解组合了 @Component 注解功能,最常⽤的就是作为全局异常处理的切⾯类,同时通过该注解可以指定包扫描的范围。@ControllerAdvice 约定了⼏种可⾏的返回值,如果是直接返回 model 类的话,需要使⽤@ResponseBody 进⾏ json 转换。
(2)@ExceptionHandler
该注解在 Spring 3.X 版本引⼊,在处理异常时标注在⽅法级别,代表当前⽅法处理的异常类型有哪些具体应⽤以 Restful 接口为例,测试保存用户接口。
七、SpringBoot 数据校验 - Validation
1.环境配置
在引⼊ spring-boot-starter-web 依赖时,该模块会⾃动依赖 spring-boot-starter-validation
2.校验相关注解
@AssertFalse 可以为null,如果不为null的话必须为false
@AssertTrue 可以为null,如果不为null的话必须为true
@DecimalMax 设置不能超过最⼤值
@DecimalMin 设置不能超过最⼩值
@Digits 设置必须是数字且数字整数的位数和⼩数的位数必须在指定范围内
@Future ⽇期必须在当前⽇期的未来
@Past ⽇期必须在当前⽇期的过去
@Max 最⼤不得超过此最⼤值
@Min 最⼤不得⼩于此最⼩值
@NotNull 不能为null,可以是空
@Min 最⼤不得⼩于此最⼩值
@Pattern 必须满⾜指定的正则表达式
@Size 集合、数组、map等的size()值必须在指定范围内
@Email 必须是email格式
@Length ⻓度必须在指定范围内
@NotBlank 字符串不能为null,字符串trim()后也不能等于“”
@NotEmpty 不能为null,集合、数组、map等size()不能为0;字符串trim()后可以等于“”
@Range 值必须在指定范围内
@URL 必须是⼀个URL
3.校验注解使用
User
 @ApiModelProperty(value = "用户名称" )
    @NotBlank(message = "用户名称不能为空")
    private String userName;
    @ApiModelProperty(value = "用户密码" )
    @NotBlank(message = "用户密码不能为空")
    @Length(min = 6,max = 10,message = "密码长度至少是6位,且最多不超过10位")
    private String userPwd;
接口方法形参 @Valid 注解添加
 /**
     * 添加
     * @param user
     * @return
     */
    @ApiOperation(value = "添加用户")
    @ApiImplicitParam(name = "user",value = "用户添加")
    @PutMapping("/user")
    public ResultInfo saveUser2(@Valid User user){
        ResultInfo resultInfo = new ResultInfo();
        userService.saveUser(user);
        return resultInfo;
    }
全局异常错误信息捕捉
@ControllerAdvice
public class GlobalExceptionHandler {
    /**
     * 数据验证全局处理
     * @return
     */
    @ExceptionHandler(value = BindException.class)
    @ResponseBody
    public ResultInfo bindExceptionHandler(BindException p){
        ResultInfo resultInfo = new ResultInfo();
        resultInfo.setCode(500);
        resultInfo.setMsg(p.getBindingResult().getFieldError().getDefaultMessage());
        return resultInfo;
    }
}
八、SpringBoot 框架入门完结
