使用 JWT 和 H2 数据库的 Spring Boot 安全登录示例
Spring Boot Security Login example with JWT and H2 Database - BezKoder![]() https://www.bezkoder.com/spring-boot-security-login-jwt/
https://www.bezkoder.com/spring-boot-security-login-jwt/
在本教程中,我们将构建一个 Spring Boot,Spring Security:登录和注册示例(Rest API),它支持 JWT 和 HttpOnly Cookie 与 H2 数据库一起使用。你会知道:
- 使用 JWT 和 HttpOnly Cookie 进行用户登录和注册的适当流程
- 具有 Spring Security 的 Spring Boot Rest Api 架构
- 如何配置 Spring Security 以使用 JWT
- 如何为身份验证和授权定义数据模型和关联
- 使用 Spring Data JPA 与 H2 数据库交互的方式
Spring Boot 安全登录示例概述
我们将使用 JWT 构建一个 Spring Boot + Spring Security 应用程序:
- 用户可以注册新帐户(注册),或使用用户名和密码登录。
- 通过用户的角色(管理员、版主、用户),我们授权用户访问资源。
这些是我们需要提供的 API:
| 方法 | 网址 | 行动 |
|---|---|---|
| POST | /api/auth/signup | 注册新帐户 |
| POST | /api/auth/signin | 登录帐户 |
| POST | /api/auth/signout | 注销帐户 |
| GET | /api/test/all | 检索公共内容 |
| GET | /api/test/user | 访问用户的内容 |
| GET | /api/test/mod | 访问版主的内容 |
| GET | /api/test/admin | 访问管理员的内容 |
通过配置项目依赖和数据源,我们将使用的数据库是 H2。
Spring Boot 安全登录示例流程
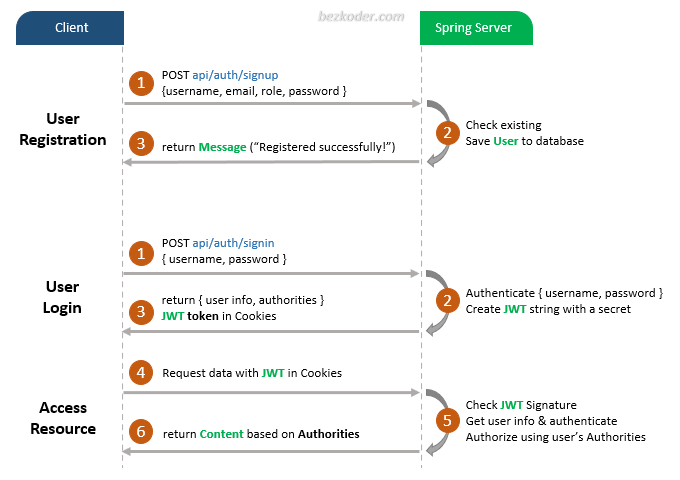
该图显示了我们如何实现用户注册、用户登录/注销和授权过程的流程。
合法的 JWT 将存储在HttpOnly Cookie中如果客户端访问受保护的资源
您可能需要实现刷新令牌:
更多细节在:Spring Boot Refresh Token with JWT example
带有 Spring Security 的 Spring Boot 架构
您可以通过下图大致了解我们的 Spring Boot 安全登录示例:
现在我将简要解释一下。
春季安全
–WebSecurityConfigurerAdapter是我们安全实施的关键。它提供HttpSecurity配置来配置 cors、csrf、会话管理、受保护资源的规则。我们还可以扩展和自定义包含以下元素的默认配置。
–UserDetailsService接口有一个方法通过用户名加载用户并返回一个UserDetailsSpring Security 可以用于身份验证和验证的对象。
–UserDetails包含构建身份验证对象所需的信息(例如:用户名、密码、权限)。
–UsernamePasswordAuthenticationToken从登录请求中获取 {username, password},AuthenticationManager将使用它来验证登录帐户。
–AuthenticationManager有一个(在&DaoAuthenticationProvider的帮助下)来验证对象。如果成功,则返回一个完全填充的 Authentication 对象(包括授予的权限)。UserDetailsServicePasswordEncoderUsernamePasswordAuthenticationTokenAuthenticationManager
–OncePerRequestFilter对我们的 API 的每个请求进行一次执行。它提供了一个doFilterInternal()方法,我们将实现解析和验证 JWT,加载用户详细信息(使用UserDetailsService),检查授权(使用UsernamePasswordAuthenticationToken)。
–AuthenticationEntryPoint将捕获身份验证错误。
Repository包含UserRepository&RoleRepository与 Database 一起使用,将被导入Controller。
控制器在被过滤后接收并处理请求OncePerRequestFilter。
–AuthController处理注册/登录请求
–TestController使用基于角色的验证访问受保护的资源方法。
深入了解架构,更容易掌握概览:
Spring Boot Architecture for JWT with Spring Security
技术
- 爪哇 8
- Spring Boot 2.6.3(带有 Spring Security、Spring Web、Spring Data JPA)
- jjwt 0.9.1
- H2 - 嵌入式数据库
- Maven 3.6.1
项目结构
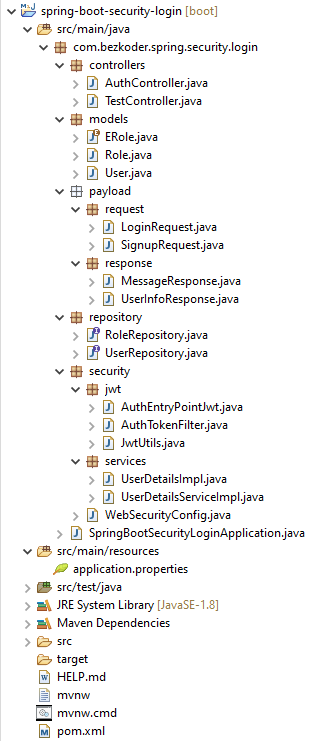
这是我们的 Spring Boot 安全登录示例的文件夹和文件结构:
安全性:我们在这里配置 Spring Security 并实现安全对象。
WebSecurityConfig延伸WebSecurityConfigurerAdapterUserDetailsServiceImpl工具UserDetailsServiceUserDetailsImpl工具UserDetailsAuthEntryPointJwt工具AuthenticationEntryPointAuthTokenFilter延伸OncePerRequestFilterJwtUtils提供生成、解析、验证 JWT 的方法
控制器处理注册/登录请求和授权请求。
AuthController: @PostMapping('/signup'), @PostMapping('/signin'), @PostMapping('/signout')TestController: @GetMapping('/api/test/all'), @GetMapping('/api/test/[role]')
存储库具有扩展 Spring Data JPAJpaRepository以与数据库交互的接口。
UserRepository延伸JpaRepositoryRoleRepository延伸JpaRepository
models定义了 Authentication ( User) 和 Authorization ( Role) 的两个主要模型。它们具有多对多的关系。
User: id、用户名、电子邮件、密码、角色Role:身份证,姓名
有效负载定义了请求和响应对象的类
我们还有用于配置 Spring Datasource、Spring Data JPA 和 App 属性(例如 JWT Secret 字符串或 Token 过期时间)的application.properties 。
设置新的 Spring Boot 登录项目
使用Spring Web 工具或您的开发工具(Spring Tool Suite、Eclipse、Intellij)创建一个 Spring Boot 项目。
然后打开pom.xml并添加这些依赖项:
	org.springframework.boot
	spring-boot-starter-data-jpa


	org.springframework.boot
	spring-boot-starter-security


	org.springframework.boot
	spring-boot-starter-validation


	org.springframework.boot
	spring-boot-starter-web


	io.jsonwebtoken
	jjwt
	0.9.1


	com.h2database
	h2
	runtime
配置 Spring Datasource、JPA、App 属性
在src/main/resources文件夹下,打开application.properties,添加一些新行。
spring.h2.console.enabled=true
# default path: h2-console
spring.h2.console.path=/h2-ui

spring.datasource.url=jdbc:h2:file:./testdb
spring.datasource.driverClassName=org.h2.Driver
spring.datasource.username=sa
spring.datasource.password=

spring.jpa.show-sql=true
spring.jpa.properties.hibernate.dialect=org.hibernate.dialect.H2Dialect
spring.jpa.hibernate.ddl-auto= update

# App Properties
bezkoder.app.jwtCookieName= bezkoder
bezkoder.app.jwtSecret= bezKoderSecretKey
bezkoder.app.jwtExpirationMs= 86400000spring.datasource.url:jdbc:h2:mem:[database-name]用于内存数据库和jdbc:h2:file:[path/database-name]基于磁盘的数据库。spring.datasource.username&spring.datasource.password属性与您的数据库安装相同。- Spring Boot 使用 Hibernate 进行 JPA 实现,我们
H2Dialect为 H2 数据库配置 spring.jpa.hibernate.ddl-auto用于数据库初始化。我们将 value 设置为 value,update以便在数据库中创建一个表,自动对应于定义的数据模型。对模型的任何更改也将触发对表的更新。对于生产,这个属性应该是validate。spring.h2.console.enabled=true告诉 Spring 启动 H2 数据库管理工具,您可以在浏览器上访问此工具:http://localhost:8080/h2-console.spring.h2.console.path=/h2-ui用于 H2 控制台的 url,因此默认 urlhttp://localhost:8080/h2-console将更改为http://localhost:8080/h2-ui.
创建模型
我们将在数据库中有 3 个表:用户、角色和user_roles用于多对多关系。
让我们定义这些模型。
在模型包中,创建 3 个文件:
ERoleERole.java中的枚举。
在这个例子中,我们有 3 个角色对应于 3 个枚举。
package com.bezkoder.spring.security.login.models;

public enum ERole {
  ROLE_USER,
  ROLE_MODERATOR,
  ROLE_ADMIN
}RoleRole.java中的模型
package com.bezkoder.spring.security.login.models;

import javax.persistence.*;

@Entity
@Table(name = "roles")
public class Role {
  @Id
  @GeneratedValue(strategy = GenerationType.IDENTITY)
  private Integer id;

  @Enumerated(EnumType.STRING)
  @Column(length = 20)
  private ERole name;

  public Role() {

  }

  public Role(ERole name) {
    this.name = name;
  }

  public Integer getId() {
    return id;
  }

  public void setId(Integer id) {
    this.id = id;
  }

  public ERole getName() {
    return name;
  }

  public void setName(ERole name) {
    this.name = name;
  }
}UserUser.java中的模型。
它有 5 个字段:id、用户名、电子邮件、密码、角色。
package com.bezkoder.spring.security.login.models;

import java.util.HashSet;
import java.util.Set;

import javax.persistence.*;
import javax.validation.constraints.Email;
import javax.validation.constraints.NotBlank;
import javax.validation.constraints.Size;

@Entity
@Table(name = "users",
       uniqueConstraints = {
           @UniqueConstraint(columnNames = "username"),
           @UniqueConstraint(columnNames = "email")
       })
public class User {
  @Id
  @GeneratedValue(strategy = GenerationType.IDENTITY)
  private Long id;

  @NotBlank
  @Size(max = 20)
  private String username;

  @NotBlank
  @Size(max = 50)
  @Email
  private String email;

  @NotBlank
  @Size(max = 120)
  private String password;

  @ManyToMany(fetch = FetchType.LAZY)
  @JoinTable(name = "user_roles",
             joinColumns = @JoinColumn(name = "user_id"),
             inverseJoinColumns = @JoinColumn(name = "role_id"))
  private Set roles = new HashSet<>();

  public User() {
  }

  public User(String username, String email, String password) {
    this.username = username;
    this.email = email;
    this.password = password;
  }

  public Long getId() {
    return id;
  }

  public void setId(Long id) {
    this.id = id;
  }

  public String getUsername() {
    return username;
  }

  public void setUsername(String username) {
    this.username = username;
  }

  public String getEmail() {
    return email;
  }

  public void setEmail(String email) {
    this.email = email;
  }

  public String getPassword() {
    return password;
  }

  public void setPassword(String password) {
    this.password = password;
  }

  public Set getRoles() {
    return roles;
  }

  public void setRoles(Set roles) {
    this.roles = roles;
  }
}
实施存储库
现在,上面的每个模型都需要一个用于持久化和访问数据的存储库。在存储库中包中,让我们创建 2 个存储库。
用户存储库
有 3 种必要的方法JpaRepository支持。
package com.bezkoder.spring.security.login.repository;

import java.util.Optional;

import org.springframework.data.jpa.repository.JpaRepository;
import org.springframework.stereotype.Repository;

import com.bezkoder.spring.security.login.models.User;

@Repository
public interface UserRepository extends JpaRepository {
  Optional findByUsername(String username);

  Boolean existsByUsername(String username);

  Boolean existsByEmail(String email);
}
角色存储库
该存储库还扩展JpaRepository并提供了一个查找器方法。
package com.bezkoder.spring.security.login.repository;

import java.util.Optional;

import org.springframework.data.jpa.repository.JpaRepository;
import org.springframework.stereotype.Repository;

import com.bezkoder.spring.security.login.models.ERole;
import com.bezkoder.spring.security.login.models.Role;

@Repository
public interface RoleRepository extends JpaRepository {
  Optional findByName(ERole name);
}
配置 Spring Security
在安全包中,创建WebSecurityConfig扩展的类WebSecurityConfigurerAdapter。
WebSecurityConfig.java
package com.bezkoder.spring.security.login.security;

import org.springframework.beans.factory.annotation.Autowired;
import org.springframework.beans.factory.annotation.Value;
import org.springframework.context.annotation.Bean;
import org.springframework.context.annotation.Configuration;
import org.springframework.security.authentication.AuthenticationManager;
import org.springframework.security.config.annotation.authentication.builders.AuthenticationManagerBuilder;
import org.springframework.security.config.annotation.method.configuration.EnableGlobalMethodSecurity;
import org.springframework.security.config.annotation.web.builders.HttpSecurity;
import org.springframework.security.config.annotation.web.configuration.EnableWebSecurity;
import org.springframework.security.config.annotation.web.configuration.WebSecurityConfigurerAdapter;
import org.springframework.security.config.http.SessionCreationPolicy;
import org.springframework.security.crypto.bcrypt.BCryptPasswordEncoder;
import org.springframework.security.crypto.password.PasswordEncoder;
import org.springframework.security.web.authentication.UsernamePasswordAuthenticationFilter;

import com.bezkoder.spring.security.login.security.jwt.AuthEntryPointJwt;
import com.bezkoder.spring.security.login.security.jwt.AuthTokenFilter;
import com.bezkoder.spring.security.login.security.services.UserDetailsServiceImpl;

@Configuration
@EnableWebSecurity
@EnableGlobalMethodSecurity(
    // securedEnabled = true,
    // jsr250Enabled = true,
    prePostEnabled = true)
public class WebSecurityConfig extends WebSecurityConfigurerAdapter {

  @Value("${spring.h2.console.path}")
  private String h2ConsolePath;

  @Autowired
  UserDetailsServiceImpl userDetailsService;

  @Autowired
  private AuthEntryPointJwt unauthorizedHandler;

  @Bean
  public AuthTokenFilter authenticationJwtTokenFilter() {
    return new AuthTokenFilter();
  }

  @Override
  public void configure(AuthenticationManagerBuilder authenticationManagerBuilder) throws Exception {
    authenticationManagerBuilder.userDetailsService(userDetailsService).passwordEncoder(passwordEncoder());
  }

  @Bean
  @Override
  public AuthenticationManager authenticationManagerBean() throws Exception {
    return super.authenticationManagerBean();
  }

  @Bean
  public PasswordEncoder passwordEncoder() {
    return new BCryptPasswordEncoder();
  }

  @Override
  protected void configure(HttpSecurity http) throws Exception {
    http.cors().and().csrf().disable()
      .exceptionHandling().authenticationEntryPoint(unauthorizedHandler).and()
      .sessionManagement().sessionCreationPolicy(SessionCreationPolicy.STATELESS).and()
      .authorizeRequests().antMatchers("/api/auth/**").permitAll()
      .antMatchers("/api/test/**").permitAll()
      .antMatchers(h2ConsolePath + "/**").permitAll()
      .anyRequest().authenticated();

    // fix H2 database console: Refused to display ' in a frame because it set 'X-Frame-Options' to 'deny'
    http.headers().frameOptions().sameOrigin();

    http.addFilterBefore(authenticationJwtTokenFilter(), UsernamePasswordAuthenticationFilter.class);
  }
}
让我解释一下上面的代码。
–@EnableWebSecurity允许 Spring 查找并自动将类应用于全局 Web 安全。
–@EnableGlobalMethodSecurity为方法提供 AOP 安全性。它启用@PreAuthorize,,@PostAuthorize它还支持JSR-250。您可以在方法安全表达式中的配置中找到更多参数。
– 我们覆盖了接口中的configure(HttpSecurity http)方法。WebSecurityConfigurerAdapter它告诉 Spring Security 我们如何配置 CORS 和 CSRF,何时我们想要要求所有用户都经过身份验证,哪个过滤器(AuthTokenFilter)以及我们希望它何时工作(过滤之前UsernamePasswordAuthenticationFilter),选择哪个异常处理程序(AuthEntryPointJwt)。
– Spring Security 将加载用户详细信息以执行身份验证和授权。所以它有UserDetailsService我们需要实现的接口。
– 的实现UserDetailsService将用于DaoAuthenticationProvider按AuthenticationManagerBuilder.userDetailsService()方法配置。
– 我们还需要一个PasswordEncoder用于DaoAuthenticationProvider. 如果我们不指定,它将使用纯文本。
实施 UserDetails 和 UserDetailsService
如果身份验证过程成功,我们可以从对象中获取用户的信息,例如用户名、密码、权限Authentication。
Authentication authentication =
        authenticationManager.authenticate(
            new UsernamePasswordAuthenticationToken(username, password)
        );

UserDetails userDetails = (UserDetails) authentication.getPrincipal();
// userDetails.getUsername()
// userDetails.getPassword()
// userDetails.getAuthorities()如果我们想获取更多数据(id、email……),我们可以创建这个UserDetails接口的实现。
安全/服务/UserDetailsImpl.java
package com.bezkoder.spring.security.login.security.services;

import java.util.Collection;
import java.util.List;
import java.util.Objects;
import java.util.stream.Collectors;

import org.springframework.security.core.GrantedAuthority;
import org.springframework.security.core.authority.SimpleGrantedAuthority;
import org.springframework.security.core.userdetails.UserDetails;

import com.bezkoder.spring.security.login.models.User;
import com.fasterxml.jackson.annotation.JsonIgnore;

public class UserDetailsImpl implements UserDetails {
  private static final long serialVersionUID = 1L;

  private Long id;

  private String username;

  private String email;

  @JsonIgnore
  private String password;

  private Collection authorities;

  public UserDetailsImpl(Long id, String username, String email, String password,
      Collection authorities) {
    this.id = id;
    this.username = username;
    this.email = email;
    this.password = password;
    this.authorities = authorities;
  }

  public static UserDetailsImpl build(User user) {
    List authorities = user.getRoles().stream()
        .map(role -> new SimpleGrantedAuthority(role.getName().name()))
        .collect(Collectors.toList());

    return new UserDetailsImpl(
        user.getId(),
        user.getUsername(),
        user.getEmail(),
        user.getPassword(),
        authorities);
  }

  @Override
  public Collection getAuthorities() {
    return authorities;
  }

  public Long getId() {
    return id;
  }

  public String getEmail() {
    return email;
  }

  @Override
  public String getPassword() {
    return password;
  }

  @Override
  public String getUsername() {
    return username;
  }

  @Override
  public boolean isAccountNonExpired() {
    return true;
  }

  @Override
  public boolean isAccountNonLocked() {
    return true;
  }

  @Override
  public boolean isCredentialsNonExpired() {
    return true;
  }

  @Override
  public boolean isEnabled() {
    return true;
  }

  @Override
  public boolean equals(Object o) {
    if (this == o)
      return true;
    if (o == null || getClass() != o.getClass())
      return false;
    UserDetailsImpl user = (UserDetailsImpl) o;
    return Objects.equals(id, user.id);
  }
} 看上面的代码,你可以注意到我们转换Set成List. Authentication稍后使用 Spring Security 和对象很重要。
正如我之前所说,我们需要UserDetailsService获取UserDetails对象。您可以查看UserDetailsService只有一种方法的接口:
public interface UserDetailsService {
  UserDetails loadUserByUsername(String username) throws UsernameNotFoundException;
}所以我们实现它并覆盖loadUserByUsername()方法。
安全/服务/UserDetailsServiceImpl.java
package com.bezkoder.spring.security.login.security.services;

import org.springframework.beans.factory.annotation.Autowired;
import org.springframework.security.core.userdetails.UserDetails;
import org.springframework.security.core.userdetails.UserDetailsService;
import org.springframework.security.core.userdetails.UsernameNotFoundException;
import org.springframework.stereotype.Service;
import org.springframework.transaction.annotation.Transactional;

import com.bezkoder.spring.security.login.models.User;
import com.bezkoder.spring.security.login.repository.UserRepository;

@Service
public class UserDetailsServiceImpl implements UserDetailsService {
  @Autowired
  UserRepository userRepository;

  @Override
  @Transactional
  public UserDetails loadUserByUsername(String username) throws UsernameNotFoundException {
    User user = userRepository.findByUsername(username)
        .orElseThrow(() -> new UsernameNotFoundException("User Not Found with username: " + username));

    return UserDetailsImpl.build(user);
  }
}
在上面的代码中,我们使用 获取完整的自定义 User 对象,然后我们使用静态方法UserRepository构建一个对象。UserDetailsbuild()
过滤请求
让我们定义一个每个请求执行一次的过滤器。所以我们创建AuthTokenFilter了扩展OncePerRequestFilter和覆盖doFilterInternal()方法的类。
安全/jwt/AuthTokenFilter.java
package com.bezkoder.spring.security.login.security.jwt;

import java.io.IOException;

import javax.servlet.FilterChain;
import javax.servlet.ServletException;
import javax.servlet.http.HttpServletRequest;
import javax.servlet.http.HttpServletResponse;

import org.slf4j.Logger;
import org.slf4j.LoggerFactory;
import org.springframework.beans.factory.annotation.Autowired;
import org.springframework.security.authentication.UsernamePasswordAuthenticationToken;
import org.springframework.security.core.context.SecurityContextHolder;
import org.springframework.security.core.userdetails.UserDetails;
import org.springframework.security.web.authentication.WebAuthenticationDetailsSource;
import org.springframework.web.filter.OncePerRequestFilter;

import com.bezkoder.spring.security.login.security.services.UserDetailsServiceImpl;

public class AuthTokenFilter extends OncePerRequestFilter {
  @Autowired
  private JwtUtils jwtUtils;

  @Autowired
  private UserDetailsServiceImpl userDetailsService;

  private static final Logger logger = LoggerFactory.getLogger(AuthTokenFilter.class);

  @Override
  protected void doFilterInternal(HttpServletRequest request, HttpServletResponse response, FilterChain filterChain)
      throws ServletException, IOException {
    try {
      String jwt = parseJwt(request);
      if (jwt != null && jwtUtils.validateJwtToken(jwt)) {
        String username = jwtUtils.getUserNameFromJwtToken(jwt);

        UserDetails userDetails = userDetailsService.loadUserByUsername(username);

        UsernamePasswordAuthenticationToken authentication =
            new UsernamePasswordAuthenticationToken(userDetails,
                                                    null,
                                                    userDetails.getAuthorities());

        authentication.setDetails(new WebAuthenticationDetailsSource().buildDetails(request));

        SecurityContextHolder.getContext().setAuthentication(authentication);
      }
    } catch (Exception e) {
      logger.error("Cannot set user authentication: {}", e);
    }

    filterChain.doFilter(request, response);
  }

  private String parseJwt(HttpServletRequest request) {
    String jwt = jwtUtils.getJwtFromCookies(request);
    return jwt;
  }
}我们在里面做什么doFilterInternal():
–JWT从 HTTP Cookies 中获取
– 如果请求有,验证它,从中JWT解析– 从,获取创建一个对象–使用方法在SecurityContext中设置当前值。usernameusernameUserDetailsAuthenticationUserDetailssetAuthentication(authentication)
在此之后,每次你想得到UserDetails,只需SecurityContext像这样使用:
UserDetails userDetails =
	(UserDetails) SecurityContextHolder.getContext().getAuthentication().getPrincipal();

// userDetails.getUsername()
// userDetails.getPassword()
// userDetails.getAuthorities()
创建 JWT 实用程序类
这个类有3个主要功能:
getJwtFromCookies:JWT通过 Cookie 名称从 Cookies 中获取generateJwtCookie: 生成一个包含JWT用户名、日期、过期时间、秘密的 CookiegetCleanJwtCookie: 返回带有null值的 Cookie(用于干净的 Cookie)getUserNameFromJwtToken: 获取用户名JWTvalidateJwtTokenJWT:用秘密验证 a
安全/jwt/JwtUtils.java
package com.bezkoder.spring.security.login.security.jwt;

import java.util.Date;

import javax.servlet.http.Cookie;
import javax.servlet.http.HttpServletRequest;

import org.slf4j.Logger;
import org.slf4j.LoggerFactory;
import org.springframework.beans.factory.annotation.Value;
import org.springframework.http.ResponseCookie;
import org.springframework.stereotype.Component;
import org.springframework.web.util.WebUtils;

import com.bezkoder.spring.security.login.security.services.UserDetailsImpl;
import io.jsonwebtoken.*;

@Component
public class JwtUtils {
  private static final Logger logger = LoggerFactory.getLogger(JwtUtils.class);

  @Value("${bezkoder.app.jwtSecret}")
  private String jwtSecret;

  @Value("${bezkoder.app.jwtExpirationMs}")
  private int jwtExpirationMs;

  @Value("${bezkoder.app.jwtCookieName}")
  private String jwtCookie;

  public String getJwtFromCookies(HttpServletRequest request) {
    Cookie cookie = WebUtils.getCookie(request, jwtCookie);
    if (cookie != null) {
      return cookie.getValue();
    } else {
      return null;
    }
  }

  public ResponseCookie generateJwtCookie(UserDetailsImpl userPrincipal) {
    String jwt = generateTokenFromUsername(userPrincipal.getUsername());
    ResponseCookie cookie = ResponseCookie.from(jwtCookie, jwt).path("/api").maxAge(24 * 60 * 60).httpOnly(true).build();
    return cookie;
  }

  public ResponseCookie getCleanJwtCookie() {
    ResponseCookie cookie = ResponseCookie.from(jwtCookie, null).path("/api").build();
    return cookie;
  }

  public String getUserNameFromJwtToken(String token) {
    return Jwts.parser().setSigningKey(jwtSecret).parseClaimsJws(token).getBody().getSubject();
  }

  public boolean validateJwtToken(String authToken) {
    try {
      Jwts.parser().setSigningKey(jwtSecret).parseClaimsJws(authToken);
      return true;
    } catch (SignatureException e) {
      logger.error("Invalid JWT signature: {}", e.getMessage());
    } catch (MalformedJwtException e) {
      logger.error("Invalid JWT token: {}", e.getMessage());
    } catch (ExpiredJwtException e) {
      logger.error("JWT token is expired: {}", e.getMessage());
    } catch (UnsupportedJwtException e) {
      logger.error("JWT token is unsupported: {}", e.getMessage());
    } catch (IllegalArgumentException e) {
      logger.error("JWT claims string is empty: {}", e.getMessage());
    }

    return false;
  }

  public String generateTokenFromUsername(String username) {
    return Jwts.builder()
        .setSubject(username)
        .setIssuedAt(new Date())
        .setExpiration(new Date((new Date()).getTime() + jwtExpirationMs))
        .signWith(SignatureAlgorithm.HS512, jwtSecret)
        .compact();
  }
}请记住,我们在文件中添加了bezkoder.app.jwtSecret,bezkoder.app.jwtExpirationMs和bezkoder.app.jwtCookieName属性application.properties。
处理认证异常
现在我们创建AuthEntryPointJwt实现AuthenticationEntryPoint接口的类。然后我们重写该commence()方法。AuthenticationException每当未经身份验证的用户请求安全的 HTTP 资源并抛出异常时,都会触发此方法。
安全/jwt/AuthEntryPointJwt.java
package com.bezkoder.spring.security.login.security.jwt;

import java.io.IOException;
import java.util.HashMap;
import java.util.Map;

import javax.servlet.ServletException;
import javax.servlet.http.HttpServletRequest;
import javax.servlet.http.HttpServletResponse;

import org.slf4j.Logger;
import org.slf4j.LoggerFactory;
import org.springframework.http.MediaType;
import org.springframework.security.core.AuthenticationException;
import org.springframework.security.web.AuthenticationEntryPoint;
import org.springframework.stereotype.Component;

import com.fasterxml.jackson.databind.ObjectMapper;

@Component
public class AuthEntryPointJwt implements AuthenticationEntryPoint {

  private static final Logger logger = LoggerFactory.getLogger(AuthEntryPointJwt.class);

  @Override
  public void commence(HttpServletRequest request, HttpServletResponse response, AuthenticationException authException)
      throws IOException, ServletException {
    logger.error("Unauthorized error: {}", authException.getMessage());

    response.setContentType(MediaType.APPLICATION_JSON_VALUE);
    response.setStatus(HttpServletResponse.SC_UNAUTHORIZED);

    final Map body = new HashMap<>();
    body.put("status", HttpServletResponse.SC_UNAUTHORIZED);
    body.put("error", "Unauthorized");
    body.put("message", authException.getMessage());
    body.put("path", request.getServletPath());

    final ObjectMapper mapper = new ObjectMapper();
    mapper.writeValue(response.getOutputStream(), body);
  }
} HttpServletResponse.SC_UNAUTHORIZED是401状态码。表示请求需要 HTTP 认证。
如果要自定义响应数据,只需使用ObjectMapper类似以下代码:
@Override
public void commence(HttpServletRequest request, HttpServletResponse response, AuthenticationException authException)
    throws IOException, ServletException {
  logger.error("Unauthorized error: {}", authException.getMessage());

  response.setContentType(MediaType.APPLICATION_JSON_VALUE);
  response.setStatus(HttpServletResponse.SC_UNAUTHORIZED);

  final Map body = new HashMap<>();
  body.put("status", HttpServletResponse.SC_UNAUTHORIZED);
  body.put("error", "Unauthorized");
  body.put("message", authException.getMessage());
  body.put("path", request.getServletPath());

  final ObjectMapper mapper = new ObjectMapper();
  mapper.writeValue(response.getOutputStream(), body);
}
我们已经为 Spring Security 构建了所有东西。本教程的下一部分将向您展示如何为我们的 Rest API 实现控制器。
为身份验证控制器定义有效负载
让我总结一下我们的 RestAPI 的有效负载:
– 请求:
- 登录请求:{用户名,密码}
- 注册请求:{用户名、电子邮件、密码}
– 回应:
- UserInfoResponse:{ id、用户名、电子邮件、角色}
- 消息响应:{消息}
为了不让教程太长,我没有在这里展示这些 POJO。您可以在Github
上的项目源代码中找到有效负载类的详细信息。
创建 Spring Rest 控制器
认证控制器
此控制器提供用于注册和登录、注销操作的 API。
– /api/auth/signup
- 检查现有
username/email - 创建新的
User(ROLE_USER如果没有指定角色) - 使用保存
User到数据库UserRepository
– /api/auth/signin
- 验证{用户名,密码}
SecurityContext使用Authentication对象更新- 产生
JWT UserDetails从Authentication对象获取- 响应包含
JWT和UserDetails数据
- /api/auth/signout:清除 Cookie。
控制器/AuthController.java
package com.bezkoder.spring.security.login.controllers;

import java.util.HashSet;
import java.util.List;
import java.util.Set;
import java.util.stream.Collectors;

import javax.validation.Valid;

import org.springframework.beans.factory.annotation.Autowired;
import org.springframework.http.HttpHeaders;
import org.springframework.http.ResponseCookie;
import org.springframework.http.ResponseEntity;
import org.springframework.security.authentication.AuthenticationManager;
import org.springframework.security.authentication.UsernamePasswordAuthenticationToken;
import org.springframework.security.core.Authentication;
import org.springframework.security.core.context.SecurityContextHolder;
import org.springframework.security.crypto.password.PasswordEncoder;
import org.springframework.web.bind.annotation.CrossOrigin;
import org.springframework.web.bind.annotation.PostMapping;
import org.springframework.web.bind.annotation.RequestBody;
import org.springframework.web.bind.annotation.RequestMapping;
import org.springframework.web.bind.annotation.RestController;

import com.bezkoder.spring.security.login.models.ERole;
import com.bezkoder.spring.security.login.models.Role;
import com.bezkoder.spring.security.login.models.User;
import com.bezkoder.spring.security.login.payload.request.LoginRequest;
import com.bezkoder.spring.security.login.payload.request.SignupRequest;
import com.bezkoder.spring.security.login.payload.response.UserInfoResponse;
import com.bezkoder.spring.security.login.payload.response.MessageResponse;
import com.bezkoder.spring.security.login.repository.RoleRepository;
import com.bezkoder.spring.security.login.repository.UserRepository;
import com.bezkoder.spring.security.login.security.jwt.JwtUtils;
import com.bezkoder.spring.security.login.security.services.UserDetailsImpl;

@CrossOrigin(origins = "*", maxAge = 3600)
@RestController
@RequestMapping("/api/auth")
public class AuthController {
  @Autowired
  AuthenticationManager authenticationManager;

  @Autowired
  UserRepository userRepository;

  @Autowired
  RoleRepository roleRepository;

  @Autowired
  PasswordEncoder encoder;

  @Autowired
  JwtUtils jwtUtils;

  @PostMapping("/signin")
  public ResponseEntity authenticateUser(@Valid @RequestBody LoginRequest loginRequest) {

    Authentication authentication = authenticationManager
        .authenticate(new UsernamePasswordAuthenticationToken(loginRequest.getUsername(), loginRequest.getPassword()));

    SecurityContextHolder.getContext().setAuthentication(authentication);

    UserDetailsImpl userDetails = (UserDetailsImpl) authentication.getPrincipal();

    ResponseCookie jwtCookie = jwtUtils.generateJwtCookie(userDetails);

    List roles = userDetails.getAuthorities().stream()
        .map(item -> item.getAuthority())
        .collect(Collectors.toList());

    return ResponseEntity.ok().header(HttpHeaders.SET_COOKIE, jwtCookie.toString())
        .body(new UserInfoResponse(userDetails.getId(),
                                   userDetails.getUsername(),
                                   userDetails.getEmail(),
                                   roles));
  }

  @PostMapping("/signup")
  public ResponseEntity registerUser(@Valid @RequestBody SignupRequest signUpRequest) {
    if (userRepository.existsByUsername(signUpRequest.getUsername())) {
      return ResponseEntity.badRequest().body(new MessageResponse("Error: Username is already taken!"));
    }

    if (userRepository.existsByEmail(signUpRequest.getEmail())) {
      return ResponseEntity.badRequest().body(new MessageResponse("Error: Email is already in use!"));
    }

    // Create new user's account
    User user = new User(signUpRequest.getUsername(),
                         signUpRequest.getEmail(),
                         encoder.encode(signUpRequest.getPassword()));

    Set strRoles = signUpRequest.getRole();
    Set roles = new HashSet<>();

    if (strRoles == null) {
      Role userRole = roleRepository.findByName(ERole.ROLE_USER)
          .orElseThrow(() -> new RuntimeException("Error: Role is not found."));
      roles.add(userRole);
    } else {
      strRoles.forEach(role -> {
        switch (role) {
        case "admin":
          Role adminRole = roleRepository.findByName(ERole.ROLE_ADMIN)
              .orElseThrow(() -> new RuntimeException("Error: Role is not found."));
          roles.add(adminRole);

          break;
        case "mod":
          Role modRole = roleRepository.findByName(ERole.ROLE_MODERATOR)
              .orElseThrow(() -> new RuntimeException("Error: Role is not found."));
          roles.add(modRole);

          break;
        default:
          Role userRole = roleRepository.findByName(ERole.ROLE_USER)
              .orElseThrow(() -> new RuntimeException("Error: Role is not found."));
          roles.add(userRole);
        }
      });
    }

    user.setRoles(roles);
    userRepository.save(user);

    return ResponseEntity.ok(new MessageResponse("User registered successfully!"));
  }

  @PostMapping("/signout")
  public ResponseEntity logoutUser() {
    ResponseCookie cookie = jwtUtils.getCleanJwtCookie();
    return ResponseEntity.ok().header(HttpHeaders.SET_COOKIE, cookie.toString())
        .body(new MessageResponse("You've been signed out!"));
  }
}
用于测试授权的控制器
有 4 个 API:
–/api/test/all用于公共访问
–/api/test/user用户拥有ROLE_USER或ROLE_MODERATOR或ROLE_ADMIN
–/api/test/mod用户拥有ROLE_MODERATOR
–/api/test/admin用户拥有ROLE_ADMIN
你还记得我们用来@EnableGlobalMethodSecurity(prePostEnabled = true)上课WebSecurityConfig吗?
@Configuration
@EnableWebSecurity
@EnableGlobalMethodSecurity(prePostEnabled = true)
public class WebSecurityConfig extends WebSecurityConfigurerAdapter { ... }现在我们可以@PreAuthorize轻松地使用注释来保护我们的 API 中的方法。
控制器/TestController.java
package com.bezkoder.spring.security.login.controllers;

import org.springframework.security.access.prepost.PreAuthorize;
import org.springframework.web.bind.annotation.CrossOrigin;
import org.springframework.web.bind.annotation.GetMapping;
import org.springframework.web.bind.annotation.RequestMapping;
import org.springframework.web.bind.annotation.RestController;

@CrossOrigin(origins = "*", maxAge = 3600)
@RestController
@RequestMapping("/api/test")
public class TestController {
  @GetMapping("/all")
  public String allAccess() {
    return "Public Content.";
  }

  @GetMapping("/user")
  @PreAuthorize("hasRole('USER') or hasRole('MODERATOR') or hasRole('ADMIN')")
  public String userAccess() {
    return "User Content.";
  }

  @GetMapping("/mod")
  @PreAuthorize("hasRole('MODERATOR')")
  public String moderatorAccess() {
    return "Moderator Board.";
  }

  @GetMapping("/admin")
  @PreAuthorize("hasRole('ADMIN')")
  public String adminAccess() {
    return "Admin Board.";
  }
}
运行和检查
使用以下命令运行 Spring Boot 应用程序: mvn spring-boot:run
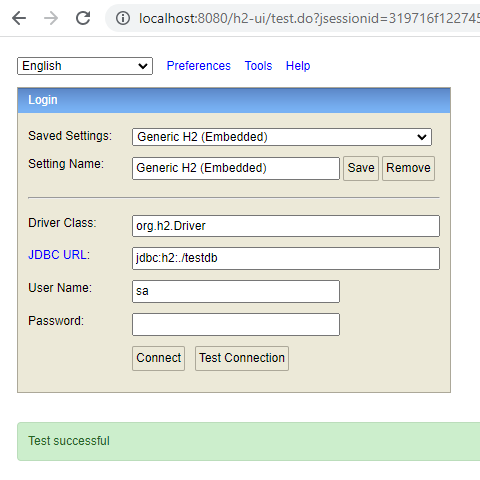
让我们使用 url: 来检查 H2 数据库http://localhost:8080/h2-ui:
点击Connect按钮,我们在模型包中定义的表将在数据库中自动生成。
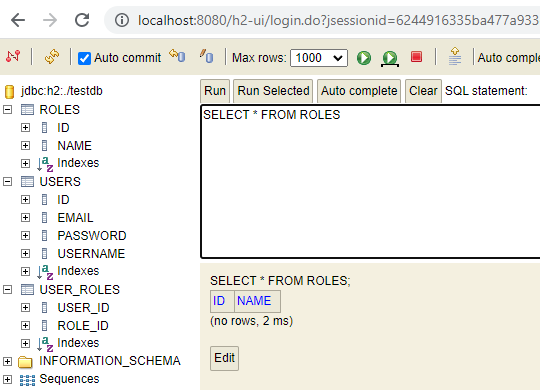
在将任何角色分配给用户之前,我们还需要在角色表中添加一些行。
运行以下 SQL 插入语句:
INSERT INTO roles(name) VALUES('ROLE_USER');
INSERT INTO roles(name) VALUES('ROLE_MODERATOR');
INSERT INTO roles(name) VALUES('ROLE_ADMIN');然后检查角色表:
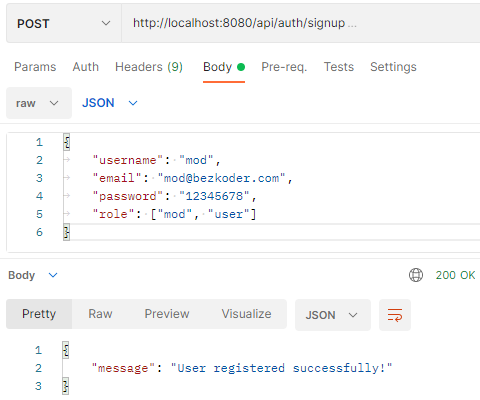
/signup使用API注册一些用户:
- 管理员与
ROLE_ADMIN - 与
ROLE_MODERATOR和_ROLE_USER - zkoder与
ROLE_USER
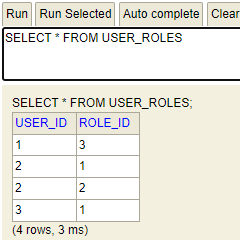
检查用户和user_roles表:
访问公共资源: GET/api/test/all
无需登录即可访问受保护的资源: GET/api/test/user
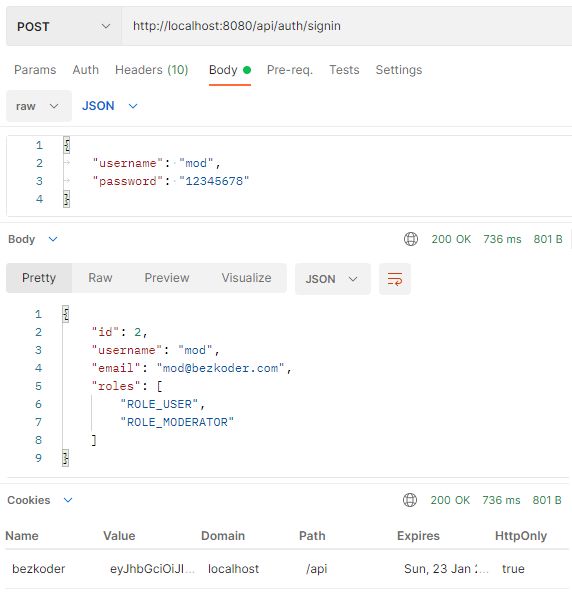
登录一个帐户: POST/api/auth/signin
检查 Cookie:
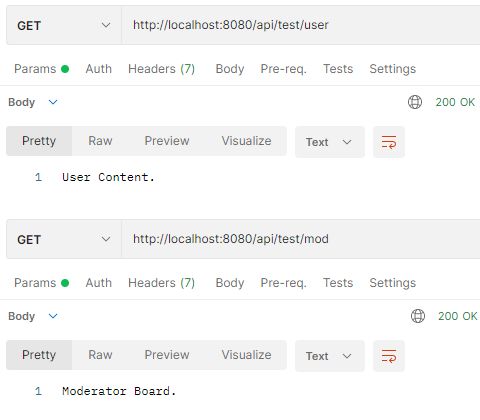
访问ROLE_USER和ROLE_MODERATOR资源:
– GET /api/test/user
– GET/api/test/mod
访问ROLE_ADMIN资源: GET /api/test/admin,响应将是403 Forbidden:
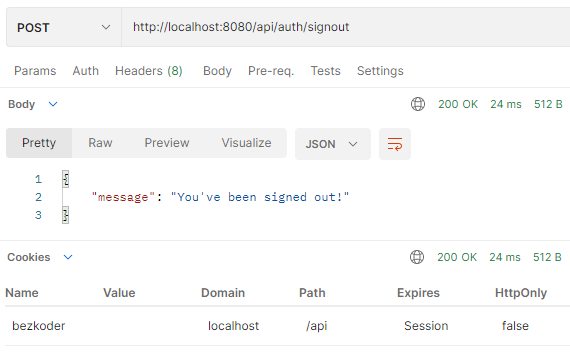
注销帐户: POST/api/auth/signout
解决 JDK 14 的问题
如果您使用 JDK 14 运行此 Spring Boot 应用程序并在尝试进行身份验证时出现以下错误:
FilterChain java.lang.NoClassDefFoundError: javax/xml/bind/DatatypeConverter
只需将以下依赖项添加到pom.xml:
    jakarta.xml.bind
    jakarta.xml.bind-api
    2.3.2
一切都会好起来的。
结论
今天我们学习了很多关于 Spring Boot 安全登录和注册示例的有趣知识,其中 JWT 和 H2 数据库和 HttpOnly Cookie。
为了更深入地理解架构并更容易掌握概述:
Spring Boot Architecture for JWT with Spring Security
你应该继续了解如何实现 Refresh Token:
Spring Boot Refresh Token with JWT example
您还可以通过本教程了解如何在 AWS(免费)上部署 Spring Boot 应用程序。
快乐学习!再见。
延伸阅读
- Spring 安全参考
- JWT-JSON Web Token 深入介绍
- 架构:Spring Boot 2 JWT 身份验证与 Spring Security
相关文章:
- Spring Boot JPA + H2 示例:CRUD Rest API
- Spring Boot 分页和过滤器示例 | Spring JPA,可分页
- 带有 Spring Boot 和 Spring JPA 的 CRUD GraphQL API 示例
- Spring Boot Rest XML 示例 – 带有 XML 响应的 Web 服务
- 带有多部分文件的 Spring Boot 文件上传示例
- Spring Boot 中的 @RestControllerAdvice 示例
- Spring Boot @ControllerAdvice 和 @ExceptionHandler 示例
- Spring 数据存储库单元测试的 @DataJpaTest 示例
部署:
- 在 AWS 上部署 Spring Boot 应用程序 – Elastic Beanstalk
- Docker Compose:Spring Boot 和 MySQL 示例
全栈 CRUD 应用程序:
– Vue + Spring Boot 示例
– Angular 8 + Spring Boot 示例
– Angular 10 + Spring Boot 示例
– Angular 11 + Spring Boot 示例
– Angular 12 + Spring Boot 示例
– Angular 13 + Spring Boot 示例
– React + Spring Boot例子
如果您需要此后端的工作前端,您可以在帖子中找到客户端应用程序:(
只需使用本地存储修改为 Cookie)
– Vue
– Angular 8 / Angular 10 / Angular 11 / Angular 12 / Angular 13
– React / React Hooks / React + Redux
其他数据库:
–使用 JWT 和 MySQL 的
Spring Boot 登录和注册示例 – 使用 JWT 和 MongoDB 的 Spring Boot 登录和注册示例
源代码
您可以在Github上找到本教程的完整源代码。
