springboot 相关问题
1、SpringBoot:Hello,World!
本博客于看【狂神说】视频后编写
附链接:https://www.bilibili.com/read/cv5702420
SpringBoot简介
1.1、回顾什么是Spring
Spring是一个开源框架,2003 年兴起的一个轻量级的Java 开发框架,作者:Rod Johnson 。
Spring是为了解决企业级应用开发的复杂性而创建的,简化开发。
**
**
1.2、Spring是如何简化Java开发的
为了降低Java开发的复杂性,Spring采用了以下4种关键策略:
1、基于POJO的轻量级和最小侵入性编程,所有东西都是bean;
2、通过IOC,依赖注入(DI)和面向接口实现松耦合;
3、基于切面(AOP)和惯例进行声明式编程;
4、通过切面和模版减少样式代码RedisTemplate,xxxTemplate;
1.3、什么是SpringBoot
学过javaweb的同学就知道,开发一个web应用,从最初开始接触Servlet结合Tomcat, 跑出一个Hello Wolrld程序,是要经历特别多的步骤;后来就用了框架Struts,再后来是SpringMVC,到了现在的SpringBoot,过一两年又会有其他web框架出现;你们有经历过框架不断的演进,然后自己开发项目所有的技术也在不断的变化、改造吗?建议都可以去经历一遍;
言归正传,什么是SpringBoot呢,就是一个javaweb的开发框架,和SpringMVC类似,对比其他javaweb框架的好处,官方说是简化开发,约定大于配置, you can “just run”,能迅速的开发web应用,几行代码开发一个http接口。
所有的技术框架的发展似乎都遵循了一条主线规律:从一个复杂应用场景 衍生 一种规范框架,人们只需要进行各种配置而不需要自己去实现它,这时候强大的配置功能成了优点;发展到一定程度之后,人们根据实际生产应用情况,选取其中实用功能和设计精华,重构出一些轻量级的框架;之后为了提高开发效率,嫌弃原先的各类配置过于麻烦,于是开始提倡“约定大于配置”,进而衍生出一些一站式的解决方案。
是的这就是Java企业级应用->J2EE->spring->springboot的过程。
随着 Spring 不断的发展,涉及的领域越来越多,项目整合开发需要配合各种各样的文件,慢慢变得不那么易用简单,违背了最初的理念,甚至人称配置地狱。Spring Boot 正是在这样的一个背景下被抽象出来的开发框架,目的为了让大家更容易的使用 Spring 、更容易的集成各种常用的中间件、开源软件;
Spring Boot 基于 Spring 开发,Spirng Boot 本身并不提供 Spring 框架的核心特性以及扩展功能,只是用于快速、敏捷地开发新一代基于 Spring 框架的应用程序。也就是说,它并不是用来替代 Spring 的解决方案,而是和 Spring 框架紧密结合用于提升 Spring 开发者体验的工具。Spring Boot 以约定大于配置的核心思想,默认帮我们进行了很多设置,多数 Spring Boot 应用只需要很少的 Spring 配置。同时它集成了大量常用的第三方库配置(例如 Redis、MongoDB、Jpa、RabbitMQ、Quartz 等等),Spring Boot 应用中这些第三方库几乎可以零配置的开箱即用。
简单来说就是SpringBoot其实不是什么新的框架,它默认配置了很多框架的使用方式,就像maven整合了所有的jar包,spring boot整合了所有的框架 。
Spring Boot 出生名门,从一开始就站在一个比较高的起点,又经过这几年的发展,生态足够完善,Spring Boot 已经当之无愧成为 Java 领域最热门的技术。
Spring Boot的主要优点:
- 为所有Spring开发者更快的入门
- 开箱即用,提供各种默认配置来简化项目配置
- 内嵌式容器简化Web项目
- 没有冗余代码生成和XML配置的要求
1.4、准备工作
1.5、创建基础项目说明
1.6、pom.xml 分析
打开pom.xml,看看Spring Boot项目的依赖:
<parent>
    <groupId>org.springframework.bootgroupId>
    <artifactId>spring-boot-starter-parentartifactId>
    <version>2.2.5.RELEASEversion>
    <relativePath/>
parent>

<dependencies>

    <dependency>
        <groupId>org.springframework.bootgroupId>
        <artifactId>spring-boot-starter-webartifactId>
    dependency>

    <dependency>
        <groupId>org.springframework.bootgroupId>
        <artifactId>spring-boot-starter-testartifactId>
        <scope>testscope>

        <exclusions>
            <exclusion>
                <groupId>org.junit.vintagegroupId>
                <artifactId>junit-vintage-engineartifactId>
            exclusion>
        exclusions>
    dependency>
dependencies>

<build>
    <plugins>

        <plugin>
            <groupId>org.springframework.bootgroupId>
            <artifactId>spring-boot-maven-pluginartifactId>
        plugin>
    plugins>
build>
1.7、编写一个http接口
1、在主程序的同级目录下,新建一个controller包,一定要在同级目录下,否则识别不到
2、在包中新建一个HelloController类
@RestController
public class HelloController {

    @RequestMapping("/hello")
    public String hello() {
        return "Hello World";
    }

}
3、编写完毕后,从主程序启动项目,浏览器发起请求,看页面返回;控制台输出了 Tomcat 访问的端口号!
简单几步,就完成了一个web接口的开发,SpringBoot就是这么简单。所以我们常用它来建立我们的微服务项目!
1.8、将项目打成jar包,点击 maven的 package
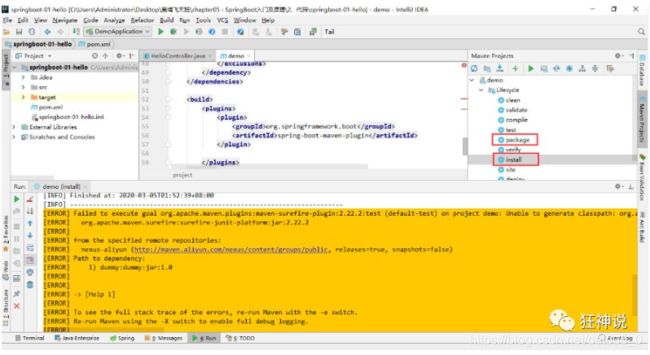
如果遇到以上错误,可以配置打包时 跳过项目运行测试用例
<plugin>
    <groupId>org.apache.maven.pluginsgroupId>
    <artifactId>maven-surefire-pluginartifactId>
    <configuration>

        <skipTests>trueskipTests>
    configuration>
plugin>
如果打包成功,则会在target目录下生成一个 jar 包

打成了jar包后,就可以在任何地方运行了!OK
2、SpringBoot:运行原理初探
我们之前写的HelloSpringBoot,到底是怎么运行的呢,Maven项目,我们一般从pom.xml文件探究起;
pom.xml
2.1、父依赖
其中它主要是依赖一个父项目,主要是管理项目的资源过滤及插件!
<parent>
    <groupId>org.springframework.bootgroupId>
    <artifactId>spring-boot-starter-parentartifactId>
    <version>2.2.5.RELEASEversion>
    <relativePath/>
parent>
点进去,发现还有一个父依赖
<parent>
    <groupId>org.springframework.bootgroupId>
    <artifactId>spring-boot-dependenciesartifactId>
    <version>2.2.5.RELEASEversion>
    <relativePath>../../spring-boot-dependenciesrelativePath>
parent>
这里才是真正管理SpringBoot应用里面所有依赖版本的地方,SpringBoot的版本控制中心;
以后我们导入依赖默认是不需要写版本;但是如果导入的包没有在依赖中管理着就需要手动配置版本
2.2、启动器 spring-boot-starter
<dependency>
    <groupId>org.springframework.bootgroupId>
    <artifactId>spring-boot-starter-webartifactId>
dependency>
springboot-boot-starter-xxx:就是spring-boot的场景启动器
spring-boot-starter-web:帮我们导入了web模块正常运行所依赖的组件;
SpringBoot将所有的功能场景都抽取出来,做成一个个的starter (启动器),只需要在项目中引入这些starter即可,所有相关的依赖都会导入进来 , 我们要用什么功能就导入什么样的场景启动器即可
主启动类
2.3、默认的主启动类
//@SpringBootApplication 来标注一个主程序类
//说明这是一个Spring Boot应用
@SpringBootApplication
public class SpringbootApplication {

   public static void main(String[] args) {
     //以为是启动了一个方法,没想到启动了一个服务
      SpringApplication.run(SpringbootApplication.class, args);
   }

}
2.4、@SpringBootApplication
作用:标注在某个类上说明这个类是SpringBoot的主配置类 , SpringBoot就应该运行这个类的main方法来启动SpringBoot应用;
进入这个注解:可以看到上面还有很多其他注解!
@SpringBootConfiguration
@EnableAutoConfiguration
@ComponentScan(
    excludeFilters = {@Filter(
    type = FilterType.CUSTOM,
    classes = {TypeExcludeFilter.class}
), @Filter(
    type = FilterType.CUSTOM,
    classes = {AutoConfigurationExcludeFilter.class}
)}
)
public @interface SpringBootApplication {
    // ......
}
2.5、@ComponentScan
这个注解在Spring中很重要 ,它对应XML配置中的元素。
作用:自动扫描并加载符合条件的组件或者bean , 将这个bean定义加载到IOC容器中
2.6、@SpringBootConfiguration
作用:SpringBoot的配置类 ,标注在某个类上 , 表示这是一个SpringBoot的配置类;
// 点进去得到下面的 @Component
@Configuration
public @interface SpringBootConfiguration {}

@Component
public @interface Configuration {}
这里的 @Configuration,说明这是一个配置类 ,配置类就是对应Spring的xml 配置文件;
里面的 @Component 这就说明,启动类本身也是Spring中的一个组件而已,负责启动应用!
我们回到 SpringBootApplication 注解中继续看。
2.7、@EnableAutoConfiguration
@EnableAutoConfiguration :开启自动配置功能
以前我们需要自己配置的东西,而现在SpringBoot可以自动帮我们配置 ;@EnableAutoConfiguration告诉SpringBoot开启自动配置功能,这样自动配置才能生效;
点进注解接续查看:
@AutoConfigurationPackage :自动配置包
@Import({Registrar.class})
public @interface AutoConfigurationPackage {
}
@import :Spring底层注解@import , 给容器中导入一个组件
Registrar.class 作用:将主启动类的所在包及包下面所有子包里面的所有组件扫描到Spring容器 ;
这个分析完了,退到上一步,继续看
@Import({AutoConfigurationImportSelector.class}) :给容器导入组件 ;
AutoConfigurationImportSelector :自动配置导入选择器,那么它会导入哪些组件的选择器呢?我们点击去这个类看源码:
1、这个类中有一个这样的方法
// 获得候选的配置
protected List<String> getCandidateConfigurations(AnnotationMetadata metadata, AnnotationAttributes attributes) {
    //这里的getSpringFactoriesLoaderFactoryClass()方法
    //返回的就是我们最开始看的启动自动导入配置文件的注解类;EnableAutoConfiguration
    List<String> configurations = SpringFactoriesLoader.loadFactoryNames(this.getSpringFactoriesLoaderFactoryClass(), this.getBeanClassLoader());
    Assert.notEmpty(configurations, "No auto configuration classes found in META-INF/spring.factories. If you are using a custom packaging, make sure that file is correct.");
    return configurations;
}
2、这个方法又调用了 SpringFactoriesLoader 类的静态方法!我们进入SpringFactoriesLoader类loadFactoryNames() 方法
public static List<String> loadFactoryNames(Class<?> factoryClass, @Nullable ClassLoader classLoader) {
    String factoryClassName = factoryClass.getName();
    //这里它又调用了 loadSpringFactories 方法
    return (List)loadSpringFactories(classLoader).getOrDefault(factoryClassName, Collections.emptyList());
}
3、我们继续点击查看 loadSpringFactories 方法
private static Map<String, List<String>> loadSpringFactories(@Nullable ClassLoader classLoader) {
    //获得classLoader , 我们返回可以看到这里得到的就是EnableAutoConfiguration标注的类本身
    MultiValueMap<String, String> result = (MultiValueMap)cache.get(classLoader);
    if (result != null) {
        return result;
    } else {
        try {
            //去获取一个资源 "META-INF/spring.factories"
            Enumeration<URL> urls = classLoader != null ? classLoader.getResources("META-INF/spring.factories") : ClassLoader.getSystemResources("META-INF/spring.factories");
            LinkedMultiValueMap result = new LinkedMultiValueMap();

            //将读取到的资源遍历,封装成为一个Properties
            while(urls.hasMoreElements()) {
                URL url = (URL)urls.nextElement();
                UrlResource resource = new UrlResource(url);
                Properties properties = PropertiesLoaderUtils.loadProperties(resource);
                Iterator var6 = properties.entrySet().iterator();

                while(var6.hasNext()) {
                    Entry<?, ?> entry = (Entry)var6.next();
                    String factoryClassName = ((String)entry.getKey()).trim();
                    String[] var9 = StringUtils.commaDelimitedListToStringArray((String)entry.getValue());
                    int var10 = var9.length;

                    for(int var11 = 0; var11 < var10; ++var11) {
                        String factoryName = var9[var11];
                        result.add(factoryClassName, factoryName.trim());
                    }
                }
            }

            cache.put(classLoader, result);
            return result;
        } catch (IOException var13) {
            throw new IllegalArgumentException("Unable to load factories from location [META-INF/spring.factories]", var13);
        }
    }
}
4、发现一个多次出现的文件:spring.factories,全局搜索它
2.8、spring.factories
我们根据源头打开spring.factories , 看到了很多自动配置的文件;这就是自动配置根源所在!
WebMvcAutoConfiguration
所以,自动配置真正实现是从classpath中搜寻所有的META-INF/spring.factories配置文件 ,并将其中对应的 org.springframework.boot.autoconfigure. 包下的配置项,通过反射实例化为对应标注了 @Configuration的JavaConfig形式的IOC容器配置类 , 然后将这些都汇总成为一个实例并加载到IOC容器中。
结论:
- SpringBoot在启动的时候从类路径下的META-INF/spring.factories中获取EnableAutoConfiguration指定的值
- 将这些值作为自动配置类导入容器 , 自动配置类就生效 , 帮我们进行自动配置工作;
- 整个J2EE的整体解决方案和自动配置都在springboot-autoconfigure的jar包中;
- 它会给容器中导入非常多的自动配置类 (xxxAutoConfiguration), 就是给容器中导入这个场景需要的所有组件 , 并配置好这些组件 ;
- 有了自动配置类 , 免去了我们手动编写配置注入功能组件等的工作;
SpringApplication
2.9、不简单的方法
我最初以为就是运行了一个main方法,没想到却开启了一个服务;
@SpringBootApplication
public class SpringbootApplication {
    public static void main(String[] args) {
        SpringApplication.run(SpringbootApplication.class, args);
    }
}
SpringApplication.run分析
分析该方法主要分两部分,一部分是SpringApplication的实例化,二是run方法的执行;
2.10、SpringApplication
这个类主要做了以下四件事情:
1、推断应用的类型是普通的项目还是Web项目
2、查找并加载所有可用初始化器 , 设置到initializers属性中
3、找出所有的应用程序监听器,设置到listeners属性中
4、推断并设置main方法的定义类,找到运行的主类
查看构造器:
public SpringApplication(ResourceLoader resourceLoader, Class... primarySources) {
    // ......
    this.webApplicationType = WebApplicationType.deduceFromClasspath();
    this.setInitializers(this.getSpringFactoriesInstances();
    this.setListeners(this.getSpringFactoriesInstances(ApplicationListener.class));
    this.mainApplicationClass = this.deduceMainApplicationClass();
}
2.11、run方法流程分析
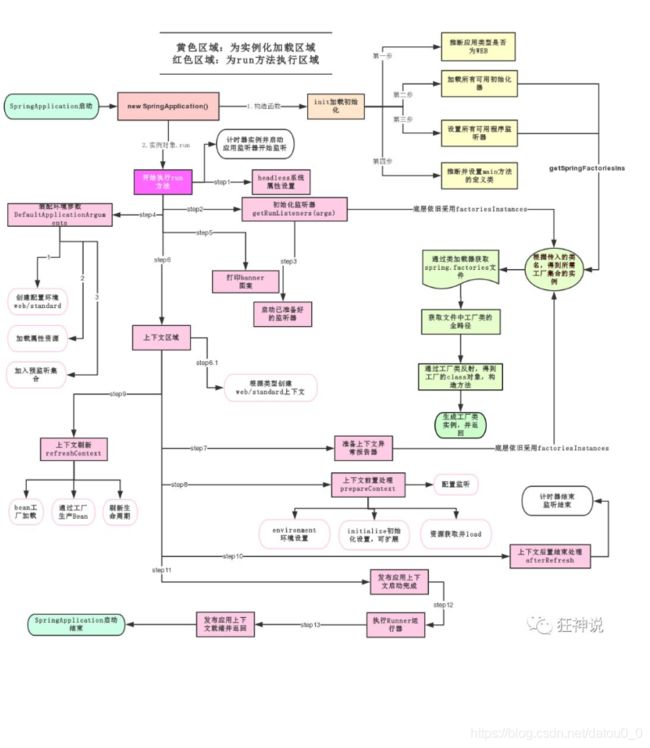
跟着源码和这幅图就可以一探究竟了!
3、SpringBoot:JSR303数据校验及多环境切换
JSR303数据校验
3.1、先看看如何使用
Springboot中可以用@validated来校验数据,如果数据异常则会统一抛出异常,方便异常中心统一处理。我们这里来写个注解让我们的name只能支持Email格式;
@Component //注册bean
@ConfigurationProperties(prefix = "person")
@Validated  //数据校验
public class Person {

    @Email(message="邮箱格式错误") //name必须是邮箱格式
    private String name;
}
运行结果 :default message [不是一个合法的电子邮件地址];
使用数据校验,可以保证数据的正确性;
3.2、常见参数
@NotNull(message="名字不能为空")
private String userName;
@Max(value=120,message="年龄最大不能查过120")
private int age;
@Email(message="邮箱格式错误")
private String email;

空检查
@Null       验证对象是否为null
@NotNull    验证对象是否不为null, 无法查检长度为0的字符串
@NotBlank   检查约束字符串是不是Null还有被Trim的长度是否大于0,只对字符串,且会去掉前后空格.
@NotEmpty   检查约束元素是否为NULL或者是EMPTY.

Booelan检查
@AssertTrue     验证 Boolean 对象是否为 true
@AssertFalse    验证 Boolean 对象是否为 false

长度检查
@Size(min=, max=) 验证对象(Array,Collection,Map,String)长度是否在给定的范围之内
@Length(min=, max=) string is between min and max included.

日期检查
@Past       验证 Date 和 Calendar 对象是否在当前时间之前
@Future     验证 Date 和 Calendar 对象是否在当前时间之后
@Pattern    验证 String 对象是否符合正则表达式的规则

.......等等
除此以外,我们还可以自定义一些数据校验规则
多环境切换
profile是Spring对不同环境提供不同配置功能的支持,可以通过激活不同的环境版本,实现快速切换环境;
3.3、多配置文件
我们在主配置文件编写的时候,文件名可以是 application-{profile}.properties/yml , 用来指定多个环境版本;
例如:
application-test.properties 代表测试环境配置
application-dev.properties 代表开发环境配置
但是Springboot并不会直接启动这些配置文件,它默认使用application.properties主配置文件;
我们需要通过一个配置来选择需要激活的环境:
#比如在配置文件中指定使用dev环境,我们可以通过设置不同的端口号进行测试;
#我们启动SpringBoot,就可以看到已经切换到dev下的配置了;
spring.profiles.active=dev
3.4、yaml的多文档块
和properties配置文件中一样,但是使用yml去实现不需要创建多个配置文件,更加方便了 !
server:
  port: 8081
#选择要激活那个环境块
spring:
  profiles:
    active: prod

---
server:
  port: 8083
spring:
  profiles: dev #配置环境的名称


---

server:
  port: 8084
spring:
  profiles: prod  #配置环境的名称
注意:如果yml和properties同时都配置了端口,并且没有激活其他环境 , 默认会使用properties配置文件的!
3.5、配置文件加载位置
外部加载配置文件的方式十分多,我们选择最常用的即可,在开发的资源文件中进行配置!
springboot 启动会扫描以下位置的application.properties或者application.yml文件作为Spring boot的默认配置文件:
优先级1:项目路径下的config文件夹配置文件
优先级2:项目路径下配置文件
优先级3:资源路径下的config文件夹配置文件
优先级4:资源路径下配置文件
优先级由高到底,高优先级的配置会覆盖低优先级的配置;
SpringBoot会从这四个位置全部加载主配置文件;互补配置;
我们在最低级的配置文件中设置一个项目访问路径的配置来测试互补问题;
#配置项目的访问路径
server.servlet.context-path=/kuang
4、SpringBoot:自动配置原理
自动配置原理
4.1、分析自动配置原理
我们以**HttpEncodingAutoConfiguration(Http编码自动配置)**为例解释自动配置原理;
//表示这是一个配置类,和以前编写的配置文件一样,也可以给容器中添加组件;
@Configuration

//启动指定类的ConfigurationProperties功能;
  //进入这个HttpProperties查看,将配置文件中对应的值和HttpProperties绑定起来;
  //并把HttpProperties加入到ioc容器中
@EnableConfigurationProperties({HttpProperties.class})

//Spring底层@Conditional注解
  //根据不同的条件判断,如果满足指定的条件,整个配置类里面的配置就会生效;
  //这里的意思就是判断当前应用是否是web应用,如果是,当前配置类生效
@ConditionalOnWebApplication(
    type = Type.SERVLET
)

//判断当前项目有没有这个类CharacterEncodingFilter;SpringMVC中进行乱码解决的过滤器;
@ConditionalOnClass({CharacterEncodingFilter.class})

//判断配置文件中是否存在某个配置:spring.http.encoding.enabled;
  //如果不存在,判断也是成立的
  //即使我们配置文件中不配置pring.http.encoding.enabled=true,也是默认生效的;
@ConditionalOnProperty(
    prefix = "spring.http.encoding",
    value = {"enabled"},
    matchIfMissing = true
)

public class HttpEncodingAutoConfiguration {
    //他已经和SpringBoot的配置文件映射了
    private final Encoding properties;
    //只有一个有参构造器的情况下,参数的值就会从容器中拿
    public HttpEncodingAutoConfiguration(HttpProperties properties) {
        this.properties = properties.getEncoding();
    }

    //给容器中添加一个组件,这个组件的某些值需要从properties中获取
    @Bean
    @ConditionalOnMissingBean //判断容器没有这个组件?
    public CharacterEncodingFilter characterEncodingFilter() {
        CharacterEncodingFilter filter = new OrderedCharacterEncodingFilter();
        filter.setEncoding(this.properties.getCharset().name());
        filter.setForceRequestEncoding(this.properties.shouldForce(org.springframework.boot.autoconfigure.http.HttpProperties.Encoding.Type.REQUEST));
        filter.setForceResponseEncoding(this.properties.shouldForce(org.springframework.boot.autoconfigure.http.HttpProperties.Encoding.Type.RESPONSE));
        return filter;
    }
    //。。。。。。。
}
一句话总结 :根据当前不同的条件判断,决定这个配置类是否生效!
- 一但这个配置类生效;这个配置类就会给容器中添加各种组件;
- 这些组件的属性是从对应的properties类中获取的,这些类里面的每一个属性又是和配置文件绑定的;
- 所有在配置文件中能配置的属性都是在xxxxProperties类中封装着;
- 配置文件能配置什么就可以参照某个功能对应的这个属性类
//从配置文件中获取指定的值和bean的属性进行绑定
@ConfigurationProperties(prefix = "spring.http")
public class HttpProperties {
    // .....
}
4.2、精髓
1、SpringBoot启动会加载大量的自动配置类
2、我们看我们需要的功能有没有在SpringBoot默认写好的自动配置类当中;
3、我们再来看这个自动配置类中到底配置了哪些组件;(只要我们要用的组件存在在其中,我们就不需要再手动配置了)
4、给容器中自动配置类添加组件的时候,会从properties类中获取某些属性。我们只需要在配置文件中指定这些属性的值即可;
xxxxAutoConfigurartion:自动配置类;给容器中添加组件
xxxxProperties:封装配置文件中相关属性;
4.3、了解:@Conditional
了解完自动装配的原理后,我们来关注一个细节问题,自动配置类必须在一定的条件下才能生效;
@Conditional派生注解(Spring注解版原生的@Conditional作用)
作用:必须是@Conditional指定的条件成立,才给容器中添加组件,配置配里面的所有内容才生效;
那么多的自动配置类,必须在一定的条件下才能生效;也就是说,我们加载了这么多的配置类,但不是所有的都生效了。
5、SpringBoot:自定义starter
我们分析完毕了源码以及自动装配的过程,我们可以尝试自定义一个启动器来玩玩!
5.1、说明
启动器模块是一个 空 jar 文件,仅提供辅助性依赖管理,这些依赖可能用于自动装配或者其他类库;
命名归约:
官方命名:
- 前缀:spring-boot-starter-xxx
- 比如:spring-boot-starter-web…
自定义命名:
- xxx-spring-boot-starter
- 比如:mybatis-spring-boot-starter
5.2、编写启动器
1、在IDEA中新建一个空项目 spring-boot-starter-diy
2、新建一个普通Maven模块:kuang-spring-boot-starter
3、新建一个Springboot模块:kuang-spring-boot-starter-autoconfigure
4、点击apply即可,基本结构
5、在我们的 starter 中 导入 autoconfigure 的依赖!
<dependencies>

    <dependency>
        <groupId>com.kuanggroupId>
        <artifactId>kuang-spring-boot-starter-autoconfigureartifactId>
        <version>0.0.1-SNAPSHOTversion>
    dependency>
dependencies>
6、将 autoconfigure 项目下多余的文件都删掉,Pom中只留下一个 starter,这是所有的启动器基本配置!
7、我们编写一个自己的服务
package com.kuang;

public class HelloService {

    HelloProperties helloProperties;

    public HelloProperties getHelloProperties() {
        return helloProperties;
    }

    public void setHelloProperties(HelloProperties helloProperties) {
        this.helloProperties = helloProperties;
    }

    public String sayHello(String name){
        return helloProperties.getPrefix() + name + helloProperties.getSuffix();
    }

}
8、编写HelloProperties 配置类
package com.kuang;

import org.springframework.boot.context.properties.ConfigurationProperties;

// 前缀 kuang.hello
@ConfigurationProperties(prefix = "kuang.hello")
public class HelloProperties {

    private String prefix;
    private String suffix;

    public String getPrefix() {
        return prefix;
    }

    public void setPrefix(String prefix) {
        this.prefix = prefix;
    }

    public String getSuffix() {
        return suffix;
    }

    public void setSuffix(String suffix) {
        this.suffix = suffix;
    }
}
9、编写我们的自动配置类并注入bean,测试!
package com.kuang;

import org.springframework.beans.factory.annotation.Autowired;
import org.springframework.boot.autoconfigure.condition.ConditionalOnWebApplication;
import org.springframework.boot.context.properties.EnableConfigurationProperties;
import org.springframework.context.annotation.Bean;
import org.springframework.context.annotation.Configuration;

@Configuration
@ConditionalOnWebApplication //web应用生效
@EnableConfigurationProperties(HelloProperties.class)
public class HelloServiceAutoConfiguration {

    @Autowired
    HelloProperties helloProperties;

    @Bean
    public HelloService helloService(){
        HelloService service = new HelloService();
        service.setHelloProperties(helloProperties);
        return service;
    }

}
10、在resources编写一个自己的 META-INF\spring.factories
# Auto Configure
org.springframework.boot.autoconfigure.EnableAutoConfiguration=\
com.kuang.HelloServiceAutoConfiguration
11、编写完成后,可以安装到maven仓库中!

5.3、新建项目测试我们自己写的启动器
1、新建一个SpringBoot 项目
2、导入我们自己写的启动器
<dependency>
    <groupId>com.kuanggroupId>
    <artifactId>kuang-spring-boot-starterartifactId>
    <version>1.0-SNAPSHOTversion>
dependency>
3、编写一个 HelloController 进行测试我们自己的写的接口!
package com.kuang.controller;

@RestController
public class HelloController {

    @Autowired
    HelloService helloService;

    @RequestMapping("/hello")
    public String hello(){
        return helloService.sayHello("zxc");
    }

}
4、编写配置文件 application.properties
kuang.hello.prefix="ppp"
kuang.hello.suffix="sss"
5、启动项目进行测试,结果成功 !
6、SpringBoot 整合mybatis
6.1、导入mybatis所需要的依赖
    org.mybatis.spring.boot
    mybatis-spring-boot-starter
    2.1.0
6.2、配置数据库连接信息
spring.datasource.username=root
spring.datasource.password=123456
spring.datasource.url=jdbc:mysql://localhost:3306/mybatis?serverTimezone=UTC&useUnicode=true&characterEncoding=utf-8
spring.datasource.driver-class-name=com.mysql.jdbc.Driver
6.3、我们这里就是用默认的数据源了;先去测试一下连接是否成功!
@RunWith(SpringRunner.class)
@SpringBootTest
public class SpringbootDemoMybatisApplicationTests {

    @Autowired
    DataSource dataSource;

    @Test
    public void contextLoads() throws SQLException {

        System.out.println("数据源>>>>>>" + dataSource.getClass());
        Connection connection = dataSource.getConnection();
        System.out.println("连接>>>>>>>>>" + connection);
        System.out.println("连接地址>>>>>" + connection.getMetaData().getURL());
        connection.close();

    }

}
查看输出结果,数据库配置OK!
6.4、创建实体类
package com.kuang.mybatis.pojo;

public class User {

    private int id;
    private String name;
    private String pwd;

    public User() {
    }

    public User(int id, String name, String pwd) {
        this.id = id;
        this.name = name;
        this.pwd = pwd;
    }

    public int getId() {
        return id;
    }

    public void setId(int id) {
        this.id = id;
    }

    public String getName() {
        return name;
    }

    public void setName(String name) {
        this.name = name;
    }

    public String getPwd() {
        return pwd;
    }

    public void setPwd(String pwd) {
        this.pwd = pwd;
    }

    @Override
    public String toString() {
        return "User{" +
                "id=" + id +
                ", name='" + name + '\'' +
                ", pwd='" + pwd + '\'' +
                '}';
    }

}
6.5、配置Mapper接口类
package com.kuang.mybatis.pojo.mapper;

import com.kuang.mybatis.pojo.User;
import org.apache.ibatis.annotations.Mapper;
import org.springframework.stereotype.Repository;

import java.util.List;

//@Mapper : 表示本类是一个 MyBatis 的 Mapper,等价于以前 Spring 整合 MyBatis 时的 Mapper 接口
@Mapper
@Repository
public interface UserMapper {

    //选择全部用户
    List<User> selectUser();
    //根据id选择用户
    User selectUserById(int id);
    //添加一个用户
    int addUser(User user);
    //修改一个用户
    int updateUser(User user);
    //根据id删除用户
    int deleteUser(int id);

}
6.6、对应Mapper映射文件
<mapper namespace="com.kuang.mybatis.pojo.mapper.UserMapper">

    <select id="selectUser" resultType="User">
    select * from user
  select>

    <select id="selectUserById" resultType="User">
    select * from user where id = #{id}
select>

    <insert id="addUser" parameterType="User">
    insert into user (id,name,pwd) values (#{id},#{name},#{pwd})
insert>

    <update id="updateUser" parameterType="User">
    update user set name=#{name},pwd=#{pwd} where id = #{id}
update>

    <delete id="deleteUser" parameterType="int">
    delete from user where id = #{id}
delete>
mapper>
6.7、maven配置资源过滤问题
<resources>
    <resource>
        <directory>src/main/javadirectory>
        <includes>
            <include>**/*.xmlinclude>
        includes>
        <filtering>truefiltering>
    resource>
resources>
6.8、SpringBoot 整合!
以前 MyBatis 未与 spring 整合时,配置数据源、事务、连接数据库的账号、密码等都是在 myBatis 核心配置文件中进行的myBatis 与 spring 整合后,配置数据源、事务、连接数据库的账号、密码等就交由 spring 管理。因此,在这里我们即使不使用mybatis配置文件也完全ok!
既然已经提供了 myBatis 的映射配置文件,自然要告诉 spring boot 这些文件的位置
spring.datasource.username=root
spring.datasource.password=123456
spring.datasource.url=jdbc:mysql://localhost:3306/mybatis?serverTimezone=UTC&useUnicode=true&characterEncoding=utf-8
spring.datasource.driver-class-name=com.mysql.jdbc.Driver

#指定myBatis的核心配置文件与Mapper映射文件
mybatis.mapper-locations=classpath:mybatis/mapper/*.xml
# 注意:对应实体类的路径
mybatis.type-aliases-package=com.kuang.mybatis.pojo
已经说过 spring boot 官方并没有提供 myBaits 的启动器,是 myBatis 官方提供的开发包来适配的 spring boot,从 pom.xml 文件中的依赖包名也能看出来,并非是以 spring-boot 开头的;
同理上面全局配置文件中的这两行配置也是以 mybatis 开头 而非 spring 开头也充分说明这些都是 myBatis 官方提供的
可以从 org.mybatis.spring.boot.autoconfigure.MybatisProperties 中查看所有配置项
@ConfigurationProperties(
    prefix = "mybatis"
)
public class MybatisProperties {
    public static final String MYBATIS_PREFIX = "mybatis";
    private static final ResourcePatternResolver resourceResolver = new PathMatchingResourcePatternResolver();
    private String configLocation;
    private String[] mapperLocations;
    private String typeAliasesPackage;
    private Class<?> typeAliasesSuperType;
    private String typeHandlersPackage;
    private boolean checkConfigLocation = false;
    private ExecutorType executorType;
    private Class<? extends LanguageDriver> defaultScriptingLanguageDriver;
    private Properties configurationProperties;
    @NestedConfigurationProperty
    private Configuration configuration;
也可以直接去查看 官方文档
6.9、编写controller
package com.kuang.mybatis.controller;

import com.kuang.mybatis.pojo.User;
import com.kuang.mybatis.pojo.mapper.UserMapper;

import org.springframework.beans.factory.annotation.Autowired;
import org.springframework.web.bind.annotation.GetMapping;
import org.springframework.web.bind.annotation.RestController;

import java.util.List;

@RestController
public class UserController {

    @Autowired
    private UserMapper userMapper;

    //选择全部用户
    @GetMapping("/selectUser")
    public String selectUser(){
        List<User> users = userMapper.selectUser();
        for (User user : users) {
            System.out.println(user);
        }

        return "ok";
    }
    //根据id选择用户
    @GetMapping("/selectUserById")
    public String selectUserById(){
        User user = userMapper.selectUserById(1);
        System.out.println(user);
        return "ok";
    }
    //添加一个用户
    @GetMapping("/addUser")
    public String addUser(){
        userMapper.addUser(new User(5,"阿毛","456789"));
        return "ok";
    }
    //修改一个用户
    @GetMapping("/updateUser")
    public String updateUser(){
        userMapper.updateUser(new User(5,"阿毛","421319"));
        return "ok";
    }
    //根据id删除用户
    @GetMapping("/deleteUser")
    public String deleteUser(){
        userMapper.deleteUser(5);
        return "ok";
    }

}
6.10、启动项目访问进行测试!
步骤:
Mybatis整合包
mybatis-spring-boot-starter
1.导入包
2.配置文件
3.mybatis配置
4.编写sql
5.service层调用dao层
6.controller调用service层
注:配置数据库连接信息(不变)
spring:
  datasource:
    username: root
    password: 123456
    #?serverTimezone=UTC解决时区的报错
    url: jdbc:mysql://localhost:3306/mybatis?serverTimezone=UTC&useUnicode=true&characterEncoding=utf-8
    driver-class-name: com.mysql.jdbc.Driver
    type: com.alibaba.druid.pool.DruidDataSource

    #Spring Boot 默认是不注入这些属性值的,需要自己绑定
    #druid 数据源专有配置
    initialSize: 5
    minIdle: 5
    maxActive: 20
    maxWait: 60000
    timeBetweenEvictionRunsMillis: 60000
    minEvictableIdleTimeMillis: 300000
    validationQuery: SELECT 1 FROM DUAL
    testWhileIdle: true
    testOnBorrow: false
    testOnReturn: false
    poolPreparedStatements: true

    #配置监控统计拦截的filters,stat:监控统计、log4j:日志记录、wall:防御sql注入
    #如果允许时报错  java.lang.ClassNotFoundException: org.apache.log4j.Priority
    #则导入 log4j 依赖即可,Maven 地址: https://mvnrepository.com/artifact/log4j/log4j
    filters: stat,wall,log4j
    maxPoolPreparedStatementPerConnectionSize: 20
    useGlobalDataSourceStat: true
    connectionProperties: druid.stat.mergeSql=true;
7、SpringBoot:Web开发静态资源处理
Web开发探究
7.1、简介
好的,同学们,那么接下来呢,我们开始学习SpringBoot与Web开发,从这一章往后,就属于我们实战部分的内容了;
其实SpringBoot的东西用起来非常简单,因为SpringBoot最大的特点就是自动装配。
使用SpringBoot的步骤:
1、创建一个SpringBoot应用,选择我们需要的模块,SpringBoot就会默认将我们的需要的模块自动配置好
2、手动在配置文件中配置部分配置项目就可以运行起来了
3、专注编写业务代码,不需要考虑以前那样一大堆的配置了。
要熟悉掌握开发,之前学习的自动配置的原理一定要搞明白!
比如SpringBoot到底帮我们配置了什么?我们能不能修改?我们能修改哪些配置?我们能不能扩展?
向容器中自动配置组件 :*** Autoconfiguration
自动配置类,封装配置文件的内容:***Properties
没事就找找类,看看自动装配原理!
我们之后来进行一个单体项目的小项目测试,让大家能够快速上手开发!
静态资源处理
7.2、静态资源映射规则
首先,我们搭建一个普通的SpringBoot项目,回顾一下HelloWorld程序!
写请求非常简单,那我们要引入我们前端资源,我们项目中有许多的静态资源,比如css,js等文件,这个SpringBoot怎么处理呢?
如果我们是一个web应用,我们的main下会有一个webapp,我们以前都是将所有的页面导在这里面的,对吧!但是我们现在的pom呢,打包方式是为jar的方式,那么这种方式SpringBoot能不能来给我们写页面呢?当然是可以的,但是SpringBoot对于静态资源放置的位置,是有规定的!
我们先来聊聊这个静态资源映射规则:
SpringBoot中,SpringMVC的web配置都在 WebMvcAutoConfiguration 这个配置类里面;
我们可以去看看 WebMvcAutoConfigurationAdapter 中有很多配置方法;
有一个方法:addResourceHandlers 添加资源处理
@Override
public void addResourceHandlers(ResourceHandlerRegistry registry) {
    if (!this.resourceProperties.isAddMappings()) {
        // 已禁用默认资源处理
        logger.debug("Default resource handling disabled");
        return;
    }
    // 缓存控制
    Duration cachePeriod = this.resourceProperties.getCache().getPeriod();
    CacheControl cacheControl = this.resourceProperties.getCache().getCachecontrol().toHttpCacheControl();
    // webjars 配置
    if (!registry.hasMappingForPattern("/webjars/**")) {
        customizeResourceHandlerRegistration(registry.addResourceHandler("/webjars/**")
                                             .addResourceLocations("classpath:/META-INF/resources/webjars/")
                                             .setCachePeriod(getSeconds(cachePeriod)).setCacheControl(cacheControl));
    }
    // 静态资源配置
    String staticPathPattern = this.mvcProperties.getStaticPathPattern();
    if (!registry.hasMappingForPattern(staticPathPattern)) {
        customizeResourceHandlerRegistration(registry.addResourceHandler(staticPathPattern)
                                             .addResourceLocations(getResourceLocations(this.resourceProperties.getStaticLocations()))
                                             .setCachePeriod(getSeconds(cachePeriod)).setCacheControl(cacheControl));
    }
}
读一下源代码:比如所有的 /webjars/** , 都需要去 classpath:/META-INF/resources/webjars/ 找对应的资源;
7.3、什么是webjars 呢?
Webjars本质就是以jar包的方式引入我们的静态资源 , 我们以前要导入一个静态资源文件,直接导入即可。
使用SpringBoot需要使用Webjars,我们可以去搜索一下:
网站:https://www.webjars.org
要使用jQuery,我们只要要引入jQuery对应版本的pom依赖即可!
<dependency>
    <groupId>org.webjarsgroupId>
    <artifactId>jqueryartifactId>
    <version>3.4.1version>
dependency>
导入完毕,查看webjars目录结构,并访问Jquery.js文件!

7.4、第二种静态资源映射规则
那我们项目中要是使用自己的静态资源该怎么导入呢?我们看下一行代码;
我们去找staticPathPattern发现第二种映射规则 :/** , 访问当前的项目任意资源,它会去找 resourceProperties 这个类,我们可以点进去看一下分析:
// 进入方法
public String[] getStaticLocations() {
    return this.staticLocations;
}
// 找到对应的值
private String[] staticLocations = CLASSPATH_RESOURCE_LOCATIONS;
// 找到路径
private static final String[] CLASSPATH_RESOURCE_LOCATIONS = {
    "classpath:/META-INF/resources/",
  "classpath:/resources/",
    "classpath:/static/",
    "classpath:/public/"
};
ResourceProperties 可以设置和我们静态资源有关的参数;这里面指向了它会去寻找资源的文件夹,即上面数组的内容。
所以得出结论,以下四个目录存放的静态资源可以被我们识别:
"classpath:/META-INF/resources/"
"classpath:/resources/"
"classpath:/static/"
"classpath:/public/"
我们可以在resources根目录下新建对应的文件夹,都可以存放我们的静态文件;
比如我们访问 http://localhost:8080/1.js , 他就会去这些文件夹中寻找对应的静态资源文件;
7.5、自定义静态资源路径
我们也可以自己通过配置文件来指定一下,哪些文件夹是需要我们放静态资源文件的,在application.properties中配置;
spring.resources.static-locations=classpath:/coding/,classpath:/kuang/
一旦自己定义了静态文件夹的路径,原来的自动配置就都会失效了!
首页处理
静态资源文件夹说完后,我们继续向下看源码!可以看到一个欢迎页的映射,就是我们的首页!
@Bean
public WelcomePageHandlerMapping welcomePageHandlerMapping(ApplicationContext applicationContext, FormattingConversionService mvcConversionService,ResourceUrlProvider mvcResourceUrlProvider) {
    WelcomePageHandlerMapping welcomePageHandlerMapping = new WelcomePageHandlerMapping(
        new TemplateAvailabilityProviders(applicationContext), applicationContext, getWelcomePage(), // getWelcomePage 获得欢迎页
        this.mvcProperties.getStaticPathPattern());
    welcomePageHandlerMapping.setInterceptors(getInterceptors(mvcConversionService, mvcResourceUrlProvider));
    return welcomePageHandlerMapping;
}
点进去继续看
private Optional<Resource> getWelcomePage() {
    String[] locations = getResourceLocations(this.resourceProperties.getStaticLocations());
    // ::是java8 中新引入的运算符
    // Class::function的时候function是属于Class的,应该是静态方法。
    // this::function的funtion是属于这个对象的。
    // 简而言之,就是一种语法糖而已,是一种简写
    return Arrays.stream(locations).map(this::getIndexHtml).filter(this::isReadable).findFirst();
}
// 欢迎页就是一个location下的的 index.html 而已
private Resource getIndexHtml(String location) {
    return this.resourceLoader.getResource(location + "index.html");
}
欢迎页,静态资源文件夹下的所有 index.html 页面;被 /** 映射。
比如我访问 http://localhost:8080/ ,就会找静态资源文件夹下的 index.html
新建一个 index.html ,在我们上面的3个目录中任意一个;然后访问测试 http://localhost:8080/ 看结果!
8、SpringBoot:MVC自动配置原理
8.1、官网阅读
在进行项目编写前,我们还需要知道一个东西,就是SpringBoot对我们的SpringMVC还做了哪些配置,包括如何扩展,如何定制。
只有把这些都搞清楚了,我们在之后使用才会更加得心应手。途径一:源码分析,途径二:官方文档!
地址 :https://docs.spring.io/spring-boot/docs/2.2.5.RELEASE/reference/htmlsingle/#boot-features-spring-mvc-auto-configuration
Spring MVC Auto-configuration
// Spring Boot为Spring MVC提供了自动配置,它可以很好地与大多数应用程序一起工作。
Spring Boot provides auto-configuration for Spring MVC that works well with most applications.
// 自动配置在Spring默认设置的基础上添加了以下功能:
The auto-configuration adds the following features on top of Spring’s defaults:
// 包含视图解析器
Inclusion of ContentNegotiatingViewResolver and BeanNameViewResolver beans.
// 支持静态资源文件夹的路径,以及webjars
Support for serving static resources, including support for WebJars
// 自动注册了Converter:
// 转换器,这就是我们网页提交数据到后台自动封装成为对象的东西,比如把"1"字符串自动转换为int类型
// Formatter:【格式化器,比如页面给我们了一个2019-8-10,它会给我们自动格式化为Date对象】
Automatic registration of Converter, GenericConverter, and Formatter beans.
// HttpMessageConverters
// SpringMVC用来转换Http请求和响应的的,比如我们要把一个User对象转换为JSON字符串,可以去看官网文档解释;
Support for HttpMessageConverters (covered later in this document).
// 定义错误代码生成规则的
Automatic registration of MessageCodesResolver (covered later in this document).
// 首页定制
Static index.html support.
// 图标定制
Custom Favicon support (covered later in this document).
// 初始化数据绑定器:帮我们把请求数据绑定到JavaBean中!
Automatic use of a ConfigurableWebBindingInitializer bean (covered later in this document).

/*
如果您希望保留Spring Boot MVC功能,并且希望添加其他MVC配置(拦截器、格式化程序、视图控制器和其他功能),则可以添加自己
的@configuration类,类型为webmvcconfiguer,但不添加@EnableWebMvc。如果希望提供
RequestMappingHandlerMapping、RequestMappingHandlerAdapter或ExceptionHandlerExceptionResolver的自定义
实例,则可以声明WebMVCregistrationAdapter实例来提供此类组件。
*/
If you want to keep Spring Boot MVC features and you want to add additional MVC configuration
(interceptors, formatters, view controllers, and other features), you can add your own
@Configuration class of type WebMvcConfigurer but without @EnableWebMvc. If you wish to provide
custom instances of RequestMappingHandlerMapping, RequestMappingHandlerAdapter, or
ExceptionHandlerExceptionResolver, you can declare a WebMvcRegistrationsAdapter instance to provide such components.

// 如果您想完全控制Spring MVC,可以添加自己的@Configuration,并用@EnableWebMvc进行注释。
If you want to take complete control of Spring MVC, you can add your own @Configuration annotated with @EnableWebMvc.
我们来仔细对照,看一下它怎么实现的,它告诉我们SpringBoot已经帮我们自动配置好了SpringMVC,然后自动配置了哪些东西呢?
8.2、ContentNegotiatingViewResolver 内容协商视图解析器
自动配置了ViewResolver,就是我们之前学习的SpringMVC的视图解析器;
即根据方法的返回值取得视图对象(View),然后由视图对象决定如何渲染(转发,重定向)。
我们去看看这里的源码:我们找到 WebMvcAutoConfiguration , 然后搜索ContentNegotiatingViewResolver。找到如下方法!
@Bean
@ConditionalOnBean(ViewResolver.class)
@ConditionalOnMissingBean(name = "viewResolver", value = ContentNegotiatingViewResolver.class)
public ContentNegotiatingViewResolver viewResolver(BeanFactory beanFactory) {
    ContentNegotiatingViewResolver resolver = new ContentNegotiatingViewResolver();
    resolver.setContentNegotiationManager(beanFactory.getBean(ContentNegotiationManager.class));
    // ContentNegotiatingViewResolver使用所有其他视图解析器来定位视图,因此它应该具有较高的优先级
    resolver.setOrder(Ordered.HIGHEST_PRECEDENCE);
    return resolver;
}
我们可以点进这类看看!找到对应的解析视图的代码;
@Nullable // 注解说明:@Nullable 即参数可为null
public View resolveViewName(String viewName, Locale locale) throws Exception {
    RequestAttributes attrs = RequestContextHolder.getRequestAttributes();
    Assert.state(attrs instanceof ServletRequestAttributes, "No current ServletRequestAttributes");
    List<MediaType> requestedMediaTypes = this.getMediaTypes(((ServletRequestAttributes)attrs).getRequest());
    if (requestedMediaTypes != null) {
        // 获取候选的视图对象
        List<View> candidateViews = this.getCandidateViews(viewName, locale, requestedMediaTypes);
        // 选择一个最适合的视图对象,然后把这个对象返回
        View bestView = this.getBestView(candidateViews, requestedMediaTypes, attrs);
        if (bestView != null) {
            return bestView;
        }
    }
    // .....
}
我们继续点进去看,他是怎么获得候选的视图的呢?
getCandidateViews中看到他是把所有的视图解析器拿来,进行while循环,挨个解析!
Iterator var5 = this.viewResolvers.iterator();
所以得出结论:ContentNegotiatingViewResolver 这个视图解析器就是用来组合所有的视图解析器的
我们再去研究下他的组合逻辑,看到有个属性viewResolvers,看看它是在哪里进行赋值的!
protected void initServletContext(ServletContext servletContext) {
    // 这里它是从beanFactory工具中获取容器中的所有视图解析器
    // ViewRescolver.class 把所有的视图解析器来组合的
    Collection<ViewResolver> matchingBeans = BeanFactoryUtils.beansOfTypeIncludingAncestors(this.obtainApplicationContext(), ViewResolver.class).values();
    ViewResolver viewResolver;
    if (this.viewResolvers == null) {
        this.viewResolvers = new ArrayList(matchingBeans.size());
    }
    // ...............
}
既然它是在容器中去找视图解析器,我们是否可以猜想,我们就可以去实现一个视图解析器了呢?
我们可以自己给容器中去添加一个视图解析器;这个类就会帮我们自动的将它组合进来;
所以说,我们如果想要使用自己定制化的东西,我们只需要给容器中添加这个组件就好了!剩下的事情SpringBoot就会帮我们做了!
8.3、转换器和格式化器
找到格式化转换器:
@Bean
@Override
public FormattingConversionService mvcConversionService() {
    // 拿到配置文件中的格式化规则
    WebConversionService conversionService =
        new WebConversionService(this.mvcProperties.getDateFormat());
    addFormatters(conversionService);
    return conversionService;
}
点击去:
public String getDateFormat() {
    return this.dateFormat;
}

/**
* Date format to use. For instance, `dd/MM/yyyy`. 默认的
 */
private String dateFormat;
可以看到在我们的Properties文件中,我们可以进行自动配置它!
如果配置了自己的格式化方式,就会注册到Bean中生效,我们可以在配置文件中配置日期格式化的规则:
8.4、修改SpringBoot的默认配置
这么多的自动配置,原理都是一样的,通过这个WebMVC的自动配置原理分析,我们要学会一种学习方式,通过源码探究,得出结论;这个结论一定是属于自己的,而且一通百通。
SpringBoot的底层,大量用到了这些设计细节思想,所以,没事需要多阅读源码!得出结论;
SpringBoot在自动配置很多组件的时候,先看容器中有没有用户自己配置的(如果用户自己配置@bean),如果有就用用户配置的,如果没有就用自动配置的;
如果有些组件可以存在多个,比如我们的视图解析器,就将用户配置的和自己默认的组合起来!
扩展使用SpringMVC 官方文档如下:
If you want to keep Spring Boot MVC features and you want to add additional MVC configuration (interceptors, formatters, view controllers, and other features), you can add your own @Configuration class of type WebMvcConfigurer but without @EnableWebMvc. If you wish to provide custom instances of RequestMappingHandlerMapping, RequestMappingHandlerAdapter, or ExceptionHandlerExceptionResolver, you can declare a WebMvcRegistrationsAdapter instance to provide such components.
我们要做的就是编写一个@Configuration注解类,并且类型要为WebMvcConfigurer,还不能标注@EnableWebMvc注解;我们去自己写一个;我们新建一个包叫config,写一个类MyMvcConfig;
//应为类型要求为WebMvcConfigurer,所以我们实现其接口
//可以使用自定义类扩展MVC的功能
@Configuration
public class MyMvcConfig implements WebMvcConfigurer {

    @Override
    public void addViewControllers(ViewControllerRegistry registry) {
        // 浏览器发送/test , 就会跳转到test页面;
        registry.addViewController("/test").setViewName("test");
    }
}
我们去浏览器访问一下:
确实也跳转过来了!所以说,我们要扩展SpringMVC,官方就推荐我们这么去使用,既保SpringBoot留所有的自动配置,也能用我们扩展的配置!
我们可以去分析一下原理:
1、WebMvcAutoConfiguration 是 SpringMVC的自动配置类,里面有一个类WebMvcAutoConfigurationAdapter
2、这个类上有一个注解,在做其他自动配置时会导入:@Import(EnableWebMvcConfiguration.class)
3、我们点进EnableWebMvcConfiguration这个类看一下,它继承了一个父类:DelegatingWebMvcConfiguration
这个父类中有这样一段代码:
public class DelegatingWebMvcConfiguration extends WebMvcConfigurationSupport {
    private final WebMvcConfigurerComposite configurers = new WebMvcConfigurerComposite();

  // 从容器中获取所有的webmvcConfigurer
    @Autowired(required = false)
    public void setConfigurers(List<WebMvcConfigurer> configurers) {
        if (!CollectionUtils.isEmpty(configurers)) {
            this.configurers.addWebMvcConfigurers(configurers);
        }
    }
}
4、我们可以在这个类中去寻找一个我们刚才设置的viewController当做参考,发现它调用了一个
protected void addViewControllers(ViewControllerRegistry registry) {
    this.configurers.addViewControllers(registry);
}
5、我们点进去看一下
public void addViewControllers(ViewControllerRegistry registry) {
    Iterator var2 = this.delegates.iterator();

    while(var2.hasNext()) {
        // 将所有的WebMvcConfigurer相关配置来一起调用!包括我们自己配置的和Spring给我们配置的
        WebMvcConfigurer delegate = (WebMvcConfigurer)var2.next();
        delegate.addViewControllers(registry);
    }

}
所以得出结论:所有的WebMvcConfiguration都会被作用,不止Spring自己的配置类,我们自己的配置类当然也会被调用;
8.5、全面接管SpringMVC
官方文档:
If you want to take complete control of Spring MVC
you can add your own @Configuration annotated with @EnableWebMvc.
全面接管即:SpringBoot对SpringMVC的自动配置不需要了,所有都是我们自己去配置!
只需在我们的配置类中要加一个@EnableWebMvc。
我们看下如果我们全面接管了SpringMVC了,我们之前SpringBoot给我们配置的静态资源映射一定会无效,我们可以去测试一下;
不加注解之前,访问首页:
给配置类加上注解:@EnableWebMvc
我们发现所有的SpringMVC自动配置都失效了!回归到了最初的样子;
当然,我们开发中,不推荐使用全面接管SpringMVC
思考问题?为什么加了一个注解,自动配置就失效了!我们看下源码:
1、这里发现它是导入了一个类,我们可以继续进去看
@Import({DelegatingWebMvcConfiguration.class})public @interface EnableWebMvc {}
2、它继承了一个父类
WebMvcConfigurationSupport

public class DelegatingWebMvcConfiguration extends WebMvcConfigurationSupport {  // ......}
3、我们来回顾一下Webmvc自动配置类
@Configuration(proxyBeanMethods = false)
@ConditionalOnWebApplication(type = Type.SERVLET)
@ConditionalOnClass({ Servlet.class, DispatcherServlet.class, WebMvcConfigurer.class })
// 这个注解的意思就是:容器中没有这个组件的时候,这个自动配置类才生效
@ConditionalOnMissingBean(WebMvcConfigurationSupport.class)
@AutoConfigureOrder(Ordered.HIGHEST_PRECEDENCE + 10)
@AutoConfigureAfter({ DispatcherServletAutoConfiguration.class, TaskExecutionAutoConfiguration.class,
    ValidationAutoConfiguration.class })
public class WebMvcAutoConfiguration {

}
总结一句话:@EnableWebMvc将WebMvcConfigurationSupport组件导入进来了;
而导入的WebMvcConfigurationSupport只是SpringMVC最基本的功能!
9、SpringBoot:异步、定时、邮件任务
前言
在我们的工作中,常常会用到异步处理任务,比如我们在网站上发送邮件,后台会去发送邮件,此时前台会造成响应不动,直到邮件发送完毕,响应才会成功,所以我们一般会采用多线程的方式去处理这些任务。还有一些定时任务,比如需要在每天凌晨的时候,分析一次前一天的日志信息。还有就是邮件的发送,微信的前身也是邮件服务呢?这些东西都是怎么实现的呢?其实SpringBoot都给我们提供了对应的支持,我们上手使用十分的简单,只需要开启一些注解支持,配置一些配置文件即可!那我们来看看吧~
最后编辑于2020.3.26 作者:狂神说
9.1、异步任务
1、创建一个service包
2、创建一个类AsyncService
异步处理还是非常常用的,比如我们在网站上发送邮件,后台会去发送邮件,此时前台会造成响应不动,直到邮件发送完毕,响应才会成功,所以我们一般会采用多线程的方式去处理这些任务。
编写方法,假装正在处理数据,使用线程设置一些延时,模拟同步等待的情况;
@Service
public class AsyncService {

   public void hello(){
       try {
           Thread.sleep(3000);
      } catch (InterruptedException e) {
           e.printStackTrace();
      }
       System.out.println("业务进行中....");
  }
}
3、编写controller包
4、编写AsyncController类
我们去写一个Controller测试一下
@RestController
public class AsyncController {

   @Autowired
   AsyncService asyncService;

   @GetMapping("/hello")
   public String hello(){
       asyncService.hello();
       return "success";
  }

}
5、访问http://localhost:8080/hello进行测试,3秒后出现success,这是同步等待的情况。
问题:我们如果想让用户直接得到消息,就在后台使用多线程的方式进行处理即可,但是每次都需要自己手动去编写多线程的实现的话,太麻烦了,我们只需要用一个简单的办法,在我们的方法上加一个简单的注解即可,如下:
6、给hello方法添加@Async注解;
//告诉Spring这是一个异步方法
@Async
public void hello(){
   try {
       Thread.sleep(3000);
  } catch (InterruptedException e) {
       e.printStackTrace();
  }
   System.out.println("业务进行中....");
}
SpringBoot就会自己开一个线程池,进行调用!但是要让这个注解生效,我们还需要在主程序上添加一个注解@EnableAsync ,开启异步注解功能;
@EnableAsync //开启异步注解功能
@SpringBootApplication
public class SpringbootTaskApplication {

   public static void main(String[] args) {
       SpringApplication.run(SpringbootTaskApplication.class, args);
  }

}
7、重启测试,网页瞬间响应,后台代码依旧执行!
9.2、定时任务
项目开发中经常需要执行一些定时任务,比如需要在每天凌晨的时候,分析一次前一天的日志信息,Spring为我们提供了异步执行任务调度的方式,提供了两个接口。
- TaskExecutor接口
- TaskScheduler接口
两个注解:
- @EnableScheduling
- @Scheduled
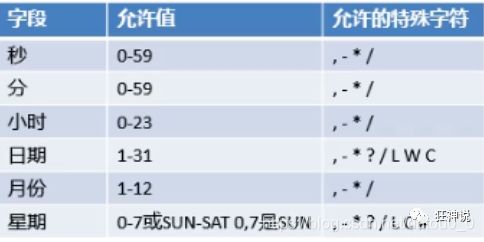
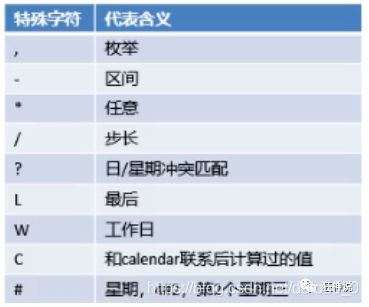
cron表达式:
测试步骤:
1、创建一个ScheduledService
我们里面存在一个hello方法,他需要定时执行,怎么处理呢?
@Service
public class ScheduledService {

   //秒   分   时     日   月   周几
   //0 * * * * MON-FRI
   //注意cron表达式的用法;
   @Scheduled(cron = "0 * * * * 0-7")
   public void hello(){
       System.out.println("hello.....");
  }
}
2、这里写完定时任务之后,我们需要在主程序上增加@EnableScheduling 开启定时任务功能
@EnableAsync //开启异步注解功能
@EnableScheduling //开启基于注解的定时任务
@SpringBootApplication
public class SpringbootTaskApplication {

   public static void main(String[] args) {
       SpringApplication.run(SpringbootTaskApplication.class, args);
  }

}
3、我们来详细了解下cron表达式;
http://www.bejson.com/othertools/cron/
4、常用的表达式
 (1)0/2 * * * * ?   表示每2秒 执行任务
(1)0 0/2 * * * ?   表示每2分钟 执行任务
(1)0 0 2 1 * ?   表示在每月的1日的凌晨2点调整任务
(2)0 15 10 ? * MON-FRI   表示周一到周五每天上午10:15执行作业
(3)0 15 10 ? 6L 2002-2006   表示2002-2006年的每个月的最后一个星期五上午10:15执行作
(4)0 0 10,14,16 * * ?   每天上午10点,下午2点,4点
(5)0 0/30 9-17 * * ?   朝九晚五工作时间内每半小时
(6)0 0 12 ? * WED   表示每个星期三中午12点
(7)0 0 12 * * ?   每天中午12点触发
(8)0 15 10 ? * *   每天上午10:15触发
(9)0 15 10 * * ?     每天上午10:15触发
(10)0 15 10 * * ?   每天上午10:15触发
(11)0 15 10 * * ? 2005   2005年的每天上午10:15触发
(12)0 * 14 * * ?     在每天下午2点到下午2:59期间的每1分钟触发
(13)0 0/5 14 * * ?   在每天下午2点到下午2:55期间的每5分钟触发
(14)0 0/5 14,18 * * ?     在每天下午2点到2:55期间和下午6点到6:55期间的每5分钟触发
(15)0 0-5 14 * * ?   在每天下午2点到下午2:05期间的每1分钟触发
(16)0 10,44 14 ? 3 WED   每年三月的星期三的下午2:10和2:44触发
(17)0 15 10 ? * MON-FRI   周一至周五的上午10:15触发
(18)0 15 10 15 * ?   每月15日上午10:15触发
(19)0 15 10 L * ?   每月最后一日的上午10:15触发
(20)0 15 10 ? * 6L   每月的最后一个星期五上午10:15触发
(21)0 15 10 ? * 6L 2002-2005   2002年至2005年的每月的最后一个星期五上午10:15触发
(22)0 15 10 ? * 6#3   每月的第三个星期五上午10:15触发
9.3、邮件任务
邮件发送,在我们的日常开发中,也非常的多,Springboot也帮我们做了支持
- 邮件发送需要引入spring-boot-start-mail
- SpringBoot 自动配置MailSenderAutoConfiguration
- 定义MailProperties内容,配置在application.yml中
- 自动装配JavaMailSender
- 测试邮件发送
测试:
1、引入pom依赖
<<dependency>
   <groupId>org.springframework.bootgroupId>
   <artifactId>spring-boot-starter-mailartifactId>
dependency>
看它引入的依赖,可以看到 jakarta.mail
<dependency>
   <groupId>com.sun.mailgroupId>
   <artifactId>jakarta.mailartifactId>
   <version>1.6.4version>
   <scope>compilescope>
dependency>
2、查看自动配置类:MailSenderAutoConfiguration
这个类中存在bean,JavaMailSenderImpl
然后我们去看下配置文件
@ConfigurationProperties(
   prefix = "spring.mail"
)
public class MailProperties {
   private static final Charset DEFAULT_CHARSET;
   private String host;
   private Integer port;
   private String username;
   private String password;
   private String protocol = "smtp";
   private Charset defaultEncoding;
   private Map<String, String> properties;
   private String jndiName;
}
3、配置文件:
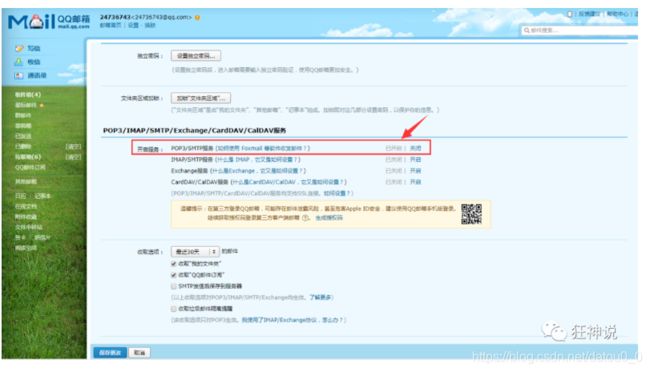
[email protected]=你的qq授权码spring.mail.host=smtp.qq.com# qq需要配置sslspring.mail.properties.mail.smtp.ssl.enable=true
获取授权码:在QQ邮箱中的设置->账户->开启pop3和smtp服务
4、Spring单元测试
@Autowired
JavaMailSenderImpl mailSender;

@Test
public void contextLoads() {
   //邮件设置1:一个简单的邮件
   SimpleMailMessage message = new SimpleMailMessage();
   message.setSubject("通知-明天来狂神这听课");
   message.setText("今晚7:30开会");

   message.setTo("[email protected]");
   message.setFrom("[email protected]");
   mailSender.send(message);
}

@Test
public void contextLoads2() throws MessagingException {
   //邮件设置2:一个复杂的邮件
   MimeMessage mimeMessage = mailSender.createMimeMessage();
   MimeMessageHelper helper = new MimeMessageHelper(mimeMessage, true);

   helper.setSubject("通知-明天来狂神这听课");
   helper.setText("今天 7:30来开会",true);

   //发送附件
   helper.addAttachment("1.jpg",new File(""));
   helper.addAttachment("2.jpg",new File(""));

   helper.setTo("[email protected]");
   helper.setFrom("[email protected]");

   mailSender.send(mimeMessage);
}
查看邮箱,邮件接收成功!
我们只需要使用Thymeleaf进行前后端结合即可开发自己网站邮件收发功能了!