深度之眼Pytorch框架训练营第四期——PyTorch中的张量
【深度之眼Pytorch框架训练营第四期】PyTorch中的张量
-
-
- `PyTorch`中的`Tensor`(张量)
-
- 1、`Tensor`概念
-
- (1)张量是什么
- (2)`Tensor`与`Variable`
- 2、`Tensor`的创建
-
- (1)直接创建
- (2)依据数值创建
- (3)依据概率创建
- 3、`Tensor`的操作
-
- (1)张量的拼接与切分
-
- **张量的拼接**
- **张量的切分**
- (2)张量索引
- (3)张量变换
- 4、`Tensor`的数学运算
-
- (1)加减乘除
- (2)对数,指数,幂函数
- (3)三角函数
- (1)求解步骤
- (2)代码实现
-
PyTorch中的Tensor(张量)
1、Tensor概念
(1)张量是什么
张量是一个多维数组,它是标量、向量、矩阵的高维拓展
(2)Tensor与Variable
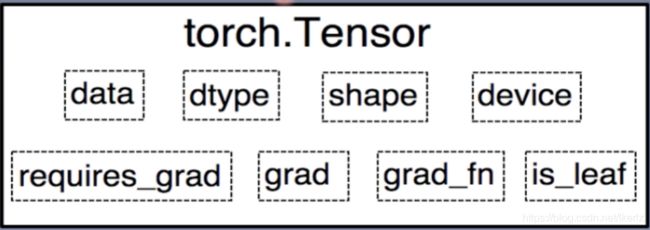
Variable:Variable是torch. Autograd中的数据类型,主要用于封装Tensor,进行自动求导:data:被包装的Tensorgrad:data的梯度grad_fn:创建Tensor的function,是自动求导的关键requires_grad:指示是否需要梯度is_leaf:指示是否是叶子结点(张量)

Tensor:Pytorch0.4.0 版开始,Variable并入Tensordtype:张量的数据类型,如torch. Floattensor,torch.cudaFloattensor shape:张量的形状,如(64,3,224,224)device:张量所在设备——GPU/CPU,是加速的关键
从上图中可以看出,Tensor中4个与属性相关,4个与求导相关
2、Tensor的创建
(1)直接创建
torch.tensor()- 功能:从数据中直接创建
tensor - 参数:
data:数据,可以是list或numpydtype:数据类型,默认与data的一致device: 所在设备,可选"cuda"或cpurequires_grad:是否需要梯度pin_ memory:是否存于锁页内存,一般为False
arr = np.ones((3,3))
print("ndarray的数据类型:", arr.dtype)
t = torch.tensor(arr) # use torch.tensor()
print(t)
##################
# ndarray的数据类型: float64
# tensor([[1., 1., 1.],
#         [1., 1., 1.],
#         [1., 1., 1.]], dtype=torch.float64)
torch.from_numpy(ndarray)- 功能:从
numpy创建tensor - 注意事项:从
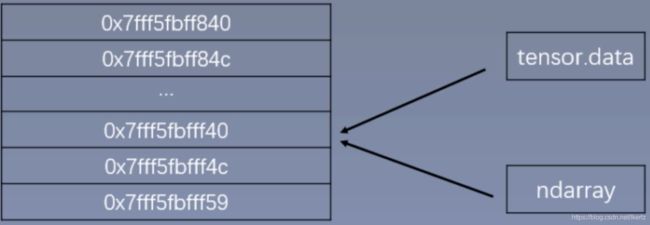
torch.from_ numpy创建的tensor与原ndarray共享内存,当修改其中一个的数据,另外一个也将会被改动
# TODO 通过 torch.from_numpy() 创建张量
arr = np.array([[1,2,3], [4,5,6]])
t = torch.from_numpy(arr)
print("numpy array:" ,arr)
print("tensor:", t)
# numpy array: [[1 2 3]
#  [4 5 6]]
# tensor: tensor([[1, 2, 3],
#         [4, 5, 6]])
print("\n修改arr")
arr[0, 0] = 0
print("numpy array:" ,arr)
print("tensor:", t)
# 修改arr
# numpy array: [[0 2 3]
#  [4 5 6]]
# tensor: tensor([[0, 2, 3],
#         [4, 5, 6]])
print("\n修改tensor")
t[0, 0] = -1
print("numpy array:" ,arr)
print("tensor:", t)
# 修改tensor
# numpy array: [[-1  2  3]
#  [ 4  5  6]]
# tensor: tensor([[-1,  2,  3],
#         [ 4,  5,  6]])
注意:这里如果查看t和arr的内存地址,会发现不相同,这是因为tensor与numpy数组是共享部分内存,而非所有内存,准确说是共享值,所以直接用id()得到的内存地址肯定是不同的(参考链接)
(2)依据数值创建
torch.zeros()- 功能:依
size创建全零张量 - 参数:
size:张量的形状,如(3,3)、(3,224,224)out:输出的张量layout:内存中布局形式,有strided,sparse_coo(多用于稀疏的情况)等device:所在设备,gpu/cpurequires_grad:是否需要梯度
out_t = torch.tensor([1])
print(out_t)
# tensor([1])
t = torch.zeros((3, 3), out=out_t)

print(t, "\n", out_t)
print(id(t), id(out_t), id(t) == id(out_t))
# tensor([[0, 0, 0],
#         [0, 0, 0],
#         [0, 0, 0]])
#  tensor([[0, 0, 0],
#         [0, 0, 0],
#         [0, 0, 0]])
# 140704226970592 140704226970592 True
torch.zeros_like()- 功能:依
input形状创建全0张量 - 参数:
intput:创建与input同形状的全0张量dtype:数据类型layout:内存中布局形式
torch.ones()- 与
torch.zeros()类似 torch.ones_like()- 与
torch.zeros_like()类似 torch.full()- 与
torch.zeros()类似 - 功能:依
size形状创建全为fill_value张量 - 参数:
size:指定形状fill_value:张量的值
t = torch.full((3,3), fill_value=5)
print(t)
# tensor([[5., 5., 5.],
#         [5., 5., 5.],
#         [5., 5., 5.]])
torch.full_like()- 与
torch.zeros_like()类似 - 依据
input形状创建全为fill_value张量 torch_arange- 功能:创建等差的一维张量
- 注意事项:数值区间为 [start, end),不包含
end - 参数:
-start:数列起始值
-end:数列结東值
-step:数列公差,默认为 1
t = torch.arange(2, 10, 2)
print(t)
# tensor([2, 4, 6, 8])
torch.linspace()- 功能:创建均分的一维张量
- 注意事项:数值区间为 [start, end],包含
endstart:数列起始值end:数列结束值steps:数列长度
t = torch.linspace (2, 10, 6)
print(t)
# tensor([ 2.0000,  3.6000,  5.2000,  6.8000,  8.4000, 10.0000])
torch.eye()- 功能:创建单位对角矩阵(2 维张量)
- 注意事项:默认为方阵
- 参数:
n:矩阵行数m:矩阵列数
t = torch.eye(3,4)
print(t)
# tensor([[1., 0., 0., 0.],
#         [0., 1., 0., 0.],
#         [0., 0., 1., 0.]])
(3)依据概率创建
torch.normal()- 功能:生成正态分布(高斯分布)
- 参数:
mean:均值std:标准差
- 模式:
1)mean为标量,std为标量
# mean为标量, std为标量
t_normal = torch.normal(0, 1, size=(4,))
print(t_normal)
# tensor([-1.2037, -2.6311,  0.5868,  1.2614])
2)mean为标量,std为张量
# mean为标量, std为张量
mean = 0
std = torch.arange(1, 5, dtype=torch.float)
t_normal = torch.normal(mean, std)
print("mean:{}\nstd:{}".format(mean, std))
print(t_normal)
# mean:0
# std:tensor([1., 2., 3., 4.])
# tensor([-1.0449,  0.3933, -1.9833, -0.1817])
3) mean为张量,std为标量
# mean为张量, std为标量
mean = torch.arange(1, 5, dtype=torch.float)
std = 1
t_normal = torch.normal(mean, std)
print("mean:{}\nstd:{}".format(mean, std))
print(t_normal)
# mean:tensor([1., 2., 3., 4.])
# std:1
# tensor([2.6778, 1.4530, 3.1085, 3.9316])
4) mean为张量,std为张量
# mean为张量, std为张量
mean = torch.arange(1, 5, dtype=torch.float)
std = torch.arange(1, 5, dtype=torch.float)
t_normal = torch.normal(mean, std)
print("mean:{}\nstd:{}".format(mean, std))
print(t_normal)
# mean:tensor([1., 2., 3., 4.])
# std:tensor([1., 2., 3., 4.])
# tensor([ 0.5354, -0.5579,  2.3737,  5.1949])
torch.randn()与torch.randn_like()- 功能:生成标准正态分布
- 参数:
size:张量的形状
torch.rand()与torch.rand_like()- 功能:在区间**[0,1)** 上,生成均匀分布
- 参数:
size:张量的形状
torch.randint()与torch.randint_like()- 功能:区间**[Iow, high)**生成整数均匀分布
- 参数:
size:张量的形状
torch.randperm()- 功能:生成从 0 到 n − 1 n-1 n−1 的随机排列
- 参数:
n:张量的长度
torch.bernoulli()- 功能:以
input为概率,生成伯努力分布(0-1 分布,两点分布) - 参数:
input:概率值
3、Tensor的操作
(1)张量的拼接与切分
张量的拼接
torch.cat()- 功能:将张量按维度
dim进行拼接 - 参数:
tensors: 张量序列dim: 要拼接的维度(如果是 n n n维张量,则dim可选的值为 0 ∼ ( n − 1 ) 0 \sim (n-1) 0∼(n−1))
torch.cat()拼接不一定局限于两个张量的拼接,可以同时进行多个张量的拼接[red]
t = torch.ones((2, 3))
t_0 = torch.cat([t, t], dim=0)
t_1 = torch.cat([t, t, t], dim=1)
print("t_0:{} shape:{}\nt_1:{} shape:{}".format(t_0, t_0.shape, t_1, t_1.shape))

# t_0:tensor([[1., 1., 1.],
#         [1., 1., 1.],
#         [1., 1., 1.],
#         [1., 1., 1.]]) shape:torch.Size([4, 3])
# t_1:tensor([[1., 1., 1., 1., 1., 1., 1., 1., 1.],
#         [1., 1., 1., 1., 1., 1., 1., 1., 1.]]) shape:torch.Size([2, 9])
torch.stack()- 功能:在新创建的维度
dim上进行拼接tensors:张量序列dim:要拼接的维度
a = torch.tensor([[1, 2, 3],
                  [11, 22, 33]])
b = torch.tensor([[4, 5, 6],
                  [44, 55, 66]])
c = torch.stack([a, b], dim=0)
d = torch.stack([a, b], dim=1)
e = torch.stack([a, b], dim=2)
print("c:{} shape:{}\nd:{} shape:{}\ne:{} shape:{}".
      format(c, c.shape, d, d.shape, e, e.shape))

# c:tensor([[[ 1,  2,  3],
#          [11, 22, 33]],
#
#         [[ 4,  5,  6],
#          [44, 55, 66]]]) shape:torch.Size([2, 2, 3])
# d:tensor([[[ 1,  2,  3],
#          [ 4,  5,  6]],
#
#         [[11, 22, 33],
#          [44, 55, 66]]]) shape:torch.Size([2, 2, 3])
# e:tensor([[[ 1,  4],
#          [ 2,  5],
#          [ 3,  6]],
#
#         [[11, 44],
#          [22, 55],
#          [33, 66]]]) shape:torch.Size([2, 3, 2])
代码分析:c,d,e按照不同的维度进行拼接,本质上的拼接过程为:
(参考链接)
张量的切分
torch.chunk()- 功能:将张量按维度
dim进行平均切分 - 返回值:张量列表
- 注意事项:若不能整除,最后一份张量小于其他张量(内部实现是将选取的
dim的值除需要切分的数目再向上取整,因此最后一份必然小于其他张量) - 参数:
input:要切分的张量chunks:要切分的份数dim:要切分的维度
a = torch.ones((2, 7))  # 7
list_of_tensors = torch.chunk(a, dim=1, chunks=3)  # 3

for idx, t in enumerate(list_of_tensors):
    print("第{}个张量:{}, shape is {}".format(idx + 1, t, t.shape))

# 第1个张量:tensor([[1., 1., 1.],
#         [1., 1., 1.]]), shape is torch.Size([2, 3])
# 第2个张量:tensor([[1., 1., 1.],
#         [1., 1., 1.]]), shape is torch.Size([2, 3])
# 第3个张量:tensor([[1.],
#         [1.]]), shape is torch.Size([2, 1])
torch.split()- 功能:将张量按维度
dim进行切分 - 返回值:张量列表
- 参数:
tensor:要切分的张量split_size_or_sections:两种模式
- 如果为int,则表示每一份的长度
- 如果为list,则表示按照list中的元素进行切分dim:要切分的维度
t1 = torch.ones((2, 5))
t2 = torch.ones((2, 5))

# int模式
list_of_tensors1 = torch.split(t1, 2, dim=1)
for idx, t in enumerate(list_of_tensors1):
    print("第{}个张量:{}, shape is {}".format(idx+1, t, t.shape))
# 第1个张量:tensor([[1., 1.],
#         [1., 1.]]), shape is torch.Size([2, 2])
# 第2个张量:tensor([[1., 1.],
#         [1., 1.]]), shape is torch.Size([2, 2])
# 第3个张量:tensor([[1.],
#         [1.]]), shape is torch.Size([2, 1])

# list模式
list_of_tensors2 = torch.split(t2, [2, 1, 2], dim=1)
for idx, t in enumerate(list_of_tensors2):
    print("第{}个张量:{}, shape is {}".format(idx, t, t.shape))
# 第0个张量:tensor([[1., 1.],
#         [1., 1.]]), shape is torch.Size([2, 2])
# 第1个张量:tensor([[1.],
#         [1.]]), shape is torch.Size([2, 1])
# 第2个张量:tensor([[1., 1.],
#         [1., 1.]]), shape is torch.Size([2, 2])
(2)张量索引
torch.index_select()- 功能:在维度
dim上,按index索引数据 - 返回值:依
index索引数据拼接的张量 - 参数:
input:要索引的张量dim:要索引的维度index:要索引数据的序号(index的类型必须是一个tensor,且数据类型是torch.long不能是torch.float)
t = torch.randint(0, 9, size=(3, 3))
idx = torch.tensor([0, 2], dtype=torch.long)
t_select = torch.index_select(t, dim=0, index=idx)
print("t:\n{}\nt_select:\n{}".format(t, t_select))

# t:
# tensor([[4, 5, 0],
#         [5, 7, 1],
#         [2, 5, 8]])
# t_select:
# tensor([[4, 5, 0],
#         [2, 5, 8]])
torch.masked_select()- 功能:按mask中的
True进行索引 - 返回值:一维张量
- 参数:
input:要索引的张量mask:与input同形状(维度相同)的布尔类型张量
通过torch.masked_select()索引需要先利用条件构建mask,然后再将构建好的mask放到torch.masked_select()中[red]
t = torch.randint(0, 9, size=(3, 3))
mask = t.le(5)  # ge is mean greater than or equal/   gt: greater than  le  lt
t_select = torch.masked_select(t, mask)
print("t:\n{}\nmask:\n{}\nt_select:\n{} ".format(t, mask, t_select))

# t:
# tensor([[4, 5, 0],
#         [5, 7, 1],
#         [2, 5, 8]])
# mask:
# tensor([[ True,  True,  True],
#         [ True, False,  True],
#         [ True,  True, False]])
# t_select:
# tensor([4, 5, 0, 5, 1, 2, 5])
(3)张量变换
torch.reshape()- 功能:变换张量形状
- 注意事项:当张量在内存中是连续时,新张量与
input共享数据内存 - 参数:
input:要变换的张量shape:新张量的形状
t = torch.randperm(8)
t_reshape = torch.reshape(t, (-1, 2, 2))  # -1
print("t:{}\nt_reshape:\n{}".format(t, t_reshape))
print("-----------------------------------------")

t[0] = 1024
print("t:{}\nt_reshape:\n{}".format(t, t_reshape))
print("t.data 内存地址:{}".format(id(t.data)))
print("t_reshape.data 内存地址:{}".format(id(t_reshape.data)))

# t:tensor([5, 4, 2, 6, 7, 3, 1, 0])
# t_reshape:
# tensor([[[5, 4],
#          [2, 6]],
#
#         [[7, 3],
#          [1, 0]]])
# -----------------------------------------
# t:tensor([1024,    4,    2,    6,    7,    3,    1,    0])
# t_reshape:
# tensor([[[1024,    4],
#          [   2,    6]],
#
#         [[   7,    3],
#          [   1,    0]]])
# t.data 内存地址:140486772613024
# t_reshape.data 内存地址:140486772613024
torch.transpose()- 功能:交换张量指定的两个维度
- 参数:
input:要变换的张量dim0:要交换的维度dim1: 要交换的维度
t = torch.rand((2, 3, 4))
t_transpose = torch.transpose(t, dim0=1, dim1=2)
print("t shape:{}\nt_transpose shape: {}".format(t.shape, t_transpose.shape))

# t shape:torch.Size([2, 3, 4])
# t_transpose shape: torch.Size([2, 4, 3])
-
torch.t() -
功能:二维张量转置,对矩阵而言,等价于
torch.transpose(input, 0, 1),只能用于二维张量 -
torch.squeeze() -
功能:压缩长度为1的维度(轴)
-
参数:
dim:若为None,移除所有长度为1的轴,若指定维度,当且仅当该轴长度为1时,可以被移除
t = torch.rand((1, 2, 3, 1))
t_sq = torch.squeeze(t)
t_0 = torch.squeeze(t, dim=0)
t_1 = torch.squeeze(t, dim=1)
print(t.shape)
print(t_sq.shape)
print(t_0.shape)
print(t_1.shape)

# torch.Size([1, 2, 3, 1])
# torch.Size([2, 3])
# torch.Size([2, 3, 1])
# torch.Size([1, 2, 3, 1])
torch.usqueeze- 功能:依据
dim扩展维度
t = torch.rand((3,3))
t_unsqueeze = torch.unsqueeze(t, dim=1)
print(t.shape)
print(t_unsqueeze.shape)
print(t_unsqueeze)

# torch.Size([3, 3])
# torch.Size([3, 1, 3])
# tensor([[[0.7576, 0.2793, 0.4031]],
#
#         [[0.7347, 0.0293, 0.7999]],
#
#         [[0.3971, 0.7544, 0.5695]]])
4、Tensor的数学运算
关于Tensor的数学运算大致可以分为三类:
- 加减乘除
- 对数,指数,幂函数
- 三角函数
由于Tensor的数学运算接口参数相当简单,因此不一一展开叙述,仅展示各种类的函数名,并以torch.add()做为例子叙述参数作用
(1)加减乘除
torch.add()- 功能:逐元素计算 i n p u t + a l p h a × o t h e r input + alpha × other input+alpha×other
- 参数:
input:第一个张量alpha:乘项因子other:第二个张量
t_0 = torch.randn((3, 3))
t_1 = torch.ones_like(t_0)
t_add = torch.add(t_0, 10, t_1)

print("t_0:\n{}\nt_1:\n{}\nt_add_10:\n{}".format(t_0, t_1, t_add))

# t_0:
# tensor([[ 0.6614,  0.2669,  0.0617],
#         [ 0.6213, -0.4519, -0.1661],
#         [-1.5228,  0.3817, -1.0276]])
# t_1:
# tensor([[1., 1., 1.],
#         [1., 1., 1.],
#         [1., 1., 1.]])
# t_add_10:
# tensor([[10.6614, 10.2669, 10.0617],
#         [10.6213,  9.5481,  9.8339],
#         [ 8.4772, 10.3817,  8.9724]])
torch.addcdiv()- 功能: o u t i = i n p u t i + v a l u e × t e n s o r 1 i t e n s o r 2 i out_i = input_i + value \times \frac{tensor1_i}{tensor2_i} outi=inputi+value×tensor2itensor1i
torch.addcmul()- 功能: o u t i = i n p u t i + v a l u e × t e n s o r 1 i × t e n s o r 2 i out_i = input_i + value \times tensor1_i \times tensor2_i outi=inputi+value×tensor1i×tensor2i
torch.sub()torch.div()torch.mul()
(2)对数,指数,幂函数
torch.log(input, out=None)torch.log10(input, out=None)torch.log2(input, out=None)torch.exp(input, out=None)torch.pow()
(3)三角函数
torch.abs(input, out=None)torch.acos(input, out=None)torch.cosh(input, out=None)torch.cos(input, out=None)torch.asin(input, out=None)torch.atan(input, out=None)torch.atan2(input, other, out=None)
####5、实战:利用Tensor实现线性回归
(1)求解步骤
- 确定模型: y = ω x + b y = \omega x + b y=ωx+b
- 选择损失函数:这里选择 M S E MSE MSE作为损失函数:
f = 1 m ∑ i = 1 m ( y i − y ^ i ) 2 f = \frac{1}{m} \sum_{i=1}^{m}\left(y_{i}-\hat{y}_{i}\right)^2 f=m1i=1∑m(yi−y^i)2 - 求解梯度并更新 ω \omega ω和 b b b直到收敛:
ω = ω − L R × ω ⋅ g r a d b = b − L R ∗ w ⋅ g r a d \begin{aligned} &\omega=\omega - LR \times \omega \cdot grad\\ &b=b-LR * w \cdot grad \end{aligned} ω=ω−LR×ω⋅gradb=b−LR∗w⋅grad
(LR为学习率)
(2)代码实现
# 设置学习率参数
lr = 0.05

# 生成数据
x = torch.rand(20, 1) * 10
y = 2 * x + (5 + torch.randn(20, 1))

# 构建线性回归参数
w = torch.randn((1), requires_grad=True)
b = torch.zeros((1), requires_grad=True)
print(w)
print(b)

# 构造损失函数
for iteration in range(1000):
    # 前向传播
    y_pred = torch.add(torch.mul(w, x), b)
    # 计算loss
    loss = (0.5 * (y - y_pred) ** 2).mean()
    # 反向传播
    loss.backward()

    # 更新参数
    b.data.sub_(lr * b.grad)
    w.data.sub_(lr * w.grad)

    # 清零张量的梯度   20191015增加
    w.grad.zero_()
    b.grad.zero_()

    # 绘图
    if iteration % 20 == 0:
        plt.scatter(x.data.numpy(), y.data.numpy())
        plt.plot(x.data.numpy(), y_pred.data.numpy(), 'r-', lw=5)
        plt.text(2, 20, 'Loss=%.4f' % loss.data.numpy(), fontdict={'size': 20, 'color':  'red'})
        plt.xlim(1.5, 10)
        plt.ylim(8, 28)
        plt.title("Iteration: {}\nw: {} b: {}".format(iteration, w.data.numpy(), b.data.numpy()))
        plt.pause(0.5)

        if loss.data.numpy() < 0.6:
            print(loss.data.numpy())
            print(b)
            print(w)
            break
代码中设计到一个属性——sub_,需要注意与sub属性区分开,sub_保留了张量的各种属性,而sub只是赋值,属性并不保留