SpringBoot学习笔记
SpringBoot学习笔记
一、简介及入门
1.什么是Spring boot,优缺点。
①什么是Spring boot:简单的说是习惯优于配置。让项目快速跑起来,它并不是什么新的框架,而是它把多个框架集成在一起。
②使用SpringBoot的好处:SpringBoot不需要太多的配置文件,很多配置都是SpringBoot内置的。快速、简单的搭建项目,但入门容易精通难。
2.微服务介绍
①微服务:是一种架构风格
②一个应用应该是一组小型的服务;可以通过http方式进行沟通
③每一个功能元素最终都是一个可独立替换和独立升级的软件单元
3.环境注意事项
①MAVEN设置:给maven的setting.xml配置文件profiles标签添加配置
<profile>
      <id>jdk-1.8</id>

      <activation>
	  <activeByDefault>true</activeByDefault>
        <jdk>1.8</jdk>
      </activation>
		<properties>
		<maven.compiler.source>1.8</maven.compiler.source>
		<maven.compiler.target>1.8</maven.compiler.target>
		<maven.compiler.compilerVersion>1.8</maven.compiler.compilerVersion>
		</properties>
	</profile>
②idea的pom.xml中导入springboot相关依赖
<parent>
        <groupId>org.springframework.boot</groupId>
        <artifactId>spring-boot-starter-parent</artifactId>
        <version>1.5.9.RELEASE</version>
</parent>
    <dependencies>
        <dependency>
            <groupId>org.springframework.boot</groupId>
            <artifactId>spring-boot-starter-web</artifactId>
        </dependency>
    </dependencies>
③编写主程序
@SpringBootApplication
public class HelloWorldMainApplication {
    public static void main(String[] args){
        SpringApplication.run(HelloWorldMainApplication.class,args);
    }
}
④编写业务代码
@Controller
public class HelloController {
    @ResponseBody//需要页面显示需要添加
    @RequestMapping("/hello")
    public String hello(){
        return "helloWorld";
    }
}
⑤简化部署,打成可执行jar直接运行,前提要在pom配置一下:
<!-- 该插件可以将应用打包成可执行jar -->
    <build>
        <plugins>
            <plugin>
                <groupId>org.springframework.boot</groupId>
                <artifactId>spring-boot-maven-plugin</artifactId>
            </plugin>
        </plugins>
    </build>
⑥spring-boot-starter-parent:场景启动器,导入了web模块正常运行依赖的组件。
springboot将所有的功能场景抽取出来,生成各个starters(启动器),只需要在项目引用相关场景的依赖即可导入进来。
4.主程序类,入口类
@SpringBootApplication:springboot应用标注某个类上说明这个类是springboot的主配置类,springboot是运行这个类的main方法启动springboot应用。
@Target(ElementType.TYPE)
@Retention(RetentionPolicy.RUNTIME)
@Documented
@Inherited
@SpringBootConfiguration
@EnableAutoConfiguration
@ComponentScan(excludeFilters = {
		@Filter(type = FilterType.CUSTOM, classes = TypeExcludeFilter.class),
		@Filter(type = FilterType.CUSTOM, classes = AutoConfigurationExcludeFilter.class) })
public @interface SpringBootApplication {
@SpringBootConfiguration:springboot的配置类
@Configuration:配置类上标注这个注解;
@Component:配置类,配置文件,容器中的一个组件
@EnableAutoConfiguration:开启自动配置功能
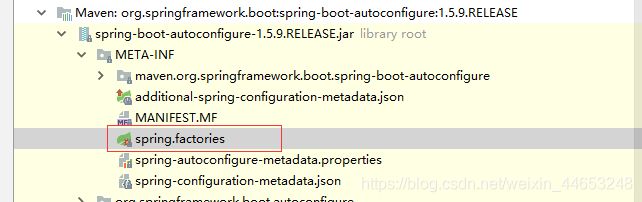
J2EE的整体整合方案和自动配置都在spring-boot-autoconfigure-1.5.9.RELEASE.jar
5.使用Spring Initializer快速创建Spring Boot项目
①选择我们需要的模块,向导会联网创建SpringBoot项目。
②业务层可以用@RestController描述类来替换@Controller和@RequestMapping两个注解。
好处是主程序已经生成好,只需要添加逻辑代码就可以
resources文件夹中的目录结构
- static:保存所有静态资源,如图片,js,images等。
- templates:保存所有的模板页面。(Springboot默认jar包使用嵌入式的tomcat,默认不支持jsp页面)可以使用模板引擎实现。
- application.properties:springboot应用的配置文件。如:server.port=8081修改端口号等。
二、Spring Boot配置
1.配置文件类型
①springboot使用一个全局的配置文件,文件名是固定好的。
- application.properties
- application.yml
②配置文件的作用:修改springboot自动配置的默认值,springboot在底层都自动配置好的。
③yml:是一个标记语言,以数据为中心,比json、xml等更适合做配置文件。
④yml和xml文件对比:
yml
 server:
   port: 8081
xml
<server>
		<port>8081</port>
</server>
2.yml语法
①基本语法
k:(空格)v:表示一个键值对。(空格必须带有)
以空格来缩进层级关系,只要是左对齐的一列数据,就证明是同一层级的,属性和值大小写敏感。
②值得写法
- 普通值(数字、字符串、布尔等):字符串默认不用加引号。
加了“ ”引号后里面的特殊字符不会被转义。
加了’ '引号后里面的特殊字符会被转义,
例:name: zhangsan - 对象、Map:
对象是k:v方式
student:
  name: zhangsan
  age: 27

或者
student: {name: zhangsan,age: 27}
- 数组(Set、List)
pets:
 - cat
 - dog
 - pig
或者
pets: {cat,dog,pig}
3.配置文件注入值方法
①创建bean
@ConfigurationProperties(prefix = “student”)的前缀要与yml的名称相同才能映射到
@Component
@ConfigurationProperties(prefix = "student")
public class Student {
    private String name;
    private Integer id;
    private boolean coke;
    private Date day;
    private Map numMap;
    private List numList;
    private Address address;
    }
②pom.xml注入依赖
<dependency>
            <groupId>org.springframework.bootgroupId>
            <artifactId>spring-boot-configuration-processorartifactId>
            <optional>trueoptional>
        dependency>
③application.yml配置
(注:除了简单类型的参数命名不能有大写字母)
student:
  name: xxx
  id: 1
  coke: true
  day: 1990/12/12
  numMap: {num1: num1,num2: num2}
  numList:
    - list12
    - list13
  address:
    address: address
④测试方法实现
@RunWith(SpringRunner.class)
@SpringBootTest
class SpringboottestApplicationTests {
	@Autowired
	Student student;
	@Test
	void contextLoads() {
		System.out.println(student);
	}
}
⑤properties方式实现
(如运行乱码可在idea配置Editor–>File Encodings–>Transparent native-to-asicc conversion勾选上)
student.name=张三
student.coke=false
student.day=2010/1/12
student.id=1
student.num-map.k1=num1
student.num-map.k2=num2
student.num-list=z,x,c
student.address=地址
⑥用@Value注解实现配置文件赋值
注:这种方式不支持松散语法绑定,如:参数名叫numMap中的M必须替换,num-map,复杂类型赋值时@Value不支持。
@Component
public class Student {
    @Value("${student.name}")
    private String name;
    @Value("${student.num-map}")
    private Map numMap;
}
⑦yml的@ConfigurationProperties(prefix = “student”)支持校验模式@Validated注解,如:
注:@Value注解方式的不支持@Validated校验
@ConfigurationProperties(prefix = "student")
@Validated
public class Student {
    @Email
    private String email;
    }
⑧用@PropertySource注解实现指定绑定properties,加在需要绑定的bean开头
@PropertySource(value = {"classpath:student.properties"})
⑨Springboot推荐给容器中添加组件的方式,推荐使用全注解方式
- 配置类=======Spring配置文件
- 使用@Bean给容器中添加注解
@Configuration
public class Config {
    @Bean
    public Hello hello(){
        return new Hello();
    }
}
⑩使用import org.junit.Test必须类和每个@Test方法都加public才可以跑测试。
(如果@Test方法编写没问题但是获取不到值优先考虑引用的Test是否有问题)
⑪配置文件占位符
生成随机数 ${random.value}
占位符获取之前配置的值,如果没有使用:后面的值
student.name=张三${random.int}
student.coke=false
student.day=2010/1/12
student.id=${student.name}1
student.num-map.k1=${student.id:hello}num1
4.profile多环境配置切换
①在properties中切换:
这个dev是要激活properties的名称,如application-dev.properties
spring.profiles.active=dev
②在yml中切换:
不需要写那么多配置文件,但是开启时确保与已有配置文件重名问题,如果重名则选择配置文件内容。
server:
  port: 8081
spring:
  profiles:
    active: dev
---
server:
  port: 8082
spring:
  profiles: dev
---
server:
  port: 8083
spring:
  profiles: pord
③在idea服务里设置:Edit Configuration—>VM options -Dspring.profiles.active=dev
5.自动配置原理
①springboot启动时加载主配置类,开启了自动配置功能 @EnableAutoConfiguration (利用EnableAutoConfigurationImportSelector给容器导入一些组件,可查看selectImports方法内容)
//获取候选配置
List configurations = getCandidateConfigurations(annotationMetadata,
					attributes);
SpringFactoriesLoader.loadFactoryNames()扫描所有jar包下的"META-INF/spring.factories"将扫描到的内容包装成properties
将jar包类路径下META-INF/spring.factories里面的所有EnableAutoConfiguration值加入到容器中。
②每一个自动配置类进行自动配置功能
③application.properties里能配置的属性都是来源于这个功能的properties类
④xxxAutoConfigurartion:自动配置类;xxxProperties:封装配置文件中的属性,用时可参照都有什么
⑤自动配置类必须在满足一定条件下才生效,可以在application.properties中添加启用debug=true模式运行项目,从控制台的启用日志报告里可以观察
四、日志
1.日志门面SLF4J,日志实现Logback springboot底层实现的也是这个组合。
注:多个框架组合不同的时候,可以使用适配器模式添加对应的适配jar适配后可正常调用日志实现。
2.如何让系统中所有的日志都统一slf4j
①将系统中其他日志先排除
②用中间适配包替换原有框架
③导入slf4j其他的实现
3.SLF4J实现原理
①在日常开发时,日志的使用应调用日志抽象层的方法。给系统导入slf4j和logback的jar
import org.slf4j.Logger;
import org.slf4j.LoggerFactory;

public class HelloWorld {
  public static void main(String[] args) {
    Logger logger = LoggerFactory.getLogger(HelloWorld.class);
    logger.info("Hello World");
  }
}
4.spirngboot日志使用
①如果需要引入新的框架,一定要把这个框架的默认日志依赖排除掉
<dependency>
			<groupId>org.springframework.boot</groupId>
			<artifactId>spring-boot-starter-test</artifactId>
			<scope>test</scope>
			<exclusions>
				<exclusion>
					<groupId>org.junit.vintage</groupId>
					<artifactId>junit-vintage-engine</artifactId>
				</exclusion>
			</exclusions>
		</dependency>
②日志输出级别,和调整级别
Logger logger = LoggerFactory.getLogger(getClass());
	@Test
	public void contextLoads() {
		//日志级别,springboot默认使用info级别的,也可以在properties中设置级别
		logger.trace("这是trace日志");
		logger.debug("这是debug日志");
		logger.info("这是info信息");
		logger.error("这是error信息");
	}
③日志输出文件
logging.file=G:/springboot.log
5.指定日志配置
①只需要将自己配置日志的文件放在类路径下即可,springboot就不会使用默认配置。
②名字已经要是logback-spring.xml,否则springboot不会识别。
五、Web开发
1.创建SpringBoot项目
①创建springboot项目时,将所需的模块勾选上springboot就自动将这些场景配置好了。
②深入理解自动配置,能能不能修改,能修改那些配置,能不能扩展等。
2.springboot对静态资源的映射规则
 public void addResourceHandlers(ResourceHandlerRegistry registry) {
            if (!this.resourceProperties.isAddMappings()) {
                logger.debug("Default resource handling disabled");
            } else {
                Duration cachePeriod = this.resourceProperties.getCache().getPeriod();
                CacheControl cacheControl = this.resourceProperties.getCache().getCachecontrol().toHttpCacheControl();
                if (!registry.hasMappingForPattern("/webjars/**")) {
                    this.customizeResourceHandlerRegistration(registry.addResourceHandler(new String[]{"/webjars/**"}).addResourceLocations(new String[]{"classpath:/META-INF/resources/webjars/"}).setCachePeriod(this.getSeconds(cachePeriod)).setCacheControl(cacheControl));
                }
                String staticPathPattern = this.mvcProperties.getStaticPathPattern();
                if (!registry.hasMappingForPattern(staticPathPattern)) {
                    this.customizeResourceHandlerRegistration(registry.addResourceHandler(new String[]{staticPathPattern}).addResourceLocations(WebMvcAutoConfiguration.getResourceLocations(this.resourceProperties.getStaticLocations())).setCachePeriod(this.getSeconds(cachePeriod)).setCacheControl(cacheControl));
                }
            }
        }
① 所有/webjars/,都去classpath:/META-INF/resources/webjars/找资源。
②参考资源选择对应的依赖引入pom
③“/”访问当前项目任何资源(静态资源的文件)
classpath:/META-INF/resources/
classpath:/resources/
classpath:/static/
classpath:/public/
“/” 当前项目的跟路径
欢迎页:静态资源文件夹下的index.xml页面
所有的**/favicon.ico 都是在静态资源文件夹找(网页标题栏图标)
3.模板引擎
①引入thymeleaf
<dependency>
		<groupId>org.springframework.boot</groupId>
		<artifactId>spring-boot-starter-thymeleaf</artifactId>
		</dependency>
<!-- 切换版本,注意看与其他包的适配-->
<properties>
		<java.version>1.8</java.version>
		<thymeleaf.version>3.0.2.RELEASE</thymeleaf.version>
		<thymeleaf-layout-dialect.version>2.1.1</thymeleaf-layout-dialect.version>
	</properties>
②thymeleaf用法:只需要将需要渲染的html放到classpath:/templates/即可
③在html导入thymeleaf的名称空间,(导入后编程有代码提示)
<html lang="en" xmlns:th="http://www.thymeleaf.org">
④使用thymeleaf获取map
<div th:text="${hello}">div>
⑤语法规则
- th:text:改变当前元素的文本内容
- th:任意替换html属性,来替换原生属性的值
4.Spring MVC auto-configuration
Springboot自动配置好了springmvc
- 自动配置了ViewsResolver视图解析器,视图对象决定什么时候渲染。
- ContentNegotatingViewsResolver:组合所有的视图解析器
- 可以给容器视图添加视图解析器,自动将添加的组合进来
- 自动注册格式化器:日期格式化
- 自动注册Converter转换器:类型转换
org.springframework.boot.autoconfigure是springboot对web应用自动配置的所有场景。
如何修改springboot默认配置
①springboot在自动配置很多组件时候,先看容器有没有自己配置的(@Bean、@Component)如果有就用用户配置的,如果没有才自动配置
5.扩展springmvc
 <mvc:view-controller path="/hello" view-name="success"/>
    <mvc:interceptors>
        <mvc:interceptor>
            <mvc:mapping path="/hello"/>
            <bean></bean>
        </mvc:interceptor>
    </mvc:interceptors>
①编写一个@Configuration配置类,是WebMvcConfigurerAdapter类型,不能标注@EnableWebMvc
既保留了springboot自动配置,也能用自己配置的
//使用WebMvcConfigurerAdapter可以扩展springmvc功能
@Configuration
public class MyMvcConfig extends WebMvcConfigurerAdapter{
    public void addViewControllers(ViewControllerRegistry registry){
        //浏览器发送请求到页面
        registry.addViewController("/springbootwebtest").setViewName("success");
    }
}
6.全面接管springMVC
springboot对springmvc的自动配置不需要了,所有mvc相关的自己配置,意味着springboot对springmvc的自动配置全部失效(不推荐全面接管)。
①在配置类中添加@EnableWebMvc即可
为什么添加了@EnableWebMvc注解全部失效,原因是@EnableWebMvc将WebMvcConfigurationSupport组件导入进来,导致springboot自动配置失效
@Import({DelegatingWebMvcConfiguration.class})
public @interface EnableWebMvc {
}
7.国际化
①编写国际化配置文件
②使用ResourceBundleMessageSource管理国际化资源文件
③在页面使用fmt:message取出国际化内容
步骤:
①编写i18n的properties
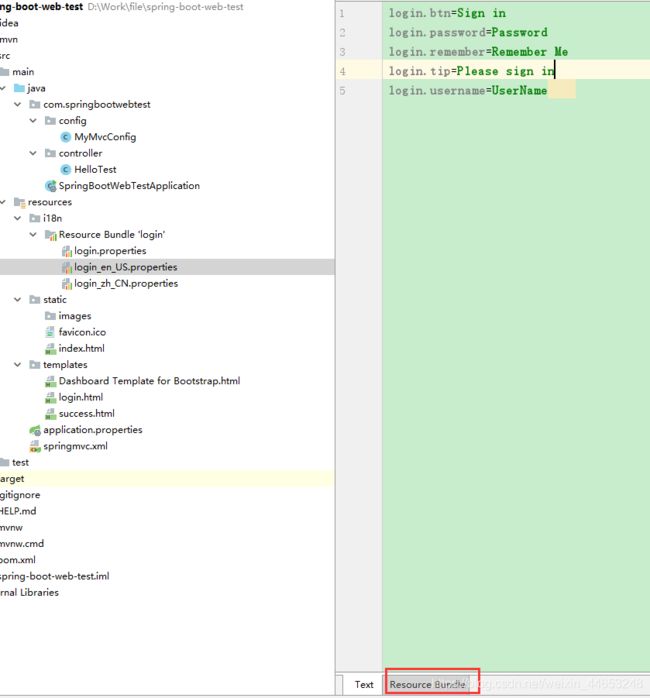
②springboot自动配置好了管理国际化文件的组件
@ConfigurationProperties(
    prefix = "spring.messages"
)
public class MessageSourceAutoConfiguration {
将写好的properties路径配置到application.properties中spring.messages.basename=i18n.login
③去页面获取国际化的值
8.配置嵌入Servlet
SPringboot默认使用的是嵌入Servlet容器(tomcat)
①定制修改Servlet容器的相关配置,在properties中修改相关server的配置即可
server.port=8081
server.context-path=/crud
server.tomcat.uri-encoding=UTF-8
也可以编辑一个EmbeddedServletContainerCustomizer :嵌入式的servlet容器定制
@Bean
    public EmbeddedServletContainerCustomizer embeddedServletContainerCustomizer(){
        return new EmbeddedServletContainerCustomizer(){
            @Override
            public void customize(ConfigurableEmbeddedServletContainer configurableEmbeddedServletContainer) {
                configurableEmbeddedServletContainer.setPort(8083);
            }
        };
    }
②注册三大组件(servlet、Filter、Listener)用以下方式:
- ServletRegistrationBean
public class MyServlet extends HttpServlet{
    @Override
    protected void doGet(HttpServletRequest req, HttpServletResponse resp) throws ServletException, IOException {
        doPost(req,resp);
    }
    @Override
    protected void doPost(HttpServletRequest req, HttpServletResponse resp) throws ServletException, IOException {
        resp.getWriter().write("servlet配置成功");
    }
}
- FilterRegistrationBean
public class MyFilter implements Filter {
    @Override
    public void init(FilterConfig filterConfig) throws ServletException {

    }
    @Override
    public void doFilter(ServletRequest servletRequest, ServletResponse servletResponse, FilterChain filterChain) throws IOException, ServletException {
        System.out.println("myfilter success");
        filterChain.doFilter(servletRequest,servletResponse);
    }
    @Override
    public void destroy() {
    }
}
- ServletListenerRegistrationBean
public class MyListener implements ServletContextListener {
    @Override
    public void contextInitialized(ServletContextEvent servletContextEvent) {
        System.out.println("context-----success");
    }
    @Override
    public void contextDestroyed(ServletContextEvent servletContextEvent) {
        System.out.println("context-----close");
    }
}
③切换其他servlet容器可以在pom文件中配置切换,springboot内置的servlet容器的缺点是默认不支持jsp和优化定制比较复杂。
④外置的servlet容器:外面安装一个tomcat或jboss,在创建项目时选择war包的方式打包
步骤:
- 必须创建一个war项目
- 将嵌入式的servlet指定为provided
- 必须编写一个SpringbootServletInitializer的子类,目的是调用configure方法
六、数据访问
1.jdbc
①配置pom和yml
<dependency>
			<groupId>org.springframework.boot</groupId>
			<artifactId>spring-boot-starter-jdbc</artifactId>
		</dependency>
		<dependency>
			<groupId>mysql</groupId>
			<artifactId>mysql-connector-java</artifactId>
			<scope>runtime</scope>
		</dependency>
application.yml
spring:
  datasource:
    username: root
    password: Caoxu0407@
    url: jdbc:mysql://localhost:3306/jdbc
    driver-class-name: com.mysql.jdbc.Driver
②利用ApplicationListener
- runSchemaScripts()运行建表语句
- runDataScripts()运行插入数据的sql语句
默认规则:schema.sql\schema-all.sql
利用yml配置指定位置:
schema:
  - classpath:user.sql
③操作数据库:自动配置了jdbcTemplate操作数据库
@RestController
public class HelloController {
    @Autowired
    JdbcTemplate jdbcTemplate;
    @GetMapping("/query")
    public Map<String,Object>map(){
        List<Map<String, Object>> maps = jdbcTemplate.queryForList("select * from user");
        return maps.get(0);
    }
}
2.整合Mybatis
①pom引入starter
<dependency>
			<groupId>org.mybatis.spring.boot</groupId>
			<artifactId>mybatis-spring-boot-starter</artifactId>
			<version>2.1.2</version>
		</dependency>
②配置数据源相关信息
③创建JavaBean
④注解版:
@Mapper
public interface userMapper {
    @Select("select * from user where id =#{id}")
    public User getAllById(Integer id);
    @Delete("delete from user where id = #{id}")
    public int deleteById(Integer id);
    @Insert("inster into user (username , birthday , sex , address ) values (#{username} ,#{birthday} ,#{sex}, #{address})")
⑤在springboot入口或mybatisConfig类上添加mapper扫描注解,可解决每个mapper上都加注解问题
@MapperScan(value= "mapper所在包路径")
@SpringBootApplication
public class SpringbootDataMybatisApplication {
	public static void main(String[] args) {
		SpringApplication.run(SpringbootDataMybatisApplication.class, args);
	}
}
⑥使用自定义规则(解决数据库字段和bean中字段的驼峰规则问题)
@org.springframework.context.annotation.Configuration
public class MybatisConfig {
    @Bean
    public ConfigurationCustomizer configurationCustomizer(){
        return new ConfigurationCustomizer(){
            public void customize(Configuration configuration){
                configuration.setMapUndersoreToCamelCase(true);
            }
        };
    }
}
⑦配置文件版application.yml
mybatis:
  config-location: classpath:maybatis/mybatis-config.xml #指定全局配置文件路径
  mapper-locations: classpath:mybatis/mapper/ *.xml       #指定sql映射文件路径
3.整合JAP
①编写实体类(bean)与数据表映射。
//映射关系
@Entity//告诉jpa这是一个实体类
@Table(name = "user_tbl")//指定和哪个数据表映射,如果不写默认就是类名首字母小写:user
public class User {
    @Id
    @GeneratedValue(strategy = GenerationType.IDENTITY)//自增主键
    private Integer id;
    @Column(name = "userName", length = 50)
    private String username;
    @Column //省略的话属性名就是列名
    private String address;
    }
②编写Dao接口操作实体类对应的数据表(Repository)
//继承JpaRepository完成对数据库操作
public interface UserRepository extends JpaRepository<User,Integer>{ }
③基本配置yml
spring:
  jpa:
    hibernate:
    # 更新或者创建表结构
      ddl-auto: update
    #控制台显示sql
    show-sql: true
七、缓存
1.定义缓存
将该方法运行结果进行缓存,以后再查相同的内容,直接从缓存中获取
①cacheNames/value,指定缓存名,如:id的值-方法返回值
@Cacheable(cacheNames = {"emp"})//(value = {"emp"})
②key缓存数据使用的key,缓存数据使用的key,如果不指定默认使用方法参数的值,value是数组的方式,可以指定多个缓存。
@Cacheable(cacheNames = {"emp"},key ="#root.methodName+'['+#id+']'")
③@Condition:指定条件情况下才缓存,如 id大于0
	@Cacheable(cacheNames = {"emp"} condition=“#id>0”)
    @Cacheable(cacheNames = {"emp"} condition=“#a0>0”)```
④@CachePut:先调用方法,将目标方法的结果缓存
@CachePut(cacheNames = {"emp"})
⑤@CacheEvict:清除缓存,一般用于删除方法,
- allEntries=true是否删除缓存中所有。
- beforeInvocation = false:缓存清除是否在方法前执行,默认是缓存在方法执行后清除,如方法内出现异常,则不清除缓存。
@CacheEvict(value="emp" key ="#id")
@CacheEvict(value="emp" allEntries=true)
public Employee select(String id){
System.out.println(“查询”+id+“员工”);
return employeeMapper.getEmpById(id);
}
2.整合redis
①安装redis,使用docker
②pom文件引入redis配置(spring-boot-starter-data-redis)
③ 配置文件配置redis
④简单用法:
@Autowired
	StringRedisTemplate stringRedisTemplate;//操作字符串
	@Autowired
	RedisTemplate redisTemplate;//操作对象
	@Test
	public void test01(){
		//给redis保存数据
		stringRedisTemplate.opsForValue().append("msg","hello");
		//查询字符串内容
		stringRedisTemplate.opsForValue().get("msg");
		//给list保存数据
		stringRedisTemplate.opsForList().leftPush("mylist","1");
		stringRedisTemplate.opsForList().leftPush("mylist","2");
		stringRedisTemplate.opsForList().leftPush("mylist","3");
		//从后向前查询list内容
		System.out.println(stringRedisTemplate.opsForList().rightPop("mylist"));
	}
⑤当存储自己定义的实体bean时,可以自己定义序列化器完成存储内容功能。
@Test
	public void test02(){
		Employee empById = employeeMapper.getEmpById("2");
		redisTemplate.opsForValue().set("emp01",empById);
	}
⑥自定义CacheManager:
@Bean
    public RedisTemplate<Object,Employee> employeeRedisTemplate(RedisConnectionFactory redisConnectionFactory)throws UnknownHostException{
        RedisTemplate<Object,Employee> template = new RedisTemplate<Object,Employee>();
        template.setConnectionFactory(redisConnectionFactory);
        Jackson2JsonRedisSerializer<Employee> ser = new Jackson2JsonRedisSerializer<Employee>(Employee);
        template.setDefaultSerializer(ser);
        return template;
    }
    @Bean
    public RedisCacheManager employeeCacheManager(RedisTemplate<Object,Employee> employeeRedisTemplate){
        RedisCacheManager cacheManager = new RedisCacheManager(employeeRedisTemplate);
        cacheManager.setUsePrefix(true);
        return cacheManager;
    }
3.定时任务
①在springboot入口方法添加开启定时任务注解
@EnableScheduling//开启定时任务
②在需要定时任务执行的方法头添加注解
cron中的定义是:(秒 分 时 日 月 周期)
//@Scheduled(cron = "0 * * * * MON-SAT")
//每0,10,20,30,40,50秒的时候调用一次,周期是周一至周六
    @Scheduled(cron = "0,10,20,30,40,50 * * * * MON-SAT")
    //从0秒启动,每10秒执行一次
    @Scheduled(cron = "0/10 * * * * MON-SAT")
    public void hello(){
        System.out.println("hello");
    }
4.发送邮件
①pom文件中引入mail配置
②springboot配置文件中mail添加相关配置
#发件人邮箱地址
spring.mail.username=64864864@163.com
#安全秘钥需要生成
spring.mail.password=gujfkufuewo
#连接邮箱的服务地址
spring.mail.host=smtp.qq.com
#开启ssl
spring.mail.properties.mail.smtp.ssl.enable=true
③测试发送邮件方法
	@Test
	public void emailTest() throws Exception{
		//创建复杂的消息邮件
		MimeMessage mimeMessage = mailSender.createMimeMessage();
		MimeMessageHelper helper = new MimeMessageHelper(mimeMessage,true);
		//邮件设置
		helper.setSubject("通知");//标题
		helper.setText("hello hi");//内容
		helper.setTo("[email protected]");//收件人
		//发送的附件图片
		helper.addAttachment("timg.jpg",new File("C:\\Users\\Administrator\\Desktop\\timg.jpg"));
		mailSender.send(mimeMessage);
	}