【技术博客】目标检测算法R-CNN介绍
目标检测算法R-CNN介绍
作者:高雨茁
目标检测简介
目标检测(Object Detection)的任务是找出图像中所有感兴趣的目标(物体),确定它们的类别和位置。
计算机视觉中关于图像识别有四大类任务:
1.分类-Classification:解决“是什么?”的问题,即给定一张图片或一段视频判断里面包含什么类别的目标。
2.定位-Location:解决“在哪里?”的问题,即定位出这个目标的的位置。
3.检测-Detection:解决“是什么?在哪里?”的问题,即定位出这个目标的的位置并且知道目标物是什么。
4.分割-Segmentation:分为实例的分割(Instance-level)和场景分割(Scene-level),解决“每一个像素属于哪个目标物或场景”的问题。
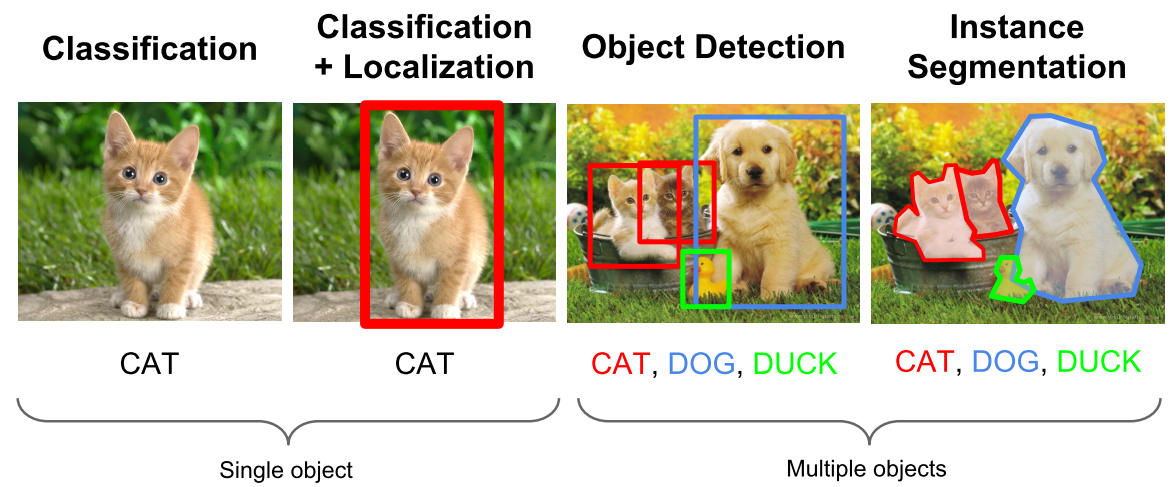
当前目标检测算法分类
1.Two stage目标检测算法
先进行区域生成(region proposal,RP)(一个有可能包含待检物体的预选框),再通过卷积神经网络进行样本分类。
任务:特征提取—>生成RP—>分类/定位回归。
常见的two stage目标检测算法有:R-CNN、SPP-Net、Fast R-CNN、Faster R-CNN和R-FCN等。
2.One stage目标检测算法
不用RP,直接在网络中提取特征来预测物体分类和位置。
任务:特征提取—>分类/定位回归。
常见的one stage目标检测算法有:OverFeat、YOLOv1、YOLOv2、YOLOv3、SSD和RetinaNet等。
本文后续将介绍其中的经典算法R-CNN并给出相应的代码实现。
R-CNN
R-CNN(Regions with CNN features)是将CNN方法应用到目标检测问题上的一个里程碑。借助CNN良好的特征提取和分类性能,通过RegionProposal方法实现目标检测问题的转化。
算法分为四个步骤:
- 从原图像生成候选区域(RoI proposal)
- 将候选区域输入CNN进行特征提取
- 将特征送入每一类别的SVM检测器,判断是否属于该类
- 通过边界回归得到精确的目标区域
算法前向流程图如下(图中数字标记对应上述四个步骤):
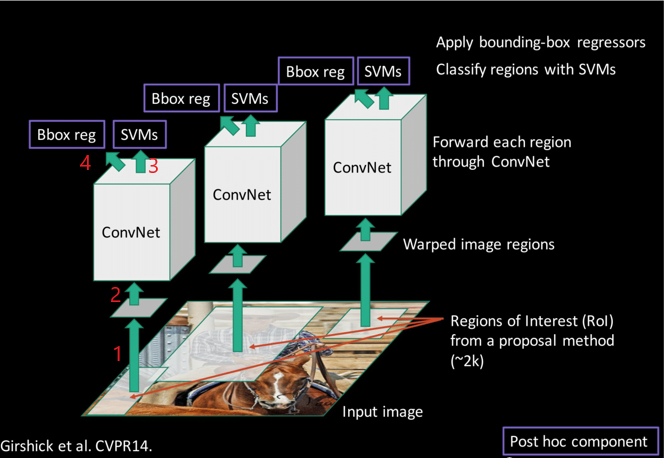
在下文中我们也会按照上述四个步骤的顺序讲解模型构建,在这之后我们会讲解如何进行模型训练。
但在开始具体上述操作之前,让我们简单了解下在训练中我们将会使用到的数据集。
数据集简介
原论文中使用的数据集为:
1.ImageNet ILSVC(一个较大的识别库) 一千万图像,1000类。
2.PASCAL VOC 2007(一个较小的检测库) 一万图像,20类。
训练时使用识别库进行预训练,而后用检测库调优参数并在检测库上评测模型效果。
由于原数据集容量较大,模型的训练时间可能会达到几十个小时之久。为了简化训练,我们替换了训练数据集。
与原论文类似,我们使用的数据包括两部分:
1.含17种分类的花朵图片
2.含2种分类的花朵图片。
我们后续将使用17分类数据进行模型的预训练,用2分类数据进行fine-tuning得到最终的预测模型,并在2分类图片上进行评测。
模型构建
步骤一
该步骤中我们要完成的算法流程部分如下图数字标记:
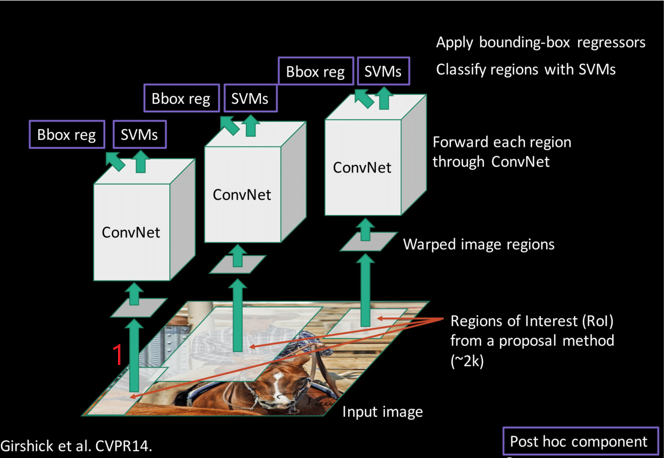
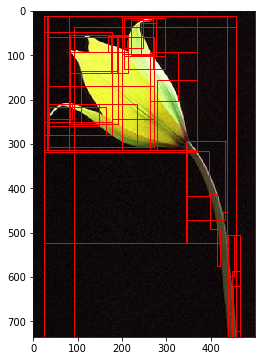
R-CNN中采用了selective search算法来进行region proposal。该算法首先通过基于图的图像分割方法初始化原始区域,即将图像分割成很多很多的小块。然后使用贪心策略,计算每两个相邻的区域的相似度,然后每次合并最相似的两块,直至最终只剩下一块完整的图片。并将该过程中每次产生的图像块包括合并的图像块都保存下来作为最终的RoI(Region of Interest)集。详细算法流程如下:
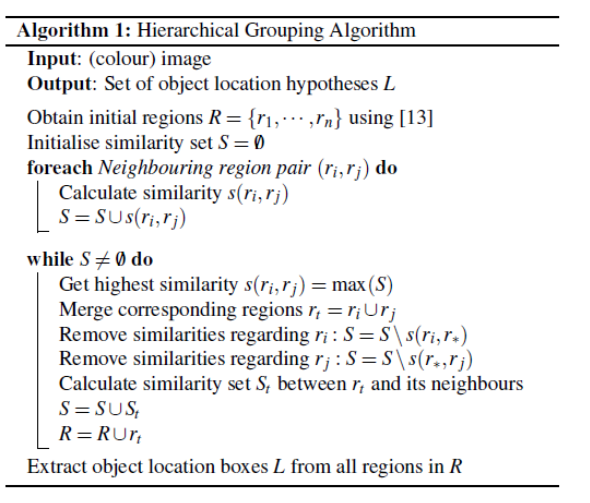
区域合并采用了多样性的策略,如果简单采用一种策略很容易错误合并不相似的区域,比如只考虑纹理时,不同颜色的区域很容易被误合并。selective search采用三种多样性策略来增加候选区域以保证召回:
- 多种颜色空间,考虑RGB、灰度、HSV及其变种
- 多种相似度度量标准,既考虑颜色相似度,又考虑纹理、大小、重叠情况等
- 通过改变阈值初始化原始区域,阈值越大,分割的区域越少
很多机器学习框架都内置实现了selective search操作。
步骤二
该步骤中我们要完成的算法流程部分如下图数字标记:
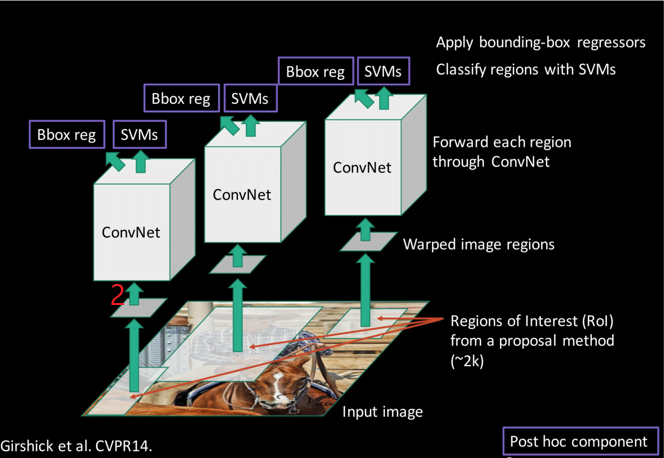
在步骤一中我们得到了由selective search算法生成的region proposals,但各proposal大小基本不一致,考虑到region proposals后续要被输入到ConvNet中进行特征提取,因此有必要将所有region proposals调整至统一且符合ConvNet架构的标准尺寸。相关的代码实现如下:
import matplotlib.patches as mpatches
# Clip Image
def clip_pic(img, rect):
    x = rect[0]
    y = rect[1]
    w = rect[2]
    h = rect[3]
    x_1 = x + w
    y_1 = y + h
    # return img[x:x_1, y:y_1, :], [x, y, x_1, y_1, w, h]
    return img[y:y_1, x:x_1, :], [x, y, x_1, y_1, w, h]

#Resize Image
def resize_image(in_image, new_width, new_height, out_image=None, resize_mode=cv2.INTER_CUBIC):
    img = cv2.resize(in_image, (new_width, new_height), resize_mode)
    if out_image:
        cv2.imwrite(out_image, img)
    return img

def image_proposal(img_path):
    img = cv2.imread(img_path)
    img_lbl, regions = selective_search(
                       img, scale=500, sigma=0.9, min_size=10)
    candidates = set()
    images = []
    vertices = []
    for r in regions:
        # excluding same rectangle (with different segments)
        if r['rect'] in candidates:
            continue
        # excluding small regions
        if r['size'] < 220:
            continue
        if (r['rect'][2] * r['rect'][3]) < 500:
            continue
        # resize to 227 * 227 for input
        proposal_img, proposal_vertice = clip_pic(img, r['rect'])
        # Delete Empty array
        if len(proposal_img) == 0:
            continue
        # Ignore things contain 0 or not C contiguous array
        x, y, w, h = r['rect']
        if w == 0 or h == 0:
            continue
        # Check if any 0-dimension exist
        [a, b, c] = np.shape(proposal_img)
        if a == 0 or b == 0 or c == 0:
            continue
        resized_proposal_img = resize_image(proposal_img,224, 224)
        candidates.add(r['rect'])
        img_float = np.asarray(resized_proposal_img, dtype="float32")
        images.append(img_float)
        vertices.append(r['rect'])
    return images, vertices
让我们选择一张图片检查下selective search算法效果
img_path = './17flowers/jpg/7/image_0591.jpg'
imgs, verts = image_proposal(img_path)
fig, ax = plt.subplots(ncols=1, nrows=1, figsize=(6, 6))
img = skimage.io.imread(img_path)
ax.imshow(img)
for x, y, w, h in verts:
    rect = mpatches.Rectangle((x, y), w, h, fill=False, edgecolor='red', linewidth=1)
    ax.add_patch(rect)
plt.show()
得到尺寸统一的proposals后,可以将其输入到ConvNet进行特征提取。这里我们ConvNet使用的网络架构模型为AlexNet。其网络具体构造如下:
import tflearn
from tflearn.layers.core import input_data, dropout, fully_connected
from tflearn.layers.conv import conv_2d, max_pool_2d
from tflearn.layers.normalization import local_response_normalization
from tflearn.layers.estimator import regression

# Building 'AlexNet'
def create_alexnet(num_classes, restore = True):
    # Building 'AlexNet'
    network = input_data(shape=[None, 224, 224, 3])
    network = conv_2d(network, 96, 11, strides=4, activation='relu')
    network = max_pool_2d(network, 3, strides=2)
    network = local_response_normalization(network)
    network = conv_2d(network, 256, 5, activation='relu')
    network = max_pool_2d(network, 3, strides=2)
    network = local_response_normalization(network)
    network = conv_2d(network, 384, 3, activation='relu')
    network = conv_2d(network, 384, 3, activation='relu')
    network = conv_2d(network, 256, 3, activation='relu')
    network = max_pool_2d(network, 3, strides=2)
    network = local_response_normalization(network)
    network = fully_connected(network, 4096, activation='tanh')
    network = dropout(network, 0.5)
    network = fully_connected(network, 4096, activation='tanh')
    network = dropout(network, 0.5)
    network = fully_connected(network, num_classes, activation='softmax', restore=restore)
    network = regression(network, optimizer='momentum',
                         loss='categorical_crossentropy',
                         learning_rate=0.001)
    return network
至此,我们完成了ConvNet部分的架构,通过ConvNet我们可以从proposal上提取到feature map。
步骤三、四
该步骤中我们要完成的算法流程部分如下图数字标记:
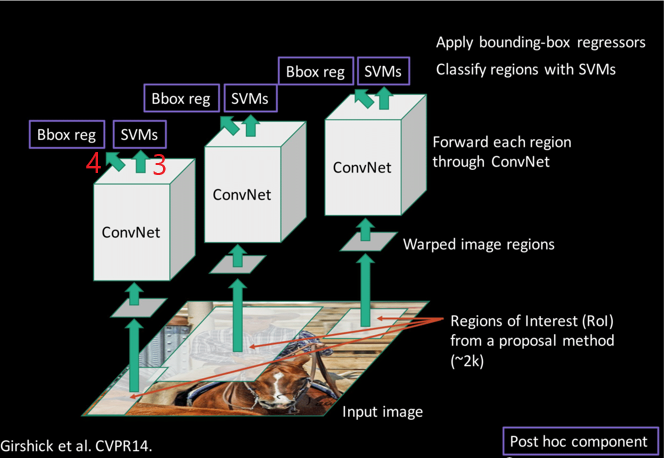
得到每个proposal上提取到的feature map之后,我们可以将其输入到SVMs(值得注意的是SVM分类器的数量并不唯一,每对应一个分类类别我们都需要训练一个SVM。对应到我们的数据集,最终要分类的花朵类别是两类,因此此时我们的SVM数量为2个)中进行分类判别。
对于上述判别为正例(非背景)的proposal后续输入到Bbox reg中进行bbox的微调,并输出最终的边框预测。
在知晓了算法的整个流程后,现在让我们着手于模型训练。
模型训练
R-CNN模型的训练分为两步:
- 初始化ConvNet并使用大数据集预训练得到预训练模型,在预训练模型上使用小数据集进行fine-tuning并得到最终的ConvNet。
- 将图片输入模型,通过第一步中得到的ConvNet提取每个proposal的feature map,使用feature map来训练我们的分类器SVMs和回归器Bbox reg。(该过程ConvNet不参与学习,即ConvNet的参数保持不变)
首先在大数据集上预训练,训练时输入X为原图片,正确标签Y为原图片的分类。相关代码如下:
import codecs

def load_data(datafile, num_class, save=False, save_path='dataset.pkl'):
    fr = codecs.open(datafile, 'r', 'utf-8')
    train_list = fr.readlines()
    labels = []
    images = []
    for line in train_list:
        tmp = line.strip().split(' ')
        fpath = tmp[0]
        img = cv2.imread(fpath)
        img = resize_image(img, 224, 224)
        np_img = np.asarray(img, dtype="float32")
        images.append(np_img)

        index = int(tmp[1])
        label = np.zeros(num_class)
        label[index] = 1
        labels.append(label)
    if save:
        pickle.dump((images, labels), open(save_path, 'wb'))
    fr.close()
    return images, labels

def train(network, X, Y, save_model_path):
    # Training
    model = tflearn.DNN(network, checkpoint_path='model_alexnet',
                        max_checkpoints=1, tensorboard_verbose=2, tensorboard_dir='output')
    if os.path.isfile(save_model_path + '.index'):
        model.load(save_model_path)
        print('load model...')
    for _ in range(5):
        model.fit(X, Y, n_epoch=1, validation_set=0.1, shuffle=True,
                  show_metric=True, batch_size=64, snapshot_step=200,
                  snapshot_epoch=False, run_id='alexnet_oxflowers17') # epoch = 1000
        # Save the model
        model.save(save_model_path)
        print('save model...')

X, Y = load_data('./train_list.txt', 17)
net = create_alexnet(17)
train(net, X, Y,'./pre_train_model/model_save.model')
之后在预训练模型上,使用小数据集fine-tuning。这部分训练方式与上部分训练有两个不同点:
1.输入使用region proposal生成的RoI而不是原图片。
2.对于每个RoI的正确标签Y,我们通过计算RoI与ground truth(原图片标注的检测物体范围标签)的IOU(Intersection over Union)来确定。
IoU计算方式如下图:
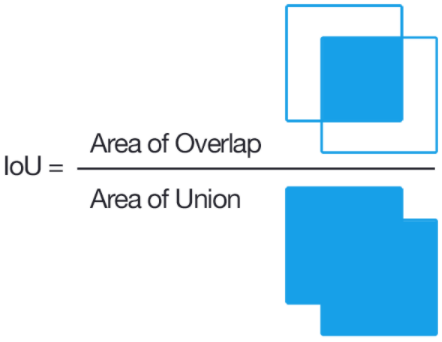
可知IoU取值∈[0,1]且取值越大表明RoI与ground truth差距越小。 定义IoU大于0.5的候选区域为正样本,其余的为负样本。
计算IoU的代码如下:
# IOU Part 1
def if_intersection(xmin_a, xmax_a, ymin_a, ymax_a, xmin_b, xmax_b, ymin_b, ymax_b):
    if_intersect = False
    if xmin_a < xmax_b <= xmax_a and (ymin_a < ymax_b <= ymax_a or ymin_a <= ymin_b < ymax_a):
        if_intersect = True
    elif xmin_a <= xmin_b < xmax_a and (ymin_a < ymax_b <= ymax_a or ymin_a <= ymin_b < ymax_a):
        if_intersect = True
    elif xmin_b < xmax_a <= xmax_b and (ymin_b < ymax_a <= ymax_b or ymin_b <= ymin_a < ymax_b):
        if_intersect = True
    elif xmin_b <= xmin_a < xmax_b and (ymin_b < ymax_a <= ymax_b or ymin_b <= ymin_a < ymax_b):
        if_intersect = True
    else:
        return if_intersect
    if if_intersect:
        x_sorted_list = sorted([xmin_a, xmax_a, xmin_b, xmax_b])
        y_sorted_list = sorted([ymin_a, ymax_a, ymin_b, ymax_b])
        x_intersect_w = x_sorted_list[2] - x_sorted_list[1]
        y_intersect_h = y_sorted_list[2] - y_sorted_list[1]
        area_inter = x_intersect_w * y_intersect_h
        return area_inter


# IOU Part 2
def IOU(ver1, vertice2):
    # vertices in four points
    vertice1 = [ver1[0], ver1[1], ver1[0]+ver1[2], ver1[1]+ver1[3]]
    area_inter = if_intersection(vertice1[0], vertice1[2], vertice1[1], vertice1[3], vertice2[0], vertice2[2], vertice2[1], vertice2[3])
    if area_inter:
        area_1 = ver1[2] * ver1[3]
        area_2 = vertice2[4] * vertice2[5]
        iou = float(area_inter) / (area_1 + area_2 - area_inter)
        return iou
    return False
在使用小数据集进行fine-tuning之前,让我们完成相关训练数据(RoI集的标签、对应图片、框体标记等)的读取工作,下方代码中我们顺带读取并保存了用于SVM训练和目标框体回归的数据。
# Read in data and save data for Alexnet
def load_train_proposals(datafile, num_clss, save_path, threshold=0.5, is_svm=False, save=False):
    fr = open(datafile, 'r')
    train_list = fr.readlines()
    # random.shuffle(train_list)
    for num, line in enumerate(train_list):
        labels = []
        images = []
        rects = []
        tmp = line.strip().split(' ')
        # tmp0 = image address
        # tmp1 = label
        # tmp2 = rectangle vertices
        img = cv2.imread(tmp[0])
        # 选择搜索得到候选框
        img_lbl, regions = selective_search(
                               img, scale=500, sigma=0.9, min_size=10)
        candidates = set()
        ref_rect = tmp[2].split(',')
        ref_rect_int = [int(i) for i in ref_rect]
        Gx = ref_rect_int[0]
        Gy = ref_rect_int[1]
        Gw = ref_rect_int[2]
        Gh = ref_rect_int[3]
        for r in regions:
            # excluding same rectangle (with different segments)
            if r['rect'] in candidates:
                continue
            # excluding small regions
            if r['size'] < 220:
                continue
            if (r['rect'][2] * r['rect'][3]) < 500:
                continue
            # 截取目标区域
            proposal_img, proposal_vertice = clip_pic(img, r['rect'])
            # Delete Empty array
            if len(proposal_img) == 0:
                continue
            # Ignore things contain 0 or not C contiguous array
            x, y, w, h = r['rect']
            if w == 0 or h == 0:
                continue
            # Check if any 0-dimension exist
            [a, b, c] = np.shape(proposal_img)
            if a == 0 or b == 0 or c == 0:
                continue
            resized_proposal_img = resize_image(proposal_img, 224, 224)
            candidates.add(r['rect'])
            img_float = np.asarray(resized_proposal_img, dtype="float32")
            images.append(img_float)
            # IOU
            iou_val = IOU(ref_rect_int, proposal_vertice)
            # x,y,w,h作差,用于boundingbox回归
            rects.append([(Gx-x)/w, (Gy-y)/h, math.log(Gw/w), math.log(Gh/h)])
            # propasal_rect = [proposal_vertice[0], proposal_vertice[1], proposal_vertice[4], proposal_vertice[5]]
            # print(iou_val)
            # labels, let 0 represent default class, which is background
            index = int(tmp[1])
            if is_svm:
                # iou小于阈值,为背景,0
                if iou_val < threshold:
                    labels.append(0)
                else:
                     labels.append(index)
            else:
                label = np.zeros(num_clss + 1)
                if iou_val < threshold:
                    label[0] = 1
                else:
                    label[index] = 1
                labels.append(label)


        if is_svm:
            ref_img, ref_vertice = clip_pic(img, ref_rect_int)
            resized_ref_img = resize_image(ref_img, 224, 224)
            img_float = np.asarray(resized_ref_img, dtype="float32")
            images.append(img_float)
            rects.append([0, 0, 0, 0])
            labels.append(index)
        view_bar("processing image of %s" % datafile.split('\\')[-1].strip(), num + 1, len(train_list))

        if save:
            if is_svm:
                # strip()去除首位空格
                np.save((os.path.join(save_path, tmp[0].split('/')[-1].split('.')[0].strip()) + '_data.npy'), [images, labels, rects])
            else:
                # strip()去除首位空格
                np.save((os.path.join(save_path, tmp[0].split('/')[-1].split('.')[0].strip()) + '_data.npy'),
                        [images, labels])
    print(' ')
    fr.close()

# load data
def load_from_npy(data_set):
    images, labels = [], []
    data_list = os.listdir(data_set)
    # random.shuffle(data_list)
    for ind, d in enumerate(data_list):
        i, l = np.load(os.path.join(data_set, d),allow_pickle=True)
        images.extend(i)
        labels.extend(l)
        view_bar("load data of %s" % d, ind + 1, len(data_list))
    print(' ')
    return images, labels

import math
import sys
#Progress bar
def view_bar(message, num, total):
    rate = num / total
    rate_num = int(rate * 40)
    rate_nums = math.ceil(rate * 100)
    r = '\r%s:[%s%s]%d%%\t%d/%d' % (message, ">" * rate_num, " " * (40 - rate_num), rate_nums, num, total,)
    sys.stdout.write(r)
    sys.stdout.flush()
有了上述准备我们可以开始模型fine-tuning阶段的训练,相关代码如下:
def fine_tune_Alexnet(network, X, Y, save_model_path, fine_tune_model_path):
    # Training
    model = tflearn.DNN(network, checkpoint_path='rcnn_model_alexnet',
                        max_checkpoints=1, tensorboard_verbose=2, tensorboard_dir='output_RCNN')
    if os.path.isfile(fine_tune_model_path + '.index'):
        print("Loading the fine tuned model")
        model.load(fine_tune_model_path)
    elif os.path.isfile(save_model_path + '.index'):
        print("Loading the alexnet")
        model.load(save_model_path)
    else:
        print("No file to load, error")
        return False

    model.fit(X, Y, n_epoch=1, validation_set=0.1, shuffle=True,
              show_metric=True, batch_size=64, snapshot_step=200,
              snapshot_epoch=False, run_id='alexnet_rcnnflowers2')
    # Save the model
    model.save(fine_tune_model_path)

data_set = './data_set'
if len(os.listdir('./data_set')) == 0:
    print("Reading Data")
    load_train_proposals('./fine_tune_list.txt', 2, save=True, save_path=data_set)
print("Loading Data")
X, Y = load_from_npy(data_set)
restore = False
if os.path.isfile('./fine_tune_model/fine_tune_model_save.model' + '.index'):
    restore = True
    print("Continue fine-tune")
# three classes include background
net = create_alexnet(3, restore=restore)
fine_tune_Alexnet(net, X, Y, './pre_train_model/model_save.model', './fine_tune_model/fine_tune_model_save.model')
步骤二
该步骤中我们要训练SVMs和Bbox reg如下图数字标记: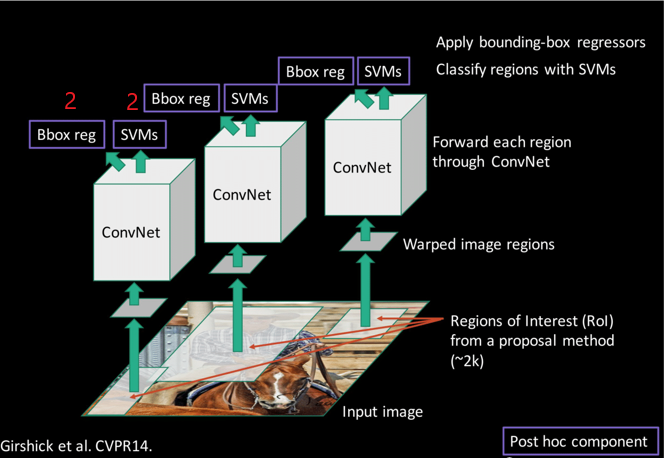
首先我们从步骤一这里使用的CNN模型里提取出feature map,注意这里使用的ConvNet与之前训练时所用的相比少了最后一层softmax,因为此时我们需要的是从RoI上提取到的特征而训练中需要softmax层来进行分类。相关代码如下:
def create_alexnet():
    # Building 'AlexNet'
    network = input_data(shape=[None, 224, 224, 3])
    network = conv_2d(network, 96, 11, strides=4, activation='relu')
    network = max_pool_2d(network, 3, strides=2)
    network = local_response_normalization(network)
    network = conv_2d(network, 256, 5, activation='relu')
    network = max_pool_2d(network, 3, strides=2)
    network = local_response_normalization(network)
    network = conv_2d(network, 384, 3, activation='relu')
    network = conv_2d(network, 384, 3, activation='relu')
    network = conv_2d(network, 256, 3, activation='relu')
    network = max_pool_2d(network, 3, strides=2)
    network = local_response_normalization(network)
    network = fully_connected(network, 4096, activation='tanh')
    network = dropout(network, 0.5)
    network = fully_connected(network, 4096, activation='tanh')
    network = regression(network, optimizer='momentum',
                         loss='categorical_crossentropy',
                         learning_rate=0.001)
    return network
每对应一个分类类别我们都需要训练一个SVM。我们最终要分类的花朵类别是两类,因此我们需要训练的SVM数量为2个。
SVM训练所用的输入为RoI中提取到的feature map,所用的标签共有n+1个类别(+1的为背景),对应到我们的数据集此时标签共有三个类别。
相关代码如下:
from sklearn import svm
from sklearn.externals import joblib

# Construct cascade svms
def train_svms(train_file_folder, model):
    files = os.listdir(train_file_folder)
    svms = []
    train_features = []
    bbox_train_features = []
    rects = []
    for train_file in files:
        if train_file.split('.')[-1] == 'txt':
            X, Y, R = generate_single_svm_train(os.path.join(train_file_folder, train_file))
            Y1 = []
            features1 = []
            features_hard = []
            for ind, i in enumerate(X):
                # extract features 提取特征
                feats = model.predict([i])
                train_features.append(feats[0])
                # 所有正负样本加入feature1,Y1
                if Y[ind]>=0:
                    Y1.append(Y[ind])
                    features1.append(feats[0])
                    # 对与groundtruth的iou>0.5的加入boundingbox训练集
                    if Y[ind]>0:
                        bbox_train_features.append(feats[0])
                view_bar("extract features of %s" % train_file, ind + 1, len(X))

            clf = svm.SVC(probability=True)

            clf.fit(features1, Y1)
            print(' ')
            print("feature dimension")
            print(np.shape(features1))
            svms.append(clf)
            # 将clf序列化,保存svm分类器
            joblib.dump(clf, os.path.join(train_file_folder, str(train_file.split('.')[0]) + '_svm.pkl'))

    # 保存boundingbox回归训练集
    np.save((os.path.join(train_file_folder, 'bbox_train.npy')),
            [bbox_train_features, rects])
    return svms

# Load training images
def generate_single_svm_train(train_file):
    save_path = train_file.rsplit('.', 1)[0].strip()
    if len(os.listdir(save_path)) == 0:
        print("reading %s's svm dataset" % train_file.split('\\')[-1])
        load_train_proposals(train_file, 2, save_path, threshold=0.3, is_svm=True, save=True)
    print("restoring svm dataset")
    images, labels,rects = load_from_npy_(save_path)

    return images, labels,rects

# load data
def load_from_npy_(data_set):
    images, labels ,rects= [], [], []
    data_list = os.listdir(data_set)
    # random.shuffle(data_list)
    for ind, d in enumerate(data_list):
        i, l, r = np.load(os.path.join(data_set, d),allow_pickle=True)
        images.extend(i)
        labels.extend(l)
        rects.extend(r)
        view_bar("load data of %s" % d, ind + 1, len(data_list))
    print(' ')
    return images, labels ,rects
回归器是线性的,输入为N对值,{(,)}=1,2,…,{(Pi,Gi)}i=1,2,…,N,分别为候选区域的框坐标和真实的框坐标。相关代码如下:
from sklearn.linear_model import Ridge

#在图片上显示boundingbox
def show_rect(img_path, regions):
    fig, ax = plt.subplots(ncols=1, nrows=1, figsize=(6, 6))
    img = skimage.io.imread(img_path)
    ax.imshow(img)
    for x, y, w, h in regions:
        rect = mpatches.Rectangle(
            (x, y), w, h, fill=False, edgecolor='red', linewidth=1)
        ax.add_patch(rect)
    plt.show()


# 训练boundingbox回归
def train_bbox(npy_path):
    features, rects = np.load((os.path.join(npy_path, 'bbox_train.npy')),allow_pickle=True)
    # 不能直接np.array(),应该把元素全部取出放入空列表中。因为features和rects建立时用的append,导致其中元素结构不能直接转换成矩阵
    X = []
    Y = []
    for ind, i in enumerate(features):
        X.append(i)
    X_train = np.array(X)

    for ind, i in enumerate(rects):
        Y.append(i)
    Y_train = np.array(Y)

    # 线性回归模型训练
    clf = Ridge(alpha=1.0)
    clf.fit(X_train, Y_train)
    # 序列化,保存bbox回归
    joblib.dump(clf, os.path.join(npy_path,'bbox_train.pkl'))
    return clf
开始训练SVM分类器与框体回归器。
train_file_folder = './svm_train'
# 建立模型,网络
net = create_alexnet()
model = tflearn.DNN(net)
# 加载微调后的alexnet网络参数
model.load('./fine_tune_model/fine_tune_model_save.model')
# 加载/训练svm分类器 和 boundingbox回归器
svms = []
bbox_fit = []
# boundingbox回归器是否有存档
bbox_fit_exit = 0
# 加载svm分类器和boundingbox回归器
for file in os.listdir(train_file_folder):
    if file.split('_')[-1] == 'svm.pkl':
        svms.append(joblib.load(os.path.join(train_file_folder, file)))
    if file == 'bbox_train.pkl':
        bbox_fit = joblib.load(os.path.join(train_file_folder, file))
        bbox_fit_exit = 1
if len(svms) == 0:
    svms = train_svms(train_file_folder, model)
if bbox_fit_exit == 0:
    bbox_fit = train_bbox(train_file_folder)

print("Done fitting svms")
至此模型已训练完毕。
模型效果查看
让我们选择一张图片顺着模型正向传播的顺序查看模型的具体运行效果。首先查看下region proposal所产生的RoI区域。
img_path = './2flowers/jpg/1/image_1282.jpg'
image = cv2.imread(img_path)
im_width = image.shape[1]
im_height = image.shape[0]
# 提取region proposal
imgs, verts = image_proposal(img_path)
show_rect(img_path, verts)
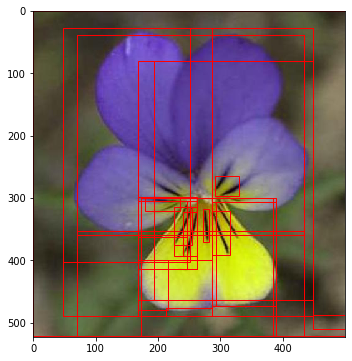
将RoI输入ConvNet中得到特征并输入SVMs中与回归器中,并选取SVM分类结果为正例的样例进行边框回归。
# 从CNN中提取RoI的特征
features = model.predict(imgs)
print("predict image:")
# print(np.shape(features))
results = []
results_label = []
results_score = []
count = 0
print(len(features))
for f in features:
    for svm in svms:
        pred = svm.predict([f.tolist()])
        # not background
        if pred[0] != 0:
            # boundingbox回归
            bbox = bbox_fit.predict([f.tolist()])
            tx, ty, tw, th = bbox[0][0], bbox[0][1], bbox[0][2], bbox[0][3]
            px, py, pw, ph = verts[count]
            gx = tx * pw + px
            gy = ty * ph + py
            gw = math.exp(tw) * pw
            gh = math.exp(th) * ph
            if gx < 0:
                gw = gw - (0 - gx)
                gx = 0
            if gx + gw > im_width:
                gw = im_width - gx
            if gy < 0:
                gh = gh - (0 - gh)
                gy = 0
            if gy + gh > im_height:
                gh = im_height - gy
            results.append([gx, gy, gw, gh])
            results_label.append(pred[0])
            results_score.append(svm.predict_proba([f.tolist()])[0][1])
    count += 1
print(results)
print(results_label)
print(results_score)
show_rect(img_path, results)
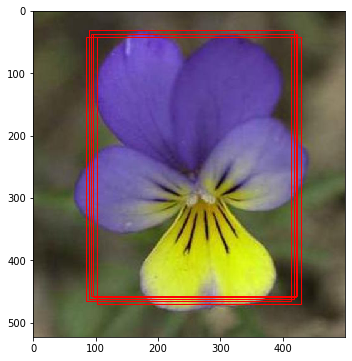
可以看到可能会得到数量大于一的框体,此时我们需要借助NMS(Non-Maximum Suppression)来选择出相对最优的结果。
代码如下:
results_final = []
results_final_label = []

# 非极大抑制
# 删除得分小于0.5的候选框
delete_index1 = []
for ind in range(len(results_score)):
    if results_score[ind] < 0.5:
        delete_index1.append(ind)
num1 = 0
for idx in delete_index1:
    results.pop(idx - num1)
    results_score.pop(idx - num1)
    results_label.pop(idx - num1)
    num1 += 1

while len(results) > 0:
    # 找到列表中得分最高的
    max_index = results_score.index(max(results_score))
    max_x, max_y, max_w, max_h = results[max_index]
    max_vertice = [max_x, max_y, max_x + max_w, max_y + max_h, max_w, max_h]
    # 该候选框加入最终结果
    results_final.append(results[max_index])
    results_final_label.append(results_label[max_index])
    # 从results中删除该候选框
    results.pop(max_index)
    results_label.pop(max_index)
    results_score.pop(max_index)
    # print(len(results_score))
    # 删除与得分最高候选框iou>0.5的其他候选框
    delete_index = []
    for ind, i in enumerate(results):
        iou_val = IOU(i, max_vertice)
        if iou_val > 0.5:
            delete_index.append(ind)
    num = 0
    for idx in delete_index:
        # print('\n')
        # print(idx)
        # print(len(results))
        results.pop(idx - num)
        results_score.pop(idx - num)
        results_label.pop(idx - num)
        num += 1

print("result:",results_final)
print("result label:",results_final_label)
show_rect(img_path, results_final)
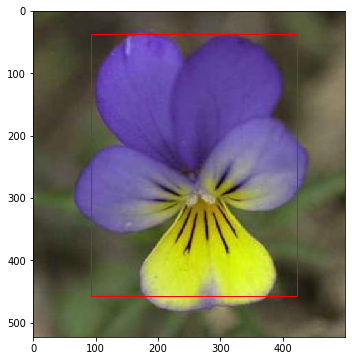
总结
至此我们得到了一个粗糙的R-CNN模型。
R-CNN灵活地运用了当时比较先进的工具和技术,并充分吸收,根据自己的逻辑改造,最终取得了很大的进步。但其中也有不少明显的缺点:
- 训练过于繁琐:微调网络+训练SVM+边框回归,其中会涉及到许多硬盘读写操作效率低下。
- 每个RoI都需要经过CNN网络进行特征提取,产生了大量的额外运算(想象一下两个有重合部分的RoI,重合部分相当于进行了两次卷积运算,但理论上来说仅需进行一次)。
- 运行速度慢,像独立特征提取、使用selective search作为region proposal等都过于耗时。
幸运的是,这些问题在后续的Fast R-CNN与Faster R-CNN都有了很大的改善。
项目地址
https://momodel.cn/workspace/5f1ec0505607a4070d65203b?type=app