openstack环境搭建
- 创建虚拟机,再克隆一个
控制节点内存4G,计算节点内存1G
虚拟化Intel要打勾
- 基本网络设置
IP地址(两个结点都改)
vi /etc/sysconfig/network-scripts/ifcfg-eno16777736
BOOTPROTO=none(修改为这个)
IPADDR=192.168.132.105—还有106
NETMASK=255.255.255.0
GATEWAY=192.168.132.2
DNS1=8.8.8.8
DNS2=8.8.4.4
修改主机名
hostnamectl set-hostname controller
hostnamectl set-hostname compute1
host解析
vi /etc/hosts
测试ping百度和互相ping
- 配置yum源(两个结点都要配)
mount /dev/cdrom /mnt
上传openstack_rpm.tar.gz,移到/opt下, 并解压 tar xf openstack_rpm.tar.gz
生成repo配置文件
vi /etc/yum.repos.d/local.repo (用echo输入的,就不用这个了)
echo ‘[local]
name=local
baseurl=file:///mnt
gpgcheck=0
[openstack]
name=openstack
baseurl=file:///opt/repo
gpgcheck=0’ >/etc/yum.repos.d/local.repo
echo ‘mount /dev/cdrom /mnt’ >>/etc/rc.local
chmod +x /etc/rc.d/rc.local
- 安装基础服务
(两个结点都要)同步时间 vi /etc/chrony.conf
(两个结点都要)安装openstack客户端和openstack-selinux
yum install python-openstackclient openstack-selinux -y
(仅控制节点)安装配置mariadb
yum install mariadb mariadb-server python2-PyMySQL -y
创建并编辑 /etc/my.cnf.d/openstack.cnf
[mysqld]
bind-address = 192.168.132.105
default-storage-engine = innodb
innodb_file_per_table
max_connections = 4096
collation-server = utf8_general_ci
character-set-server = utf8
systemctl enable mariadb.service
systemctl start mariadb.service
mysql_secure_installation ----第一个问题空,第二个不设密码,后面全部y
(仅控制节点)安装消息队列rabbitmq和创建用户
yum install rabbitmq-server -y
systemctl enable rabbitmq-server.service
systemctl start rabbitmq-server.service
rabbitmqctl add_user openstack RABBIT_PASS
rabbitmqctl set_permissions openstack “." ".” “.*”
方便做监控,尤其监控队列
rabbitmq-plugins enable rabbitmq_management
(仅控制节点)Memcached缓存token
yum install memcached python-memcached -y
sed -i ‘s#127.0.0.1#192.168.132.105#g’ /etc/sysconfig/memcached
或编辑/etc/sysconfig/memcached 文件 OPTIONS="-l 127.0.0.1,::1,controller"
systemctl enable memcached.service
systemctl start memcached.service
- 认证服务
创建数据库并授权
CREATE DATABASE keystone;
GRANT ALL PRIVILEGES ON keystone.* TO ‘keystone’@‘localhost’
IDENTIFIED BY ‘KEYSTONE_DBPASS’;
GRANT ALL PRIVILEGES ON keystone.* TO ‘keystone’@’%’
IDENTIFIED BY ‘KEYSTONE_DBPASS’;
安装keystone相关软件包
yum install openstack-keystone httpd mod_wsgi -y
修改配置文件
编辑文件 /etc/keystone/keystone.conf
由于文件比较长,备份一下,然后把注释去掉
cp /etc/keystone/keystone.conf /etc/keystone/keystone.conf.bak
grep -Ev ‘^$|#’ /etc/keystone/keystone.conf.bak >/etc/keystone/keystone.conf
vi /etc/keystone/keystone.conf
[DEFAULT]
admin_token = ADMIN_TOKEN
[database]
connection = mysql+pymysql://keystone:KEYSTONE_DBPASS@controller/keystone
[token]
provider = fernet
同步数据库
su -s /bin/sh -c “keystone-manage db_sync” keystone
初始化fernet
keystone-manage fernet_setup --keystone-user keystone --keystone-group keystone
配置httpd
echo “ServerName controller” >>/etc/httpd/conf/httpd.conf
用下面的内容创建文件 /etc/httpd/conf.d/wsgi-keystone.conf–内容见官方文档
关闭下防火墙,不然服务开启会失败,还有一个Selinux不确定要不要关掉,没验证不关可不可以,直接关掉了,应该不关也可以
systemctl enable httpd.service
systemctl start httpd.service
检查端口:netstat -lntup
创建服务和注册api
export OS_TOKEN=ADMIN_TOKEN
export OS_URL=http://controller:35357/v3
export OS_IDENTITY_API_VERSION=3
检查环境变量 env | grep OS
-检验
openstack service create
–name keystone --description “OpenStack Identity” identity
openstack endpoint create --region RegionOne
identity public http://controller:5000/v3
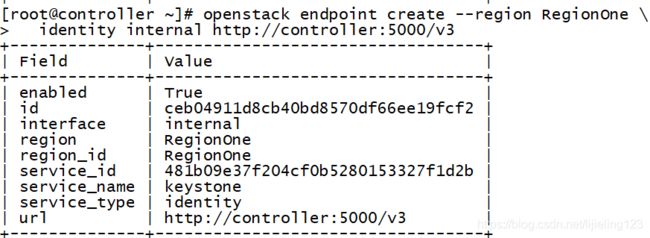
openstack endpoint create --region RegionOne
identity internal http://controller:5000/v3
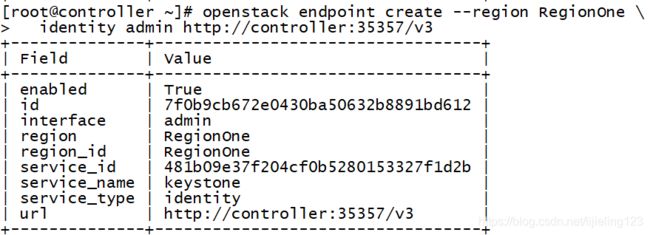
openstack endpoint create --region RegionOne
identity admin http://controller:35357/v3
openstack domain create --description “Default Domain” default
openstack project create --domain default --description “FZU Project” fzu


